
What is Spotlight?
Spotlight is a powerful search feature that is built into the macOS operating system. It allows you to quickly and easily find files, folders, applications, documents, emails, contacts, calendar events, websites, bookmarks, notes, reminders, music, photos, and even perform calculations and conversions. Spotlight is designed to make it effortless to locate and access information on your Mac.
With Spotlight, you no longer need to manually navigate through various folders and directories to find what you’re looking for. It saves you time and effort by providing instant search results right at your fingertips.
Spotlight not only searches the names of files and folders, but it also indexes the contents of supported file formats. This means that you can search for a specific phrase or keyword within a document, even if you don’t remember its file name.
Spotlight is located in the top-right corner of the menu bar, represented by a magnifying glass icon. By clicking on the icon or pressing the Command key and the Space bar simultaneously, you can activate Spotlight and start entering your search query.
Whether you’re a student looking for a specific research paper, a professional trying to locate an important document, or simply searching for a particular song or photo, Spotlight is your go-to tool on your Mac.
How to Access Spotlight
Accessing Spotlight on your Mac is simple and can be done in a few different ways:
- Using the Menu Bar: The easiest way to access Spotlight is by clicking on the magnifying glass icon located in the top-right corner of the menu bar. Simply clicking on the icon will bring up the Spotlight search bar.
- Keyboard Shortcut: Another way to access Spotlight is by using a keyboard shortcut. Pressing Command + Spacebar simultaneously will activate Spotlight and open the search bar.
- Trackpad or Magic Mouse: If you’re using a trackpad or a Magic Mouse, you can access Spotlight by swiping left with three fingers on the trackpad or by double-tapping with two fingers on the Magic Mouse. This gesture will launch Spotlight and open the search bar.
Once you have accessed Spotlight, you will see a search bar in the middle of your screen. This is where you can start entering your search query.
It’s important to note that you may need to adjust your Spotlight settings if you don’t see the search results you expect. To do this, go to the Apple menu, select “System Preferences”, and then click on “Spotlight”. From there, you can customize what Spotlight shows in search results.
Now that you know how to access Spotlight, you can take advantage of its powerful search capabilities to quickly find whatever you’re looking for on your Mac. Whether you’re searching for files, applications, documents, or even performing calculations and conversions, Spotlight is here to make your life easier.
Basic Search with Spotlight
Spotlight provides a straightforward and efficient way to perform basic searches on your Mac. Here’s how you can use Spotlight to find information:
- Accessing Spotlight: As mentioned earlier, you can open Spotlight by clicking on the magnifying glass icon in the menu bar or by using the keyboard shortcut Command + Spacebar.
- Entering Your Search Query: Once you have opened Spotlight, you will see a search bar in the middle of your screen. Simply start typing your search term into the search bar.
- Viewing Search Results: As you type, Spotlight will display search results in real-time. These results will include relevant files, applications, documents, emails, contacts, and more, that match your search query.
- Opening Search Results: To open a search result, simply click on it. If it is a file or folder, it will open in its respective application. If it is an application, it will launch. If it is a document, it will open in its default application. You can also use the arrow keys to navigate through the search results and press the Enter key to open the selected item.
- Refining Your Search: If your initial search query generates too many results, you can refine it further by adding more specific keywords. You can also use search operators like AND, OR, and NOT to narrow down your search. For example, if you’re looking for a specific file, you can enter the file name in quotes (“”) to find an exact match.
Spotlight’s basic search functionality allows you to quickly locate files, launch applications, and find information on your Mac. Whether you’re searching for a document, an email, or simply looking for a specific file, Spotlight simplifies the process and saves you valuable time.
Advanced Search with Spotlight
Spotlight offers advanced search capabilities that allow you to perform more specific and targeted searches on your Mac. Here are some techniques to make the most of Spotlight’s advanced search features:
- Search Operators: You can use search operators to refine your search queries. For example, you can use the “AND” operator to find items that include all the specified keywords. Similarly, you can use the “OR” operator to find items that include any of the specified keywords, and the “NOT” operator to exclude specific keywords from your search results.
- Date and Time Filters: Spotlight allows you to search for files based on specific dates or time ranges. You can use keywords like “today,” “yesterday,” or specific date formats to filter your search results. For example, searching for “modified yesterday” will display files that were modified on the previous day.
- File Type Filters: If you’re looking for a specific file type, you can use Spotlight to filter your search results accordingly. For example, searching for “kind:PDF” will display only PDF files in your search results.
- Specific Locations: Spotlight allows you to search for files and documents in specific locations. You can specify a folder or directory path in your search query to narrow down the search results to that specific location.
- Metadata Searching: Spotlight can search the metadata attached to files, such as author names, file sizes, and more. You can utilize this feature by entering specific search queries based on the metadata properties you want to search for.
By mastering these advanced search techniques, you can quickly and efficiently locate the files, documents, and information you need on your Mac. Whether you’re searching for files modified in the last week, filtering search results by specific file types, or utilizing advanced search operators, Spotlight empowers you to perform highly targeted searches with ease.
Using Spotlight as a Calculator
Did you know that Spotlight can also serve as a handy calculator? You can perform basic arithmetic calculations right within the Spotlight search bar. Here’s how:
- Accessing Spotlight: Open Spotlight by clicking on the magnifying glass icon in the menu bar or by using the keyboard shortcut Command + Spacebar.
- Entering Your Calculation: Once Spotlight is open, simply start typing your mathematical expression into the search bar. You can use the basic arithmetic operators such as addition (+), subtraction (-), multiplication (*), and division (/).
- Viewing the Result: As you type, Spotlight will display the calculated result in real-time. It will also show you any units of measurement that it recognizes in your calculation.
- Copying the Result: If you need to use the calculated result elsewhere, you can easily copy it from the Spotlight search bar and paste it into your desired application or document.
- Performing More Complex Calculations: Spotlight’s calculator functionality is not limited to basic arithmetic. It can also handle more complex calculations involving parentheses, exponents, square roots, and trigonometric functions. Simply enter your desired calculation, and Spotlight will provide you with the accurate result.
Using Spotlight as a calculator is a convenient way to perform quick calculations without the need for a separate calculator app or desktop calculator. Whether you need to calculate a tip, convert measurements, or solve a simple equation, Spotlight has you covered.
Using Spotlight to Find and Open Applications
Spotlight not only helps you locate files and documents on your Mac, but it is also a handy tool for finding and opening applications quickly. Here’s how you can use Spotlight to streamline your application search:
- Accessing Spotlight: Open Spotlight by clicking on the magnifying glass icon in the menu bar or by using the keyboard shortcut Command + Spacebar.
- Entering Application Name: Once Spotlight is open, start typing the name of the application you want to find. As you type, Spotlight will dynamically display matching results in real-time.
- Selecting the Application: From the search results, locate the application you want to open. You can use the arrow keys to navigate through the results or simply click on the desired application.
- Launching the Application: Once you have selected the application in Spotlight, press the Enter key, and the application will be launched and ready to use.
Spotlight’s ability to search applications by name enables you to quickly find and open your preferred applications without having to manually locate them in the Applications folder or Dock. Whether you’re looking for productivity tools, creative software, or utility applications, Spotlight makes accessing your favorite apps a breeze.
Additionally, Spotlight can also display relevant information about the application, such as its category, file size, and other related details. This can be helpful when you need to identify a specific version or distinguish between similar apps.
Next time you’re in a rush to launch an application, bypass the time-consuming process of manually searching through folders or scrolling through your Dock. Let Spotlight do the work for you, and enjoy the convenience of finding and opening applications with just a few keystrokes.
Using Spotlight to Find and Open Files and Folders
Spotlight is a powerful tool for quickly locating and accessing files and folders on your Mac. Here’s how you can make the most of Spotlight to streamline your file and folder searches:
- Accessing Spotlight: Open Spotlight by clicking on the magnifying glass icon in the menu bar or by using the keyboard shortcut Command + Spacebar.
- Entering File or Folder Name: Once Spotlight is open, start typing the name of the file or folder you want to find. Spotlight will instantly begin displaying matching results as you type.
- Selecting the File or Folder: From the search results, locate the file or folder you want to open. You can use the arrow keys to navigate through the results or click on the desired item.
- Opening the File or Folder: Once you have selected the file or folder in Spotlight, press the Enter key, and it will open in its default application or Finder window respectively.
Spotlight’s file and folder search capabilities allow you to quickly access the files or folders you need, regardless of their location on your Mac. It eliminates the need for manual navigation through multiple folders and enables efficient retrieval of your documents.
Furthermore, Spotlight can display additional information about the file or folder, such as its location, file size, creation date, and more. This makes it easier to identify the correct item, especially when multiple files or folders share similar names.
Whether you’re searching for a specific document, spreadsheet, image, or folder, Spotlight’s intuitive search functionality will save you time and effort by pinpointing the exact file or folder you’re looking for. Say goodbye to tedious manual searches and embrace the efficiency of Spotlight for finding and opening files and folders on your Mac.
Using Spotlight to Find and Open Documents
Spotlight is a powerful tool on your Mac that can quickly help you locate and open documents. Regardless of whether you remember the file name or not, Spotlight’s indexing capabilities allow you to effortlessly search for and access your documents. Here’s how:
- Accessing Spotlight: Open Spotlight by clicking on the magnifying glass icon in the menu bar or by using the keyboard shortcut Command + Spacebar.
- Entering Document Keywords: Once Spotlight is open, start typing relevant keywords related to the document you’re looking for. These keywords can include the document title, content, author, or any other identifiable information.
- Browsing Through Search Results: As you type, Spotlight will display search results in real-time. You can browse through the results and identify the document you want to open.
- Selecting and Opening the Document: Once you’ve located the document in the search results, you can either click on it or use the arrow keys to highlight it. Press the Enter key to open the document in its respective application.
Spotlight’s document search functionality goes beyond simply searching for file names. It indexes the content within supported file types, such as PDFs, Word documents, and more. This means that you can search for specific keywords or phrases within a document, even if you don’t remember the exact file name.
Additionally, Spotlight can also display relevant information about the document, such as its file path, file size, and last modified date. This can assist in identifying the correct document, especially if there are multiple files with similar names.
Whether you’re searching for a presentation, a report, or any other type of document, Spotlight makes it easy to find and open your files quickly. The ability to search within documents saves you valuable time and allows you to focus on your work without getting lost in folders or manually searching for files.
Using Spotlight to Find and Open Email Messages
Spotlight isn’t just limited to finding files and folders on your Mac; it can also help you locate and open specific email messages. By leveraging the indexing power of Spotlight, you can easily search through your email messages to find the information you need. Here’s how:
- Accessing Spotlight: Open Spotlight by clicking on the magnifying glass icon in the menu bar or by using the keyboard shortcut Command + Spacebar.
- Entering Email Keywords: Once Spotlight is open, start typing relevant keywords related to the email you’re looking for. These keywords can include sender names, subject lines, email content, or any other identifiable information.
- Reviewing Search Results: As you type, Spotlight will display search results that match your keywords. You can review the results to identify the specific email message you want to open.
- Selecting and Opening the Email: Once you’ve located the email message in the search results, you can either click on it or use the arrow keys to highlight it. Press the Enter key to open the email message in your default email client, such as Mail.
Spotlight’s email message search capability allows you to quickly find and access specific emails without having to manually search through your email client’s folders and archives. It simplifies the process and saves you valuable time, especially when searching through large volumes of emails.
Moreover, Spotlight’s ability to index email message content means you can search for specific words or phrases mentioned within an email. This is particularly helpful when you remember a specific detail from an email but may not recall the sender or subject line.
Whether you’re looking for an important business communication, a reference from a colleague, or a personal message from a friend, Spotlight’s email search functionality empowers you to easily find and open the email messages you need, helping you stay organized and efficient.
Using Spotlight to Find and Open Contacts
Spotlight is not only a tool for finding files and documents but also a powerful resource for locating and accessing your contacts. With Spotlight’s indexing capabilities, you can quickly search for and open specific contact information on your Mac. Here’s how:
- Accessing Spotlight: Open Spotlight by clicking on the magnifying glass icon in the menu bar or by using the keyboard shortcut Command + Spacebar.
- Entering Contact Keywords: Once Spotlight is open, start typing relevant keywords related to the contact you’re looking for. This could include the contact’s name, company, email address, or any other identifiable information.
- Browsing Through Search Results: As you type, Spotlight will display search results that match your keywords. You can browse through the results to find the specific contact you want to open.
- Selecting and Opening the Contact: Once you’ve located the contact in the search results, click on it or use the arrow keys to highlight it. Press the Enter key to open the contact’s details in the default address book application on your Mac, such as Contacts.
Spotlight’s contact search functionality makes it easy to find and access the contact information you need, without manually searching through your address book. Whether you’re looking for a client’s phone number, a colleague’s email address, or a friend’s address, Spotlight’s quick and accurate search saves you valuable time.
In addition to searching by name, Spotlight can also search for other identifying information, such as an email address or company name. This allows you to find a contact even if you don’t remember their full name, but have other relevant details related to the contact.
By leveraging the power of Spotlight, you can seamlessly find and open contact information without having to spend time searching through your contact lists manually. Let Spotlight do the work for you, and enjoy the convenience of locating and accessing your contacts with just a few keystrokes.
Using Spotlight to Find and Open Calendar Events
Spotlight goes beyond file and document search capabilities and can also assist in finding and opening specific calendar events on your Mac. By utilizing Spotlight’s indexing feature, you can effortlessly search for and access your scheduled events. Here’s how you can use Spotlight to streamline your calendar searches:
- Accessing Spotlight: Open Spotlight by clicking on the magnifying glass icon in the menu bar or by using the keyboard shortcut Command + Spacebar.
- Entering Event Keywords: Once Spotlight is open, start typing relevant keywords related to the calendar event you’re searching for. This can include event titles, descriptions, locations, or any other identifiable information.
- Browsing Through Search Results: As you type, Spotlight will display search results that match your keywords. You can review the results to identify the specific calendar event you want to open.
- Selecting and Opening the Event: Once you’ve located the desired calendar event in the search results, click on it or use the arrow keys to highlight it. Press the Enter key to open the event’s details within your default calendar application, such as Calendar.
Spotlight’s calendar event search functionality makes it convenient to locate and access your scheduled events quickly. Instead of manually navigating through your calendar interface or scrolling through days or weeks, Spotlight eliminates the hassle by delivering results instantly.
Furthermore, Spotlight can search beyond just event titles and includes other relevant details such as locations, attendees, and descriptions. This improves the chances of finding the precise event, even if you don’t recall the exact event name.
With the help of Spotlight, you can easily find and open calendar events, whether it’s a business meeting, personal appointment, or a special event you’ve scheduled. Let Spotlight simplify your calendar management by allowing you to search for specific events with ease and efficiency.
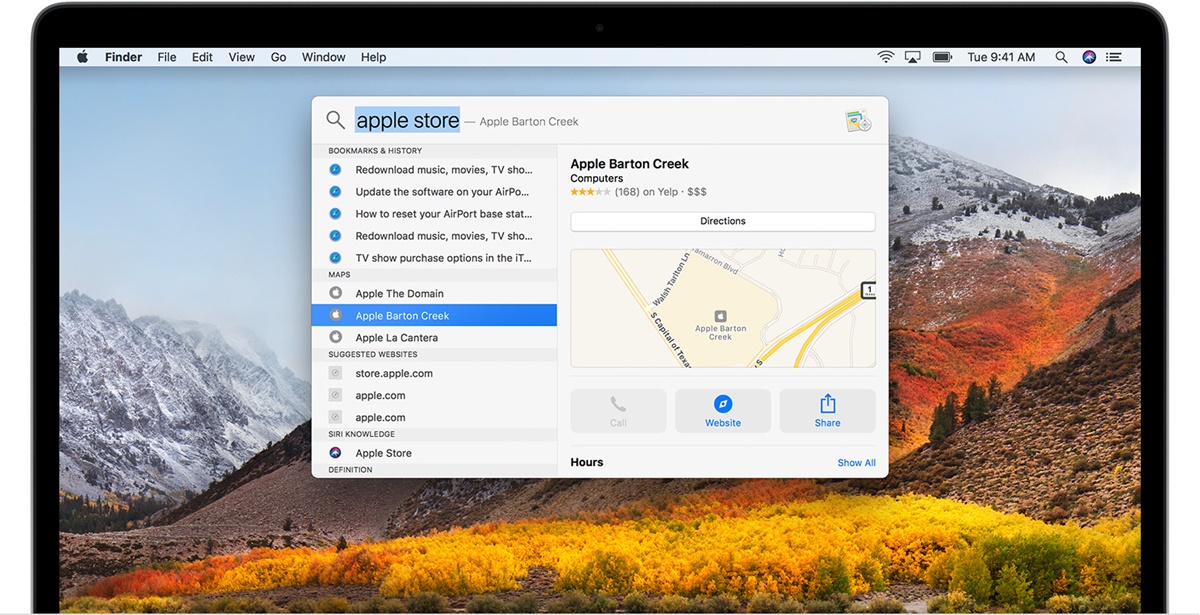
Using Spotlight to Find and Open Websites
In addition to searching for files and applications, Spotlight can also help you find and open websites quickly and conveniently. Whether you need to access a specific webpage or revisit a recently visited site, Spotlight offers a streamlined way to navigate the web. Here’s how:
- Accessing Spotlight: Open Spotlight by clicking on the magnifying glass icon in the menu bar or by using the keyboard shortcut Command + Spacebar.
- Entering Website Keywords: Once Spotlight is open, begin typing relevant keywords related to the website you want to find. This can include the website’s name, a specific page, or any other identifiable information associated with the site.
- Browsing Through Search Results: Spotlight will display search results that match your keywords as you type. Review the results to identify the specific website you want to open.
- Selecting and Opening the Website: Once you’ve located the desired website in the search results, click on it or use the arrow keys to highlight it. Press the Enter key, and your default web browser will open, directing you to the selected website.
With Spotlight’s website search capabilities, you can easily access your favorite webpages or find new sites without the need to open your browser first. It saves you time by skipping the manual process of typing URLs or searching through bookmarks.
Spotlight’s website search results are not limited to just the website name. It can display relevant information such as page titles, descriptions, and addresses. This allows for more accurate results, helping you locate the specific webpage you’re looking for.
Whether you want to revisit a frequently accessed site, locate a specific blog post, or find information on a particular topic, Spotlight’s ability to find and open websites provides a convenient way to navigate the web directly from your Mac’s desktop.
Using Spotlight to Find and Open Bookmarks
Spotlight can be a valuable tool for quickly locating and opening your bookmarks, making it easy to access your favorite webpages. By leveraging the indexing power of Spotlight, you can efficiently search through your bookmarked sites without manually browsing through your browser’s bookmark folders. Here’s how:
- Accessing Spotlight: Open Spotlight by clicking on the magnifying glass icon in the menu bar or by using the keyboard shortcut Command + Spacebar.
- Entering Bookmark Keywords: Once Spotlight is open, start typing relevant keywords related to the bookmarked website you’re looking for. This can include the website’s name, a specific page, or any other identifiable information associated with the bookmark.
- Browsing Through Search Results: As you type, Spotlight will display search results that match your keywords, including relevant bookmarks. Review the results to identify the specific bookmark you want to open.
- Selecting and Opening the Bookmark: Once you’ve located the desired bookmark in the search results, click on it or use the arrow keys to highlight it. Press the Enter key, and your default web browser will open, directing you to the bookmarked webpage.
Spotlight’s ability to search bookmarks eliminates the need to manually search through your browser’s bookmark folders or scroll through a long list. It provides a convenient and efficient way to access your saved websites within seconds.
Furthermore, Spotlight can display additional information about the bookmark, such as the website’s URL, page titles, and descriptions. This can be especially helpful for differentiating between bookmarks that have similar names or identifying the correct page you want to open.
Whether you’re trying to find an article you saved, a frequently visited site, or a specific resource, Spotlight’s bookmark search feature allows you to easily find and open your bookmarked websites, providing quick access to the information you need.
Using Spotlight to Find and Open Notes
Spotlight can be a helpful tool for quickly locating and opening your notes on your Mac. By leveraging the indexing capabilities of Spotlight, you can easily search through your notes and access the information you need. Here’s how to use Spotlight to find and open your notes:
- Accessing Spotlight: Open Spotlight by clicking on the magnifying glass icon in the menu bar or by using the keyboard shortcut Command + Spacebar.
- Entering Note Keywords: Once Spotlight is open, start typing relevant keywords related to the note you’re looking for. This can include the note’s title, content, or any other identifiable information.
- Browsing Through Search Results: As you type, Spotlight will display search results that match your keywords. Review the results to identify the specific note you want to open.
- Selecting and Opening the Note: Once you’ve located the desired note in the search results, click on it or use the arrow keys to highlight it. Press the Enter key, and the note will open in the default note-taking application on your Mac, such as Notes.
Spotlight’s note search capabilities make it easy to find and access your notes without needing to manually navigate through folders or scroll through a long list of notes. It offers a quick and efficient way to retrieve important information.
In addition to searching by note titles, Spotlight can also search the content within your notes. This allows you to find notes based on specific keywords or phrases, even if you don’t remember the exact title.
Whether you’re looking for meeting notes, to-do lists, or snippets of information, Spotlight’s ability to find and open your notes simplifies the note-taking process and helps you easily retrieve the information you need.
Using Spotlight to Find and Open Reminders
Spotlight isn’t just a search tool for files and applications on your Mac – it can also help you quickly find and access your reminders. By leveraging the indexing power of Spotlight, you can efficiently search through your reminders and stay organized. Here’s how to use Spotlight to find and open your reminders:
- Accessing Spotlight: Open Spotlight by clicking on the magnifying glass icon in the menu bar or by using the keyboard shortcut Command + Spacebar.
- Entering Reminder Keywords: Once Spotlight is open, start typing relevant keywords related to the reminder you’re looking for. This can include the reminder’s title, content, due date, or any identifiable information associated with the reminder.
- Browsing Through Search Results: As you type, Spotlight will display search results that match your keywords, including relevant reminders. Review the results to identify the specific reminder you want to open.
- Selecting and Opening the Reminder: Once you’ve located the desired reminder in the search results, click on it or use the arrow keys to highlight it. Press the Enter key, and the reminder will open within your default reminder app on your Mac, such as the Reminders app.
Spotlight’s reminder search feature makes it easy to find and open specific reminders without the need to manually navigate through your reminder lists or scroll through a long list of tasks. It provides a convenient way to access and manage your reminders efficiently.
In addition to searching by title, Spotlight can also search the content and details of your reminders. This allows you to find reminders based on specific keywords or even search for reminders with specific due dates or locations.
Whether you’re looking for an upcoming deadline, a task that needs attention, or a specific reminder in your list, Spotlight’s ability to find and open reminders helps you stay on top of your tasks and ensures you never miss an important to-do.
Using Spotlight to Find and Open Music
Spotlight is a versatile search tool on your Mac that can also help you find and open your music files quickly. By leveraging its indexing capabilities, Spotlight makes it convenient to access your favorite songs and albums. Here’s how you can use Spotlight to find and open your music:
- Accessing Spotlight: Open Spotlight by clicking on the magnifying glass icon in the menu bar or by using the keyboard shortcut Command + Spacebar.
- Entering Music Keywords: Once Spotlight is open, start typing relevant keywords related to the music you’re looking for. This can include the song title, artist name, album name, or any other identifiable information.
- Browsing Through Search Results: As you type, Spotlight will display search results that match your keywords. Review the results to identify the specific music file you want to open.
- Selecting and Opening the Music: Once you’ve located the desired music file in the search results, click on it or use the arrow keys to highlight it. Press the Enter key, and your default music player, such as Apple Music or iTunes, will open and start playing the selected song.
Spotlight’s music search functionality allows you to quickly find and play your favorite songs without opening a specific music app or browsing through folders. It saves you time and provides a seamless music experience right from your Mac’s desktop.
In addition to searching by song title or artist name, Spotlight can also search the metadata associated with your music files. This includes details like album names, genres, and file names. This comprehensive search capability ensures accurate results, even if you have a vast music library.
Whether you’re in the mood for a specific song, want to listen to an artist’s discography, or need to find a particular album, Spotlight’s ability to find and open your music files simplifies the process and enhances your music enjoyment.
Using Spotlight to Find and Open Photos
Spotlight is not just a tool for finding files and documents on your Mac – it can also help you quickly locate and access your photos. By leveraging the indexing capabilities of Spotlight, you can easily search through your photo library and find specific images. Here’s how to use Spotlight to find and open your photos:
- Accessing Spotlight: Open Spotlight by clicking on the magnifying glass icon in the menu bar or by using the keyboard shortcut Command + Spacebar.
- Entering Photo Keywords: Once Spotlight is open, start typing relevant keywords related to the photo you’re looking for. This can include the photo’s file name, location, description, or any other identifiable information.
- Browsing Through Search Results: As you type, Spotlight will display search results that match your keywords, including relevant photos. Review the results to identify the specific photo you want to open.
- Selecting and Opening the Photo: Once you’ve located the desired photo in the search results, click on it or use the arrow keys to highlight it. Press the Enter key, and the photo will open in your default image viewer or photo editing application on your Mac.
Spotlight’s photo search functionality offers a convenient way to quickly find and open your photos without having to manually search through folders or browse through your entire photo library. It makes it easy to locate and access specific images within seconds.
Additionally, Spotlight can search for more than just the file name of a photo. It can recognize metadata associated with photos, such as location, date, and even keywords or tags you have assigned. This means you can narrow down your photo search based on specific criteria or characteristics.
Whether you’re looking for a cherished memory, a specific event, or a particular location in your photo library, Spotlight simplifies the process of finding and opening photos, helping you easily relive and share your special moments.
Using Spotlight to Find and Open System Preferences
Spotlight provides a convenient way to quickly access and open various System Preferences on your Mac. Whether you want to customize your display settings, adjust your sound preferences, or modify your network settings, Spotlight can help you find and open the System Preferences pane you need. Here’s how:
- Accessing Spotlight: Open Spotlight by clicking on the magnifying glass icon in the menu bar or by using the keyboard shortcut Command + Spacebar.
- Entering Preference Keywords: Once Spotlight is open, start typing relevant keywords related to the system preference you’re looking for. This can include the specific preference name, related keywords, or any identifiable information associated with the preference.
- Browsing Through Search Results: Spotlight will display search results that match your keywords as you type. Review the results to identify the specific System Preferences pane you want to open.
- Selecting and Opening the Preference Pane: Once you’ve located the desired preference pane in the search results, click on it or use the arrow keys to highlight it. Press the Enter key, and the System Preferences window will open, displaying the selected preference pane.
Spotlight’s ability to search and open System Preferences directly from your desktop provides a convenient way to access and modify various settings on your Mac. It eliminates the need to manually navigate through the System Preferences window or search through menus to find the preference you need.
In addition to searching by preference name, Spotlight can also search for related keywords or terms associated with the preference. This makes it easier to locate specific preference panes, even if you’re not certain of the exact preference name.
Whether you’re modifying your display settings, adjusting privacy preferences, or configuring your network connections, Spotlight allows you to quickly find and open the relevant System Preferences pane, putting customization and control at your fingertips.
Using Spotlight to Perform Unit and Currency Conversions
Spotlight offers a handy feature that allows you to perform unit and currency conversions right from your Mac’s desktop. Instead of searching for dedicated conversion apps or navigating through online converters, you can utilize Spotlight’s built-in functionality for quick and convenient conversions. Here’s how:
- Accessing Spotlight: Open Spotlight by clicking on the magnifying glass icon in the menu bar or by using the keyboard shortcut Command + Spacebar.
- Entering Conversion Query: Once Spotlight is open, type in your conversion query using appropriate keywords or mathematical symbols. For example, you can enter “20 USD to EUR” or “15 kilometers to miles”.
- Viewing Conversion Result: As you type, Spotlight will display the instant conversion result, based on the entered query, in real-time. The converted value will be displayed right below the search bar.
- Performing Currency Conversions: To perform currency conversions, simply enter the amount followed by the currency codes for both the source and target currencies. Spotlight will fetch the latest exchange rates and provide you with the converted value.
- Performing Unit Conversions: For unit conversions, enter the value you want to convert, followed by the source unit and target unit. Spotlight will calculate the accurate conversion based on the entered units.
Spotlight’s conversion capabilities save you the hassle of searching for separate conversion tools, as it offers a quick and efficient way to perform unit and currency conversions with just a few keystrokes.
Spotlight’s currency conversion feature is powered by up-to-date exchange rate data, ensuring accurate and reliable results. It eliminates the need to navigate to a browser or rely on external websites to get the latest currency exchange rates.
Whether you need to convert kilometers to miles, USD to EUR, or kilograms to pounds, Spotlight’s conversion functionality is there to assist you, providing convenience and simplicity for all your conversion needs.
Customizing Spotlight Search Results
Spotlight offers a high degree of customization, allowing you to tailor your search results to best suit your needs. By adjusting the settings and preferences, you can refine the search results to prioritize certain types of content or exclude specific categories. Here’s how you can customize Spotlight search results:
- Accessing Spotlight Preferences: Go to the Apple menu, select “System Preferences,” and then click on “Spotlight.” Alternatively, you can open Spotlight and click on the “Preferences” button at the bottom of the search results.
- Customizing Content: In the Spotlight preferences, you can customize the content types that appear in search results. For example, you can choose whether to include or exclude applications, documents, messages, contacts, or other categories from your search results.
- Reordering Search Results: You can change the order in which Spotlight displays search results. In the Spotlight preferences, simply drag and drop the content categories in the list to reorder them according to your preference.
- Managing Spotlight Suggestions: Spotlight can provide suggestions from the web, iTunes Store, App Store, and more. You can toggle these suggestions on or off based on your preferences by checking or unchecking the corresponding checkboxes in the Spotlight preferences.
- Choosing Privacy Settings: You can control what information Spotlight indexes by adjusting your privacy settings. In the Spotlight preferences, click on the “Privacy” tab, and then add or remove folders or disks from the list to dictate which locations are excluded from Spotlight indexing.
By customizing your Spotlight search results, you can improve the efficiency and accuracy of the information presented to you. You can prioritize the content types that are most important to you and eliminate clutter from irrelevant sources, making your search experience more tailored and focused.
Furthermore, adjusting the search result order allows you to control how different content categories are ranked, ensuring that the most relevant items appear at the top of the list. This customization empowers you to quickly find and access the information you need with ease.
By managing Spotlight suggestions and privacy settings, you can also have greater control over the information presented and the sources from which it is gathered. This helps to maintain your privacy and further refine the search results according to your preferences.
Take advantage of Spotlight’s customizable features to enhance your search experience and make it more personalized to match your specific needs and priorities.
Troubleshooting Spotlight Issues
Although Spotlight is a powerful tool, you may encounter some issues or experience unexpected behavior from time to time. Fortunately, there are several troubleshooting steps you can take to resolve common Spotlight issues. Here are some solutions to address and troubleshoot Spotlight problems:
- Rebuild Spotlight Index: If Spotlight is not showing accurate results or is missing certain files, rebuilding the Spotlight index might help. Go to the Apple menu, select “System Preferences,” and click on “Spotlight.” In the “Privacy” tab, add your hard drive to the list of locations and then remove it to initiate the rebuilding process.
- Check Spotlight Privacy Settings: Sometimes, Spotlight may not display certain files or folders due to privacy settings. Go to the Spotlight preferences and ensure that the locations containing the missing items are not included in the list of privacy settings.
- Verify Spotlight Search Priority: Spotlight search results may vary depending on the search priority order. Open the Spotlight preferences and adjust the order of content categories to prioritize the ones you want to see first.
- Restart Your Mac: A simple restart can resolve minor issues. It clears caches and refreshes system processes, which can help fix Spotlight problems.
- Update macOS: Make sure your Mac is running the latest version of macOS. Apple often releases updates that address bugs and enhance system performance, including improvements to Spotlight functionality.
- Check for Spotlight Spotlight Search Enabled: In the Spotlight preferences, ensure that the necessary checkboxes are selected to include the desired content categories in search results. Verify that Spotlight is enabled for the appropriate locations.
- Reset Spotlight Preferences: If all else fails, you can reset Spotlight preferences to their default settings. This can be done by navigating to the Terminal application, located in the Utilities folder, and entering the command “defaults delete com.apple.Spotlight” followed by “killall Spotlight”. However, be aware that this will reset all Spotlight preferences and settings.
By following these troubleshooting steps, you can resolve most common Spotlight issues and restore its functionality. However, if the problem persists or is more complex, it may be beneficial to seek further assistance from Apple Support or consult online forums for specialized guidance.
Remember, Spotlight is a dynamic tool, and occasional troubleshooting may be necessary to ensure its optimal performance in helping you quickly find and access the information you need on your Mac.