
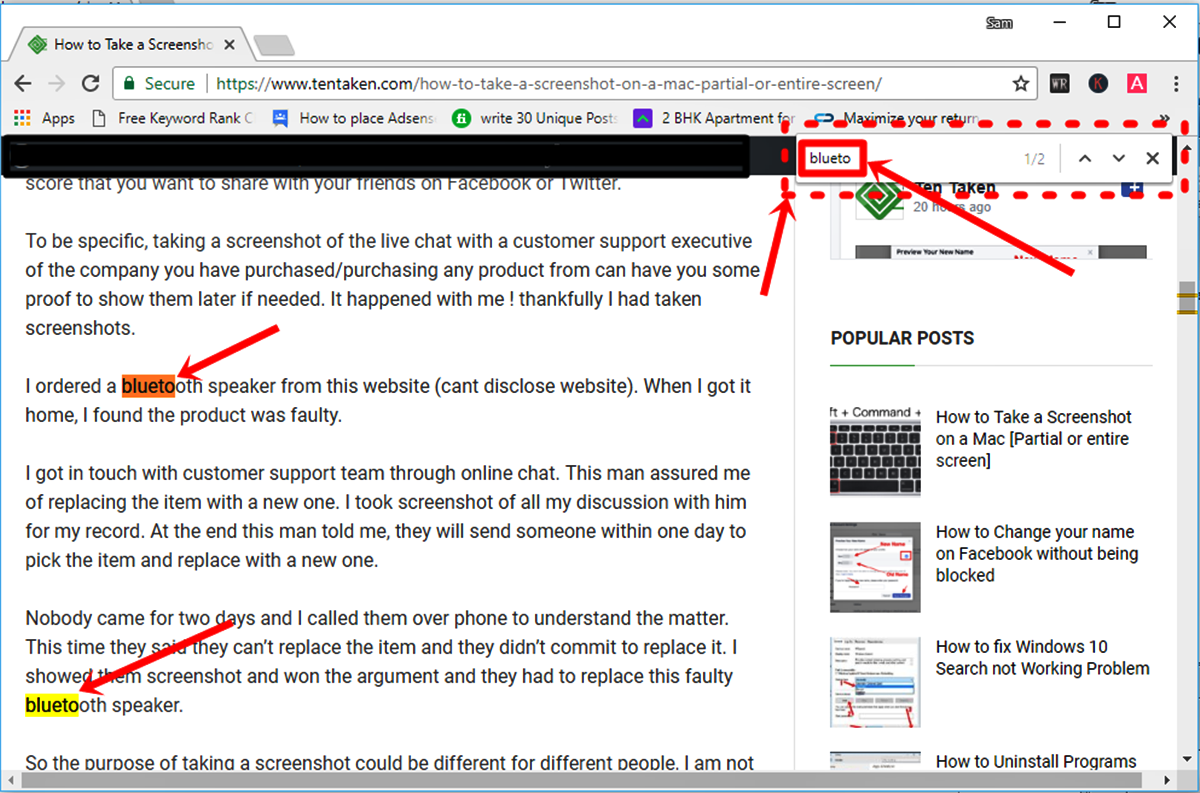
Using the Find command in Safari
Safari is a popular web browser used by many Mac users. If you’re looking for a specific word or phrase within a webpage, Safari offers a convenient Find command to help you locate it quickly. Here’s how you can use the Find command in Safari:
- Open Safari and navigate to the webpage you want to search within.
- Click on the magnifying glass icon located in the top-right corner of the Safari window, or press Command + F on your keyboard to bring up the Find bar.
- Type the word or phrase you want to find in the search field within the Find bar.
- Safari will highlight the first occurrence of the word or phrase on the webpage. You can use the arrow buttons in the Find bar to navigate to other occurrences.
- If you prefer, you can also press Command + G or Enter to cycle through each occurrence of the word or phrase.
- If you want to search for the word or phrase in a case-sensitive manner, click on the “Match Case” option in the Find bar.
- To exit the Find mode, simply click on the “x” button in the Find bar, or press Escape on your keyboard.
The Find command in Safari is a handy tool that allows you to quickly locate specific information within a webpage. Whether you’re searching for a particular word, phrase, or even part of a URL, Safari’s Find command makes it easy to find what you’re looking for without wasting time scrolling through the entire page. Give it a try next time you need to locate something specific in Safari!
Using the Find command in TextEdit
TextEdit is a built-in text editor on Mac that allows you to create and edit various types of documents. If you’re working on a lengthy document and need to find a specific word or phrase, TextEdit provides a Find command that makes the task easier. Here’s how you can use the Find command in TextEdit:
- Open TextEdit on your Mac. You can find it in the Applications folder or use the Spotlight search to locate it quickly.
- Open the document you want to search within in TextEdit.
- Click on the “Edit” menu at the top of the screen and select “Find” from the dropdown menu. Alternatively, you can use the keyboard shortcut Command + F.
- Type the word or phrase you want to find in the search field located at the top-right corner of the TextEdit window.
- As you type, TextEdit will automatically highlight the first occurrence of the word or phrase in the document.
- If there are multiple occurrences, you can use the arrow buttons in the Find bar to navigate through them.
- Press Command + G or Enter to cycle through each occurrence of the word or phrase.
- To exit the Find mode, click on the “x” button in the Find bar or press the Escape key.
The Find command in TextEdit is a useful feature when you’re working with large documents and need to locate specific information quickly. Whether you’re editing a report or writing a lengthy essay, TextEdit’s Find command can save you time and effort by allowing you to focus on the specific content you’re looking for. Try it out next time you’re working with TextEdit!
Using the Find command in Pages
Pages is a powerful word processing application designed for Mac users. When working on a document, you may need to search for a specific word or phrase within its content. Pages provides a handy Find command that allows you to quickly locate the information you’re looking for. Here’s how you can use the Find command in Pages:
- Open Pages on your Mac and open the document you want to search within.
- Click on the “Edit” menu at the top of the screen and select “Find” from the dropdown menu. You can also use the keyboard shortcut Command + F.
- In the Find bar that appears at the top-right corner of the Pages window, type the word or phrase you want to find.
- Pages will automatically highlight the first occurrence of the word or phrase in the document.
- If there are multiple occurrences, you can use the arrow buttons in the Find bar to navigate through them.
- Press Command + G or Enter to cycle through each occurrence of the word or phrase.
- If you want to customize the search options, click on the gear icon in the Find bar to access additional search settings.
- To exit the Find mode, click on the “x” button in the Find bar or press the Escape key.
The Find command in Pages is a valuable tool that helps you efficiently search for specific words or phrases within your documents. Whether you’re working on a report, a proposal, or any other type of document, Pages’ Find command can save you time and effort by allowing you to pinpoint the information you need quickly. Give it a try next time you’re using Pages!
Using the Find command in Microsoft Word
Microsoft Word is a widely used word processing program that offers a range of features to enhance productivity. If you’re working on a lengthy document and need to locate a specific word or phrase, Microsoft Word provides a powerful Find command that can help you with your search. Here’s how you can use the Find command in Microsoft Word:
- Open Microsoft Word on your Mac and open the document you want to search within.
- Click on the “Edit” tab in the menu bar and select “Find” from the dropdown menu. You can also use the keyboard shortcut Command + F.
- In the Find dialog box that appears, type the word or phrase you want to find in the search field.
- Word will automatically locate and highlight the first occurrence of the word or phrase in the document.
- If there are multiple occurrences, you can use the navigation buttons in the Find dialog box to move through them.
- Press Command + G or Enter to cycle through each occurrence of the word or phrase.
- If you want to refine your search further, click on the “More” button in the Find dialog box to access advanced search options.
- To exit the Find mode, click on the “x” button in the Find dialog box or press the Escape key.
The Find command in Microsoft Word is a valuable tool that allows you to efficiently search for specific words or phrases within your documents. Whether you’re writing an essay, creating a report, or working on any other type of document, Word’s Find command can save you time by quickly locating the information you need. Give it a try next time you’re using Microsoft Word!
Using the Find command in Preview
Preview is a native app on Mac that allows you to view and edit various types of files, including PDFs and images. When working with a lengthy document or scanning through multiple pages, you may need to locate specific words or phrases quickly. Preview offers a handy Find command that can help you with your search. Here’s how you can use the Find command in Preview:
- Open Preview on your Mac.
- Open the document or image file you want to search within.
- Click on the “Edit” menu at the top of the screen and select “Find” from the dropdown menu. Alternatively, you can use the keyboard shortcut Command + F.
- In the Find bar that appears at the top-right corner of the Preview window, type the word or phrase you want to find.
- Preview will automatically find and highlight the first occurrence of the word or phrase in the document.
- If there are multiple occurrences, you can use the arrow buttons in the Find bar to navigate through them.
- Press Command + G or Enter to cycle through each occurrence of the word or phrase.
- If you want to customize the search options, click on the gear icon in the Find bar to access advanced search settings.
- To exit the Find mode, click on the “x” button in the Find bar or press the Escape key.
The Find command in Preview is a useful feature that allows you to efficiently search for specific words or phrases within your documents or images. Whether you’re reading a long PDF, searching for text within an image, or reviewing scanned documents, Preview’s Find command can save you time and effort by quickly locating the information you need. Give it a try next time you’re using Preview!
Using the Find command in Finder
Finder is the default file manager on Mac that allows you to navigate through your files and folders. When you’re looking for a specific file or folder on your computer, Finder provides a useful Find command to help you locate it quickly. Here’s how you can use the Find command in Finder:
- Open Finder on your Mac by clicking on the Finder icon in the Dock or using the keyboard shortcut Command + Spacebar to open Spotlight and then typing “Finder”.
- Click on the “Edit” menu in the menu bar and select “Find” or press Command + F to open the Find window.
- In the Find window, enter the name or partial name of the file or folder you’re looking for in the search field.
- As you type, Finder will instantly display search results that match your query in real-time.
- If there are multiple results, you can navigate through them using the arrow buttons in the Find window.
- You can also refine your search by using additional criteria such as file type, date modified, or file size by clicking on the “+” button in the Find window.
- To exit the Find mode, simply click on the “x” button in the Find window or press the Escape key.
The Find command in Finder is a valuable tool for quickly locating files or folders on your Mac. Whether you’re searching for a specific document, image, or any other file, Finder’s Find command can save you time and effort by narrowing down your search to the desired item. Give it a try next time you’re looking for something on your Mac!
Using the Find command in Spotlight
Spotlight is a powerful search tool built into macOS that allows you to find files, apps, documents, and more on your Mac. When you’re looking for something specific on your computer, Spotlight provides a convenient Find command to help you locate it quickly. Here’s how you can use the Find command in Spotlight:
- Click on the magnifying glass icon located in the top-right corner of your Mac’s menu bar. Alternatively, you can use the keyboard shortcut Command + Spacebar to open Spotlight.
- In the Spotlight search bar that appears, type the name or partial name of the file, app, or document you’re looking for.
- As you type, Spotlight will instantly display search results that match your query in real-time.
- If you want to refine your search, you can use the filter options on the right side of the Spotlight window to narrow down the results by file type, date, or other criteria.
- Click on the desired item in the search results to open it or access it directly.
- If you prefer, you can also use the arrow keys on your keyboard to navigate through the search results.
- To exit the Spotlight search, simply click anywhere outside the Spotlight window or press the Escape key.
The Find command in Spotlight is an incredibly useful tool for quickly finding files, apps, and documents on your Mac. Whether you’re searching for a specific file, launching an app, or looking up information, Spotlight’s Find command can save you time and effort by providing instant search results. Give it a try next time you need to find something on your Mac!
Using the Find command in Terminal
Terminal is a powerful command-line tool on macOS that allows you to interact with your computer using text commands. If you need to search for files or directories within your system using specific criteria, Terminal provides a versatile Find command to help you with your search. Here’s how you can use the Find command in Terminal:
- Open Terminal on your Mac by navigating to the “Applications” folder, then “Utilities,” and clicking on the Terminal app.
- In the Terminal window, navigate to the directory where you want to start your search. You can use the “cd” command followed by the directory path to change to the desired location.
- Once you’re in the appropriate directory, use the following command to search for files or directories that match your criteria:
- Replace “search-query” with the name or wildcard pattern of the file or directory you’re looking for. For example, to find all files with the extension “.txt”, use “*.txt”.
- Press Enter to execute the command.
- Terminal will display a list of files or directories that match your search query, including their paths.
- If you want to search within a specific directory and its subdirectories, you can modify the command by specifying the path of the directory instead of “.”. For example:
- You can further refine your search by using additional options with the find command. For example, you can search for files modified within a specific time frame or files with specific permissions.
find . -name "search-query"find /path/to/directory -name "search-query"The Find command in Terminal provides a flexible way to search for files and directories on your Mac based on specific criteria. It’s especially useful if you’re comfortable with command-line interfaces and need to perform complex searches. Experiment with different options and combinations to fine-tune your search in Terminal!
Using the Find command in Notes
Notes is a versatile note-taking app that comes preinstalled on macOS. When you have a large collection of notes and need to find specific information quickly, Notes offers a convenient Find command to help you locate it within your notes. Here’s how you can use the Find command in Notes:
- Open Notes on your Mac.
- In the left sidebar, navigate to the folder or account where you want to search for your note.
- Click on the search bar located at the top-right corner of the Notes window.
- Type the word or phrase you want to find within your notes.
- As you type, Notes will instantly display the notes that match your search criteria.
- If there are multiple notes that match your search, you can scroll through the search results to find the specific note you’re looking for.
- To exit the Find mode, simply clear the search bar or click outside the search bar.
The Find command in Notes is a useful tool for quickly locating specific information within your notes. Whether you’re searching for a particular keyword, phrase, or even a specific date or attachment, the Find command can save you time and effort by narrowing down your search to the notes that contain the information you need. Give it a try next time you need to find something within your notes collection!
Using the Find command in Mail
Mail is a popular email client on macOS that allows you to manage your email accounts. When you receive a large number of emails and need to find a specific message or information quickly, Mail provides a powerful Find command to assist you in your search. Here’s how you can use the Find command in Mail:
- Open the Mail app on your Mac.
- Click on the mailbox or folder where you want to search for emails.
- At the top-right corner of the Mail window, you’ll find a search bar. Click on it to activate it.
- Type the keyword or phrase you want to search for in the search bar.
- As you type, Mail will automatically display the emails that match your search criteria.
- If there are multiple emails that match your search, you can scroll through the search results to find the specific email you’re looking for.
- To narrow down your search, you can use various search filters such as sender, subject, or date by clicking on the “Filter Messages” option that appears below the search bar.
- To exit the Find mode, simply clear the search bar or click outside the search bar.
The Find command in Mail is a valuable tool for quickly locating specific emails or information within your mailbox. Whether you’re searching for a particular email from a specific sender, with a specific subject, or containing important keywords, Mail’s Find command can save you time and effort by narrowing down your search to the messages that contain the information you need. Give it a try next time you need to find something within your email inbox!
Using Third-Party Applications for Advanced Searching
While built-in search features like Finder, Spotlight, and application-specific Find commands are powerful, there are third-party applications available on the Mac App Store that offer even more advanced searching capabilities. These applications can provide additional features, customization options, and search across specific file types or cloud services. Here are some popular third-party applications for advanced searching:
1. Alfred:
Alfred is an excellent productivity application that includes a powerful search feature. It allows you to search for files, launch applications, execute complex workflows, and even search the web, all within a single interface. Alfred offers extensive customization options, making it a versatile tool for advanced searching.
2. EasyFind:
EasyFind is a lightweight alternative to the built-in search tools. It enables you to search for files and folders by name, content, or even hidden system files. EasyFind’s intuitive interface and advanced searching options make it an ideal choice for users who require more precise control over their search queries.
3. HoudahSpot:
HoudahSpot is a powerful file search tool that lets you search your Mac based on criteria like file content, tags, date, and file size. With its advanced filtering options, you can refine your search to pinpoint specific files. HoudahSpot also offers the ability to create and save search templates for future use.
4. Devonthink:
Devonthink is a comprehensive information management application that helps you organize and search through your files, emails, web pages, and more. It uses artificial intelligence to assist in categorizing and searching your data. Devonthink’s advanced features make it a perfect choice for users dealing with large amounts of information and complex search requirements.
5. Evernote:
Evernote is a popular note-taking application that includes robust search capabilities. It allows you to search for text within notes, attach files, and organize your information with tags, notebooks, and shortcuts. With its powerful search engine, Evernote helps you easily find the information you need across your notes and attachments.
These third-party applications offer advanced search features and customization options beyond what the built-in tools provide. Depending on your specific needs, these applications can greatly enhance your productivity and make searching for files, notes, and information on your Mac more efficient and effective.