
Enable Preview Pane in Gmail
Gmail’s Preview Pane feature allows you to view and read your emails without needing to open them individually. This time-saving feature is especially helpful when you need to quickly scan through your inbox and prioritize your messages. Enabling the Preview Pane in Gmail is a straightforward process, and this section will guide you through it.
To enable the Preview Pane in Gmail, you need to follow these steps:
- Open Gmail in your web browser and sign in to your account.
- Click on the gear icon in the top-right corner of the screen and select “Settings” from the dropdown menu.
- In the Settings menu, navigate to the “Advanced” tab.
- Scroll down until you find the “Preview Pane” section.
- Select the desired option: “Enable” to activate the Preview Pane, or “Disable” to turn it off.
- Click on the “Save Changes” button at the bottom of the page to save your settings.
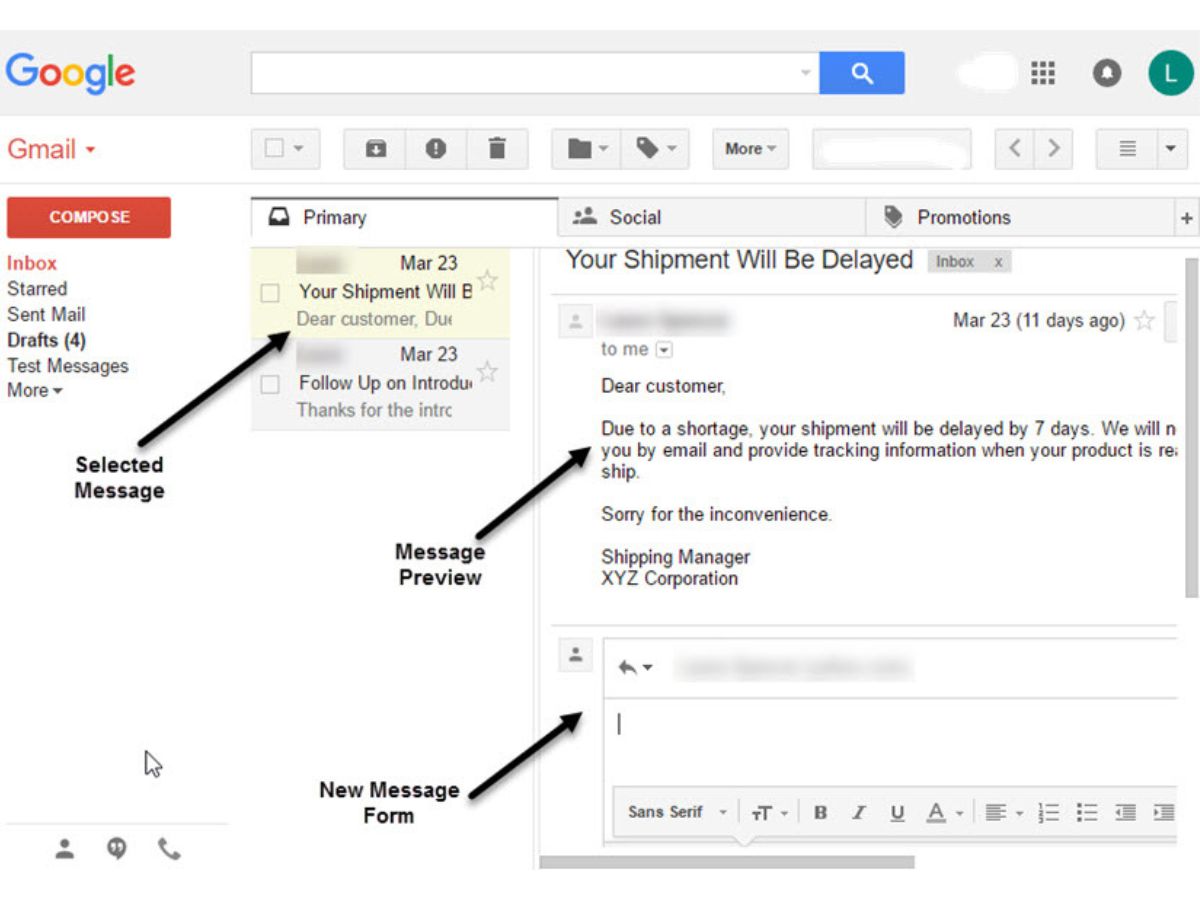
Once you have enabled the Preview Pane, you will see a new layout in your Gmail inbox. The Preview Pane will be situated to the right of your email list by default, displaying the content of the selected email. You can easily switch between the Preview Pane and regular view by clicking on the toggle icon located at the top-right corner of the Preview Pane.
It’s worth mentioning that the Preview Pane feature is currently available only in the desktop version of Gmail and not in the mobile app. Additionally, if you use Gmail with Google Workspace (previously G Suite), your organization’s admin needs to enable the Preview Pane feature for your account.
Enabling the Preview Pane in Gmail provides you with a more efficient way to manage your emails. By previewing messages without opening them fully, you can quickly determine their importance and take appropriate action, whether it’s replying, archiving, or deleting. Embrace the convenience of the Preview Pane and streamline your Gmail workflow.
Customize Preview Pane Layout
Gmail’s Preview Pane feature offers customization options to tailor the layout according to your preference. By customizing the Preview Pane, you can optimize your Gmail experience and make it more convenient for your specific needs. This section will guide you through the steps to customize the Preview Pane layout in Gmail.
To customize the Preview Pane layout in Gmail, follow these instructions:
- Open Gmail and sign in to your account.
- Click on the gear icon in the top-right corner and select “Settings” from the dropdown menu.
- Go to the “Advanced” tab in the Settings menu.
- Find the “Preview Pane” section.
- Choose your desired layout from the available options: “No Split”, “Vertical Split”, or “Horizontal Split”.
- Click on the “Save Changes” button to apply your selected layout.
The “No Split” option will display your email list and preview pane separately, just like the default Gmail layout. This layout is ideal if you prefer a traditional email view without the Preview Pane.
The “Vertical Split” layout will position the email list on the left and the Preview Pane on the right. This allows you to view the list of emails and read the selected email simultaneously, making it easier to navigate and manage your inbox.
The “Horizontal Split” layout places the email list at the top and the Preview Pane at the bottom. This configuration is useful if you prefer a more compact view, as it shows the list of emails and email content in a stacked format.
By customizing the Preview Pane layout, you can find the one that suits your workflow and reading style. Whether you prefer a traditional view, a side-by-side layout, or a stacked format, Gmail offers flexibility to accommodate your preferences.
Take advantage of the customizable Preview Pane layout in Gmail to enhance your email management and improve productivity. Experiment with different layouts and find the one that works best for you, ensuring a seamless and personalized email experience.
Toggle Between Vertical and Horizontal Layout
Gmail’s Preview Pane feature provides the flexibility to toggle between vertical and horizontal layouts, allowing you to choose the most convenient view for your email management. Whether you prefer to have the email list and preview pane side by side or stacked on top of each other, Gmail makes it easy to switch between these layouts. This section will guide you through the steps to toggle between the vertical and horizontal layout in Gmail.
To toggle between vertical and horizontal layouts in Gmail’s Preview Pane, follow these simple steps:
- Open Gmail and sign in to your account.
- Click on the toggle icon located at the top-right corner of the Preview Pane.
- If the Preview Pane is currently set to a vertical layout, clicking the toggle will switch it to a horizontal layout. Likewise, if the Preview Pane is in a horizontal layout, clicking the toggle will change it to a vertical layout.
By default, Gmail displays the Preview Pane in a vertical layout, with the email list on the left and the preview pane on the right. This layout allows you to quickly scan through your emails and read the selected email without needing to navigate to a separate page.
Switching to the horizontal layout places the email list at the top and the preview pane at the bottom. This configuration is especially useful for users who prefer a more compact view, as it allows you to easily scroll through the list of emails while simultaneously viewing the content of the selected email.
The ability to toggle between vertical and horizontal layouts gives you the flexibility to choose the most comfortable and efficient view for your email management. Experiment with both options to determine which layout suits your workflow and reading style best.
With the ability to switch between vertical and horizontal layouts in the Preview Pane, Gmail offers a customizable email experience tailored to your preferences. Adapt the layout to fit your needs, streamline your email management, and optimize your productivity.
Adjust Preview Pane Size
Gmail’s Preview Pane feature allows you to adjust the size of the preview pane to suit your preferences and optimize your email reading experience. Whether you want to view more email content at once or prioritize the email list, Gmail enables you to customize the size of the preview pane effortlessly. In this section, we will guide you on how to adjust the preview pane size in Gmail.
To adjust the size of the preview pane in Gmail, follow these steps:
- Open Gmail and sign in to your account.
- Move your cursor to the right edge of the preview pane.
- When your cursor changes to a double-sided arrow, click and drag the edge of the preview pane to resize it according to your preference.
By default, Gmail’s preview pane is set to a moderate size, allowing you to comfortably view the email content without sacrificing the visibility of the email list. However, if you find yourself needing more space to read an email or want a larger preview, you can adjust the size of the preview pane to better suit your needs.
Expanding the preview pane allows you to see more content of the selected email, making it easier to read through longer messages or view attachments without the need to scroll frequently. Conversely, if you prioritize the email list and prefer to have a smaller preview pane, you can shrink it to allocate more space to the list.
The ability to adjust the preview pane size gives you the freedom to customize your Gmail experience and adapt it to your reading preferences. Experiment with different sizes to find the perfect balance between the email list and the preview pane, ensuring a comfortable and efficient workflow.
By adjusting the preview pane size in Gmail, you can personalize your email management and improve your productivity. Tailor the layout to your specific needs, whether you want to focus on the email content or scan through the email list more efficiently.
Mark Emails as Read or Unread in Preview Pane
Gmail’s Preview Pane feature not only allows you to view and read emails without opening them but also provides the ability to mark emails as read or unread directly within the preview pane. This feature is incredibly useful for quickly managing your inbox and keeping track of important messages. In this section, we will guide you on how to mark emails as read or unread in the preview pane in Gmail.
To mark emails as read or unread in the preview pane, follow these steps:
- Open Gmail and sign in to your account.
- Enable the Preview Pane if you haven’t already done so (refer to the earlier section on how to enable it).
- In your email list, click on the email that you want to mark as read or unread.
- The email’s content will appear in the preview pane. Look for the small circle icon located next to the email’s sender name or subject.
- Click on the circle icon to toggle the email’s status between read and unread.
When an email is marked as read, the circle icon will turn gray or disappear, depending on your Gmail settings. Conversely, marking an email as unread will display a filled circle icon, indicating that the email has not been opened or read.
Marking emails as read or unread in the preview pane offers a convenient way to manage your inbox. It allows you to quickly triage your emails without opening them individually. By marking emails as read, you can keep track of messages that you have reviewed, while marking emails as unread serves as a visual reminder to revisit those messages later.
Furthermore, Gmail automatically synchronizes the status of emails across different devices. So, if you mark an email as read or unread in the preview pane on your desktop, it will reflect the same status on your mobile device or any other device where you access Gmail.
With the ability to mark emails as read or unread in the preview pane, Gmail empowers you to efficiently manage your inbox’s organization and ensure that important emails receive the attention they deserve. Take advantage of this feature to streamline your email workflow and make email management more effortless and effective.
Reply and Forward Emails in Preview Pane
Gmail’s Preview Pane feature not only allows you to view and read emails without opening them but also provides the functionality to reply to and forward emails directly from the preview pane. This time-saving feature eliminates the need to open each email individually, streamlining your email management process. In this section, we will guide you on how to reply to and forward emails in the preview pane in Gmail.
To reply to or forward an email in the preview pane, follow these steps:
- Open Gmail and sign in to your account.
- Enable the Preview Pane if you haven’t already done so (refer to the earlier section on how to enable it).
- In your email list, find the email to which you want to reply or forward.
- Click on the email to display its content in the preview pane.
- Look for the reply or forward icons located at the top or bottom of the email.
- Click on the appropriate icon to either reply to the email or forward it.
When you click the reply icon, a reply window will open either in a new tab or within the preview pane itself, depending on your Gmail settings. You can compose your reply in the window, add recipients, and customize the email before sending it.
Similarly, clicking the forward icon will open a new window where you can enter the recipient’s email address and add any additional information or comments. Finally, you can send the email to forward the message to the intended recipient.
Replying to and forwarding emails within the preview pane allows you to efficiently respond to messages without interrupting your workflow. This feature is particularly useful when you need to provide quick responses or share information with others, saving you time and effort.
Additionally, Gmail keeps track of your conversations, making it easy to follow the email thread and view previous replies and forwarded messages. This ensures that you have a complete history of your interactions and can refer back to previous conversations whenever necessary.
Take advantage of the ability to reply to and forward emails directly from the preview pane in Gmail to streamline your email management and improve your productivity. With this feature, you can effortlessly respond to messages and share information, all without needing to open each email individually.
Archive, Delete, and Move Emails in Preview Pane
Gmail’s Preview Pane feature not only allows you to view and read emails without opening them but also provides the ability to perform essential actions like archiving, deleting, and moving emails directly from the preview pane. This feature enables you to efficiently manage your inbox and keep it organized without the need to navigate to separate screens. In this section, we will guide you on how to archive, delete, and move emails in the preview pane in Gmail.
To archive, delete, or move an email in the preview pane, follow these steps:
- Open Gmail and sign in to your account.
- Enable the Preview Pane if you haven’t already done so (refer to the earlier section on how to enable it).
- In your email list, select the email you want to take action on.
- Look for the icons corresponding to the actions you want to perform: archive, delete, or move.
- Click on the appropriate icon to archive the email, move it to a different folder, or delete it.
The archive icon looks like a small box with an arrow pointing down. Clicking this icon will remove the email from your inbox and move it to the “All Mail” or “Archive” folder, depending on your Gmail settings. Archiving emails is a great way to declutter your inbox while still keeping them easily accessible for future reference.
The delete icon typically looks like a trash can. Clicking this icon will immediately move the email to the “Trash” folder, where it will be permanently deleted after a certain period, as determined by your Gmail settings. Deleting unwanted or unnecessary emails helps you maintain a clean and organized inbox.
To move an email to a different folder, look for the move icon, usually represented by a folder or file icon. Clicking this icon will allow you to select the desired folder or label where you want to move the email. Moving emails to specific folders or labels helps you categorize and organize your inbox to find messages more easily later on.
Performing these actions directly from the preview pane in Gmail’s Preview Pane feature streamlines your email management process, saving you time and effort. Instead of opening each email individually, you can quickly take action on them right from the preview pane, maintaining a well-organized inbox.
By archiving, deleting, and moving emails in the preview pane, you can keep your inbox clutter-free and ensure that important emails are appropriately organized. Take advantage of these features to stay on top of your email management and enjoy a more efficient email experience with Gmail.
Search and Filter Emails in Preview Pane
Gmail’s Preview Pane feature not only allows you to view and read emails without opening them but also provides robust search and filtering capabilities directly within the preview pane. This powerful feature enables you to easily locate specific emails or narrow down your search results, saving you time and effort when searching for important messages. In this section, we will guide you on how to search for and filter emails in the preview pane in Gmail.
To search for and filter emails in the preview pane, follow these steps:
- Open Gmail and sign in to your account.
- Enable the Preview Pane if you haven’t already done so (refer to the earlier section on how to enable it).
- In the search bar at the top of your Gmail interface, enter the keyword, sender, subject, or any other criteria you want to search for.
- As you start typing, Gmail’s search suggestions will appear, helping you refine your search query.
- Press Enter or click on the search icon to initiate the search.
- The search results will appear in the email list, and you can click on an email to view its content in the preview pane.
Searching for emails directly within the preview pane allows you to quickly locate specific messages based on your search criteria. Whether you’re searching for a particular sender, subject, keyword, or even specific labels or folders, Gmail’s search functionality is powerful and helps you find the emails you need in no time.
In addition to searching, Gmail provides advanced filtering options to narrow down your search results. To access the filtering options, click on the downward-facing arrow at the right side of the search bar. This will open a menu where you can specify criteria such as sender, recipient, subject, date, and more to refine your search even further.
By utilizing the search and filtering capabilities within the preview pane, you can easily find and access the emails you need without the need to navigate to separate screens or manually sort through your inbox. This streamlines your email management process and improves your overall productivity.
Take advantage of Gmail’s search and filtering features in the preview pane to efficiently locate specific emails, narrow down your search results, and stay organized. Whether you’re searching for important information or trying to declutter your inbox by finding and deleting irrelevant emails, Gmail provides the tools to help you accomplish these tasks with ease.
Keyboard Shortcuts for Preview Pane in Gmail
Gmail’s Preview Pane feature offers a range of keyboard shortcuts that allow you to navigate and perform actions within the preview pane quickly. These shortcuts provide a convenient way to manage your emails without relying solely on your mouse or touchpad. In this section, we will introduce you to some of the essential keyboard shortcuts for the preview pane in Gmail.
Here are a few keyboard shortcuts to help you navigate and interact with emails in the preview pane:
- Menu navigation:
- j and k: Move down and up in the email list.
- o: Open the selected email in the preview pane.
- u: Return to the email list after opening an email.
- Marking emails:
- x: Select or deselect multiple emails.
- s: Star or unstar the selected email.
- !: Mark the selected email as spam.
- Archiving, deleting, and moving:
- e: Archive the selected email.
- #: Delete the selected email.
- v: Open the “Move To” menu to move the email to a specific folder.
- Replying and forwarding:
- r: Reply to the selected email.
- a: Reply to all recipients of the selected email.
- f: Forward the selected email.
- Other actions:
- Shift + i: Mark an email as read or unread.
- Shift + n: Update conversation status, suppress email notification.
- ? (question mark): Display the full list of keyboard shortcuts.
These are just a few examples of the commonly used keyboard shortcuts for the preview pane in Gmail. Remember that you can always access a full list of keyboard shortcuts by pressing the question mark key (?).
By familiarizing yourself with these keyboard shortcuts, you can navigate and manage your emails more efficiently. Whether you are triaging your inbox, replying to emails, or organizing your messages, keyboard shortcuts provide a quicker and more streamlined way to interact with Gmail’s preview pane.
Take advantage of these keyboard shortcuts to boost your productivity and save time when working with Gmail’s Preview Pane feature. Once you get used to using them, you’ll find yourself navigating and managing emails with ease and efficiency.