
Why Use Google Slides for Spreadsheets?
Google Slides is not only a powerful tool for creating presentations, but it also offers several benefits for incorporating spreadsheets into your slides. Here are some reasons why you should consider using Google Slides for your spreadsheet needs:
- Convenience and Accessibility: Google Slides allows you to access your spreadsheets from anywhere, as long as you have an internet connection. This means you can easily collaborate with others, whether they are sitting next to you or on the other side of the world.
- Seamless Integration: With Google Slides, you can insert spreadsheets directly into your presentation, eliminating the need to switch between different applications. This streamlines the process and ensures a smooth flow for your audience.
- Real-time Updates: When you embed a Google Sheets spreadsheet in Google Slides, any changes made to the original spreadsheet will be automatically updated in your presentation. This ensures that the data is always up-to-date, without the need for manual updates.
- Interactive Data Visualization: Google Slides offers various formatting options and chart types to enhance the visual appeal of your spreadsheets. You can easily create dynamic charts and graphs to present your data in a more engaging and understandable way.
- Collaboration and Feedback: Google Slides enables easy collaboration, allowing multiple users to work on the same spreadsheet simultaneously. Additionally, viewers can leave comments and suggestions directly in the presentation, facilitating efficient feedback loops.
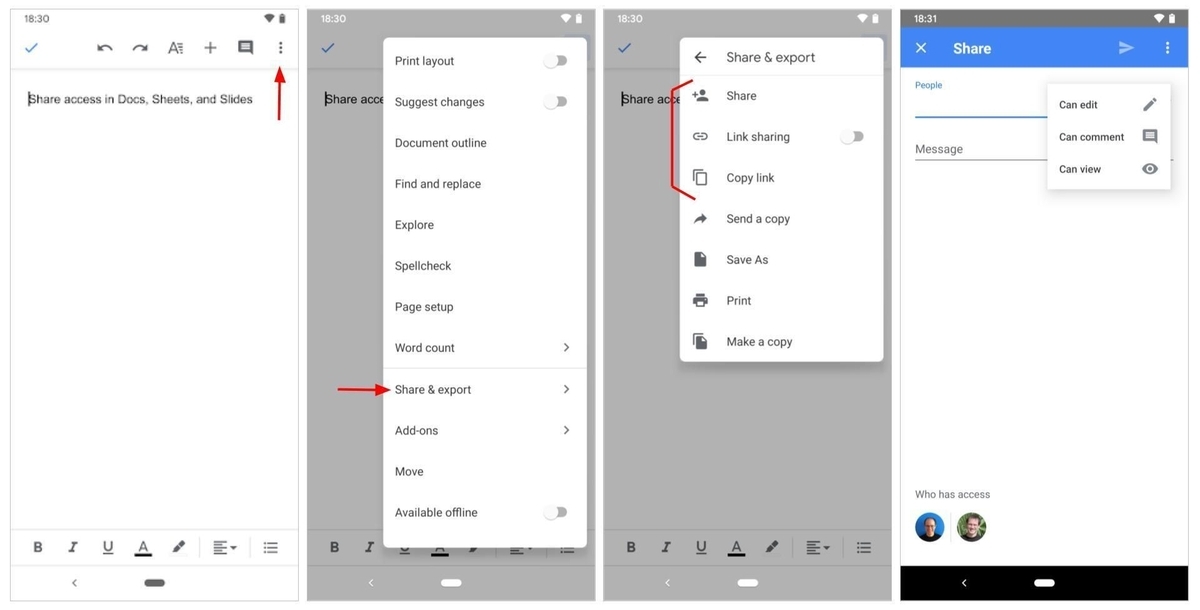
- Easy Sharing: Sharing your presentation with others is a breeze with Google Slides. You can grant specific permissions to each collaborator, ensuring that everyone has the appropriate level of access and control over the spreadsheet content.
These are just a few of the advantages that Google Slides offers when it comes to incorporating spreadsheets into your presentations. Whether you need to display data, create charts, or collaborate with others, Google Slides provides a user-friendly and versatile platform to meet your spreadsheet needs.
How to Insert a Spreadsheet in Google Slides
Inserting a spreadsheet into your Google Slides presentation is a simple process. Here are three options to consider:
- Option 1: Embedding a Google Sheets Spreadsheet: If your spreadsheet is already in Google Sheets, you can easily embed it in Google Slides. Just follow these steps:
- Open your Google Slides presentation and go to the slide where you want to insert the spreadsheet.
- Click on the “Insert” tab in the menu bar and select “Chart”.
- In the sidebar that appears, click on the “Sheets” tab.
- Choose the Google Sheets spreadsheet you want to insert and click “Insert”.
- The embedded spreadsheet will now appear on your slide, and you can resize and position it as needed.
- Option 2: Uploading an Excel Spreadsheet: If you have an Excel spreadsheet that you want to use in Google Slides, you can upload it and convert it to a Google Sheets file. Here’s how:
- Open Google Slides and go to the slide where you want to insert the spreadsheet.
- Click on the “Insert” tab in the menu bar and select “Chart”.
- In the sidebar that appears, click on the “Sheets” tab.
- Click on the “Upload” button and select the Excel spreadsheet from your computer.
- Google Slides will upload and convert the spreadsheet to a Google Sheets file, and it will be inserted into your slide.
- Option 3: Inserting a Table: If you don’t have a specific spreadsheet but want to create a table within Google Slides, you can insert a table directly. Here’s how:
- Open your Google Slides presentation and go to the slide where you want to insert the table.
- Click on the “Insert” tab in the menu bar and select “Table”.
- Choose the number of rows and columns you want for your table.
- The table will be inserted into your slide, and you can enter data and format it as needed.
By following these steps, you can easily insert spreadsheets, whether they are in Google Sheets or Excel, into your Google Slides presentation. Choose the option that suits your needs, and seamlessly integrate data and tables into your slides to enhance your presentation.
Option 1: Embedding a Google Sheets Spreadsheet
One of the easiest ways to insert a spreadsheet into Google Slides is by embedding a Google Sheets spreadsheet directly. This option is especially useful if your data is already in Google Sheets. Here’s how to do it:
- Open your Google Slides presentation and navigate to the slide where you want to insert the spreadsheet.
- Click on the “Insert” tab in the menu bar and select “Chart”.
- In the sidebar that appears, click on the “Sheets” tab.
- A list of your available Google Sheets files will be displayed. Select the one you want to embed into your slide.
- Click the “Insert” button, and the chosen spreadsheet will be inserted into your slide as an interactive object.
By embedding the Google Sheets spreadsheet, any updates or changes made to the original document will automatically reflect in your Google Slides presentation. This ensures that you always have the most up-to-date data displayed.
After embedding the spreadsheet, you can easily resize, reposition, and customize it to fit your slide layout. You can also specify which sheet or range of cells from your Google Sheets document you want to display in the embedded version.
Another advantage of embedding a Google Sheets spreadsheet is the ability to interact with the data directly within the slide. Viewers can scroll through the different sheets, apply filters, and sort the data without leaving the presentation.
Furthermore, if you want to make any changes to the embedded spreadsheet’s presentation in Google Slides, you can simply right-click on the embedded sheet and select “Open source”. This will open the original Google Sheets document in a new tab, allowing you to make edits or updates as needed.
Overall, embedding a Google Sheets spreadsheet in Google Slides offers a seamless way to incorporate live data into your presentation. It ensures that your information remains dynamic and provides viewers with an interactive experience, all while maintaining the convenience and accessibility of Google’s suite of tools.
Option 2: Uploading an Excel Spreadsheet
If you have an Excel spreadsheet that you want to include in your Google Slides presentation, you can easily upload and convert it to a Google Sheets file. Follow these steps to upload an Excel spreadsheet:
- Open Google Slides and go to the slide where you want to insert the spreadsheet.
- Click on the “Insert” tab in the menu bar and select “Chart”.
- In the sidebar that appears, click on the “Sheets” tab.
- Next, click on the “Upload” button.
- Select the Excel spreadsheet file from your computer that you want to upload.
- Google Slides will upload and convert the Excel spreadsheet to a Google Sheets file.
- Finally, the newly converted Google Sheets file will be inserted into your slide.
Once your Excel spreadsheet is converted to a Google Sheets file and inserted into your Google Slides presentation, you can modify and format the data just like any other sheet.
It’s worth noting that the converted Google Sheets file will be separate from the original Excel spreadsheet. Any updates or changes you make to the Excel spreadsheet in the future will not automatically reflect in the Google Slides presentation. To keep the data in sync, you will need to upload the updated version of the Excel spreadsheet and replace the previously inserted Google Sheets file.
By uploading an Excel spreadsheet into Google Slides, you can take advantage of the collaborative features and easy sharing options that Google’s suite of tools provides. This option allows you to seamlessly integrate Excel data into your presentations while still benefiting from the convenience and accessibility of Google Slides.
Option 3: Inserting a Table
If you don’t have a specific spreadsheet but still want to include tabular data in your Google Slides presentation, you can easily insert a table directly within the slides. Here’s how you can do it:
- Open your Google Slides presentation and navigate to the slide where you want to insert the table.
- Click on the “Insert” tab in the menu bar and select “Table”.
- A grid of cells will appear on your slide, representing the table. You can click and drag to resize the table and add or remove rows and columns as needed.
- Double-click inside a cell to begin typing in your data. You can also copy and paste data from other sources such as Excel or Google Sheets.
- To format the table, you can select individual cells, rows, or columns and use the formatting options available in the menu bar. This includes changing font styles, cell colors, borders, and more.
Inserting a table directly in Google Slides gives you the flexibility to create and customize tabular data on the fly. It is particularly useful when you don’t have a pre-existing spreadsheet or when you want to present a small set of data without the need for a full-fledged spreadsheet.
Once you have inserted the table, you can easily move and resize it as needed to fit your slide layout. You can also apply different table styles and themes to match the overall design of your presentation.
Another advantage of inserting a table in Google Slides is the ability to collaborate and make real-time changes to the table with the help of your team or audience during a presentation. This can be particularly useful in situations where you want to collect feedback or gather input from others.
With the ability to insert and format tables directly in Google Slides, you have the flexibility to present tabular data effectively while maintaining the convenience and accessibility offered by the platform.
Modifying the Spreadsheet in Google Slides
Once you have inserted a spreadsheet into your Google Slides presentation, you can modify and customize it to suit your needs. Here are some key ways you can make changes to the spreadsheet:
- Resize and Reposition: To resize the spreadsheet, simply click and drag the corner or edge of the embedded spreadsheet. You can also reposition it by clicking and dragging it to a new location on the slide.
- Edit Data: To edit the data within the spreadsheet, double-click on a cell and start typing. You can make changes to existing data or add new data directly within the slide.
- Format Cells: To format cells, select the cells you want to modify and use the formatting options in the toolbar to change font styles, cell background color, borders, and more.
- Apply Filters and Sort: If your spreadsheet contains a lot of data, you can apply filters to specific columns to quickly narrow down the data shown. You can also sort the data in ascending or descending order for better presentation.
- Add Charts and Graphs: Google Slides offers a variety of chart and graph options that you can insert into the spreadsheet. These visualizations can help present the data in a more visually engaging manner.
- Link to Other Slides: You can create a link from certain cells or elements within the spreadsheet to other slides in your presentation. This allows you to navigate to a specific slide based on user interaction with the embedded spreadsheet.
Modifying the spreadsheet within Google Slides is a straightforward process that offers a level of flexibility and functionality. By adjusting the elements of the spreadsheet, you can customize it to convey your information effectively and visually appeal to your audience.
It’s important to note that any changes made to the embedded spreadsheet in Google Slides will not affect the original file in Google Sheets or Excel. The changes are limited to the presentation itself, ensuring that you have control over the content without impacting the original data source.
By utilizing these modification options, you can enhance the visual presentation of your data and present it in a way that supports your overall message and engages your audience.
Adjusting the Display Settings
Google Slides offers several display settings that allow you to customize how the embedded spreadsheet appears in your presentation. Here are some key ways to adjust the display settings:
- Size and Proportion: You can resize the embedded spreadsheet by clicking and dragging the corners or edges. This allows you to adjust the size and proportion to fit your slide layout and ensure optimal visibility for your audience.
- Aspect Ratio: You can change the aspect ratio of the embedded spreadsheet to match the slide or presentation’s aspect ratio. This ensures that the spreadsheet fills the slide properly without distortion or stretching.
- Fullscreen Mode: You can enable fullscreen mode for the embedded spreadsheet, allowing it to occupy the entire slide. This is useful when you want to focus the audience’s attention solely on the data presented.
- Rotation and Flip: If you want to change the orientation of the embedded spreadsheet, you can rotate it by right-clicking on the sheet and selecting “Rotate”. You can also flip it horizontally or vertically to accommodate specific design preferences.
- Background and Transparency: You can modify the background color or add transparency to the embedded spreadsheet. This can help integrate it seamlessly into your slide design or highlight specific data points.
- Hide Gridlines and Headers: To enhance the visual appearance of the embedded spreadsheet, you can choose to hide gridlines and headers. This can create a more polished and streamlined presentation of your data.
- Slide Transition: You can apply slide transitions to the slide containing the embedded spreadsheet. This allows for a seamless flow between slides and enhances the overall visual experience during presentations.
By adjusting the display settings, you can optimize the appearance of the embedded spreadsheet within your Google Slides presentation. This enables you to deliver a visually appealing and well-structured presentation that effectively showcases your data.
Keep in mind that these display settings are specific to the embedded spreadsheet in Google Slides and do not affect the original file in Google Sheets or Excel. Therefore, you have the flexibility to tailor the presentation of the data without altering the underlying dataset.
Take advantage of these display settings to create a visually captivating presentation that enhances the clarity and impact of your spreadsheet data.
Working with Links and Formulas
In Google Slides, you can incorporate links and formulas into your embedded spreadsheet to enhance its functionality and provide additional value to your audience. Here’s how you can work with links and formulas in your Google Slides presentation:
- Adding Links: You can create clickable links within the spreadsheet to direct viewers to external websites, documents, or other slides within your presentation. Simply select the cell or text you want to link, right-click, and choose “Link”. Then, enter the URL or choose the slide you want to link to.
- Updating Links: If you need to modify or update the links in your embedded spreadsheet, you can do so by right-clicking on the linked cell or text and selecting “Edit link”. This allows you to change the URL or the linked slide as needed.
- Using Formulas: Google Sheets’ powerful formula capabilities can be utilized even within the embedded spreadsheet in Google Slides. You can create formulas to perform calculations, manipulate data, or generate dynamic content based on the values in other cells or ranges.
- Referencing Data: You can reference data from other cells or sheets within the same embedded spreadsheet to display calculated results or update data dynamically. By using cell references, you can ensure that your presentation reflects the most up-to-date information.
- Collaborative Formulas: Because Google Slides allows real-time collaboration, multiple users can work on the same embedded spreadsheet simultaneously. This means you can collaborate on formulas, troubleshoot errors, and refine calculations together with your team.
- Data Validation: Google Sheets offers data validation options for cells, allowing you to restrict the type of data that can be entered. You can apply data validation to cells within the embedded spreadsheet to maintain data integrity and consistency.
Working with links and formulas gives you the ability to create interactive and dynamic spreadsheets within your Google Slides presentation. By incorporating relevant links and utilizing powerful formulas, you can provide additional context, functionality, and insights to your audience.
Remember, any changes made to the links or formulas within the embedded spreadsheet in Google Slides will not affect the original file in Google Sheets or Excel. This maintains the integrity of your data while allowing you to tailor your presentation for maximum impact.
By leveraging the capabilities of links and formulas, you can create a more interactive and informative presentation that engages your audience and enhances the overall effectiveness of your embedded spreadsheet.
Collaborating on the Spreadsheet
One of the standout features of Google Slides is its ability to facilitate seamless collaboration. This extends to the embedded spreadsheet, allowing multiple users to work together on the same document in real-time. Here’s how you can collaborate on the spreadsheet within your Google Slides presentation:
- Real-time Editing: When multiple users are working on the embedded spreadsheet, you can see their edits in real-time. This enables instant collaboration and promotes efficient teamwork.
- Comments and Suggestions: Users can leave comments and suggestions on specific cells or ranges within the spreadsheet. This feature encourages collaboration and fosters communication between team members.
- Version History: Google Slides keeps a detailed version history for the embedded spreadsheet, allowing you to review changes, revert to previous versions, or restore deleted data if needed. This ensures that you can track and manage edits effectively.
- Permissions and Sharing: You can easily control who has access to the embedded spreadsheet by setting permissions in Google Slides. You can grant different levels of access, such as editing, commenting, or view-only, to collaborators, ensuring privacy and security.
- Notifications: Google Slides provides notifications for changes and comments made to the embedded spreadsheet. This keeps everyone involved in the collaboration process up to date with the latest developments.
- Simultaneous Editing: With the ability to have multiple users edit the embedded spreadsheet at the same time, you can have a collaborative working session where everyone can see changes in real-time. This promotes creativity, efficiency, and teamwork.
- Chat and Video Calls: Alongside the collaborative features of Google Slides, you can use the integrated chat and video call functions to communicate with your team members while working on the embedded spreadsheet. This enhances communication and ensures a seamless collaboration experience.
Collaborating on the spreadsheet within Google Slides opens up a world of possibilities for teams working together on data analysis, creating reports, or making data-driven decisions. The ability to edit, comment, and track changes in real-time keeps everyone on the same page and fosters productive collaboration.
By leveraging the collaborative features of Google Slides, you can tap into the collective expertise and ideas of your team, leading to more accurate and impactful presentations.
Take advantage of the collaboration capabilities provided by Google Slides and empower your team to work together seamlessly on the embedded spreadsheet within your presentation.
Benefits of Using a Spreadsheet in Google Slides
Incorporating a spreadsheet in your Google Slides presentation offers numerous advantages that can enhance your overall presentation and data visualization. Here are some key benefits of using a spreadsheet in Google Slides:
- Convenience and Accessibility: With Google Slides, you can access your spreadsheets from anywhere with an internet connection, making it easy to collaborate and present on the go.
- Seamless Integration: Google Slides allows you to insert, embed, and modify spreadsheets directly within your presentation, streamlining the process and ensuring a cohesive flow for your audience.
- Real-time Updates: When you embed a Google Sheets spreadsheet in Google Slides, any changes made to the original spreadsheet will automatically update in the presentation, ensuring the data is always up-to-date.
- Interactive Data Visualization: Google Slides provides various formatting options and chart types to help you create visually appealing charts and graphs, making it easy for your audience to understand complex data.
- Collaboration and Feedback: Google Slides supports real-time collaboration, allowing multiple users to work on the same spreadsheet simultaneously. Viewers can also leave comments and suggestions, fostering an environment for effective feedback and collaboration.
- Easy Sharing: Sharing your presentation with others is hassle-free in Google Slides. You can grant specific permissions to each collaborator and control who can edit, comment, or view the spreadsheet content.
- Dynamic Presentations: Embedding a live spreadsheet adds dynamism to your presentation. You can update the data and formulas in real-time, creating engaging and interactive presentations that respond to audience input or changes to the dataset.
- Data Integrity: Google Sheets provides built-in data validation and protection features, ensuring the accuracy and security of your data within the embedded spreadsheet.
- Efficient Workflow: By seamlessly incorporating a spreadsheet into your presentation, you eliminate the need for switching between applications, saving time and effort in preparing and delivering your content.
These benefits of using a spreadsheet in Google Slides empower you to create compelling presentations that make data more accessible, engaging, and impactful. Whether you need to share data insights, present financial information, or collaborate on analytics, the integration of spreadsheets in Google Slides offers a powerful platform for effective data visualization and communication.