
What is an Email Alias?
An email alias is an alternative email address that forwards messages to your primary email account. It serves as a virtual mask, allowing you to manage multiple email addresses without creating separate accounts.
When you create an email alias, you can use it to send and receive emails, just like with your primary email address. However, the alias does not have its own inbox or storage; instead, it directs messages to your main email account, ensuring all your emails are centralized.
Email aliases are commonly used for various purposes. For example, you may want to create separate email addresses for work, personal, or online transactions to better organize your inbox and maintain privacy.
Furthermore, email aliases can be useful for filtering and managing incoming emails. You can set up rules or filters to automatically sort messages based on the alias they were sent to, simplifying the process of organizing your inbox and reducing clutter.
It is important to note that email aliases do not provide a separate login credential or mailbox. They are merely forwarding addresses that redirect messages to your primary email account. This means that replies to emails sent from an alias will appear as if they were sent from your primary email address.
Differences between Email Alias and Email Forwarding
Email alias and email forwarding are both methods that allow you to manage multiple email addresses, but they differ in how they function and their purpose.
Email alias:
- An email alias is an additional email address that forwards messages to your primary email account. It acts as a mask for your primary email address.
- You can create multiple email aliases, each serving different purposes such as work, personal, or online transactions.
- Email aliases do not have their own inbox or storage. Instead, they redirect messages to your primary email account.
- You can send and receive emails using an email alias, and replies will appear as if they were sent from your primary email address.
- Email aliases can be helpful for organizing incoming emails, as you can use filters or rules to sort messages based on the alias they were sent to.
Email forwarding:
- Email forwarding is a process of redirecting incoming emails from one email address to another.
- You can set up email forwarding to automatically send all messages received in one email account to another specified email address.
- Email forwarding can be useful when you want to consolidate multiple email accounts into one primary account.
- Unlike email aliases, email forwarding does not allow you to send emails from the forwarded address. It only redirects incoming messages.
- Email forwarding can be temporary or permanent, and you can choose to keep a copy of the forwarded messages in the original account or not.
Benefits of Using an Email Alias
Using an email alias can bring several benefits to your email management and online communication. Here are some advantages:
1. Organization: Email aliases allow you to create separate email addresses for different purposes, such as work, personal, or online shopping. This helps you keep your inbox organized and easily identify the source or type of emails you receive.
2. Privacy and Security: When you use an email alias, you can keep your primary email address private. By using aliases for online registrations, subscriptions, or online transactions, you can protect your primary email address from potential spam, phishing attempts, or data breaches.
3. Email Filtering: With email aliases, you can set up rules or filters to automatically sort incoming emails based on the alias they were sent to. This allows you to manage and prioritize your emails more efficiently, reducing inbox clutter.
4. Easy Email Address Management: Rather than creating separate email accounts for different purposes, email aliases allow you to manage multiple email addresses from a single mailbox. This simplifies the process of checking and responding to emails, as you don’t need to log in and out of different accounts.
5. Professionalism: If you have a small business or a freelance career, using an email alias that matches your domain name can give you a more professional appearance. It creates a cohesive branding experience for your clients or customers.
6. Flexibility: Email aliases offer flexibility in managing different aspects of your online presence. You can easily create and delete aliases as needed, allowing you to adapt to changing circumstances, such as when switching jobs or closing an online store.
7. Backup and Recovery: In the event of a temporary issue or downtime with your primary email account, having an email alias ensures that you can still receive important emails. It acts as a backup solution, ensuring you don’t miss any critical messages.
By taking advantage of the benefits offered by email aliases, you can streamline your email management, improve security, and enhance your overall online communication experience.
How to Create an Email Alias in Outlook
Creating an email alias in Outlook is a straightforward process that allows you to manage multiple email addresses within a single Outlook account. Follow these steps to create an email alias:
1. Open Outlook: Launch the Outlook application on your computer or access the Outlook website and sign in to your account.
2. Access Account Settings: Once you’re in Outlook, go to the settings menu. In the desktop application, click on “File” and select “Account Settings.” If you’re using the Outlook website, click on the gear icon in the top-right corner and choose “Options,” then select “Mail” and click on “Email Aliases.”
3. Add an Alias: In the Account Settings or Email Aliases section, look for the option to add an alias. Click on “Add” or “Create Alias” to proceed.
4. Enter Alias Details: Provide the desired alias in the appropriate field. This can be any unique name or phrase that is not already in use. Choose the domain associated with your Outlook account (e.g., outlook.com, hotmail.com, or custom domain).
5. Confirm or Customize: Outlook might suggest different variations of the alias based on availability. Review these suggestions or customize the alias if needed. Once you’re satisfied, click on “Save” or “Create” to finalize the alias creation.
6. Verification: Outlook may require you to verify the alias before it becomes active. This helps ensure that you have access to the email address provided. Follow the verification steps, which typically involve clicking on a verification link sent to the alias email address.
7. Start Using the Alias: Once the alias is verified, it is ready to use. You can send and receive emails using the alias, and all correspondences will be redirected to your primary Outlook account.
Remember, the emails you send from an alias will appear as if they were sent from your primary account. To distinguish between aliases and your primary email address, you can set up rules or filters within Outlook to manage incoming messages based on the alias they were addressed to.
Creating an email alias in Outlook gives you the flexibility to manage multiple email addresses without the need for separate accounts, simplifying your email management process.
Step-by-Step Guide: Creating an Email Alias in Outlook
Creating an email alias in Outlook allows you to manage multiple email addresses within a single account. Follow this step-by-step guide to create an email alias in Outlook:
1. Open Outlook: Launch the Outlook application on your computer or go to the Outlook website and log in to your account using your credentials.
2. Access Account Settings: In the Outlook desktop application, click on the “File” tab at the top-left corner of the window. From the dropdown menu, select “Account Settings” and then choose “Manage Profiles.” If you’re using the Outlook website, click on the gear icon in the top-right corner and select “Options.” Then, under “Options,” click on “Mail,” followed by “Email Aliases.”
3. Create an Alias: In the Account Settings or Email Aliases section, click on the “Add” or “Create Alias” button to create a new alias.
4. Enter Alias Details: A form will appear where you can enter the desired alias. Type in the name or phrase you want to use for the alias, ensuring it is unique and not already in use. Choose the domain associated with your Outlook account from the dropdown menu.
5. Customize if Needed: Outlook may provide suggestions for variations of the alias based on availability. Review these suggestions or customize the alias further according to your preference.
6. Save the Alias: Once you are satisfied with the alias, click on the “Save” or “Create” button to save the alias to your Outlook account.
7. Verify the Alias: Outlook may require you to verify ownership of the alias by sending a verification email to the corresponding email address. Check your inbox for the verification email and follow the provided instructions to complete the verification process.
8. Start Using the Alias: Once the alias is verified, it will become active. You can start using the alias to send and receive emails. The emails sent to the alias will be redirected to your primary Outlook account.
Remember to set up filters or rules within Outlook to manage incoming emails based on the alias they were sent to. This will help you organize and filter the messages received through your alias.
By following these simple steps, you can create an email alias in Outlook and enjoy the convenience of managing multiple email addresses within a single account.
How to Create an Email Alias in Outlook.com
Creating an email alias in Outlook.com allows you to manage multiple email addresses within a single account. Follow these steps to create an email alias:
1. Sign in to Outlook.com: Go to the Outlook.com website and sign in to your Outlook account using your username and password.
2. Access Account Settings: Once you’re logged in, click on the gear icon in the top-right corner of the Outlook.com interface. From the dropdown menu, select “View all Outlook settings.”
3. Navigate to Email Aliases: In the Settings menu, select “Mail” from the left-hand sidebar. Then, click on “Sync email” under the “Sync settings” section. Scroll down to find the “Create Outlook alias” option and click on it.
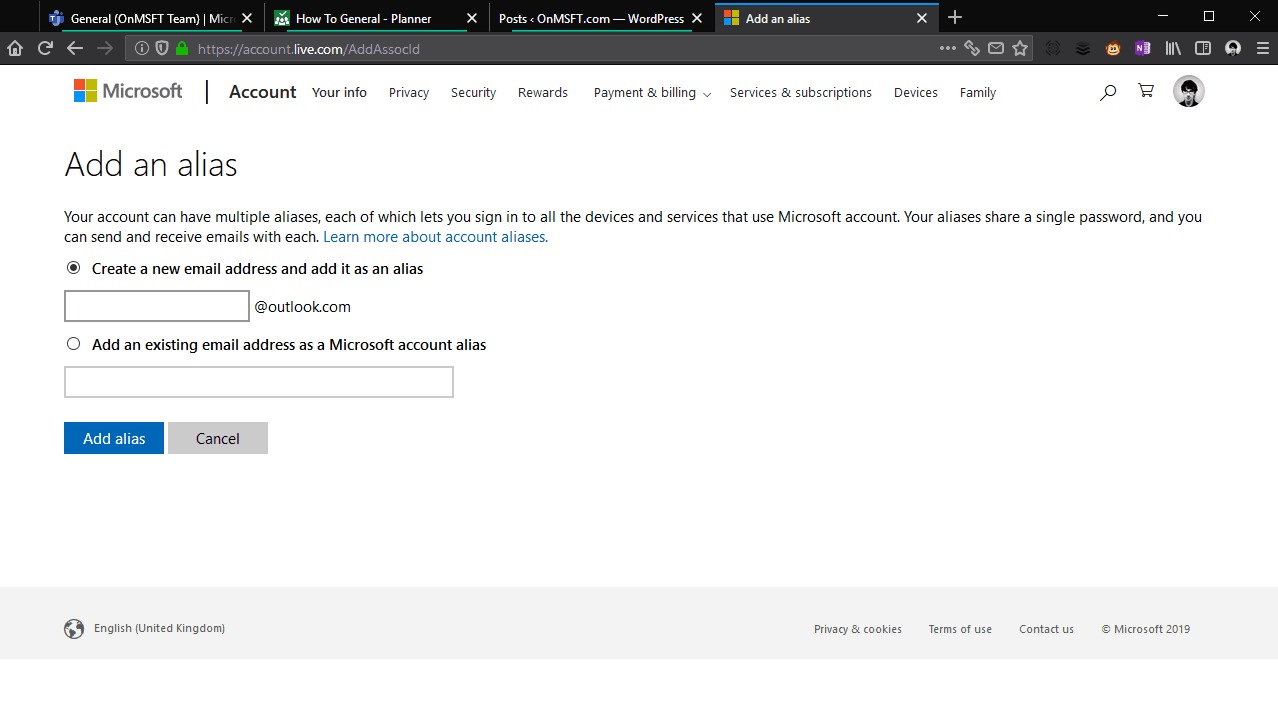
4. Create Alias: In the “Create an Outlook alias” window, enter the desired email address alias in the provided field. Choose the domain associated with your Outlook.com account from the dropdown menu.
5. Customize if Needed: Outlook.com may suggest variations of the alias based on availability. Review these suggestions or customize the alias further according to your preference.
6. Save the Alias: Once you’re satisfied with the alias, click on the “Add alias” or “Save” button to create the alias and associate it with your Outlook.com account.
7. Verify the Alias: Outlook.com may require you to verify ownership of the alias by sending a verification email to the corresponding email address. Check your inbox for the verification email and follow the provided instructions to complete the verification process.
8. Start Using the Alias: Once the alias is verified, it will become active. You can start using the alias to send and receive emails through your Outlook.com account. The emails sent to the alias will be redirected to your primary Outlook.com inbox.
Remember to set up filters or rules within Outlook.com to manage incoming emails based on the alias they were sent to. This will help you keep your inbox organized and efficiently manage your emails.
Creating an email alias in Outlook.com allows you to manage multiple email addresses conveniently within the same account, providing flexibility and control over your email communication.
Step-by-Step Guide: Creating an Email Alias in Outlook.com
Creating an email alias in Outlook.com allows you to manage multiple email addresses within a single account. Follow this step-by-step guide to create an email alias:
1. Sign in to Outlook.com: Go to the Outlook.com website and log in to your Outlook account using your username and password.
2. Access Account Settings: Once you’re logged in, click on the gear icon in the top-right corner of the Outlook.com interface. From the dropdown menu, select “View all Outlook settings.”
3. Navigate to Email Aliases: In the Settings menu, select “Mail” from the left-hand sidebar. Then, click on “Sync email” under the “Sync settings” section. Scroll down to find the “Create Outlook alias” option and click on it.
4. Create an Alias: In the “Create an Outlook alias” window, enter the desired email address alias in the provided field. Choose the domain associated with your Outlook.com account from the dropdown menu.
5. Customize if Needed: Outlook.com may provide suggested variations of the alias based on availability. Review these suggestions or customize the alias further according to your preference.
6. Save the Alias: Once you’re satisfied with the alias, click on the “Add alias” or “Save” button to create the alias and associate it with your Outlook.com account.
7. Verify the Alias: Outlook.com may require you to verify ownership of the alias by sending a verification email to the corresponding email address. Check your inbox for the verification email and follow the provided instructions to complete the verification process.
8. Start Using the Alias: Once the alias is verified, it will become active. You can start using the alias to send and receive emails through your Outlook.com account. The emails sent to the alias will be redirected to your primary Outlook.com inbox.
Remember to set up filters or rules within Outlook.com to manage incoming emails based on the alias they were sent to. This will help you keep your inbox organized and efficiently manage your emails.
By following these simple steps, you can easily create an email alias in Outlook.com and enjoy the convenience of managing multiple email addresses within a single account.
Managing Email Aliases in Outlook and Outlook.com
Once you’ve created email aliases in Outlook or Outlook.com, it’s important to understand how to manage them effectively. Here are some essential aspects to consider:
1. Adding or Removing Aliases: You can add additional email aliases to your Outlook or Outlook.com account at any time. Simply follow the steps outlined in the respective platform’s settings menu to create a new alias. If you no longer need an alias, you can remove it from your account to keep your email management streamlined.
2. Setting a Primary Alias: In Outlook and Outlook.com, you have the option to set a primary alias. The primary alias is used by default when sending emails from your account. You can select a different alias as the primary if desired, making it the default address for outgoing messages.
3. Forwarding Emails: If you prefer to receive the emails sent to your aliases in a different email account, you can set up email forwarding. In the settings menu, you will find options to forward emails received on specific aliases to another email address of your choice.
4. Alias Visibility: Outlook and Outlook.com allow you to control the visibility of your email aliases. You can choose to keep an alias private or make it visible to others when sending emails. This flexibility allows you to decide whether to disclose your primary email address or use an alias for communication purposes.
5. Managing Filters and Rules: Use filters and rules to automatically route incoming emails based on the alias they are addressed to. This can help keep your inbox organized and ensure that emails sent to different aliases are properly sorted.
6. Updating Alias Preferences: In the settings menu, you can make changes to your alias preferences, such as updating the display name associated with an alias or modifying forwarding options. Take advantage of these customization features to tailor your aliases to your specific needs.
By understanding and effectively managing your email aliases in Outlook and Outlook.com, you can maintain control over your email communication and streamline your inbox. Regularly review and update your alias settings to ensure they continue to meet your requirements and offer a seamless email experience.
How to Delete an Email Alias in Outlook
If you no longer need an email alias in Outlook, you can easily delete it from your account. Follow these steps to delete an email alias:
1. Open Outlook: Launch the Outlook application on your computer or access the Outlook website and sign in to your account.
2. Access Account Settings: Once you’re in Outlook, go to the settings menu. In the desktop application, click on “File” and select “Account Settings.” If you’re using the Outlook website, click on the gear icon in the top-right corner and choose “Options,” then select “Mail” and click on “Email Aliases.”
3. Locate the Alias: In the Account Settings or Email Aliases section, find the email alias you want to delete. It will be listed under the “Alias” or “Email Address” column.
4. Delete the Alias: Look for the option to delete the alias, usually represented by a trash bin icon or a “Remove” button. Click on it.
5. Confirmation: Outlook will ask you to confirm the deletion of the email alias. Read the prompt carefully to make sure you are deleting the correct alias. If you are sure you want to proceed, confirm the deletion.
6. Verify the Deletion: After confirming the deletion, the alias will be immediately removed from your account. Double-check the list of aliases to ensure that the deleted alias is no longer present.
Remember that once you delete an email alias, it cannot be undone. Any emails sent to the deleted alias will no longer be redirected to your account, so make sure to update any necessary accounts or contacts with your primary email address.
Deleting unnecessary email aliases can help keep your account organized and streamline your email management process. Regularly review your aliases and remove any that are no longer needed to maintain a clean and efficient Outlook experience.
Step-by-Step Guide: Deleting an Email Alias in Outlook
If you no longer need an email alias in Outlook, you can easily delete it from your account. Follow this step-by-step guide to delete an email alias:
1. Open Outlook: Launch the Outlook application on your computer or access the Outlook website and sign in to your account.
2. Access Account Settings: In the Outlook desktop application, click on the “File” tab at the top-left corner of the window. From the dropdown menu, select “Account Settings” and then choose “Manage Profiles.” If you’re using the Outlook website, click on the gear icon in the top-right corner and select “Options.” Then, under “Options,” click on “Mail,” followed by “Email Aliases.”
3. Find the Alias to Delete: In the Account Settings or Email Aliases section, locate the email alias that you want to delete. It will be listed under the “Alias” or “Email Address” column.
4. Select the Alias: Click on the alias name or select the checkbox next to it to highlight the alias you wish to delete.
5. Delete the Alias: Look for the option to delete the alias, usually represented by a trash bin icon or a “Remove” button. Click on it.
6. Confirmation: Outlook will prompt you to confirm the deletion of the email alias. Make sure you have selected the correct alias for deletion. If you are certain, proceed with confirming the deletion.
7. Verify the Deletion: After confirming the deletion, the email alias will be immediately removed from your account. Double-check the list of aliases to ensure that the deleted alias is no longer listed.
Remember that deleting an email alias is a permanent action, and once it is deleted, you cannot retrieve the alias. Any emails sent to the deleted alias will no longer be redirected to your account. Ensure that you update any necessary accounts or contacts with your primary email address after deleting an alias.
Regularly reviewing and deleting unnecessary email aliases can help declutter your account and streamline your email management process in Outlook.
How to Delete an Email Alias in Outlook.com
If you no longer need an email alias in Outlook.com, you can easily delete it from your account. Follow these steps to delete an email alias:
1. Sign in to Outlook.com: Go to the Outlook.com website and log in to your Outlook.com account using your username and password.
2. Access Account Settings: Once you’re logged in, click on the gear icon in the top-right corner of the Outlook.com interface. From the dropdown menu, select “View all Outlook settings.”
3. Navigate to Email Aliases: In the Settings menu, select “Mail” from the left-hand sidebar. Then, click on “Sync email” under the “Sync settings” section. Scroll down to find the list of your existing email aliases.
4. Delete the Alias: Locate the email alias you want to delete and click on the “Delete” or “Remove” button next to it.
5. Confirmation: Outlook.com will ask for confirmation before deleting the email alias. Review the information to ensure you have selected the correct alias for deletion. If you are sure you want to proceed, confirm the deletion.
6. Verify the Deletion: After confirming the deletion, the email alias will be immediately removed from your Outlook.com account. Double-check the list of aliases to ensure that the deleted alias is no longer displayed.
Remember that deleting an email alias is a permanent action, and once it is deleted, you cannot recover the alias. Any emails sent to the deleted alias will no longer be redirected to your account. It’s important to update any necessary accounts or contacts with your primary email address after deleting an alias.
Regularly reviewing and deleting unnecessary email aliases can help maintain a clean and organized Outlook.com account. By removing aliases that are no longer needed, you can streamline your email management and reduce clutter in your mailbox.
Step-by-Step Guide: Deleting an Email Alias in Outlook.com
If you no longer need an email alias in Outlook.com, you can easily delete it from your account. Follow this step-by-step guide to delete an email alias:
1. Sign in to Outlook.com: Go to the Outlook.com website and log in to your Outlook.com account using your username and password.
2. Access Account Settings: Once you’re logged in, click on the gear icon in the top-right corner of the Outlook.com interface. From the dropdown menu, select “View all Outlook settings.”
3. Navigate to Email Aliases: In the Settings menu, select “Mail” from the left-hand sidebar. Then, click on “Sync email” under the “Sync settings” section. Scroll down to find the list of your existing email aliases.
4. Select the Alias to Delete: Locate the email alias you want to delete from the list. Click on the checkbox beside the alias to select it.
5. Delete the Alias: At the top of the list of aliases, click on the “Delete” button. A confirmation dialog box will appear.
6. Confirmation: Confirm the deletion by clicking on “Yes.” Outlook.com will ask for confirmation to ensure the correct alias is being deleted.
7. Verify the Deletion: After confirming the deletion, the email alias will be immediately removed from your Outlook.com account. Check the list of aliases to ensure that the deleted alias is no longer present.
Remember that once an email alias is deleted, it cannot be recovered. Any emails sent to the deleted alias will no longer be redirected to your account. It is important to update any necessary accounts or contacts with your primary email address after deleting an alias.
Regularly reviewing and deleting unnecessary email aliases can help keep your Outlook.com account organized and reduce clutter. By removing aliases that are no longer needed, you can streamline your email management and maintain an efficient email workflow.
Follow these simple steps to delete an email alias in Outlook.com and ensure that your email communication remains streamlined and organized.
Troubleshooting Email Alias Issues in Outlook and Outlook.com
While using email aliases in Outlook and Outlook.com can enhance your email management, you may encounter certain issues or challenges along the way. Here are some common troubleshooting steps to resolve email alias issues:
1. Verify Alias Configuration: Double-check the settings for your email alias to ensure that it is properly configured. Verify that the alias is correctly associated with your account and that it is active and not expired.
2. Check Forwarding Settings: If you have set up email forwarding for your aliases, ensure that the forwarding settings are correct. Confirm that the emails sent to the alias are being redirected to the desired email address.
3. Confirm Email Delivery: If you are not receiving emails sent to your alias, check your spam or junk folders. Sometimes, emails from aliases can be filtered as spam by mistake. You can adjust your email filters or rules to ensure that emails sent to the alias are delivered to your inbox.
4. Verify Alias Availability: If you are experiencing issues while trying to create an alias, it may be because the desired alias is already taken. Try using a different name or variation and ensure that it is not already in use by another user.
5. Clear Cache and Cookies: Clearing the cache and cookies in your browser can resolve certain technical issues related to accessing and managing email aliases in Outlook.com. Close and reopen your browser, then try accessing your account again.
6. Updating Outlook Version: If you are using the Outlook desktop application, ensure that you have the latest version installed. Outdated versions may have compatibility issues that can affect the functionality of email aliases.
7. Contact Support: If none of the troubleshooting steps mentioned above resolve the issue, it may be necessary to contact the Outlook or Outlook.com support team. They can provide further assistance in diagnosing and resolving any technical problems specific to your account.
Remember to provide detailed information about the issue you are experiencing when reaching out to support. This will help them understand the problem better and provide you with more accurate and efficient solutions.
By following these troubleshooting steps, you can resolve common email alias issues in Outlook and Outlook.com, ensuring that your email communication remains smooth and hassle-free.