
Why You Need a Hotmail Signature in Outlook.com
When it comes to communicating via email, having a professional and informative signature can make a significant impact. Whether you’re a business professional, freelancer, or even a casual email user, a well-crafted signature in Outlook.com can help you make a lasting impression and enhance your overall branding.
Here are a few reasons why setting up a Hotmail signature in Outlook.com is essential:
- Promote your brand: Including your company logo, website link, and social media icons in your signature helps promote your brand and create awareness. It acts as a subtle yet effective marketing tool, driving traffic to your website and increasing your online presence.
- Provide important information: Your signature allows you to provide crucial contact information, such as your name, job title, phone number, and physical address. This makes it easier for recipients to get in touch with you and speeds up communication.
- Create a professional image: A well-designed signature adds a touch of professionalism to your emails. It showcases your attention to detail, credibility, and demonstrates that you take your communication seriously.
- Increase email engagement: An informative signature can include links to your latest blog post, a call-to-action, or even a special offer. By adding these elements, you can drive higher engagement rates and increase the chances of recipients taking action.
- Save time: With an automated signature in Outlook.com, you don’t have to manually type out your contact details or other relevant information in every email. It saves time, especially when you’re sending numerous emails daily.
Overall, having a Hotmail signature in Outlook.com is an essential component of effective email communication. It helps you showcase your professionalism, build your brand, and provide important details efficiently. By investing a little time in setting up your signature, you can make a lasting impression on your recipients while streamlining your workflow.
Step 1: Accessing the Outlook.com Settings
Setting up your Hotmail signature in Outlook.com is a straightforward process. Follow the steps outlined below to access the settings:
- Open your web browser and go to https://www.outlook.com.
- Sign in to your Outlook.com account using your Hotmail email address and password.
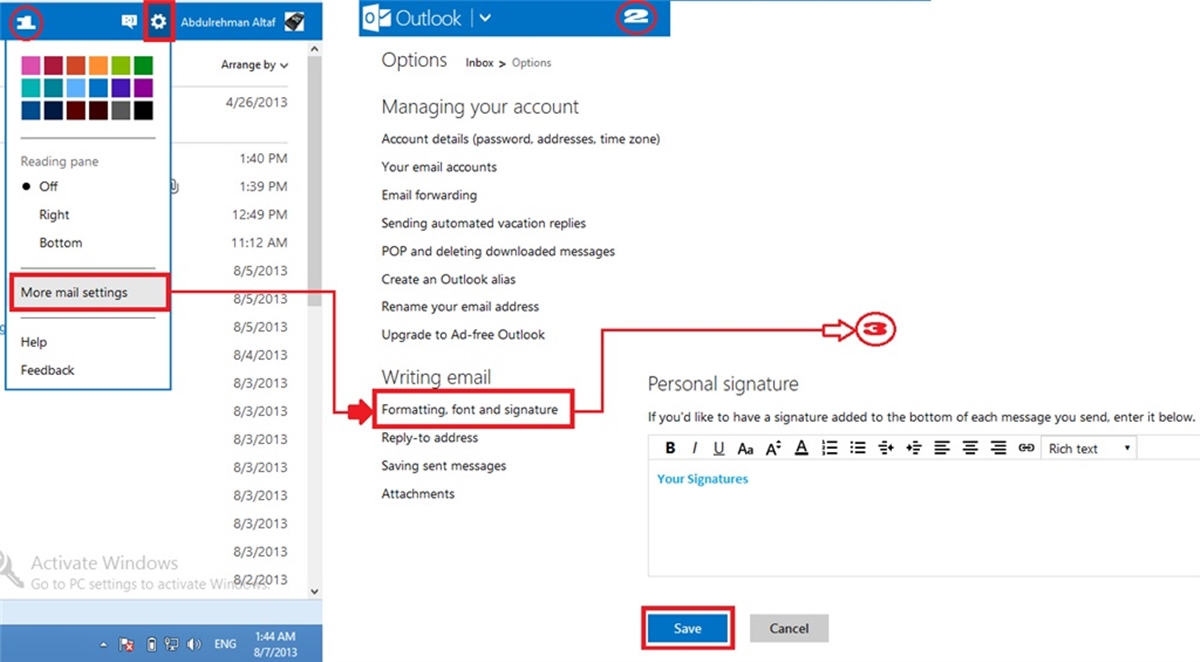
- Once you’re logged in, locate the settings icon in the top-right corner of the Outlook.com interface. It looks like a gear or cogwheel.
- Click on the settings icon, and a drop-down menu will appear. From the menu, select “View all Outlook settings” at the bottom.
- A new tab or window will open, displaying the Outlook.com settings.
- In the left sidebar, you’ll see various categories. Scroll down and click on “Mail” to access the email settings.
- Under the “Mail” category, look for the “Compose and reply” section. Click on it to expand the options.
- Within the “Compose and reply” section, click on “Email signature.”
You have now successfully accessed the Outlook.com settings required to create and customize your Hotmail signature. Now, it’s time to move on to the next step and begin crafting your signature to make it stand out.
Step 2: Creating a Signature in Outlook.com
To create your Hotmail signature in Outlook.com, follow the steps outlined below:
- In the “Email signature” section of the Outlook.com settings, you’ll see a text box where you can compose your signature. This is where you’ll enter the text, add formatting, and include any images or links you want.
- Start by typing your desired signature text in the text box. This can include your name, job title, contact information, and any other details you wish to include.
- Use the formatting options located above the text box to customize your signature further. You can make the text bold, italicized, underlined, or change the font and size to match your branding or personal preference.
- If you want to include an image, such as your company logo or a headshot, click on the “Image” icon in the formatting toolbar. Upload the image from your computer or choose one from your Outlook.com OneDrive.
- Once you’ve added the image, you can resize it by clicking and dragging the corners. Ensure that the image is visually appealing and not overly large to maintain a professional look.
- If you’d like to include links in your signature, use the “Link” icon in the formatting toolbar. Highlight the text you want to link and click on the icon. Enter the URL you want the text to link to and click “Insert.” You can add multiple links to different sections of your signature if desired.
- As you create your signature, periodically save your progress by clicking on the “Save” button located at the bottom of the settings page.
- Preview your signature by clicking on the “Preview” button. This allows you to see how your signature will appear in emails before finalizing it.
By following these steps, you can create a customized and professional Hotmail signature in Outlook.com. Remember to save your changes and proceed to the next step to further enhance and optimize your signature.
Step 3: Adding Text to Your Signature
Once you have accessed the Outlook.com settings and created a signature, it’s time to add text to personalize it. Follow these steps:
- In the signature text box, enter the desired text you want to include in your signature. This typically consists of your name, job title, and contact information.
- Consider including additional details such as your company name, website, social media profiles, or a professional tagline to make your signature more informative and engaging.
- If you want to emphasize certain parts of your signature, use the formatting options available in the formatting toolbar. You can make the text bold, italicized, underlined, or change the font size and color to match your preferences or branding.
- Ensure that your text is concise and easy to read. Use line breaks to separate different pieces of information, making your signature visually appealing and organized.
- Double-check the accuracy of the information you’ve added. Spelling errors or incorrect contact details can reflect poorly on your professionalism.
- As you make changes to your signature text, periodically save your progress by clicking on the “Save” button located at the bottom of the settings page to avoid losing any updates.
- Preview your signature by clicking on the “Preview” button to see how it will appear in your emails before finalizing it.
Remember, your signature should effectively represent your professional identity and provide relevant contact information to recipients. By adding text that is clear, concise, and informative, you can create a signature that makes a memorable impression and encourages recipients to connect with you.
Step 4: Customizing the Font and Color of Your Signature
To make your Hotmail signature in Outlook.com visually appealing and aligned with your brand, you can customize the font style and color. Follow these steps to personalize the look of your signature:
- In the signature text box within the Outlook.com settings, highlight the text you want to customize.
- Click on the formatting options available in the formatting toolbar to change the font style, size, and color. Experiment with different combinations to find the aesthetic that best reflects your professional branding.
- Choose a font that is legible and matches the overall tone of your signature. Common options include Arial, Helvetica, Times New Roman, or Calibri. Avoid using overly decorative or difficult-to-read fonts.
- If your brand has specific color schemes, select the appropriate colors for your text. This can be done by choosing from the color options available in the formatting toolbar or by inputting the hexadecimal code for the desired color.
- Consider using bold or italicized text to highlight important elements such as your name or job title.
- Remember to maintain consistency throughout your signature. Stick to the same font style and color, ensuring that it complements the overall design.
- Take into account the background color of your emails when selecting font and text colors. Make sure the text is easily readable against different backgrounds.
- Preview your signature by clicking on the “Preview” button to see how the customized font and color choices appear in your emails. Adjust if necessary to achieve the desired visual impact.
- Save your changes regularly by clicking on the “Save” button at the bottom of the settings page to ensure that your customizations are preserved.
By customizing the font and color of your Hotmail signature, you can create a professional and visually coherent signature that leaves a lasting impression on your email recipients.
Step 5: Including Images in Your Signature
Adding images to your Hotmail signature in Outlook.com can help enhance its visual appeal and reinforce your branding. Follow these steps to include images in your signature:
- Within the Outlook.com settings, locate the signature text box where you’ve typed your signature text.
- Click on the location within the text box where you want to insert an image.
- Look for the image icon in the formatting toolbar. Click on it to open the image insertion options.
- You can choose to upload an image from your computer by clicking on the “Upload” button. Alternatively, you can select an image from your Outlook.com OneDrive by clicking on the “OneDrive” option.
- Select the image you want to include in your signature and click “Insert.” The image will now appear in the signature text box at the designated location.
- Resize the image if necessary by clicking and dragging its corners. Ensure that the image is visually appealing and not too large, so it doesn’t overshadow other elements of your signature.
- If desired, you can further align or position the image within the text box by using the alignment options available in the formatting toolbar.
- Preview your signature by clicking on the “Preview” button to see how the image appears. Adjust the position and size if needed for optimum visual impact.
- Remember to save your changes by clicking on the “Save” button at the bottom of the settings page to ensure that the image remains in your signature.
When including images in your signature, it is crucial to optimize them for email usage. This means using compressed and appropriately sized images to ensure fast loading times for your recipients.
By incorporating images that align with your branding and messaging, you can create a visually striking Hotmail signature that helps you stand out and leaves a memorable impression on your email recipients.
Step 6: Adding Links to Your Signature
Adding links to your Hotmail signature in Outlook.com can direct recipients to your website, social media profiles, or other relevant online platforms. Follow these steps to include links in your signature:
- In the Outlook.com settings, locate the signature text box where you’ve typed your signature text.
- Highlight the text within the signature that you want to turn into a clickable link.
- In the formatting toolbar, look for the chain link icon or the word “Link.” Click on it to open the link insertion options.
- In the popup window, enter the URL or web address you want the highlighted text to link to. Double-check the accuracy of the URL to avoid broken links.
- Specify how the link should open. You can choose to open it in a new tab or within the current tab.
- Click “Insert” or “OK” to insert the link into the signature text box. The highlighted text will now be a clickable link.
- If you want to add additional links to different sections of your signature, repeat steps 2 to 6 for each link.
- Preview your signature by clicking on the “Preview” button to test the functionality of the links. Ensure they open as intended and test them on different devices and email clients if possible.
- Save your changes by clicking on the “Save” button at the bottom of the settings page to preserve the links in your signature.
Including links in your signature allows recipients to easily access your website, social media profiles, or other important resources. It enhances your professional image and encourages engagement with your online presence. Just make sure to use relevant and reliable links that align with your branding and messaging.
By adding clickable links to your Hotmail signature, you can provide recipients with convenient access to more information and increase the chances of them engaging with your online platforms.
Step 7: Configuring Signature Options
Configuring the signature options in Outlook.com allows you to determine when your Hotmail signature will be automatically added to your emails. Follow these steps to set up your signature options:
- Within the Outlook.com settings, navigate to the “Email signature” section where you’ve composed your signature.
- Under the signature text box, you’ll find different options to configure your signature settings.
- New messages: Choose whether you want your signature to be automatically added to new emails that you compose. Selecting “New messages” ensures consistency in your communication and helps promote your branding.
- Replies/forwards: Decide whether you want your signature to appear in the emails you reply to or forward. Enabling this option allows you to maintain a professional presence in all correspondence.
- Default signature: If you have multiple email accounts linked to Outlook.com, you can select which account should have this specific signature as the default. This is useful if you want different signatures for different email accounts.
- Sensitivity: If desired, you can choose to exclude your signature from emails marked as “Private” or “Confidential.” This helps maintain privacy when sharing sensitive information.
- Mobile: Decide whether you want your signature to be included in emails sent from your mobile device. Enabling this option ensures consistent branding across different devices.
- Adjust the options according to your preferences and requirements.
- Preview your signature by clicking on the “Preview” button to see how it appears based on your configured options.
- Save your changes by clicking on the “Save” button at the bottom of the settings page to activate the signature options.
Configuring the signature options allows you to customize when and how your Hotmail signature is applied to your emails. By carefully selecting the appropriate settings, you can ensure a consistent and professional representation of your brand in all communication.
Step 8: Saving Your Signature
After creating and customizing your Hotmail signature in Outlook.com, it’s crucial to save your signature to ensure it is applied to your emails. Follow these steps to save your signature:
- In the Outlook.com settings, navigate to the “Email signature” section where you’ve composed and customized your signature.
- Double-check that your signature is displaying correctly in the signature text box. Make sure the text, formatting, images, and links are all as intended.
- If you made any last-minute changes, review the signature preview by clicking on the “Preview” button to ensure everything appears as desired.
- Scroll to the bottom of the settings page and locate the “Save” button. It is usually positioned below the signature text box or at the very bottom of the page.
- Click on the “Save” button to save your signature. A confirmation message may appear, informing you that your changes have been saved.
- You can always revisit the Outlook.com settings in the future to make any updates or modifications to your signature as needed.
- Test your signature by creating a new email to yourself or a trusted recipient. Make sure the signature is applied correctly and that all the elements, such as images and links, are functioning as intended.
- If any issues are found during the testing phase, return to the Outlook.com settings and make the necessary adjustments to your signature.
- Keep in mind that if you have multiple devices or email clients, you may need to set up your signature separately for each one to ensure it is consistently included in your emails.
Saving your signature is a crucial step in the process, as it ensures your customized signature is applied to your emails. By following these steps, you can confidently save your Hotmail signature in Outlook.com and start using it in your email communications.
Step 9: Testing Your Signature in Outlook.com
Now that you have created and saved your Hotmail signature in Outlook.com, it’s important to test it to ensure it appears correctly in your email messages. Follow these steps to test your signature:
- Open a new email in Outlook.com by clicking on the “New message” or “Compose” button.
- Verify that your signature is automatically included at the bottom of the email. It should display the text, formatting, images, and links you have set up.
- Check that any images in your signature are loading properly and are appropriately sized within the email message.
- Test the functionality of any links included in your signature. Click on the links to ensure they navigate to the correct web pages or resources.
- Verify that the signature appears correctly in both new emails and in email replies or forwards.
- If your signature includes social media icons or logos, click on them to confirm that they successfully link to your respective social media profiles.
- Review the overall visual appearance of the signature in the email. Ensure that the font, color, and alignment are consistent with your branding and visually appealing.
- Send a test email to yourself or a trusted contact to verify that the signature appears as intended in their email client or device.
- If any issues are discovered during the testing process, return to the Outlook.com settings and make the necessary adjustments to your signature. Repeat the testing steps until it appears correctly.
- Perform periodic tests on different devices and email clients to ensure that your Hotmail signature appears consistently across platforms.
By thoroughly testing your Hotmail signature in Outlook.com, you can ensure it appears correctly and professionally in your email messages. This step is crucial for guaranteeing a positive impression and effective communication with your recipients.
Tips for a Professional and Effective Signature
A well-crafted signature can significantly enhance your professional image and make a lasting impression on recipients. Here are some tips to create a professional and effective Hotmail signature in Outlook.com:
- Keep it concise: Your signature should be concise and focused. Include only the most essential information, such as your name, job title, and contact details. Avoid cluttering it with unnecessary information.
- Use a professional email address: Ensure that the email address associated with your signature is professional and appropriate for business communication. Avoid using personal or unprofessional email addresses.
- Add a professional photo: Consider including a professional headshot in your signature. It adds a personal touch and helps recipients put a face to your name.
- Make it mobile-friendly: With the rising use of mobile devices for email communication, ensure that your signature is mobile-friendly and displays properly on small screens. Test it on different devices to ensure optimal responsiveness.
- Consider branding: Incorporate branding elements such as your company logo and color scheme into your signature. This helps to reinforce your brand identity and make your emails recognizable.
- Use consistent formatting: Maintain consistent formatting throughout your signature. Use the same font style, size, and colors for a cohesive and professional appearance.
- Include social media links: If applicable, add links to your professional social media profiles. This allows recipients to connect with you beyond email and promotes your online presence.
- Optimize images: Ensure that any images you include in your signature are properly optimized for email and do not slow down email loading times. Compress images and use appropriate file formats to keep the file size small.
- Update information regularly: Regularly review your signature to make sure that your contact details, job title, and other relevant information are current. Outdated information can create confusion and appear unprofessional.
- Avoid excessive design elements: Keep your signature clean and professional by avoiding excessive design elements, flashy animations, or large, distracting images. The focus should be on providing essential information rather than unnecessary visual elements.
By following these tips, you can create a professional and effective Hotmail signature in Outlook.com. Remember, your signature is an important tool for branding, communication, and making a positive impression on your recipients.