
Why is Changing the ‘From’ Name Important?
The ‘From’ name is the first thing recipients see when they receive an email from you. It is what establishes your identity and sets the tone for your communication. Therefore, being able to change the ‘From’ name is essential for several reasons:
- Personalization: Changing the ‘From’ name allows you to personalize your emails and establish a stronger connection with your recipients. Using your real name or a recognizable brand name can increase trust and engagement.
- Brand Consistency: For businesses, maintaining brand consistency across all communication channels is crucial. By changing the ‘From’ name to your company name or a specific department, you ensure that recipients immediately recognize your brand and associate the email with your organization.
- Relevance: When sending emails to different segments or groups of recipients, changing the ‘From’ name enables you to customize the sender information to make it more relevant. For example, if you are running a marketing campaign targeting a specific demographic, you can customize the ‘From’ name to resonate with that audience, increasing the chances of your email being opened and read.
- Avoiding Spam Filters: Unfortunately, some email filters may categorize emails with generic ‘From’ names as spam. By changing the ‘From’ name to a recognizable name or company, you might increase the likelihood of your emails reaching the recipient’s inbox rather than being filtered out.
- Clarity and Recognition: Sometimes, you may have multiple email addresses associated with different roles or departments. Changing the ‘From’ name allows you to differentiate between these addresses, making it easier for recipients to recognize the purpose of the email and respond accordingly.
Overall, changing the ‘From’ name is a small but crucial aspect of email communication. It allows you to personalize, enhance brand recognition, improve relevancy, avoid spam filters, and ensure clarity in your email exchanges. Now, let’s dive into the steps you can follow to change the ‘From’ name in your email provider settings.
Step 1: Determine the Email Provider You’re Using
Before you can change the ‘From’ name in your email, you need to determine which email provider you’re using. Each provider has its own interface and settings, so the process may vary slightly depending on which one you use. Here are a few popular email providers and how you can identify them:
- Gmail: Gmail is one of the most widely used email providers. If you have an email address ending with “@gmail.com,” you are using Gmail.
- Outlook/Hotmail: If your email address ends with “@outlook.com” or “@hotmail.com,” you are using either Outlook or Hotmail.
- Yahoo Mail: Yahoo Mail addresses end with “@yahoo.com.” If your email address has this domain, you are using Yahoo Mail.
- AOL Mail: AOL Mail addresses end with “@aol.com.” If your email address has this domain, you are using AOL Mail.
- Other Email Providers: If you are not using one of the above-mentioned providers, you may be using a custom domain or a different email service. In this case, you can typically identify your email provider by checking the domain of your email address. For example, if your email ends with “@yourcompany.com,” your email provider may be the one associated with your company’s domain.
Once you have identified your email provider, you can proceed to the next step of accessing your email settings. Remember that the specific steps for changing the ‘From’ name will vary depending on the email provider you are using. Be sure to follow the instructions tailored to your provider in the subsequent steps.
Step 2: Access Your Email Settings
After identifying your email provider, the next step is to access your email settings. The location of the settings may vary depending on the provider, but generally, you can find them by following these steps:
- Open your email provider’s website or launch its mobile application.
- Sign in to your email account using your username and password.
- Look for a settings icon or a gear icon in the interface. It is typically located in the top-right corner of the page or in the navigation menu.
- Click or tap on the settings icon to access your email settings.
- Depending on the provider, you might have to navigate through different sections or tabs to find the specific setting related to the ‘From’ name. Look for options related to account settings, email preferences, or sender information.
- If you are using a mobile application, the steps might be slightly different. In general, you can find the settings option by tapping on the menu icon or your profile picture within the app.
If you encounter any difficulties finding the settings, consider referring to the help or support pages of your email provider. They often provide step-by-step instructions for accessing the settings in their platform.
Once you have successfully accessed your email settings, you are ready to proceed to the next step of locating the ‘From’ name field.
Step 3: Locate the ‘From’ Name Field
After accessing your email settings, the next step is to locate the ‘From’ name field. This is the section where you can edit and customize the name that appears as the sender of your emails. The process of locating the ‘From’ name field may vary depending on your email provider. Here are a few general guidelines to help you find it:
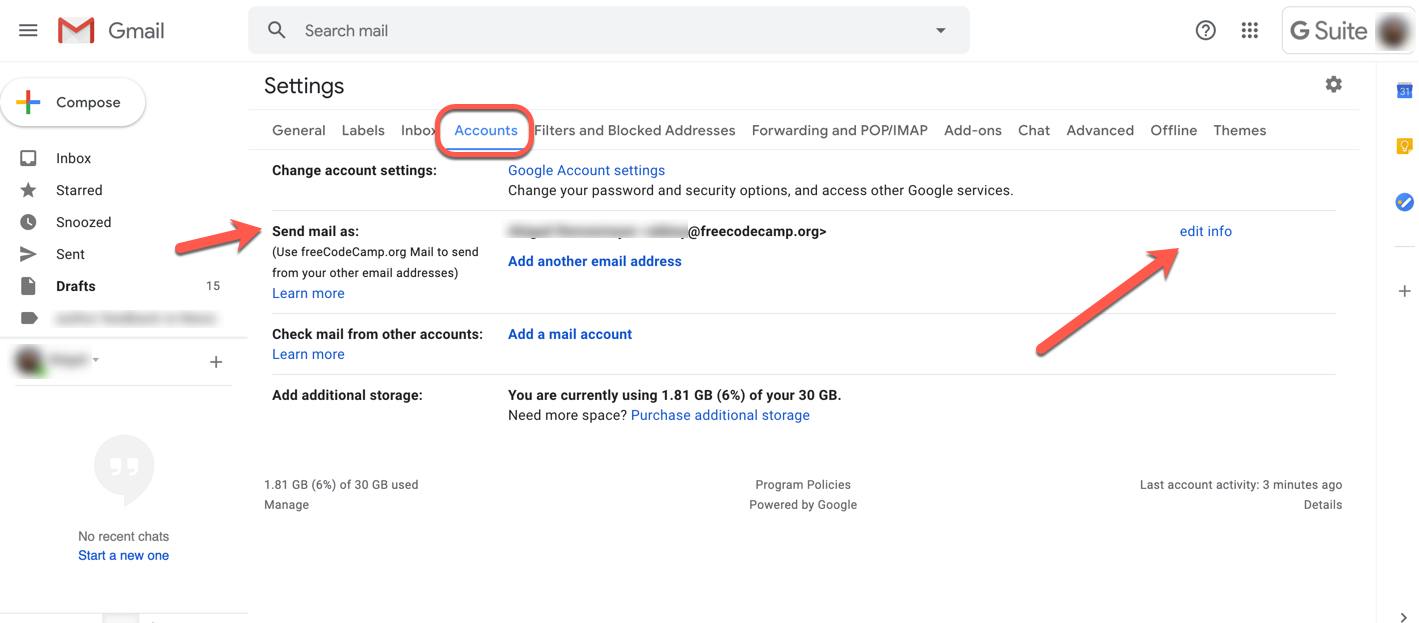
- Look for an option titled “Account Settings” or “Profile Settings.” This is a common section where email providers place settings related to personal information and sender identity.
- Navigate through different tabs or sections within the settings until you find an option specifically related to the ‘From’ name or sender information. It might be labeled as “Sender Name,” “Display Name,” or something similar.
- In some email providers, the ‘From’ name field may be located under the “Compose” or “Sending” settings, as it directly relates to the email composition and sending process.
- Pay attention to any tooltips or descriptions accompanying the fields. They might provide additional information or instructions regarding the ‘From’ name.
- If you are unable to locate the ‘From’ name field, consider referring to the help or support documentation provided by your email provider. They often have specific instructions tailored to their platform.
Remember, the location of the ‘From’ name field may differ between desktop and mobile interfaces, so be sure to explore both if you are using a mobile application. Once you have successfully located the ‘From’ name field, you can proceed to the next step of editing the name to your desired choice.
Step 4: Edit the ‘From’ Name
Once you have found the ‘From’ name field in your email settings, you are ready to edit and customize the name that will appear as the sender of your emails. Follow these steps to make the necessary changes:
- Click or tap on the ‘From’ name field to activate the edit mode. It may be a text box or a dropdown menu, depending on your email provider.
- Replace the existing ‘From’ name with your desired name. It can be your actual name, your business name, or any other name that you want to be displayed as the sender.
- Pay attention to any character limits or restrictions that might apply to the ‘From’ name field. Some providers may have limitations on the number of characters or special characters that can be used.
- If you are using a business email address, consider using a name that reflects your brand or the specific department you represent. This can help with brand recognition and establishing a professional image.
- If you are using a personal email address, you can choose to use your real name or any other preferred name that you feel comfortable with.
- Make sure to double-check the spelling and formatting of the ‘From’ name before saving your changes. This will ensure that the name is displayed correctly to your recipients.
- Some email providers may offer additional options or settings related to the ‘From’ name. Explore those options if available to further customize the way your name appears to recipients.
Once you have made the necessary edits to the ‘From’ name, proceed to the next step of saving your changes in the email settings.
Step 5: Save the Changes
After editing the ‘From’ name in your email settings, it is important to save your changes to ensure that the updated name will be used as the sender of your emails. Follow these steps to save the changes in your email settings:
- Look for a “Save,” “Apply,” or “Update” button within the email settings interface. It is typically located at the bottom of the page or within the specific section where you made the ‘From’ name edits.
- Click or tap on the save button to apply the changes to your email account.
- Some email providers may require you to confirm your action by clicking on a confirmation link sent to your email address. If prompted, check your inbox, open the confirmation email, and follow the instructions provided.
- Wait for the changes to be saved and applied to your account. This may take a few seconds or minutes depending on the provider and the server processing time.
Once the changes have been successfully saved, your ‘From’ name will be updated and will appear as the sender of your outgoing emails. It may take some time for the updated name to be visible to recipients, especially if they have previously received emails from your old ‘From’ name.
It is recommended to test the changes by sending a test email to yourself or a trusted contact to verify that the new ‘From’ name is displayed correctly. This will give you confidence that the changes have been successfully implemented.
Now that you have saved the changes to your ‘From’ name, proceed to the final step of sending a test email to verify the changes.
Step 6: Send a Test Email to Verify the Changes
After saving the changes to your ‘From’ name, it is essential to send a test email to verify that the updated name is displayed correctly to recipients. Follow these steps to send a test email and confirm the changes:
- Open a new composition window or click on the “Compose” button within your email interface to create a new email.
- Enter your own email address or the email address of a trusted recipient as the recipient of the test email.
- Compose a brief message, such as “This is a test email to verify the updated ‘From’ name,” in the body of the email.
- Double-check that the ‘From’ name displayed in the composition window matches the updated name you previously set in the email settings.
- Click or tap on the “Send” button to send the test email.
- Open your email inbox and check for the test email you just sent. Verify that the ‘From’ name displayed in the received email matches the updated ‘From’ name you set.
- If the ‘From’ name appears correctly, congratulations! You have successfully changed the ‘From’ name in your email and verified the changes. If not, review the steps again to ensure that you followed them correctly, or consider reaching out to the customer support of your email provider for assistance.
By sending a test email and verifying the changes, you can ensure that your recipients see the updated ‘From’ name as intended. It’s important to remember that some email clients or servers may cache the ‘From’ name for a certain period, so it may take some time for the changes to be visible to everyone.
Now that you have successfully verified the changes, you can confidently use your new ‘From’ name in your future email communications.
Additional Tips for Changing ‘From’ Name
Changing the ‘From’ name in your email can have a significant impact on how your emails are perceived and received. To make the most out of this feature, consider the following tips:
- Consistency: It’s important to maintain consistency with your ‘From’ name across all your email accounts and platforms. If you have multiple email addresses, ensure that the ‘From’ name is consistent with your personal or brand identity.
- Professionalism: If you’re using email for business purposes, it’s recommended to use a professional ‘From’ name that reflects your brand or organization. This can enhance your credibility and professionalism in the eyes of your recipients.
- Relevance: Customize the ‘From’ name based on the recipient or email campaign to make it more relevant. For example, if you’re sending emails to different departments within your organization, tailor the ‘From’ name to match the specific department for better recognition and response.
- Branding: Consider adding a brand logo or icon in combination with your ‘From’ name to further enhance brand recognition. Some email providers offer features to include an avatar or profile picture that represents your brand.
- Email Signature: Take advantage of the opportunity to include an email signature that complements your ‘From’ name. Include relevant contact information, social media links, and any other details that you want to convey in your email signature.
- Testing: Regularly send test emails to yourself or trusted contacts to verify that the ‘From’ name appears correctly in various email clients and devices. This will help ensure consistent branding and professionalism across different platforms.
- Review Spam Filters: Keep an eye on spam filters to ensure that your updated ‘From’ name doesn’t trigger any spam warnings. Avoid using spammy or misleading names that may lead to your emails being flagged as spam.
Remember, changing the ‘From’ name is a powerful tool to personalize your emails, reinforce your brand, and increase engagement. Take the time to customize it to suit your specific needs and goals.
By following these additional tips and best practices, you can optimize the impact of your ‘From’ name and create a positive impression with your recipients.