
Adjusting the Font and Size of Unread Messages
When it comes to organizing your email in Microsoft Outlook, one of the ways to make important messages stand out is by adjusting the font and size of the unread messages. By making a few simple changes, you can ensure that unread messages catch your attention immediately, allowing you to prioritize your email management effectively. Here’s how you can adjust the font and size of unread messages in Outlook:
1. Go to the “View” tab: Open Outlook and navigate to the “View” tab in the ribbon at the top of the window.
2. Select “View Settings”: Click on the “View Settings” button within the “Current View” section.
3. Open “Conditional Formatting”: In the “Advanced View Settings” window, select the “Conditional Formatting” button.
4. Choose the “Unread Messages” rule: In the “Conditional Formatting” window, you will see a list of existing rules. Look for the rule named “Unread Messages” and select it.
5. Click on “Font”: Once you have the “Unread Messages” rule selected, click on the “Font” button, which will open the “Font” dialog box.
6. Customize the font and size: In the “Font” dialog box, you can adjust the font, size, style, and color of the unread messages. Choose a font that is visually distinct and easy to read, and select an appropriate size to make the text stand out.
7. Save the changes: After customizing the font and size settings, click “OK” to save the changes and return to the “Conditional Formatting” window.
8. Apply the changes: Finally, click “OK” to apply the changes to the “Unread Messages” rule. You will now see the updated font and size settings for unread messages in your Outlook inbox.
By adjusting the font and size of unread messages in Outlook, you can make sure that these messages catch your attention instantly. This helps you stay organized and ensures that you can promptly respond to important emails without overlooking them in a cluttered inbox.
Changing the Background Color of Unread Messages
In Microsoft Outlook, changing the background color of unread messages can be a great way to visually emphasize and differentiate them from the rest of your email. By following a few simple steps, you can customize the background color of unread messages to suit your preferences. Here’s how you can change the background color of unread messages in Outlook:
1. Open “View Settings”: Launch Outlook and navigate to the “View” tab in the ribbon. Click on the “View Settings” button within the “Current View” section.
2. Select “Conditional Formatting”: In the “Advanced View Settings” window, click on the “Conditional Formatting” button.
3. Choose the “Unread Messages” rule: Locate the “Unread Messages” rule in the “Conditional Formatting” window and select it.
4. Click on “Font”: Once you have the “Unread Messages” rule selected, click on the “Font” button, which will open the “Font” dialog box.
5. Select the desired background color: Within the “Font” dialog box, you’ll notice an option to choose the background color. Click on the color square to open the color palette and select the color you prefer for highlighting unread messages.
6. Save the changes: After selecting the desired background color, click “OK” to exit the “Font” dialog box, then click “OK” again in the “Conditional Formatting” window to save the changes.
7. Apply the changes: Once you have saved the changes, click “OK” in the “Advanced View Settings” window to apply the new background color to unread messages.
By changing the background color of unread messages, you can instantly draw attention to important emails and prioritize your inbox management more effectively. Whether you opt for a vibrant hue or a subtle shade, customizing the background color enhances the visual appeal of your Outlook inbox and helps you stay organized.
Adding a Bold Effect to Unread Messages
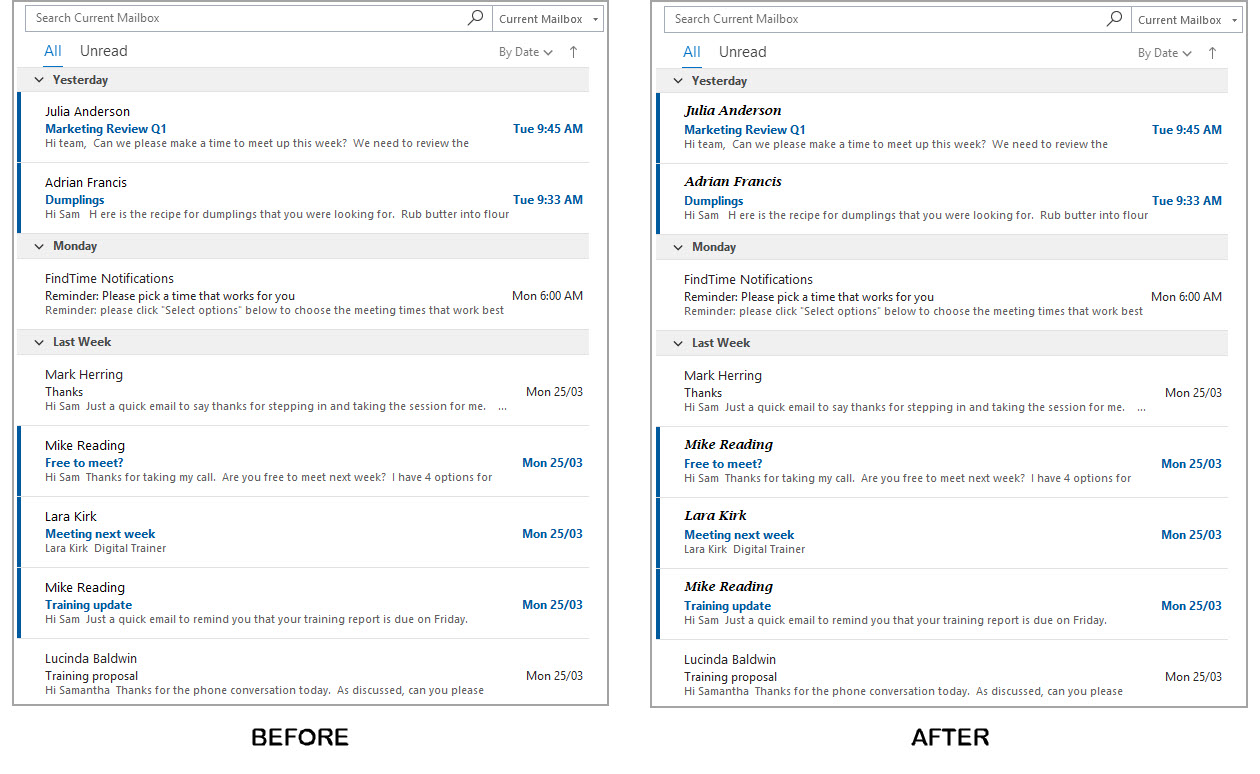
If you want to make unread messages stand out in Microsoft Outlook, adding a bold effect to the text can be a simple yet effective solution. By making the text bold, you can easily scan your inbox and prioritize your attention to important emails. Here’s how you can add a bold effect to unread messages in Outlook:
1. Access “View Settings”: Open Outlook and navigate to the “View” tab in the ribbon. Click on the “View Settings” button in the “Current View” section.
2. Select “Conditional Formatting”: In the “Advanced View Settings” window, select the “Conditional Formatting” button.
3. Choose the “Unread Messages” rule: Look for the “Unread Messages” rule in the “Conditional Formatting” window and select it.
4. Click on “Font”: With the “Unread Messages” rule selected, click on the “Font” button to open the “Font” dialog box.
5. Enable the bold effect: Inside the “Font” dialog box, check the box next to “Bold” to enable the bold effect on unread messages.
6. Save the changes: After enabling the bold effect, click “OK” to exit the “Font” dialog box. Then, click “OK” again in the “Conditional Formatting” window to save the changes.
7. Apply the changes: Once you have saved the changes, click “OK” in the “Advanced View Settings” window to apply the bold effect to unread messages.
By adding a bold effect to unread messages, you can easily spot them within your Outlook inbox. The visually distinct styling helps you identify important messages at a glance, allowing you to focus your attention and respond promptly to crucial emails.
Applying Conditional Formatting to Unread Messages
In Microsoft Outlook, you have the option to apply conditional formatting to unread messages, which enables you to customize the appearance of these messages based on specific criteria. By using conditional formatting, you can easily differentiate and highlight unread messages, making it easier to manage your inbox. Here’s how you can apply conditional formatting to unread messages in Outlook:
1. Access the “View Settings” window: Open Outlook and go to the “View” tab in the ribbon. Click on the “View Settings” button within the “Current View” section.
2. Select “Conditional Formatting”: In the “Advanced View Settings” window, click on the “Conditional Formatting” button to open the formatting options.
3. Create a new rule: In the “Conditional Formatting” window, click on the “Add” button to create a new formatting rule.
4. Name the rule: In the “Name” field of the “New Formatting Rule” dialog box, enter a descriptive name for your rule, such as “Unread Messages”.
5. Define the formatting conditions: In the “Condition” field of the dialog box, select “Unread Messages” from the drop-down menu.
6. Choose the formatting style: Click on the “Format” button to customize the formatting options for unread messages. You can modify the font, font size, font color, background color, and other visual elements.
7. Save the changes: After customizing the formatting style, click “OK” to save the changes in the “New Formatting Rule” dialog box.
8. Apply the changes: Once you have saved the formatting rule, it will be listed in the “Conditional Formatting” window. Click “OK” to apply the conditional formatting to unread messages.
By applying conditional formatting to unread messages, you can visually customize their appearance, making them more noticeable and easier to identify in your Outlook inbox. This allows you to quickly locate and prioritize important emails, optimizing your productivity and organization.
Modifying the Font Color of Unread Messages
In Microsoft Outlook, modifying the font color of unread messages can be an effective way to visually distinguish them from other emails in your inbox. By changing the font color, you can make the text stand out and easily identify unread messages. Here’s how you can modify the font color of unread messages in Outlook:
1. Open “View Settings”: Launch Outlook and navigate to the “View” tab in the ribbon. Click on the “View Settings” button within the “Current View” section.
2. Select “Conditional Formatting”: In the “Advanced View Settings” window, click on the “Conditional Formatting” button.
3. Choose the “Unread Messages” rule: Locate the “Unread Messages” rule in the “Conditional Formatting” window and select it.
4. Click on “Font”: Once you have the “Unread Messages” rule selected, click on the “Font” button, which will open the “Font” dialog box.
5. Modify the font color: Inside the “Font” dialog box, you’ll see an option to choose the font color. Click on the color square to open the color palette and select the color you prefer for the text of unread messages.
6. Save the changes: After selecting the desired font color, click “OK” to exit the “Font” dialog box, then click “OK” again in the “Conditional Formatting” window to save the changes.
7. Apply the changes: Once you have saved the changes, click “OK” in the “Advanced View Settings” window to apply the new font color to unread messages.
By modifying the font color of unread messages, you can easily identify them and prioritize your email management. Whether you choose a vibrant color or a subtle shade, customizing the font color allows you to visually enhance your Outlook inbox and quickly identify important messages.
Using Categories to Highlight Unread Messages
In Microsoft Outlook, one efficient way to highlight unread messages and ensure their visibility is by using categories. By assigning specific categories to unread messages, you can easily distinguish them from other emails and prioritize your attention. Here’s how you can use categories to highlight unread messages in Outlook:
1. Open Outlook and go to your inbox: Launch Outlook and navigate to your inbox where you want to categorize unread messages.
2. Select the unread messages: Look for the unread messages that you want to highlight. You can either select them individually by holding the Ctrl key and clicking on each message or use the Ctrl+A shortcut to select all unread messages in the inbox.
3. Assign a category: Right-click on the selected unread messages and choose “Categorize” from the context menu. Select a category that represents unread messages or create a new category dedicated specifically to highlighting unread messages.
4. Apply the category color: The selected unread messages will now be tagged with the assigned category color, making them visually distinct from other emails in your inbox. The category color appears as a colored text or bar next to the email’s subject line.
5. View categorized messages: To quickly view all categorized, unread messages, you can use the “Categories” view in Outlook. Simply go to the “View” tab, click on “Categories” in the “Arrangement” group, and select the category that represents unread messages.
6. Update categories as needed: If the status of an email changes from unread to read, you can update its category by right-clicking on the email, selecting “Categorize,” and choosing the appropriate category. This ensures accurate highlighting of unread messages.
By utilizing categories to highlight unread messages in Outlook, you can easily identify and prioritize important emails. This visual organization system allows you to focus your attention on unread messages, enabling efficient email management and ensuring timely responses.
Customizing the Flag or Reminder for Unread Messages
In Microsoft Outlook, customizing the flag or reminder for unread messages can be a useful way to draw attention to important emails and ensure that they are not overlooked. By adjusting the flag or reminder settings, you can create visual cues that prompt you to take action on unread messages. Here’s how you can customize the flag or reminder for unread messages in Outlook:
1. Open your inbox: Launch Outlook and navigate to your inbox where you want to customize the flag or reminder settings for unread messages.
2. Locate an unread message: Look for the unread message that you want to customize the flag or reminder for. You can scroll through your inbox or use the search feature if needed.
3. Right-click on the message: Once you have found the desired unread message, right-click on it to open the context menu.
4. Choose “Follow Up” or “Flag for Follow Up”: In the context menu, select either “Follow Up” or “Flag for Follow Up” (the wording may vary depending on your version of Outlook).
5. Set the flag or reminder: In the sub-menu that appears, choose the desired flag or reminder option. You can select a specific flag color or set a reminder with a specified time and date for the unread message.
6. Apply the customization: Once you have selected the flag or reminder option, the unread message will now be visually marked according to your chosen settings, making it stand out from other emails.
7. Manage flagged or reminded messages: To track and manage your flagged or reminded messages, you can go to the “Tasks” or “To-Do” view in Outlook. These views will display all the messages that you have flagged or set reminders for, allowing you to focus on taking action on important emails.
By customizing the flag or reminder for unread messages in Outlook, you can create visual cues that remind you to prioritize and take action on important emails. These personalized flags or reminders help you stay organized and ensure that no critical messages are left unanswered or neglected.
Creating a Rule for Unread Messages
In Microsoft Outlook, creating a rule for unread messages can streamline your email management and automate actions based on specific criteria. By setting up a rule, you can apply custom actions to unread messages, such as moving them to specific folders, flagging them, or categorizing them. Here’s how you can create a rule for unread messages in Outlook:
1. Open the “Rules and Alerts” window: Launch Outlook and go to the “File” tab. Click on “Manage Rules & Alerts” to open the “Rules and Alerts” window.
2. Select “New Rule”: In the “Rules and Alerts” window, click on the “New Rule” button to start creating a new rule.
3. Choose “Apply rule on messages I receive”: In the “Rules Wizard,” select “Apply rule on messages I receive” under the “Start from a blank rule” section. Click “Next” to proceed.
4. Select “where my name is in the To or Cc box”: In the next window, choose the condition that corresponds to your preference for identifying unread messages. For example, selecting “where my name is in the To or Cc box” will apply the rule to messages that you were directly addressed in.
5. Select the action(s) to be applied: In the following window, choose the action(s) you want to perform on unread messages. You can select multiple actions, such as categorizing, flagging, moving to a specific folder, or applying other custom settings.
6. Specify any exceptions (optional): If there are any exceptions to the rule, such as specific senders or subjects that should be excluded from the action, you can set them in the next window. Otherwise, click “Next” to proceed.
7. Provide a name for the rule: In the final window, enter a descriptive name for the rule. You can also choose whether to run the rule on existing unread messages in your inbox.
8. Save and apply the rule: After naming the rule, click “Finish” to save and activate it. The rule will now be applied to all incoming unread messages, based on your specified criteria and actions.
By creating a rule for unread messages in Outlook, you can automate actions and organization, saving time and ensuring that important messages receive the necessary attention. Customizing rules allows you to have greater control over your email management and maintain an organized inbox.
Enabling Desktop Alerts for Unread Messages
In Microsoft Outlook, enabling desktop alerts for unread messages can be a helpful way to receive timely notifications about new emails. Desktop alerts display a pop-up notification on your computer screen, ensuring that you are immediately notified of incoming messages and can promptly respond. Here’s how you can enable desktop alerts for unread messages in Outlook:
1. Open Outlook’s Options: Launch Outlook and go to the “File” tab. Click on “Options” to open the Outlook Options window.
2. Access the “Mail” section: In the Outlook Options window, select the “Mail” tab from the left-hand menu.
3. Enable desktop alerts: Scroll down to the “Message arrival” section within the Mail options. Check the box next to “Display a Desktop Alert” to enable desktop alerts for new unread messages.
4. Customize desktop alerts: If you wish to further customize the appearance or behavior of the desktop alerts, you can click on the “Desktop Alert Settings” button. This allows you to adjust the duration of the alert, choose its transparency, or even change the sound played when the alert appears.
5. Confirm and save the changes: Once you have made your desired adjustments to the desktop alert settings, click “OK” in the Desktop Alert Settings window, and then click “OK” again in the Outlook Options window to save the changes.
6. Test the desktop alert: To confirm that desktop alerts are enabled and functioning correctly, ask someone to send you a test email. When the email arrives, a desktop alert should appear on your screen, providing a brief preview of the new message.
By enabling desktop alerts for unread messages in Outlook, you can ensure that you stay informed and never miss important emails. This feature provides instant notifications, allowing you to respond promptly and efficiently to incoming messages and stay on top of your email communication.
Setting up a Quick Action for Unread Messages
In Microsoft Outlook, setting up a quick action for unread messages can enhance your productivity by allowing you to perform common actions with just a single click. Quick actions provide a convenient way to manage your inbox efficiently, eliminating the need to navigate through multiple menus. Here’s how you can set up a quick action for unread messages in Outlook:
1. Access Outlook’s Options: Launch Outlook and go to the “File” tab. Click on “Options” to open the Outlook Options window.
2. Go to the “Quick Steps” section: In the Outlook Options window, select the “Quick Steps” tab from the left-hand menu.
3. Create a new Quick Step: Click on the “New” button to create a new quick action.
4. Enter a name for the Quick Step: In the “Name” field of the “Edit Quick Step” window, provide a descriptive name for the quick action, such as “Mark as Read & Archive”.
5. Select the desired action(s): In the “Actions” section, choose the action(s) you want to perform on the unread message. This can include marking the message as read, categorizing it, moving it to a specific folder, or applying other custom settings.
6. Decide on keyboard shortcuts and tooltip: Optionally, you can assign a keyboard shortcut and add a tooltip text for the quick action to appear when hovering over it.
7. Save the Quick Step: Once you have configured the desired action(s) and any additional settings, click “Finish” or “OK” to save the quick action.
8. Apply the Quick Step: To use the newly created quick action on an unread message, select the message and click on the appropriate quick action button in the Quick Steps group on the Outlook ribbon. The selected action will be applied to the message instantly.
By setting up a quick action for unread messages in Outlook, you can perform repetitive tasks with ease and efficiency. Quick actions streamline your email management, saving time and effort, and allowing you to focus on more important tasks.