
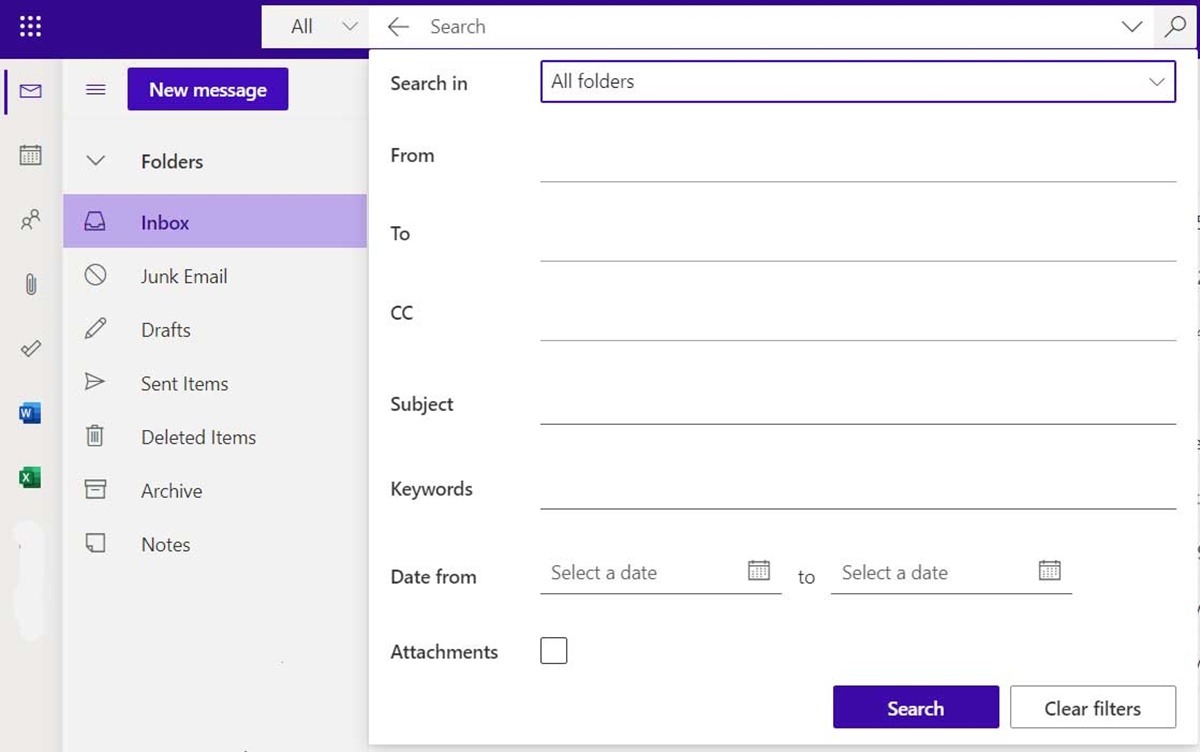
What are search operators in Outlook.com?
Search operators in Outlook.com are special keywords or symbols that can be used to refine and narrow down your search results within the Outlook.com email client. By using these operators, you can quickly find specific emails or filter your inbox based on various criteria. This can significantly improve your productivity and efficiency when managing your emails.
Whether you are looking for emails from a particular sender, with attachments, or within a specific date range, search operators can help you locate the information you need without scrolling through countless emails. The use of these operators enables you to perform complex searches with ease, saving time and effort in the process.
Outlook.com provides a wide range of search operators that allow you to specify different criteria for your searches. Some of the commonly used search operators include the “from” operator, “subject” operator, “has attachment” operator, “category” operator, “sent” operator, “cc” operator, “bcc” operator, “unread” operator, and “flagged” operator. Each of these operators serves a specific purpose and can be combined to create more advanced search queries.
For example, if you want to find all unread emails from a specific sender, you can use the “from” operator followed by the email address and the “unread” operator. This will display only the unread messages from the specified sender, allowing you to focus on important and pending emails.
By learning and utilizing these search operators, you can streamline your email management process and find relevant information in a matter of seconds. Whether you are a busy professional, a student, or an individual who receives a high volume of emails, harnessing the power of search operators can greatly simplify your email workflow and help you stay organized.
In the following sections, we will explore various search operators in Outlook.com and delve into their usage. These search operators will empower you to search for specific emails efficiently and effectively, making your email experience more productive and enjoyable.
How to use the “from” search operator
The “from” search operator in Outlook.com allows you to search for emails based on the sender’s email address or name. This can be particularly useful when you want to narrow down your search to emails from a specific person or organization. Here’s how you can use the “from” search operator effectively:
- Start by typing “from:” in the Outlook.com search bar.
- After “from:”, enter the sender’s email address or name. You can enter the full email address or just a part of it to broaden your search.
- Press Enter or click the magnifying glass icon to initiate the search.
For example, if you want to find all emails from John Doe, you would enter “from: John Doe” in the search bar. This will display all the emails sent by John Doe in your inbox or any other folder you choose to search within.
If you only remember a part of the sender’s email address or name, you can use a wildcard “*” to broaden the search. For instance, if you want to find all emails from any sender with the domain “@example.com”, you can use the search query “from: *@example.com”. This will retrieve all emails sent from any address ending with “@example.com”.
You can also combine the “from” search operator with other search operators to further refine your search. For example, if you want to find all unread emails from John Doe, you can use the search query “from: John Doe unread”. This will display only the unread emails from John Doe.
Using the “from” search operator can help you quickly locate emails from specific senders, whether it’s for professional correspondence, personal communication, or managing subscriptions. By refining your search based on the sender’s information, you can easily navigate through your inbox and find the emails that matter most to you.
In this section, we have explored how to use the “from” search operator in Outlook.com. By incorporating this operator into your search queries, you can efficiently filter your emails based on the sender’s information, saving valuable time and effort in the process.
How to use the “subject” search operator
The “subject” search operator in Outlook.com allows you to search for emails based on the subject line. This can be handy when you are looking for a specific email or trying to locate messages related to a particular topic. Here’s how you can make use of the “subject” search operator effectively:
- Begin by typing “subject:” in the Outlook.com search bar.
- After “subject:”, enter the keywords or phrase that you want to search for within the subject line.
- Press Enter or click the magnifying glass icon to initiate the search.
For example, if you are searching for emails with the subject line “Project Update”, you would enter “subject: Project Update” in the search bar. This will display all the emails that have the specified subject line, making it easy to locate the desired correspondence.
You can also use the wildcard “*” to broaden your search if you only remember a part of the subject line. For instance, if you are looking for emails with subjects containing the word “meeting”, you can use the search query “subject: *meeting*”. This will retrieve all emails with subject lines that include the word “meeting”, such as “Team Meeting Agenda” or “Meeting Reminder”.
Furthermore, you can combine the “subject” search operator with other search operators to narrow down your search even further. For example, if you want to find all unread emails with the subject line “Important”, you can use the search query “subject: Important unread”. This will display only the unread emails that have “Important” as the subject line.
Using the “subject” search operator can be beneficial when you want to quickly locate emails based on specific topics or keywords. Whether it’s for retrieving important information, following up on previous discussions, or managing your inbox efficiently, the “subject” search operator allows you to find the relevant emails with ease.
In this section, we have explored how to use the “subject” search operator in Outlook.com. By incorporating this operator into your search queries, you can locate emails based on their subject line, making it simpler to find the messages you need.
How to use the “has attachment” search operator
The “has attachment” search operator in Outlook.com allows you to search for emails that contain attachments. This can be useful when you are looking for specific documents, files, or images that were sent to you as email attachments. Here’s how you can effectively use the “has attachment” search operator:
- Start by typing “has:attachment” in the Outlook.com search bar.
- Press Enter or click the magnifying glass icon to initiate the search.
Once you perform the search, Outlook.com will display all the emails that have attachments, making it easier for you to locate messages with important files or documents.
You can further refine your search by combining the “has attachment” search operator with other search operators. For example, if you want to find all unread emails that have attachments, you can use the search query “has:attachment unread”. This will display only the unread emails that contain attachments, helping you prioritize and access important information more efficiently.
Additionally, you can use the negative form of the “has attachment” search operator to exclude emails with attachments from your search results. For example, if you want to find all emails without any attachments, you can use the search query “-has:attachment”. This will filter out all the emails that have attachments, showing you only the messages that do not contain any files or documents.
Using the “has attachment” search operator can save you time when you need to find emails with attached files. Whether you are searching for a specific document, retrieving important images, or managing your inbox, this search operator allows you to locate the emails that include attachments quickly.
In this section, we have explored how to use the “has attachment” search operator in Outlook.com. By incorporating this operator into your search queries, you can find emails that contain attachments, making it easier to access and manage important files and documents.
How to use the “category” search operator
The “category” search operator in Outlook.com allows you to search for emails based on the categories assigned to them. Categories are customizable labels that you can use to organize and prioritize your emails. By using the “category” search operator, you can quickly locate emails that are assigned to specific categories. Here’s how you can use the “category” search operator effectively:
- Begin by typing “category:” in the Outlook.com search bar.
- After “category:”, enter the category name that you want to search for.
- Press Enter or click the magnifying glass icon to initiate the search.
For example, if you have a category named “Work” and want to find all emails assigned to this category, you would enter “category: Work” in the search bar. This will display all the emails that have been categorized as “Work”, making it easy to access and manage your work-related correspondence.
You can also combine the “category” search operator with other search operators to further refine your search. For instance, if you want to find all unread emails with the category “Personal”, you can use the search query “category: Personal unread”. This will show you only the unread emails that are assigned to the “Personal” category.
In addition to searching for individual categories, you can search for multiple categories by using the “OR” operator. For example, if you want to find emails that are assigned to either the “Projects” category or the “Meeting Notes” category, you can use the search query “category: Projects OR category: Meeting Notes”. This will display all the emails that belong to either of these categories.
Using the “category” search operator helps you easily retrieve emails that are grouped and labeled according to your personalized categories. This allows for efficient organization and retrieval of emails, making it simpler to keep track of important conversations and prioritize your inbox.
In this section, we have explored how to use the “category” search operator in Outlook.com. By incorporating this operator into your search queries, you can quickly find emails that are assigned to specific categories, allowing for effective email management and organization.
How to use the “sent” search operator
The “sent” search operator in Outlook.com allows you to search for emails based on the date they were sent. This is particularly helpful when you want to find emails sent within a specific time frame or locate a particular message based on when it was sent. Here’s how you can effectively use the “sent” search operator:
- Start by typing “sent:” in the Outlook.com search bar.
- After “sent:”, enter the date or time frame you want to search for. You can use specific dates, relative dates, or keywords like “yesterday” or “last week”.
- Press Enter or click the magnifying glass icon to initiate the search.
For example, if you want to find all emails sent on a specific date, such as January 1, 2022, you would enter “sent: 01/01/2022” in the search bar. This will display all the emails that were sent on that particular date, allowing you to quickly revisit or reference those conversations.
If you want to search emails sent within a specific time frame, you can use relative dates. For instance, if you want to find emails sent in the past week, you can enter “sent: last week” in the search bar. This will retrieve all the emails sent in the last seven days.
You can also combine the “sent” search operator with other search operators to narrow down your search further. For example, if you want to find all unread emails sent within the last month, you can use the search query “sent: last month unread”. This will display only the unread emails that were sent in the previous month.
By using the “sent” search operator, you can easily retrieve emails sent within a specific time frame, ensuring you have the relevant information at your fingertips. This is particularly useful for tracking conversations, referring to past discussions, or staying organized with time-sensitive emails.
In this section, we have explored how to use the “sent” search operator in Outlook.com. By incorporating this operator into your search queries, you can quickly find emails based on the date they were sent, allowing for efficient management and retrieval of your email conversations.
How to use the “cc” search operator
The “cc” search operator in Outlook.com allows you to search for emails that include recipients in the CC (carbon copy) field. This can be useful when you want to find emails where specific individuals were copied for information or to ensure their awareness of the communication. Here’s how you can effectively use the “cc” search operator:
- Start by typing “cc:” in the Outlook.com search bar.
- After “cc:”, enter the email address or name of the recipient you want to search for.
- Press Enter or click the magnifying glass icon to initiate the search.
For example, if you want to find all emails where John Smith was copied in the CC field, you would enter “cc: John Smith” in the search bar. This will display all the emails where John Smith was included as a recipient in the CC field.
You can also search for emails with multiple recipients in the CC field by using the “OR” operator. For instance, if you want to find emails where either John Smith or Jane Doe was copied in the CC field, you can use the search query “cc: John Smith OR cc: Jane Doe”. This will display all the emails that include either John Smith or Jane Doe in the CC field.
Additionally, you can combine the “cc” search operator with other search operators to refine your search further. For example, if you want to find all unread emails where John Smith was copied in the CC field, you can use the search query “cc: John Smith unread”. This will display only the unread emails that include John Smith in the CC field.
Using the “cc” search operator can help you easily locate emails where specific recipients were copied for information or awareness. Whether it’s for following up on discussions, tracking the involvement of relevant individuals, or managing your inbox efficiently, the “cc” search operator allows you to search for emails with ease.
In this section, we have explored how to use the “cc” search operator in Outlook.com. By incorporating this operator into your search queries, you can quickly find emails where specific individuals were copied in the CC field, making it easier to track communication and ensure efficient collaboration.
How to use the “bcc” search operator
The “bcc” search operator in Outlook.com allows you to search for emails where recipients were copied in the BCC (blind carbon copy) field. The BCC field is used to send a copy of an email to recipients without other recipients being aware of it. Here’s how you can effectively use the “bcc” search operator:
- Start by typing “bcc:” in the Outlook.com search bar.
- After “bcc:”, enter the email address or name of the recipient you want to search for.
- Press Enter or click the magnifying glass icon to initiate the search.
For example, if you want to find all emails where John Smith was copied in the BCC field, you would enter “bcc: John Smith” in the search bar. This will display all the emails where John Smith was included as a recipient in the BCC field.
Similar to the “cc” search operator, you can search for multiple recipients in the BCC field by using the “OR” operator. For instance, if you want to find emails where either John Smith or Jane Doe was copied in the BCC field, you can use the search query “bcc: John Smith OR bcc: Jane Doe”. This will display all the emails that include either John Smith or Jane Doe in the BCC field.
Combining the “bcc” search operator with other search operators can help you narrow down your search even further. For example, if you want to find all unread emails where John Smith was copied in the BCC field, you can use the search query “bcc: John Smith unread”. This will display only the unread emails that include John Smith in the BCC field.
Using the “bcc” search operator helps you easily locate emails where specific recipients were copied in the BCC field. This can be useful for tracking communication or referencing past discussions that were kept confidential. It also allows you to manage your inbox more effectively by filtering emails based on BCC recipients.
In this section, we have explored how to use the “bcc” search operator in Outlook.com. By incorporating this operator into your search queries, you can quickly find emails where specific recipients were copied in the BCC field, ensuring confidential communication and efficient email management.
How to use the “unread” search operator
The “unread” search operator in Outlook.com allows you to search for emails that you haven’t read yet. This is particularly helpful when you have a large number of unread emails and want to focus on specific messages or prioritize your inbox. Here’s how you can effectively use the “unread” search operator:
- Start by typing “unread:” in the Outlook.com search bar.
- Press Enter or click the magnifying glass icon to initiate the search.
After performing the search, Outlook.com will display all the emails that are marked as unread, allowing you to easily locate and manage them.
You can also combine the “unread” search operator with other search operators to narrow down your search further. For example, if you want to find all unread emails from a specific sender, you can use the search query “unread from: John Doe”. This will display only the unread emails received from John Doe.
If you want to find all unread emails within a specific folder, you can specify the folder name along with the “unread” search operator. For instance, if you want to find unread emails in your “Work” folder, you can use the search query “unread folder: Work”. This will show you all the unread emails contained within the specified folder.
Furthermore, you can use the negative form of the “unread” search operator to exclude unread emails from your search results. For example, if you want to find all read emails, you can use the search query “-unread”. This will filter out all the unread emails, displaying only the messages that you have already marked as read.
Using the “unread” search operator enables you to quickly locate and manage unread emails, ensuring that you stay on top of your important messages. It allows for efficient email triaging and helps you address and respond to unread emails in a timely manner.
In this section, we have explored how to use the “unread” search operator in Outlook.com. By incorporating this operator into your search queries, you can easily find and manage unread emails, ensuring effective email management and organization.
How to use the “flagged” search operator
The “flagged” search operator in Outlook.com allows you to search for emails that you have flagged for follow-up or marked as important. This can help you quickly locate and prioritize your important messages, ensuring that nothing falls through the cracks. Here’s how you can effectively use the “flagged” search operator:
- Start by typing “flagged:” in the Outlook.com search bar.
- Press Enter or click the magnifying glass icon to initiate the search.
After performing the search, Outlook.com will display all the emails that you have flagged, allowing you to easily find and manage them.
You can also combine the “flagged” search operator with other search operators to narrow down your search further. For example, if you want to find all flagged emails from a specific sender, you can use the search query “flagged from: John Doe”. This will display only the flagged emails received from John Doe.
If you want to find all flagged emails within a specific folder, you can specify the folder name along with the “flagged” search operator. For instance, if you want to find flagged emails in your “Work” folder, you can use the search query “flagged folder: Work”. This will show you all the flagged emails contained within the specified folder.
Furthermore, you can use the negative form of the “flagged” search operator to exclude flagged emails from your search results. For example, if you want to find all unflagged emails, you can use the search query “-flagged”. This will filter out all the flagged emails, displaying only the messages that are not marked or flagged.
Using the “flagged” search operator allows you to quickly locate and manage flagged emails, ensuring that you stay on top of your important messages and tasks. It provides a visual cue and helps you prioritize your email workflow by highlighting messages that require action or attention.
In this section, we have explored how to use the “flagged” search operator in Outlook.com. By incorporating this operator into your search queries, you can easily find and manage flagged emails, ensuring efficient email management and organization.
How to use the “category:categories” search operator
The “category:categories” search operator in Outlook.com allows you to search for emails that have been assigned to specific categories. Categories are custom labels that you can apply to emails to help organize and categorize them based on different criteria. Here’s how you can effectively use the “category:categories” search operator:
- Start by typing “category:” in the Outlook.com search bar.
- After “category:”, enter the category name or names that you want to search for. You can enter multiple category names, separated by a space.
- Press Enter or click the magnifying glass icon to initiate the search.
For example, if you have a category called “Personal” and want to search for all emails assigned to this category, you would enter “category: Personal” in the search bar. This will display all the emails that have been categorized as “Personal”, making it easy to access and manage your personal correspondence.
You can also search for emails that have been assigned to multiple categories by using the “AND” operator. For instance, if you want to find emails that are categorized both as “Work” and “Important”, you can use the search query “category: Work AND category: Important”. This will display all the emails that belong to both of these categories.
Similarly, you can use the “AND” operator to search for emails that have been assigned to one category but not to another. For example, if you want to find emails categorized as “Personal” but not as “Work”, you can use the search query “category: Personal AND -category: Work”. This will show you all the emails that belong to the “Personal” category but do not belong to the “Work” category.
Using the “category:categories” search operator allows you to easily locate and manage emails based on your custom-defined categories. It provides a powerful tool for organizing your inbox and grouping related emails together, making it easier to find and prioritize specific types of correspondence.
In this section, we have explored how to use the “category:categories” search operator in Outlook.com. By incorporating this operator into your search queries, you can quickly find and manage emails assigned to specific categories, enhancing your email organization and productivity.
How to use the “after:date” search operator
The “after:date” search operator in Outlook.com allows you to search for emails that were sent or received after a specific date. This can be helpful when you want to find recent emails or narrow down your search to a specific time frame. Here’s how you can effectively use the “after:date” search operator:
- Start by typing “after:” in the Outlook.com search bar.
- After “after:”, enter the date from which you want to start searching. You can enter a specific date in the YYYY/MM/DD format or use keywords like “yesterday” or “last week”.
- Press Enter or click the magnifying glass icon to initiate the search.
For example, if you want to find all emails sent or received after January 1, 2022, you would enter “after: 2022/01/01” in the search bar. This will display all the emails that were sent or received on or after that date, allowing you to easily access recent correspondence.
If you want to search within a relative time frame, you can use keywords. For instance, if you want to find emails from the past week, you can enter “after: last week” in the search bar. This will show you all the emails that were sent or received within the last seven days.
You can also combine the “after:date” search operator with other search operators to refine your search further. For example, if you want to find all unread emails sent or received after a specific date, you can use the search query “after: 2022/01/01 unread”. This will display only the unread emails that were sent or received on or after that date.
Using the “after:date” search operator enables you to quickly find emails within a specific time frame, ensuring that you stay up to date with recent correspondence. It helps you filter and focus on relevant emails based on their timing, whether you need to follow up on recent discussions or access time-sensitive information.
In this section, we have explored how to use the “after:date” search operator in Outlook.com. By incorporating this operator into your search queries, you can easily find and manage emails sent or received after a specific date, enhancing your email organization and efficiency.
How to use the “before:date” search operator
The “before:date” search operator in Outlook.com allows you to search for emails that were sent or received before a specific date. This can be helpful when you want to find older emails or narrow down your search to a specific time frame in the past. Here’s how you can effectively use the “before:date” search operator:
- Start by typing “before:” in the Outlook.com search bar.
- After “before:”, enter the date up until which you want to search. You can enter a specific date in the YYYY/MM/DD format or use keywords like “yesterday” or “last week”.
- Press Enter or click the magnifying glass icon to initiate the search.
For example, if you want to find all emails sent or received before January 1, 2022, you would enter “before: 2022/01/01” in the search bar. This will display all the emails that were sent or received prior to that date, allowing you to easily access older correspondence.
If you want to search within a relative time frame in the past, you can use keywords. For instance, if you want to find emails from the previous month, you can enter “before: last month” in the search bar. This will show you all the emails that were sent or received before the start of the previous month.
You can also combine the “before:date” search operator with other search operators to refine your search further. For example, if you want to find all unread emails sent or received before a specific date, you can use the search query “before: 2022/01/01 unread”. This will display only the unread emails that were sent or received prior to that date.
Using the “before:date” search operator allows you to quickly find emails within a specific time frame in the past, helping you locate older correspondence or reference previous discussions. It helps you filter and focus on relevant emails based on their timing, whether you need to revisit past conversations or access historical information.
In this section, we have explored how to use the “before:date” search operator in Outlook.com. By incorporating this operator into your search queries, you can easily find and manage emails sent or received before a specific date, enhancing your ability to retrieve older correspondence and stay organized.
How to use multiple search operators together
When searching for specific emails in Outlook.com, you can combine multiple search operators to create more refined and targeted search queries. By using multiple search operators together, you can narrow down your search results and find exactly what you are looking for. Here’s how you can effectively use multiple search operators in combination:
- Start by typing the first search operator in the Outlook.com search bar, followed by a space.
- Enter the second search operator, again followed by a space.
- If needed, continue to add additional search operators in the same manner.
- Press Enter or click the magnifying glass icon to initiate the search.
For example, let’s say you want to find all unread emails from a specific sender within a certain time frame. You can combine the “unread” search operator, the “from” search operator, and the “after:date” search operator. The search query would look like this: “unread from: John Doe after: 2022/01/01”. This would display only the unread emails sent by John Doe after January 1, 2022.
You can also use multiple search operators to search within specific folders or categories. For instance, if you want to find all flagged emails within your “Work” folder, you can combine the “flagged” search operator and the “folder:foldername” search operator. The search query would look like this: “flagged folder: Work”. This would display only the flagged emails within the “Work” folder.
Furthermore, combining search operators can help you create more complex search queries to meet specific criteria. For example, if you want to find all emails from a specific sender that contain attachments, you can combine the “from” search operator and the “has attachment” search operator. The search query would look like this: “from: Jane Doe has:attachment”. This would display only the emails from Jane Doe that have attachments.
Using multiple search operators together allows you to fine-tune your search and retrieve highly specific results. It enables you to filter and narrow down your search criteria, ensuring that you find precisely what you are looking for within your email inbox.
In this section, we have explored how to use multiple search operators together in Outlook.com. By combining these operators, you can create more targeted search queries and improve the accuracy and relevance of your search results, ultimately enhancing your email management and productivity.
Advanced options for search operators in Outlook.com
While the basic search operators in Outlook.com provide powerful capabilities for narrowing down email search results, there are also advanced options available that allow for even greater control and specificity. These advanced options further enhance your ability to find and manage emails efficiently. Here are some advanced options for search operators in Outlook.com:
1. Search by message importance: You can use the “importance” search operator to search for emails that are marked as high, normal, or low importance. For example, you can use “importance: high” to find all the emails marked as high importance.
2. Search by message sensitivity: The “sensitivity” search operator allows you to search for emails that are marked as personal, private, confidential, or normal sensitivity. For example, you can use “sensitivity: confidential” to find all the emails marked as confidential.
3. Search by message size: You can use the “size” search operator to search for emails based on their size. You can specify a size range or use specific size units such as KB or MB. For example, you can use “size: >5mb” to find all the emails larger than 5 megabytes.
4. Search by message importance and sensitivity combined: By combining the “importance” and “sensitivity” search operators, you can perform more targeted searches. For example, you can use “importance: high sensitivity: confidential” to find all the emails marked as high importance and confidential sensitivity.
5. Search within specific email fields: In addition to searching in the email body and subject line, you can use search operators to search within specific fields, such as the sender’s name, recipients’ names, or email addresses. For example, you can use “from: John Doe” to find all the emails sent by John Doe or “to: jane@example.com” to find all the emails sent to Jane Doe.
6. Search using wildcard characters: You can use wildcard characters to broaden or refine your search. The “*” character represents any number of characters, while the “?” character represents a single character. For example, you can use “subject: meeting*” to find emails with subjects starting with “meeting” or “from: j?hn” to find emails sent from senders with names like “John” or “Jahn”.
These advanced options for search operators in Outlook.com provide you with more granularity and control over your searches. By leveraging these advanced options, you can further customize and refine your email search queries, ensuring that you find the specific emails you need quickly and efficiently.
In this section, we have explored advanced options for search operators in Outlook.com. By familiarizing yourself with these advanced options, you can maximize the effectiveness of your email searches, streamline your email management, and save valuable time and effort in the process.
Tips and tricks for using Outlook.com search operators
To make the most out of Outlook.com search operators, here are some helpful tips and tricks to enhance your search experience and increase the efficiency of managing your emails:
1. Use quotation marks for exact phrase searching: If you are looking for an exact phrase, enclose it in quotation marks. For example, searching for “project update” in the email body or subject will only return results that include the exact phrase instead of individual words.
2. Experiment with different search operators: Familiarize yourself with the various search operators available in Outlook.com and try different combinations to refine your search. This will help you explore different ways to filter and sort through your emails, making it easier to find what you need.
3. Utilize search suggestions: As you start typing your search query, Outlook.com provides suggestions based on your search history and email content. Take advantage of these suggestions to discover relevant search operators or refine your search query based on commonly used terms.
4. Combine search operators for more specific results: To narrow down your search results, consider combining multiple search operators. For example, you can combine the “subject” and “from” operators to search for emails with a specific subject line from a particular sender.
5. Utilize search shortcuts: Outlook.com provides search shortcuts that allow you to quickly access commonly used search operators. For example, pressing “F” will activate the “from:” search operator, while “C” will activate the “cc:” search operator. Refer to the Outlook.com documentation for a complete list of search shortcuts.
6. Regularly organize your emails: Keep your inbox organized by using features like folders, categories, and flags. By categorizing and labeling your emails, you can easily locate them using search operators later on.
7. Practice using wildcard characters: Wildcard characters, such as “*” and “?”, can help broaden or refine your search. Experiment with using wildcard characters in search queries to capture variations or partial matches of words or phrases.
8. Utilize search filters: Outlook.com offers additional search filters, such as search by attachment type or search within a specific timeframe. These filters can enhance your search results and help you find specific types of emails quickly.
9. Stay organized with custom search folders: Set up custom search folders to store frequently searched emails. These folders update automatically based on your specified search criteria, making it easy to access important emails without having to perform the search each time.
By implementing these tips and tricks, you can optimize your use of Outlook.com search operators and streamline your email management. These techniques can help you efficiently find and manage your emails, saving you time and improving your overall productivity.