
Overview of Mozilla Thunderbird
Mozilla Thunderbird is a popular email client that allows users to manage multiple email accounts in one place. Developed by the creators of the Firefox web browser, Thunderbird offers a user-friendly interface and a wide range of features to enhance productivity and organization.
One of the key advantages of using Mozilla Thunderbird is its compatibility with various operating systems, including Windows, macOS, and Linux. This cross-platform availability makes it a versatile choice for users across different devices and operating systems.
With Thunderbird, users can easily set up and manage their email accounts from various providers, including Outlook.com. This enables users to access their Outlook.com emails directly from Thunderbird, eliminating the need to log in to the Outlook web client separately.
Additionally, Thunderbird supports advanced email management features such as customizable filters, tags, and folders. These features allow users to efficiently organize and sort their emails, making it easier to locate important messages and reduce inbox clutter.
Another notable feature of Thunderbird is its ability to handle a large number of emails and accounts. Users can configure Thunderbird to manage multiple email accounts simultaneously, whether they are from the same provider or different ones. This makes it convenient for individuals who need to handle emails from multiple domains or organizations.
Furthermore, Thunderbird offers a robust search functionality that enables users to quickly find specific emails based on various criteria, including sender, subject, and keywords. This can be particularly useful when dealing with a large number of emails or when trying to locate specific information.
In addition to its email management features, Thunderbird supports various add-ons and extensions that extend its functionality. These add-ons can enhance productivity, security, and customization options according to the user’s requirements.
Overall, Mozilla Thunderbird provides a reliable and feature-rich email client solution for individuals and businesses alike. Its user-friendly interface, cross-platform compatibility, and extensive functionality make it a popular choice among users looking for an alternative to web-based email clients.
Setting up Mozilla Thunderbird
Setting up Mozilla Thunderbird is a straightforward process that allows you to quickly start using the email client for efficient email management. Here are the steps to set up Thunderbird on your computer:
1. Download and Install: Go to the official Mozilla Thunderbird website and download the latest version of the software for your operating system. Once the installation file is downloaded, run it and follow the on-screen instructions to install Thunderbird on your computer.
2. Launch Thunderbird: After the installation is complete, launch Thunderbird from your desktop or start menu. You will be greeted with a welcome screen that prompts you to set up a new email account.
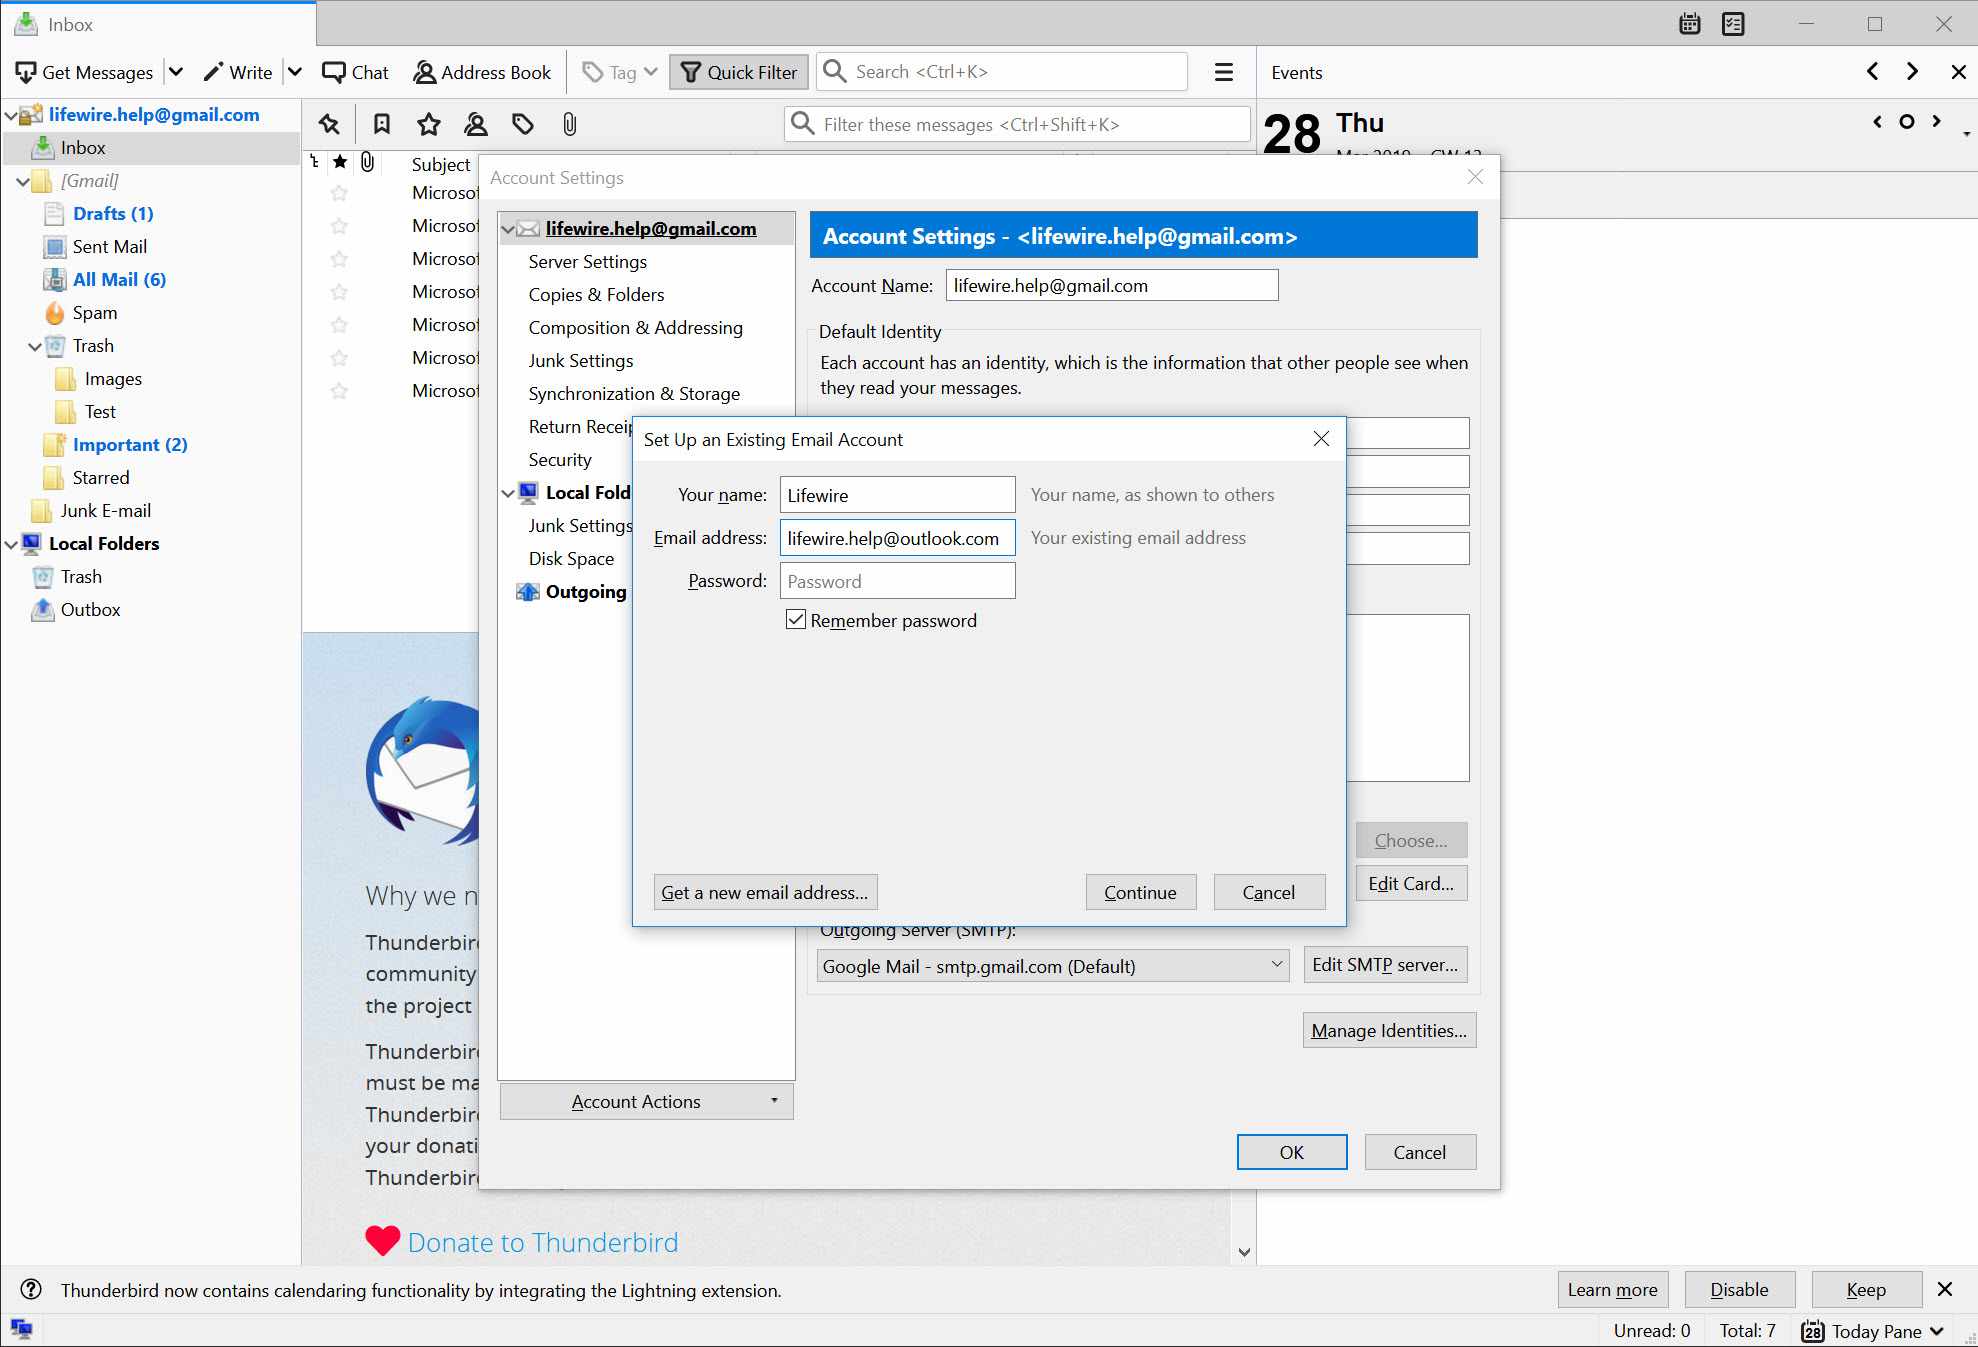
3. Add an Email Account: Click on the “Skip this and use my existing email” link on the welcome screen. This will take you to the Account Setup window where you can add your Outlook.com email account.
4. Enter Your Account Information: In the Account Setup window, enter your name, email address, and password associated with your Outlook.com account. Thunderbird will automatically configure the server settings based on your email address. Click on “Continue” to proceed.
5. Verify Account Settings: Thunderbird will attempt to automatically detect the correct settings for your Outlook.com account. Check the information displayed and make any necessary adjustments if required. Once you are satisfied, click on “Done”.
6. Start Using Thunderbird: Thunderbird will now synchronize your Outlook.com emails, folders, and contacts. Once the synchronization is complete, you can start using Thunderbird to manage your Outlook.com emails and take advantage of its various features and functionalities.
7. Additional Email Accounts: If you have multiple email accounts that you would like to integrate into Thunderbird, you can repeat the process by clicking on “File” in the Thunderbird menu, selecting “New,” and then choosing “Existing Mail Account.” Enter the account information as instructed to add another email account.
That’s it! You have successfully set up Thunderbird and added your Outlook.com email account. Thunderbird will continue to sync your emails in the background, providing you with convenient access to all your messages and allowing you to efficiently manage your email communication.
Adding an Outlook.com Email Account
Adding an Outlook.com email account to Mozilla Thunderbird allows you to access and manage your Outlook emails directly from the Thunderbird interface. Follow these steps to add your Outlook.com email account to Thunderbird:
1. Open Thunderbird: Launch Mozilla Thunderbird on your computer. If this is your first time using Thunderbird, you will be prompted to set up an email account. If not, click on “File” in the Thunderbird menu and select “New,” followed by “Existing Mail Account”.
2. Enter Your Email: In the Account Setup window, enter your Outlook.com email address in the provided field. Click on “Continue”.
3. Select Account Type: Thunderbird will automatically detect the email service associated with your email address. In this case, it should identify it as Outlook.com. Make sure that the account type is selected as “Outlook.com”. If it is not, manually select it from the drop-down menu.
4. Provide Your Password: Enter the password associated with your Outlook.com email account. If you want Thunderbird to remember your password and automatically log you in, check the box next to “Remember Password”. Click on “Continue”.
5. Verify the Account Settings: Thunderbird will attempt to automatically configure the server settings for your Outlook.com account. It will retrieve information such as incoming and outgoing server addresses, port numbers, and encryption methods. Verify the settings and make any necessary adjustments if required.
6. Account Name: Provide a name for the account that will be displayed in the Thunderbird interface. This can be your name or a descriptive label indicating the purpose of the specific Outlook.com account, such as “Personal” or “Work”. Click “Done” to complete the setup.
7. Synchronization: Thunderbird will begin synchronizing your Outlook.com emails, folders, and contacts to your local Thunderbird client. This process may take some time, depending on the size of your mailbox and the speed of your internet connection.
Once the synchronization is complete, you can start using Thunderbird to access and manage your Outlook.com emails effortlessly. Thunderbird offers various features and customization options that enhance your email management experience, allowing you to organize, search, and compose emails efficiently.
By adding your Outlook.com account to Thunderbird, you can enjoy the convenience of accessing multiple email accounts in one place, streamlining your email management process and improving productivity.
Configuring the Email Account Settings
Once you have added your Outlook.com email account to Mozilla Thunderbird, you may want to customize and configure certain settings to tailor the email client to your preferences. Here are some key account settings you can configure in Thunderbird:
1. Incoming and Outgoing Server Settings: Access the account settings by clicking on “Tools” in the Thunderbird menu, selecting “Account Settings,” and choosing the Outlook.com account from the left-hand sidebar. Here, you can view and modify the incoming and outgoing server settings, including server addresses, port numbers, and encryption methods.
2. Account Security: Thunderbird supports various security protocols, such as SSL/TLS and STARTTLS, to encrypt your email communication. You can enable these options for added security by going to the “Security” tab in the account settings. Make sure to select the appropriate options and choose the desired level of encryption.
3. Folder Synchronization: By default, Thunderbird synchronizes all folders and messages from your Outlook.com account. However, you can customize this setting by going to the “Synchronization & Storage” tab in the account settings. Here, you can choose which folders to synchronize and adjust other synchronization options, such as the frequency of synchronization and download limit.
4. Message Composition: Thunderbird allows you to configure various settings related to composing and sending emails. These settings include font styles, message format (HTML or plain text), spell-checking, and signature configuration. You can access these options by going to the “Composition & Addressing” tab in the account settings.
5. Automatic Archiving: Thunderbird offers the option to automatically archive your Outlook.com emails to keep a local copy and declutter your mailbox. You can set up automatic archiving by going to the “Automatic Archiving” tab in the account settings. Here, you can define the archiving criteria, such as the age of the emails and the folders to be archived.
6. Account Display: Thunderbird allows you to customize how your Outlook.com account is displayed in the email client. You can change the account name, choose a custom color for the account, and specify the order in which the accounts appear in the Thunderbird sidebar. These options can be accessed in the “Server Settings” tab of the account settings.
7. Advanced Settings: For advanced users, Thunderbird provides additional options to fine-tune the behavior of the Outlook.com account. These settings include adjusting connection timeouts, configuring proxy settings, and managing offline storage. You can access the advanced settings by clicking on the “Advanced” tab in the account settings.
By modifying and customizing these account settings, you can optimize your Thunderbird experience and tailor it to your specific needs. Whether you prefer enhanced security measures, personalized message composition, or specific synchronization preferences, Thunderbird offers the flexibility to configure your Outlook.com email account according to your preferences.
Syncing Outlook.com with Mozilla Thunderbird
Syncing your Outlook.com email account with Mozilla Thunderbird allows you to keep your emails, contacts, and calendar events up-to-date across both platforms. Thunderbird provides seamless integration with Outlook.com, ensuring that any changes made in one application are reflected in the other. Here’s how to sync your Outlook.com account with Thunderbird:
1. Automatic Setup: When you add your Outlook.com account to Thunderbird, the initial setup process automatically configures synchronization options for emails, contacts, and calendar events. Thunderbird will start syncing your Outlook.com content in the background, ensuring that any new messages, contacts, or events are immediately reflected in both Thunderbird and Outlook.com.
2. Manual Sync: If you want to initiate a manual sync or check for any updates, you can do so by selecting your Outlook.com account in the Thunderbird sidebar and clicking on “Get Messages” in the toolbar. Thunderbird will connect to your Outlook.com account and retrieve any new emails and updates. This ensures that you have the most recent information available at your fingertips.
3. Synchronization Frequency: By default, Thunderbird is set to automatically sync your Outlook.com account at regular intervals. You can customize the synchronization frequency by going to the account settings for your Outlook.com account. In the “Server Settings” tab, adjust the value in the “Check new messages every X minutes” field to your desired synchronization frequency.
4. Calendar Synchronization: Thunderbird supports syncing your Outlook.com calendar with its Lightning calendar extension. To enable calendar synchronization, install the Lightning extension in Thunderbird by going to “Tools” in the Thunderbird menu, selecting “Add-ons,” and searching for “Lightning”. Once installed, you can add your Outlook.com calendar by clicking on the calendar tab in Thunderbird, selecting “New Calendar,” and choosing “On the Network”. Follow the prompts to configure the Outlook.com calendar synchronization.
5. Address Book Synchronization: Thunderbird can sync your Outlook.com contacts with its integrated address book. When you add your Outlook.com account to Thunderbird, the address book synchronization is configured automatically. Any new contacts added in Thunderbird or Outlook.com will be synced between the two platforms, ensuring that you have access to all your contacts in both applications.
6. Syncing Multiple Accounts: If you have multiple Outlook.com accounts or other email accounts added to Thunderbird, each account will be individually synced. This allows you to manage and access emails, contacts, and calendar events from different accounts in one unified interface.
By syncing Outlook.com with Mozilla Thunderbird, you can stay organized and up-to-date across both platforms. Whether you’re accessing your emails on Thunderbird or Outlook.com, you can be confident that any changes or updates you make will seamlessly sync between the two, providing a consistent and convenient email management experience.
Managing Outlook.com Folders in Thunderbird
One of the advantages of using Mozilla Thunderbird with your Outlook.com email account is the ability to manage your Outlook.com folders directly from Thunderbird. This allows you to organize and categorize your emails efficiently. Here’s how you can manage Outlook.com folders in Thunderbird:
1. Viewing Folders: When you add your Outlook.com account to Thunderbird, all your Outlook.com folders will be automatically synced and displayed in the Thunderbird sidebar. You can expand or collapse the folder hierarchy to navigate through your folders.
2. Creating Folders: To create a new folder in Thunderbird, right-click on the parent folder where you want the new folder to be created. Select “New Folder” from the context menu and enter a name for the new folder. The folder will be created both in Thunderbird and on the Outlook.com server, ensuring synchronization between the two platforms.
3. Deleting Folders: To delete a folder in Thunderbird, right-click on the folder you want to delete and select “Delete” from the context menu. Confirm the deletion if prompted. The folder will be deleted from both Thunderbird and the Outlook.com server.
4. Moving Emails: Thunderbird allows you to move emails between folders easily. Simply select the email(s) you want to move, right-click, and choose “Move To” from the context menu. Select the target folder where you want to move the emails. The emails will be moved to the selected folder in Thunderbird and will be synchronized with the Outlook.com server.
5. Renaming Folders: If you want to rename a folder in Thunderbird, right-click on the folder and select “Rename” from the context menu. Enter the new name for the folder and press Enter or click outside the folder to save the changes. The folder name will be updated both in Thunderbird and on the Outlook.com server.
6. Marking Folders as Favorite: Thunderbird allows you to mark your frequently used Outlook.com folders as favorites for quick and easy access. To mark a folder as a favorite, right-click on the folder and select “Mark as Favorite” from the context menu. The folder will be added to the Favorites section in the Thunderbird sidebar for easy navigation.
7. Folder Subscriptions: Thunderbird provides the option to subscribe or unsubscribe to specific Outlook.com folders. This feature allows you to choose which folders you want to be displayed in Thunderbird, reducing clutter and focusing on folders that are important to you. To manage folder subscriptions, right-click on the Outlook.com account in the Thunderbird sidebar, select “Subscribe” from the context menu, and choose the folders you want to subscribe or unsubscribe to.
By effectively managing your Outlook.com folders in Thunderbird, you can keep your emails organized, easily navigate through your mailbox, and stay in control of your email communication. The synchronization between Thunderbird and Outlook.com ensures that any changes you make to your folders are reflected in both platforms, providing a seamless and consistent email management experience.
Composing and Sending Emails in Thunderbird
Mozilla Thunderbird provides a user-friendly interface for composing and sending emails with ease. Whether you’re drafting a quick message or creating a detailed email, Thunderbird offers a range of features to enhance your email composition experience. Here’s how you can compose and send emails in Thunderbird:
1. Click on “Write”: To start composing a new email, click on the “Write” button in the top toolbar of Thunderbird. This will open a new message window where you can enter the recipient’s email address, subject, and the content of your email.
2. Add Recipients: In the recipient field, enter the email addresses of the person or people you want to send the email to. You can add multiple recipients by separating their email addresses with a comma. Thunderbird also offers an address book lookup feature that autocompletes email addresses as you type.
3. Compose Your Message: In the body of the email, type your message. Thunderbird provides rich text editing capabilities, allowing you to format your text, add hyperlinks, change font styles, and include bulleted or numbered lists. You can also attach files to your email by clicking on the “Attach” button in the toolbar.
4. Spell-Check: To ensure your email is free from spelling and grammar errors, Thunderbird offers a built-in spell-checking feature. It automatically underlines misspelled words, allowing you to right-click on them and choose the correct spelling from the suggestions provided.
5. Attachments: If you want to include attachments in your email, click on the “Attach” button in the toolbar. This will open a file browser window, allowing you to select the file(s) you want to attach. Thunderbird supports various file types and allows you to attach multiple files to a single email.
6. Formatting Options: Thunderbird provides formatting options to enhance the appearance of your email. You can change the font style, size, and color of your text, align text, and create indents. You can access these formatting options by clicking on the respective buttons in the toolbar.
7. Signature: If you have set up a signature in Thunderbird, it will be automatically added to your emails. You can create a signature by going to “Tools” in the Thunderbird menu, selecting “Account Settings,” choosing the desired account, and clicking on the “Composition & Addressing” tab. Scroll down to the “Signature” section and enter your desired signature text.
8. Send Your Email: Once you have composed your email, reviewed it for accuracy, and added any necessary attachments, you are ready to send it. Click on the “Send” button in the top toolbar of the new message window, and Thunderbird will send your email to the specified recipients.
By utilizing Thunderbird’s intuitive interface and its range of email composition features, you can compose and send emails efficiently and professionally. With options for attachments, formatting, spell-checking, and signatures, Thunderbird provides a comprehensive solution for managing your email communication effectively.
Organizing Emails with Thunderbird’s Features
One of the key benefits of using Mozilla Thunderbird as your email client is its robust set of features that enable efficient organization and management of your emails. Thunderbird offers various tools and functionalities to help you stay organized and find important messages quickly. Here are some ways you can organize your emails using Thunderbird:
1. Folders: Thunderbird allows you to create folders to categorize your emails. You can create folders for different projects, clients, or personal topics. Simply right-click on the account name in the Thunderbird sidebar, select “New Folder”, and name the folder. You can then drag and drop emails into the respective folders for easy organization and reference.
2. Tags: Thunderbird provides a tagging system that allows you to label your emails with specific tags. Tags can be assigned based on priority, status, or any other criteria that suits your workflow. You can apply multiple tags to an email, making it easier to filter and search for specific messages later on.
3. Filters: Thunderbird’s filtering feature lets you automatically sort incoming emails into specific folders based on predefined criteria. Filters can be set up to handle specific senders, subjects, or keywords. You can create filters by going to “Tools” in the Thunderbird menu, selecting “Message Filters,” and then clicking on “New”. This feature helps you manage incoming emails and keep your inbox organized.
4. Search: Thunderbird offers a powerful search functionality that allows you to quickly find specific emails using various search criteria. The search bar, located at the top right corner of the Thunderbird window, allows you to search by sender, subject, content, or other filter options. You can also save search queries as virtual folders for convenient access to frequently searched emails.
5. Archiving: Thunderbird’s archiving feature allows you to move emails from the inbox or specific folders into an archive folder. Archiving helps declutter your mailbox while keeping important emails accessible. To archive an email or a group of emails, select them and drag them to the archive folder.
6. Junk Mail Controls: Thunderbird includes advanced junk mail controls that help filter out unwanted or spam emails. You can customize the junk mail settings by going to “Tools”, selecting “Options,” and then navigating to the “Privacy & Security” section. Thunderbird learns from your actions to improve the accuracy of its junk mail filtering over time.
7. Saved Searches: Thunderbird allows you to save frequently used search queries as virtual folders. Saved searches act as dynamic folders that display emails matching specific search criteria. To create a saved search, perform a search in Thunderbird using the desired criteria, and then right-click in the search results area and select “Save as Search Folder”.
By utilizing Thunderbird’s handy features, such as folders, tags, filters, search capabilities, archiving, and junk mail controls, you can efficiently organize and manage your emails. These tools enable you to stay on top of your inbox, locate important messages quickly when needed, and maintain a clutter-free email management experience.
Configuring Thunderbird’s Notification Settings
Mozilla Thunderbird offers various notification settings to keep you informed about incoming emails and updates. By configuring these settings, you can customize how Thunderbird notifies you of new messages, ensuring that you never miss important emails. Here’s how you can configure Thunderbird’s notification settings:
1. New Mail Alerts: Thunderbird can display a desktop alert or play a sound whenever a new email arrives in your inbox. To enable or customize new mail alerts, go to “Tools” in the Thunderbird menu, select “Options,” and navigate to the “General” tab. Here, you can choose to display an alert, play a sound, or both. You can also modify the duration and appearance of the desktop alert.
2. Enabling Sound Notifications: Thunderbird provides a range of built-in sounds for email notifications. To enable or change the sound notification, go to “Tools” in the Thunderbird menu, select “Options,” and click on the “General” tab. Under the “When new messages arrive” section, click on the “Choose…” button to select a different sound or upload a custom sound file.
3. Creating Filters for Specific Alerts: Thunderbird allows you to create filters that trigger specific notifications for certain types of incoming emails. For example, you can set up a filter to play a different sound or display a unique alert for emails from specific senders or with specific keywords. To create a filter, go to “Tools,” select “Message Filters,” and click on “New”. Set the desired filter criteria and configure the action to trigger the specific notification.
4. Configuring Mail Notification Sound Volume: To adjust the volume of the sound played for new email notifications, go to “Tools,” select “Options,” and navigate to the “General” tab. Under the “When new messages arrive” section, click on the “Settings…” button next to the sound selection. Adjust the volume slider to your desired level and click “OK” to save the changes.
5. Notification Badge: Thunderbird can display a badge on its taskbar icon or system tray icon to indicate the number of unread emails. To enable or disable the notification badge, go to “Tools,” select “Options,” and navigate to the “General” tab. Under the “When new messages arrive” section, check or uncheck the “Show an alert notification badge” option.
6. Snooze Notifications: Thunderbird allows you to snooze notifications for a specific duration, temporarily disabling alerts for incoming emails. To snooze notifications, right-click on the Thunderbird icon in the system tray or taskbar, select “Snooze”, and choose the desired snooze duration. Thunderbird will temporarily suspend new mail alerts during the snooze period.
7. Do Not Disturb Mode: Thunderbird’s Do Not Disturb mode allows you to temporarily turn off notifications during specific times of the day. This is useful when you want to focus on work or need uninterrupted time. To configure Do Not Disturb mode, go to “Tools,” select “Options,” and navigate to the “General” tab. Under the “When new messages arrive” section, click on the “Do Not Disturb” button, specify the time range, and select the desired days.
By configuring Thunderbird’s notification settings according to your preferences, you can stay informed about new emails and updates without being overwhelmed. These settings allow you to customize the way Thunderbird notifies you, ensuring that you can manage your email communication efficiently while maintaining control over your notifications.
Troubleshooting Common Issues
Mozilla Thunderbird is a reliable email client, but occasionally, you may encounter issues that can disrupt your email management experience. Here are some common issues you might face while using Thunderbird and steps to troubleshoot them:
1. Connection Issues: If Thunderbird is unable to connect to your email server or experiences intermittent connection problems, start by checking your internet connection. Ensure that you have a stable internet connection and try restarting Thunderbird. You can also verify your email server settings and make sure they are configured correctly in Thunderbird’s account settings.
2. Email Sync Problems: If Thunderbird fails to sync your emails or displays outdated information, first verify that your email account is correctly configured in Thunderbird. Ensure that you have a stable internet connection and try manually triggering a sync by right-clicking on the account name in the Thunderbird sidebar, selecting “Get Messages,” and choosing the desired sync option.
3. Missing Emails or Folders: If you notice that certain emails or folders are missing in Thunderbird, check the folder subscriptions in Thunderbird’s account settings. Ensure that the missing folders are subscribed to and displayed. If the issue persists, attempt to repair the folder hierarchy by right-clicking on the account name in the Thunderbird sidebar, selecting “Properties,” and clicking on the “Repair Folder” button.
4. Slow Performance: If Thunderbird seems slow or unresponsive, first ensure that your computer meets the minimum system requirements for Thunderbird. Also, make sure that you are using the latest version of Thunderbird. Try disabling any unnecessary add-ons or extensions, as they might impact performance. Clearing the Thunderbird cache and compacting folders can also help improve performance. Go to “Tools,” select “Options,” navigate to the “Advanced” tab, and click on the “Network & Disk Space” section to access the options for cache clearing and folder compacting.
5. Login Errors: If you are encountering login errors when attempting to access your email account in Thunderbird, double-check your email account credentials. Ensure that the username, password, and server settings are entered correctly. You may also need to enable app-specific passwords or two-factor authentication if your email provider requires them. If the issue persists, try resetting your email account password and updating it in Thunderbird’s account settings.
6. Email Sending Failure: If you are unable to send emails from Thunderbird, ensure that your outgoing server settings are correct. Verify that the server address, port number, and authentication settings match those provided by your email service provider. Additionally, check whether your internet service provider (ISP) is blocking the default SMTP port (Port 25). If so, change the outgoing port to an alternative, such as Port 587 or Port 465, and enable the appropriate encryption option (TLS or SSL).
7. Junk Mail Filtering: If Thunderbird’s junk mail filter is not effectively catching spam or is marking legitimate emails as junk, review the junk mail settings in Thunderbird’s options. Go to “Tools,” select “Options,” and navigate to the “Privacy & Security” section. Adjust the sensitivity levels, whitelist trusted senders’ email addresses, or mark specific messages as not junk to fine-tune the junk mail filtering.
If you encounter any other issues or are unable to resolve the problem yourself, consider seeking support from the Thunderbird community forums or the official Mozilla Thunderbird support channels. Remember to provide detailed information about the issue, including error messages and steps you have already taken to troubleshoot.
By addressing these common issues and following the troubleshooting steps outlined above, you can minimize disruptions and keep Thunderbird running smoothly, ensuring a seamless email management experience.