
How to Change Apple ID Email
As an Apple user, you may eventually need to change the email address linked to your Apple ID. Whether you’re switching to a new email provider or simply want to update your contact information, the process is relatively straightforward. Follow the steps below to change your Apple ID email:
- Open the browser of your choice and go to the Apple ID account page.
- Sign in to your Apple ID with your current email address and password.
- Scroll down to the “Account” section and click on “Edit” next to the “Account” field.
- Click on “Change Email Address.”
- Enter your new email address in the provided field and click “Continue.”
- You will receive a verification email at the new address. Go to your inbox and open the email from Apple.
- Click on the link in the email to verify your new email address.
- Once verified, sign in to your Apple ID again using your new email address and password.
It’s important to note that changing your Apple ID email address will also change the email address you use to sign in to the App Store, iTunes Store, and other Apple services. Make sure to update this information on your devices as well.
If you have any active subscriptions or pending authorizations, changing your Apple ID email may require you to verify your payment information. This is to ensure the security of your account and protect against unauthorized changes.
By following these steps, you can easily update your Apple ID email and ensure that future communication and purchases are sent to your correct email address. Remember to keep your Apple ID information secure and update it whenever necessary to maintain the integrity of your account.
How to Change Apple ID Password
Your Apple ID password is the key to accessing your personal data and purchases across all Apple devices. If you suspect any security concerns or simply want to update your password regularly for added protection, it’s important to know how to change your Apple ID password. Follow the steps below:
- On your device, go to the “Settings” app and tap on your name at the top.
- Select “Password & Security” or “Security,” depending on your device.
- Tap on “Change Password.”
- Enter your device passcode, if prompted.
- Next, you have the option to choose either “Password & Security” or “Change Password on Website.” Select the appropriate option based on your preference.
- If you choose “Password & Security,” enter your current password and then create a new password. Make sure to follow Apple’s password guidelines, which typically include a combination of upper and lowercase letters, numbers, and symbols.
- If you choose “Change Password on Website,” you will be directed to the Apple ID website. Sign in with your current password and follow the instructions to create a new password.
- Once you have entered your new password, tap on “Change” or “Change Password” to complete the process.
After changing your Apple ID password, it’s always a good idea to update your password on any devices or apps that use your Apple ID for sign-in. This ensures that you can continue to use your Apple services seamlessly without any interruptions.
Remember to choose a strong, unique password that is not easily predictable. Avoid using common words, personal information, or easily guessable patterns. Regularly updating your Apple ID password adds an extra layer of security and helps protect your personal information from unauthorized access.
By following these simple steps, you can change your Apple ID password and ensure the security of your Apple account. Keep your Apple ID password confidential and make it a habit to update it regularly to protect your personal data and privacy.
How to Change Apple ID Security Questions
Security questions play a vital role in safeguarding your Apple ID and protecting your personal information. If you believe your security questions have been compromised or if you simply want to update them for added security, you can change your Apple ID security questions using the following steps:
- Start by opening a browser on your device and visiting the Apple ID account page.
- Sign in to your Apple ID with your current email address and password.
- Scroll down to the “Security” section and click on “Change Security Questions.”
- You will be prompted to answer your current security questions for verification purposes. Once you have answered them correctly, click on “Continue.”
- Now, select new security questions from the dropdown menus and provide answers that are memorable to you but difficult for others to guess.
- Click on “Continue” to save your changes.
It’s crucial to choose security questions and answers that are easy for you to remember but difficult for others to guess or research. Avoid using questions that have readily available answers or can be easily guessed from social media profiles or public information.
Changing your security questions periodically is a proactive measure to maintain the security of your Apple ID. If you suspect any unauthorized access to your account or receive suspicious emails, it’s crucial to update your security questions right away.
Additionally, keep in mind that Apple may prompt you to answer your security questions when accessing certain features or making sensitive changes to your account. By selecting unique and memorable security questions, you enhance the protection of your Apple ID and reduce the risk of unauthorized access.
By following the steps outlined above, you can easily update your Apple ID security questions and ensure the continued security of your account. Regularly reviewing and updating your security settings is an essential practice for maintaining the privacy of your personal information.
How to Change Apple ID Two-Factor Authentication
Two-Factor Authentication (2FA) adds an extra layer of security to your Apple ID by requiring a verification code in addition to your password when signing in to your account. If you want to change the settings for your Apple ID Two-Factor Authentication, follow the steps below:
- On your Apple device, go to the “Settings” app and tap on your name at the top.
- Tap on “Password & Security” or “Security,” depending on your device.
- Under the “Two-Factor Authentication” section, tap on “Turn On Two-Factor Authentication” if it’s currently disabled.
- Follow the on-screen instructions to set up Two-Factor Authentication for your Apple ID. This typically involves verifying your phone number and setting up a trusted device.
- If you have already enabled Two-Factor Authentication and want to make changes, tap on “Edit” or “Turn Off Two-Factor Authentication” and follow the instructions provided by Apple.
When changing or adjusting Two-Factor Authentication settings, it’s important to have access to the trusted devices associated with your Apple ID. This ensures that you can receive verification codes and authenticate your identity securely.
Please note that Two-Factor Authentication enhances the security of your Apple ID by adding an additional layer of verification. It is recommended to keep this feature enabled to protect your Apple ID and the personal information associated with it.
By following these steps, you can easily change the Two-Factor Authentication settings for your Apple ID. It’s important to stay vigilant and ensure that you have access to trusted devices and phone numbers that will receive verification codes when signing in or making changes to your account.
How to Change Apple ID Billing Address
Your Apple ID billing address is the address associated with your payment method, and it’s essential to keep it up to date to ensure smooth transactions and accurate billing. If you have moved or need to update your billing address for any other reason, follow the steps below:
- On your device, go to the “Settings” app and tap on your name at the top.
- Tap on “Payment & Shipping” or “iTunes & App Store” and then on your Apple ID at the top of the screen.
- Choose “View Apple ID” and sign in with your Apple ID password or use Touch ID/Face ID to authenticate.
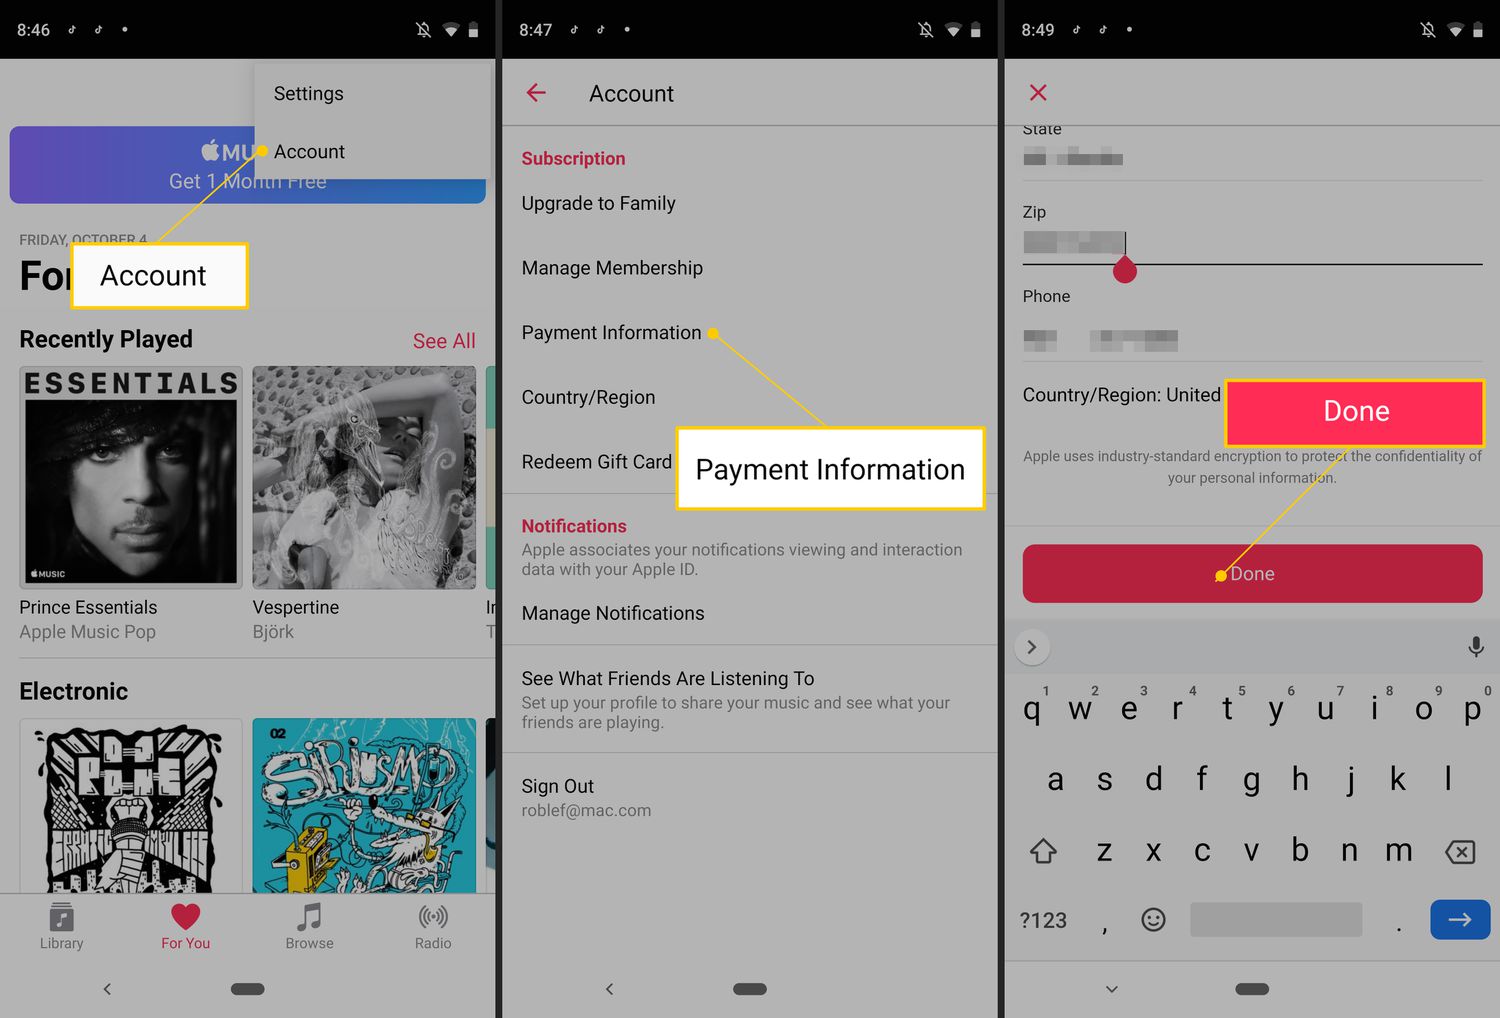
- Scroll down to the “Payment & Shipping” section and tap on “Edit” next to your billing address.
- Edit the necessary fields, including your name, street address, city, state/province, postal code, and country. Make sure to enter your new billing address accurately.
- Tap on “Done” to save your changes.
It’s important to note that changing your Apple ID billing address may affect your access to certain services or content restricted to specific regions. Make sure to update your billing address accordingly if you have moved to a different country or region.
If you have an active subscription or pending purchase, changing your billing address may require you to verify your payment information to ensure the security of your account.
By following these steps, you can easily update your Apple ID billing address and ensure that your payment details are correct. Keeping your billing address up to date is important for hassle-free transactions and to avoid any issues with payments or subscriptions.
How to Change Apple ID Credit Card
If you need to update the credit card information associated with your Apple ID, whether due to a new card or an expired one, you can easily do so by following these steps:
- On your device, go to the “Settings” app and tap on your name at the top.
- Tap on “Payment & Shipping” or “iTunes & App Store” and then on your Apple ID at the top of the screen.
- Choose “View Apple ID” and sign in with your Apple ID password or use Touch ID/Face ID to authenticate.
- Scroll down to the “Payment & Shipping” section and tap on “Edit” next to your payment information.
- Select “Add Credit or Debit Card” to enter your new card details.
- You can either manually enter the required information, such as the card number, expiration date, and cardholder’s name, or use the camera on your device to scan your card.
- Review the entered information and tap on “Next” to proceed.
- If prompted, authenticate the changes with your Apple ID password or other verification methods.
- Once your new credit card information is added, it will be automatically updated for your Apple ID purchases.
It’s important to keep your credit card information up to date to ensure successful transactions and avoid any interruption in accessing paid apps, subscriptions, or other Apple services.
If you have an active subscription or pending charges, you may need to verify the new credit card details to ensure the security of your account.
By following these steps, you can effortlessly update the credit card associated with your Apple ID, enabling seamless and secure transactions across all your Apple devices.
How to Change Apple ID Payment Method
Changing your Apple ID payment method allows you to update the payment source associated with your account, ensuring smooth and uninterrupted transactions. Whether you want to switch to a different credit or debit card, add a new payment method, or remove an existing one, you can do so by following the steps below:
- On your device, go to the “Settings” app and tap on your name at the top.
- Tap on “Payment & Shipping” or “iTunes & App Store” and then on your Apple ID at the top of the screen.
- Choose “View Apple ID” and sign in with your Apple ID password or use Touch ID/Face ID to authenticate.
- Scroll down to the “Payment & Shipping” section and tap on “Edit” next to your payment information.
- Select the payment method you want to change or add by tapping on the appropriate option.
- Depending on the desired change, you may be asked to enter your credit or debit card information, sign in to your account with the new payment provider, or follow prompts to add an alternative payment method such as PayPal.
- Review the changes and tap on “Save” or “Done” to finalize the update.
It’s important to note that if you have an active subscription or pending charges, updating your Apple ID payment method may require you to verify the new payment details to ensure the security and validity of your account.
By following these steps, you can easily change or add a new payment method to your Apple ID, providing you with flexibility and convenience when making purchases from the App Store, iTunes Store, and other Apple services. Keeping your payment information up to date ensures smooth transactions and prevents any interruption in accessing paid apps, subscriptions, or other Apple services.
How to Change Apple ID Phone Number
Ensuring that your Apple ID has an accurate and up-to-date phone number is important for security and account recovery purposes. If you need to change the phone number associated with your Apple ID, follow the steps below:
- On your device, go to the “Settings” app and tap on your name at the top.
- Tap on “Password & Security” or “Security,” depending on your device.
- Tap on “Edit” next to the “Phone Numbers” section.
- Tap on “Add a Trusted Phone Number” to add a new phone number or “Edit” next to your existing phone number to make changes.
- Enter the new phone number or make the necessary edits to your existing phone number.
- Choose the verification method for your new phone number, such as receiving a text message or a phone call.
- Follow the on-screen prompts to verify and confirm the new phone number.
It’s important to note that changing your Apple ID phone number will affect the two-factor authentication process and other security measures. Make sure to choose a phone number that is accessible and belongs to you.
By keeping your Apple ID phone number up to date, you can ensure effective communication, account recovery, and security verification. This becomes especially crucial if you ever experience any issues with your Apple ID or need to recover your account.
Remember to update your phone number not only on your device but also in other Apple services and devices associated with your Apple ID, such as iCloud, iMessage, FaceTime, and Find My iPhone.
By following these steps, you can easily change or update the phone number associated with your Apple ID, ensuring accurate communication and enhancing the security features of your account.
How to Change Apple ID Country or Region
If you have moved to a new country or region, or if you simply want to switch your Apple ID to a different country or region, you can change the country or region associated with your Apple ID by following these steps:
- On your device, go to the “Settings” app and tap on your name at the top.
- Tap on “Media & Purchases” or “iTunes & App Store” and then on your Apple ID at the top of the screen.
- Choose “View Apple ID” and sign in with your Apple ID password or use Touch ID/Face ID to authenticate.
- Tap on “Country/Region” and select the country or region you want to change to from the list.
- Review the Terms and Conditions for the selected country or region and tap on “Agree” to proceed.
- Enter your payment information for the new country or region, including a valid payment method and billing address.
- Follow the on-screen prompts to complete the process and update your Apple ID to the new country or region.
Changing your Apple ID country or region may affect the availability of certain apps, services, and content that are specific to certain regions. Make sure to review the regional restrictions and requirements before making any changes.
Keep in mind that some features, such as Apple Pay and Apple News, may not be available or have limited functionality in certain countries or regions. Check Apple’s support website for specific details on the availability of these features.
By following these steps, you can easily change the country or region associated with your Apple ID, allowing you to access region-specific content and services. It’s important to ensure that your payment method and billing address are valid and match the requirements of the new country or region.
How to Change Apple ID Display Name
Your Apple ID display name is the name that appears when you communicate through Apple’s services, such as iMessage, FaceTime, and iCloud email. If you want to change your Apple ID display name, you can do so by following these simple steps:
- On your device, go to the “Settings” app and tap on your name at the top.
- Tap on “Name, Phone Numbers, Email” or “Contactable at” depending on your device.
- Select “Name” or “Edit Name” to change your display name.
- Enter your desired new display name.
- Tap on “Save” or “Done” to save your changes.
Changing your Apple ID display name can be helpful if you want to update your personal information or use a different name for your Apple-related communication. However, keep in mind that changing your Apple ID display name will not affect the name tied to your Apple ID email address or billing information.
Your Apple ID display name will appear when you communicate with others using Apple services such as iMessage, FaceTime, iCloud email, or other sharing features. It’s important to choose a display name that represents you accurately and professionally.
Please note that your Apple ID display name may be subject to certain limitations, including length restrictions and prohibited content. Apple enforces these guidelines to maintain a safe and respectful user experience.
By following these steps, you can easily change your Apple ID display name and ensure that your communication with others through Apple services reflects your desired name and identity.
How to Change Apple ID Profile Picture
Adding a personal profile picture to your Apple ID can help personalize your account and make it easily identifiable when interacting with others through Apple services. If you want to change your Apple ID profile picture, follow the steps below:
- On your device, go to the “Settings” app and tap on your name at the top.
- Tap on “Media & Purchases” or “iTunes & App Store” and then on your Apple ID at the top of the screen.
- Choose “View Apple ID” and sign in with your Apple ID password or use Touch ID/Face ID to authenticate.
- Tap on your existing profile picture or the placeholder image, located at the top of the screen.
- From the available options, select “Choose Photo” to pick an image from your photo library or “Take Photo” to capture a new picture using your device’s camera.
- Adjust the image as desired by resizing, cropping, or rotating it.
- Tap on “Choose” or “Save” to set the selected image as your new Apple ID profile picture.
When choosing a profile picture, make sure it is clear, appropriate, and represents you well. Apple sets guidelines regarding suitable content and ensures a safe and respectful user experience for all users.
Note that changing your Apple ID profile picture will reflect across Apple services where your profile is visible, such as iMessage, FaceTime, iCloud, and Game Center.
By following these steps, you can easily update and customize your Apple ID profile picture, adding a personal touch to your account and enhancing your interaction with others through Apple’s services.