
Adding Cards to Apple Wallet
Apple Wallet, the digital wallet on your iPhone, allows you to conveniently store and manage various cards, including credit and debit cards, loyalty cards, event tickets, boarding passes, and more. Adding cards to Apple Wallet is a straightforward process that brings all your important information into one easily accessible place. Here’s how you can add cards to Apple Wallet:
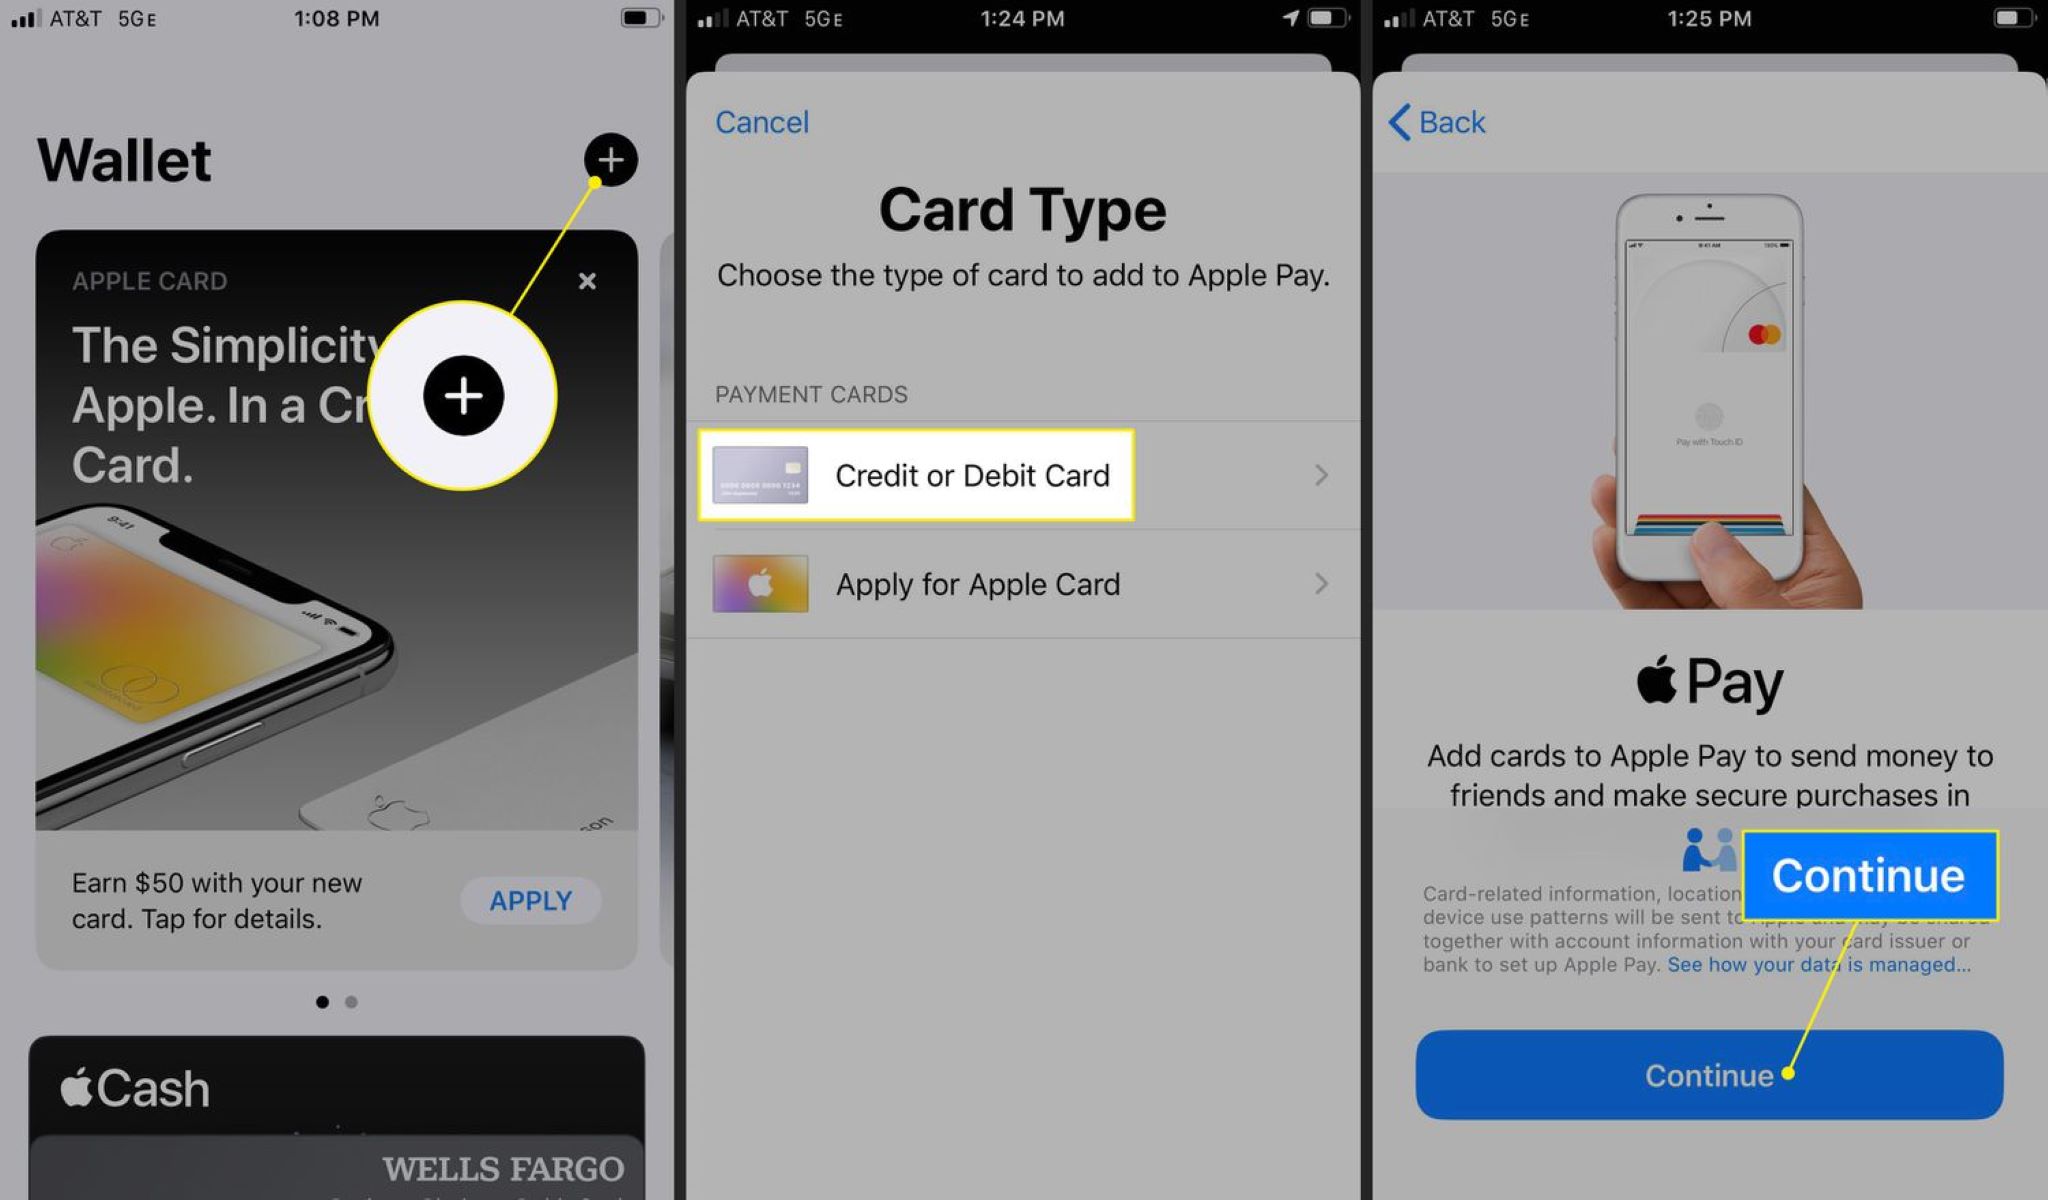
- Open the Wallet app on your iPhone.
- Tap on the “+” symbol in the top right corner of the screen.
- You will be presented with various options to add cards. For credit or debit cards, you can choose to add a card manually by entering the card details, or you can use the phone’s camera to scan the card information.
- Follow the on-screen instructions to enter or scan the card details, including the card number, expiration date, and security code.
- For supported banks and card issuers, you may have the option to add the card directly from the bank’s app, which can simplify the process even further.
- Once you have entered or scanned the card details, you may be prompted to verify your identity through text message or another method. This is to ensure the security of your card information.
- After the verification process, your card will be added to Apple Wallet, and you can begin using it for contactless payments, online purchases, and more.
By adding your cards to Apple Wallet, you eliminate the need for physical cards and reduce the risk of losing or misplacing them. Plus, using Apple Wallet for payment transactions is fast, secure, and convenient, allowing you to make purchases with just a tap of your iPhone.
Remember, not all cards are supported by Apple Wallet, so make sure to check with your card issuer for compatibility. Additionally, some cards may require additional setup or authentication steps, such as two-factor authentication, before they can be added to Apple Wallet.
Managing Payment Cards
Once you have added your payment cards to Apple Wallet, you can easily manage them to ensure smooth and secure transactions. Here are some key features and tips for managing payment cards in Apple Wallet:
- Reordering and removing cards: To customize the order of your cards, simply tap and hold a card in Apple Wallet, then drag it to your preferred position. If you wish to remove a card, swipe left on the card and tap the “Delete” button.
- Setting a default card: If you have multiple cards added to Apple Wallet, you can choose a default card for quick access. Simply go to Settings > Wallet & Apple Pay, select “Default Card,” and choose the card you want to set as the default for contactless payments.
- Card notifications: You can enable notifications for your payment cards to receive alerts for transactions, balance updates, and other relevant information. Open the Wallet app, select the card, tap the three dots in the top right corner, and toggle on the “Allow Notifications” option.
- Security features: Apple Wallet ensures the security of your payment card information with features like Face ID, Touch ID, or passcode verification. You can customize these security settings in your phone’s settings under Face ID & Passcode or Touch ID & Passcode.
- Card details: If you need to access the details of your payment card, including the card number, expiration date, and security code, you can find them in Apple Wallet. Simply tap on the card and select the three dots in the top right corner to view the card details.
By effectively managing your payment cards in Apple Wallet, you can ensure seamless transactions, keep track of your spending, and have quick access to the appropriate card when needed. Additionally, optimizing the security settings adds an extra layer of protection to safeguard your card information.
Note that managing cards may vary slightly depending on your iOS version and the specific card issuer’s policies. Always refer to the official Apple support documentation or contact your card issuer for any specific queries or issues you may encounter.
Using Apple Wallet for Contactless Payments
One of the most valuable features of Apple Wallet is its ability to make contactless payments using your iPhone. By adding your payment cards to Apple Wallet, you can enjoy the convenience of making secure transactions with just a simple tap. Here’s how you can use Apple Wallet for contactless payments:
- Ensure that the store or payment terminal supports contactless payments. Look for the contactless payment symbol, which resembles a sideways Wi-Fi signal, on the terminal.
- When you’re ready to make a payment, wake your iPhone and double-click the side button (on iPhones with Face ID) or the home button (on iPhones with Touch ID).
- Hold your iPhone near the payment terminal, within an inch or two, and authenticate yourself using Face ID, Touch ID, or your passcode.
- Once your identity is verified, the payment will be processed, and you will receive a confirmation on your screen, as well as an optional notification.
- For additional security, Apple Wallet generates a unique token for each transaction, ensuring that your actual card information is never shared with the merchant.
- If your transaction requires a higher level of authentication, such as for larger purchases, you may be prompted to enter your card’s security code.
Using Apple Wallet for contactless payments offers several advantages. It eliminates the need to carry physical cards, reduces the risk of card theft or loss, and speeds up checkout times. Additionally, Apple Wallet supports a wide range of payment cards, including credit and debit cards from major issuers, making it accessible to most users.
Remember that some countries or regions may have specific requirements or limitations for contactless payments. It’s always a good idea to check with your card issuer or local authorities to ensure compatibility and availability of contactless payment services in your area.
With Apple Wallet, your iPhone becomes not just a device for communication and entertainment, but also a secure and convenient tool for making contactless payments on the go.
Making Online Purchases with Apple Wallet
In addition to contactless payments in physical stores, Apple Wallet also enables you to make online purchases easily and securely. With the growth of e-commerce, using Apple Wallet for online transactions eliminates the need to manually enter payment details and provides a seamless checkout experience. Here’s how you can make online purchases using Apple Wallet:
- When you’re ready to make a purchase on a supported website or app, look for the Apple Pay or “Buy with Apple Pay” button during the checkout process.
- Tap on the Apple Pay button to initiate the payment process.
- If prompted, select the desired card from within Apple Wallet that you want to use for the purchase. You can choose from your added credit or debit cards.
- Confirm your payment using Face ID, Touch ID, or your device passcode.
- Once the payment is authenticated, the transaction will be completed, and you will receive a confirmation on the website or app.
- For added convenience and security, Apple Wallet may also pre-fill your shipping and billing information, making the checkout process faster and reducing the chances of errors.
Using Apple Wallet for online purchases offers several benefits. It saves time by eliminating the hassle of entering card details manually with each transaction. Additionally, using Apple Wallet adds an extra layer of security as your actual card information is not shared with the merchant, reducing the risk of data breaches or identity theft.
It’s worth noting that not all websites or apps support Apple Pay for online purchases. However, the availability of this payment option is continuously expanding, with many popular retailers and platforms allowing customers to use Apple Wallet for seamless online transactions.
By leveraging the power of Apple Wallet for online purchases, you can streamline the checkout process, enjoy a secure payment method, and have a convenient shopping experience from the comfort of your iPhone.
Organizing and Accessing Passes and Tickets
Apple Wallet goes beyond just payment cards and offers a convenient way to organize and access various passes and tickets in one place. Whether it’s airline boarding passes, event tickets, or loyalty program cards, Apple Wallet ensures easy access and management. Here’s how you can organize and access passes and tickets in Apple Wallet:
- When you receive a pass or ticket via email, message, or from a participating app, you may see an option to “Add to Apple Wallet.” Tap on this option to add the pass or ticket to your wallet.
- Once added, the pass or ticket will appear in your Apple Wallet, neatly organized and easily accessible.
- To view a pass or ticket, simply open the Wallet app and select the appropriate pass from the list.
- For added convenience, certain passes or tickets may display relevant information directly on the lock screen of your iPhone, allowing you to access them with just a swipe.
- When it’s time to use a pass or ticket, such as presenting an event ticket for entry, simply select the pass from Apple Wallet and follow the on-screen instructions.
- Many passes and tickets also feature dynamic updates, providing real-time information such as gate changes, seat upgrades, or event reminders.
By organizing and accessing passes and tickets in Apple Wallet, you can reduce the need for physical copies or searching through emails. This makes it easier to stay organized and ensures that you have the necessary information readily available when you need it.
Note that the availability and support for passes and tickets in Apple Wallet may vary depending on the specific event, airline, or loyalty program. It’s recommended to check with the issuing organization or consult their official documentation for more details on how to add and access passes or tickets in Apple Wallet.
With Apple Wallet, conveniently managing and accessing your passes and tickets has never been easier. Enjoy a clutter-free experience and a hassle-free way to store and retrieve important information right at your fingertips.
Using Apple Wallet for Airline Boarding Passes
Apple Wallet provides a convenient and efficient way to store and access your airline boarding passes, eliminating the need for printed tickets or searching through emails. With your boarding pass in Apple Wallet, you have everything you need for a smooth travel experience right on your iPhone. Here’s how you can use Apple Wallet for airline boarding passes:
- When you receive your boarding pass via email or through the airline’s app, look for an option to “Add to Apple Wallet.” Tap on this option to add your boarding pass to Apple Wallet.
- The boarding pass will automatically be stored in Apple Wallet, organized alongside your other passes and tickets.
- When you arrive at the airport, open the Wallet app and select your boarding pass from the list.
- Depending on the airline and airport, your iPhone may detect the NFC signal at the security checkpoint or boarding gate, allowing you to simply tap your iPhone on the reader to scan your boarding pass.
- If NFC is not available, you can show the QR code on your boarding pass to the airline staff for scanning.
- Once scanned, you will receive confirmation of your successful check-in or boarding.
- If there are any changes to your flight, such as gate changes or delays, the boarding pass in Apple Wallet will be automatically updated, ensuring you have the most up-to-date information.
Using Apple Wallet for airline boarding passes offers several benefits. It reduces the risk of losing or misplacing your physical ticket, allows for easy access and scanning at airport checkpoints, and streamlines the overall boarding process.
However, it is important to note that not all airlines or airports support boarding passes in Apple Wallet. Before your flight, it’s recommended to check with your airline or consult their official documentation for specific instructions on how to add and use boarding passes in Apple Wallet.
With Apple Wallet, traveling has never been more convenient. Effortlessly store and access your boarding passes on your iPhone, and breeze through security and boarding with ease.
Storing Loyalty Cards and Coupons in Apple Wallet
Apple Wallet is not just limited to payment cards and tickets; it also offers a convenient way to store and access your loyalty cards and coupons. By digitizing these items and keeping them in Apple Wallet, you can declutter your wallet and easily redeem rewards and discounts. Here’s how you can store loyalty cards and coupons in Apple Wallet:
- When you receive a loyalty card or coupon from a participating store or service, you may see an option to “Add to Apple Wallet.” Tap on this option to add the card or coupon to your wallet.
- The loyalty card or coupon will be added to Apple Wallet and organized alongside your other passes and tickets.
- To access a loyalty card or coupon, simply open the Wallet app and select the item from the list. You will see a digital representation of the card or coupon, including any relevant details such as account number or barcode.
- When you want to redeem a reward or coupon, present the digital card or coupon to the cashier or scan the barcode at the store or service. They will be able to process your rewards or discounts accordingly.
- In some cases, you may receive notifications or reminders from Apple Wallet when you are near a participating store, informing you of available rewards or discounts.
- For added convenience, Apple Wallet may also display notifications or updates for your loyalty cards, such as when you reach a certain threshold for a reward.
The ability to store loyalty cards and coupons in Apple Wallet offers several advantages. It eliminates the need to carry physical cards or paper coupons, reduces the chances of misplacing them, and allows for easy management and effortless redemption of rewards or discounts.
It’s important to note that not all retailers or service providers support loyalty cards or coupons in Apple Wallet. Before adding your loyalty cards or coupons, ensure that the specific store or service is compatible. You can typically find this information on their website or by contacting their customer support.
With Apple Wallet, managing your loyalty cards and coupons becomes a breeze. Enjoy a clutter-free wallet, hassle-free access to rewards and discounts, and seamless redemption at your favorite stores and services.
Using Apple Wallet for Public Transit
Apple Wallet extends its functionality beyond payment cards and passes to include the convenience of using public transit services. With Apple Wallet, you can store your transit tickets, passes, or fare cards, making your commuting experience smoother and more efficient. Here’s how you can use Apple Wallet for public transit:
- Check if your local transit authority supports Apple Wallet for ticketing. Many cities around the world have integrated their transit systems with Apple Wallet.
- If your transit authority supports Apple Wallet, download their app and look for an option to add your ticket or pass to Apple Wallet. Alternatively, you may receive a ticket or pass via email, message, or a specific contactless card that can be added to Apple Wallet.
- Tap on the appropriate option to add your ticket or pass to Apple Wallet. The ticket or pass will automatically appear in your Wallet app, ready for use.
- When boarding public transit, open the Wallet app and select the ticket or pass for your desired journey.
- Present your iPhone to the contactless reader or fare gate as you would with a physical ticket or card. The reader will verify your ticket or deduct the fare accordingly.
- When exiting the transit system, simply repeat the process, presenting your iPhone to the reader or gate to validate your ticket.
- For added convenience, some transit authorities may offer features like Express Transit, which allows you to use your Apple Wallet ticket or pass without the need to wake or authenticate your iPhone.
Using Apple Wallet for public transit offers several benefits. It reduces the need to carry physical tickets or fare cards, provides a seamless and fast way to access transit services, and often allows for real-time updates on your ticket or pass.
It’s important to note that the availability and support for Apple Wallet in public transit may vary depending on your location and the specific transit authority. Before relying on Apple Wallet for your transit needs, make sure to check with your local transit authority or consult their official documentation to ensure compatibility and availability of the service.
With Apple Wallet, navigating your city’s public transit becomes even more convenient. Enjoy a hassle-free and integrated ticketing experience right from your iPhone.
Sharing Cards and Passes with Others
Apple Wallet makes it easy to share your cards and passes with friends, family, or colleagues, allowing them to access the same benefits and convenience that you enjoy. Whether it’s a payment card, boarding pass, or loyalty card, here’s how you can share cards and passes with others using Apple Wallet:
- Open the Wallet app on your iPhone and locate the card or pass that you want to share.
- Tap on the card or pass to open its details.
- Look for the “Share” or “Send” option, usually represented by an arrow pointing upwards or a share icon. Tap on this option.
- You will be presented with different sharing methods, such as AirDrop, Messages, Mail, or other compatible apps installed on your iPhone.
- Select the desired sharing method and choose the recipient from your contacts or enter their details manually.
- Send the shared card or pass to the recipient.
- The recipient will receive the card or pass and can add it to their Apple Wallet by following the prompts. If it’s a payment card, they may need to enter the required card details.
- Once added to their Apple Wallet, the recipient can use the shared card or pass just like any other card or pass in their Wallet app.
Sharing cards and passes with others using Apple Wallet offers convenience and flexibility. Whether you want to share a joint payment card with a family member or send boarding passes to travel companions, it simplifies the process and ensures that everyone has the necessary information at hand.
It’s important to note that not all cards or passes can be shared in Apple Wallet, as it depends on the issuer’s policies and compatibility. For example, some loyalty programs may not allow sharing or may have limitations on the number of devices the pass can be added to.
Always ensure that you have the necessary permission to share a card or pass with someone else. Additionally, make sure to communicate any relevant instructions or details about the shared card or pass to the recipient to ensure a smooth experience.
With Apple Wallet, sharing cards and passes becomes effortless, allowing you to extend the benefits of your digital wallet to others for a more convenient and connected experience.
Troubleshooting Apple Wallet Issues
While Apple Wallet is designed to be seamless and user-friendly, you may encounter occasional issues or glitches. If you experience any problems with Apple Wallet, here are some troubleshooting steps to help resolve common issues:
- Ensure compatibility: Verify that your iPhone model and iOS version are compatible with Apple Wallet. Some features may require specific hardware or software versions to function properly.
- Check card compatibility: Not all cards are supported by Apple Wallet. If you’re having trouble adding a particular card, check with the card issuer to confirm if they support Apple Wallet integration.
- Restart your iPhone: A simple restart can often resolve temporary glitches or conflicts. Press and hold the power button, then slide to power off. Wait a few seconds, then press the power button again to turn your iPhone back on.
- Update iOS and Wallet app: Keeping your iOS and Wallet app up to date ensures that you have the latest features and bug fixes. Go to Settings > General > Software Update to check for any available updates.
- Re-add cards or passes: If you’re encountering issues with a specific card or pass, try removing it from Apple Wallet and then re-adding it. Open the Wallet app, tap on the card or pass, and select the “Remove” or “Delete” option. Then follow the steps to add it back.
- Check network connection: Some features of Apple Wallet, such as adding or refreshing passes, may require an active network connection. Ensure that you have a stable internet connection to ensure proper functionality.
- Reset settings: As a last resort, you can reset your iPhone settings to revert any changes that may be causing issues with Apple Wallet. Go to Settings > General > Reset > Reset All Settings. Keep in mind that this will reset all your settings to default and may require you to reconfigure certain preferences.
If the above troubleshooting steps do not resolve the issue, it’s recommended to contact Apple Support or the card issuer for further assistance. They can provide personalized guidance and help you troubleshoot specific problems that you may be experiencing.
Remember to always keep a backup of important information, such as card details or pass information, to avoid any data loss during troubleshooting or device-related issues.
By following these troubleshooting steps and seeking appropriate support, you can address common issues and enjoy a seamless experience with Apple Wallet.