
Sign up for Apple Pay
Apple Pay is a convenient and secure way to make payments using your iPhone, iPad, Apple Watch, or Mac. To start using Apple Pay, you’ll need to sign up and set up your digital wallet. Here’s how:
1. Open the Wallet app on your iPhone or iPad, or go to the Apple Pay section in the Settings app on your Apple Watch.
2. Tap on the option to add a new card or set up Apple Pay.
3. Follow the on-screen prompts to enter your card details. You can add credit or debit cards from participating banks and financial institutions.
4. Verify your card by following the verification process provided by your bank. This may involve entering a verification code sent via SMS or email, or contacting your bank directly.
5. Once your card is verified, you can start using Apple Pay to make purchases online, in-app, or at participating stores by simply holding your device near a contactless payment terminal.
It’s important to note that Apple Pay is available in select countries and regions, and not all banks and merchants may support the service. You may need to check with your bank or financial institution to verify if they are a participating provider.
Signing up for Apple Pay is quick and easy, and it offers a seamless and secure payment experience. By adding your cards to Apple Pay, you can leave your physical wallet at home and make transactions with just a touch or a glance. Give it a try and enjoy the convenience of Apple Pay.
Set up Apple Cash
Apple Cash is a feature of Apple Pay that allows you to send, receive, and request money from friends and family. To set up Apple Cash, follow these steps:
1. Open the Wallet app on your iPhone or iPad.
2. Tap on the Apple Cash card icon.
3. Select the option to set up Apple Cash.
4. Follow the on-screen instructions to enter your personal information, including your name, address, and date of birth.
5. Once your information is verified, you may be asked to add a debit card to link to your Apple Cash account. This card will be used to add funds to your Apple Cash balance.
6. If you prefer not to add a debit card, you can skip this step and still use Apple Cash to receive money. However, you won’t be able to send money or use Apple Cash for purchases without a linked debit card.
7. Once your Apple Cash account is set up, you can start sending and receiving money using Apple Pay. Just tap on the Apple Cash card, enter the amount you want to send or request, and choose a contact from your contacts list or enter their email address or phone number.
Apple Cash offers a convenient way to split bills, pay back friends, or send money for any reason. It’s easy to set up and even easier to use. Plus, with the added security of Apple Pay, you can trust that your money is protected during transactions.
Add a debit or credit card
To use Apple Pay, you’ll need to add a debit or credit card to your digital wallet. Here’s how:
1. Open the Wallet app on your iPhone or iPad.
2. Tap on the “+” icon to add a card.
3. If you have a physical card, you can choose to add it by scanning it with your device’s camera. Alternatively, you can enter the card details manually.
4. Follow the on-screen prompts to enter the card’s security code, expiration date, and billing information.
5. Once you’ve entered the details, your bank will verify the card. This process may vary depending on your bank, but it usually involves a verification code sent via SMS or email.
6. After the verification process is complete, your card will be added to Apple Pay, and you can start using it for contactless payments.
It’s worth noting that Apple Pay supports a wide range of debit and credit cards from various banks and financial institutions. However, not all cards may be eligible for Apple Pay, so it’s recommended to check with your bank to ensure compatibility.
Adding your debit or credit card to Apple Pay enables you to make fast and secure transactions without needing to carry your physical card with you. Whether you’re making purchases in-store, online, or using compatible apps, Apple Pay simplifies the payment process while ensuring the privacy and security of your payment information.
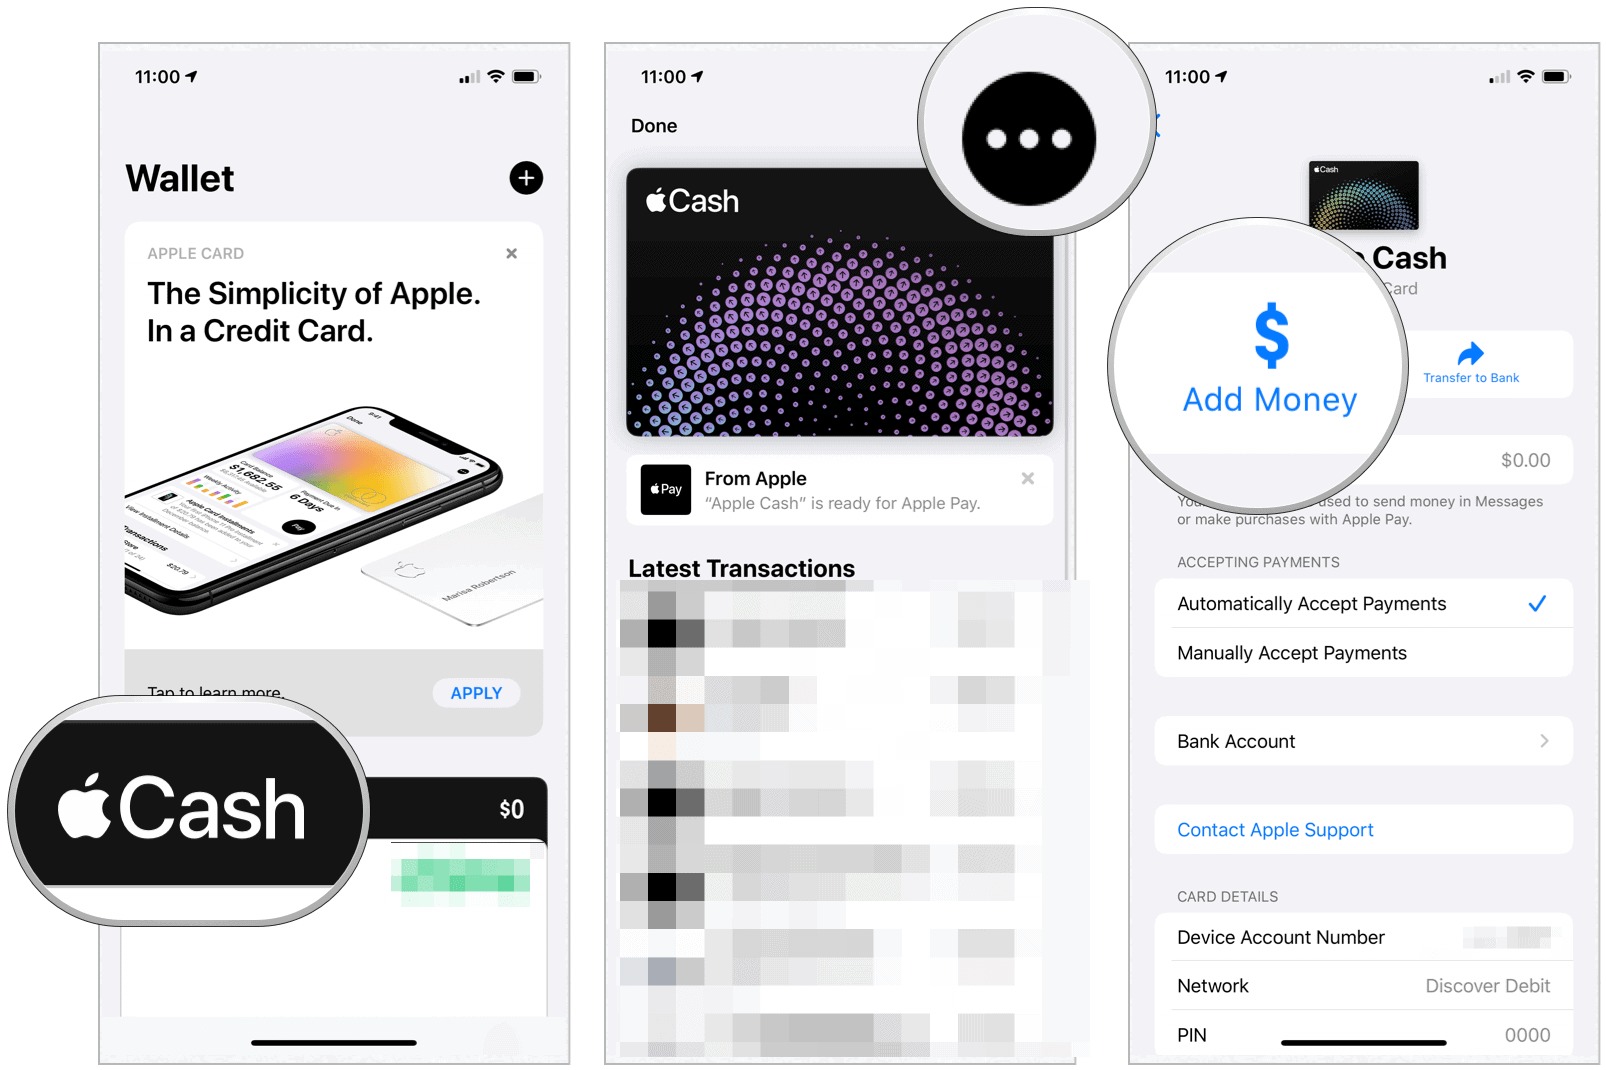
Add money to Apple Cash using a linked debit card
If you have a linked debit card, you can easily add money to your Apple Cash balance. Here’s how:
1. Open the Wallet app on your iPhone or iPad.
2. Tap on the Apple Cash card.
3. Look for the option to add money and tap on it.
4. Enter the amount you want to add to your Apple Cash balance.
5. Select your linked debit card as the payment method.
6. Verify the transaction using Touch ID or Face ID, or by entering your device passcode.
7. Once the transaction is confirmed, the funds will be added to your Apple Cash balance, and you can use them for purchases, send money to friends, or transfer the money to your linked bank account.
It’s important to note that there may be limits on how much money you can add to your Apple Cash balance using a linked debit card. These limits may vary depending on your bank and the terms of your Apple Cash account. It’s advisable to check with your bank or the Apple Cash support team to understand the specific limits that apply to you.
Adding money to your Apple Cash balance using a linked debit card gives you the flexibility and convenience to have funds readily available for various transactions. Whether you’re making a purchase or splitting a bill with friends, Apple Cash provides a seamless and secure way to manage your finances.
Add money to Apple Cash using a linked bank account
If you prefer to add money to your Apple Cash balance using a linked bank account, you can do so easily. Here’s how:
1. Open the Wallet app on your iPhone or iPad.
2. Tap on the Apple Cash card.
3. Look for the option to add money and tap on it.
4. Enter the amount you want to add to your Apple Cash balance.
5. Select your linked bank account as the payment method.
6. Verify the transaction using Touch ID or Face ID, or by entering your device passcode.
7. Once the transaction is confirmed, the funds will be transferred from your linked bank account to your Apple Cash balance.
It’s important to note that there may be limits on how much money you can add to your Apple Cash balance using a linked bank account. These limits may vary depending on your bank and the terms of your Apple Cash account. It’s advisable to check with your bank or the Apple Cash support team to understand the specific limits that apply to you.
Adding money to your Apple Cash balance using a linked bank account gives you the flexibility to manage your finances without the need for a physical debit or credit card. Whether you want to use the funds for purchases, send money to friends, or transfer the money to your linked debit card, Apple Cash provides a convenient and secure way to handle your financial transactions.
Add money to Apple Cash with a retail store gift card
If you have a retail store gift card, you may be able to add its value to your Apple Cash balance. Here’s how:
1. Open the Wallet app on your iPhone or iPad.
2. Tap on the Apple Cash card.
3. Look for the option to add money and tap on it.
4. Select the option to add money with a retail store gift card.
5. Use your device’s camera to scan the barcode on the back of the gift card or enter the card details manually as prompted.
6. Once the gift card information is verified, the value of the gift card will be added to your Apple Cash balance.
It’s important to note that not all retail store gift cards are compatible with Apple Cash. Apple Cash accepts select gift cards from participating merchants, so it’s advisable to check with the retailer or Apple’s official website to see if your gift card can be used to add money to your Apple Cash balance.
Adding money to your Apple Cash balance with a retail store gift card offers a great way to consolidate the value of your gift cards and conveniently use those funds for various transactions. Whether you received a gift card as a present or have one sitting in your wallet, take advantage of Apple Cash to easily utilize the value of your gift card for purchases, sending money, or transferring the funds to your linked bank account.
Add money to Apple Cash at an Apple Store
If you prefer to add money to your Apple Cash balance in person, you can visit an Apple Store and conveniently load funds onto your account. Here’s how:
1. Locate the nearest Apple Store by using the Apple Store app or visiting the Apple website.
2. Visit the Apple Store and approach a store employee at the service counter.
3. Let the employee know that you’d like to add money to your Apple Cash balance.
4. Provide the employee with the amount you want to add to your Apple Cash balance.
5. The employee will guide you through the payment process and add the requested funds directly to your Apple Cash balance.
6. Once the transaction is complete, you will have the added funds available in your Apple Cash balance for use with Apple Pay and other Apple Cash features.
It’s important to note that the ability to add money to your Apple Cash balance at an Apple Store may vary depending on the location and current store policies. Before visiting the store, it’s recommended to check with the specific Apple Store to confirm if this service is available.
Adding money to your Apple Cash balance at an Apple Store offers a convenient and personal way to manage your funds. Whether you prefer the in-person experience or have questions regarding the process, the knowledgeable Apple Store staff can assist you and ensure a smooth transaction.
Manage your Apple Pay balance
With Apple Pay, you have the ability to manage your Apple Pay balance right from your device. Here are some ways you can effectively manage your Apple Pay balance:
Check your balance: To view your Apple Pay balance, simply open the Wallet app on your iPhone or iPad. Your balance will be displayed on the Apple Cash card.
Add money: If you need to add funds to your Apple Pay balance, you can do so using a linked debit or credit card, a linked bank account, or a retail store gift card. Follow the appropriate steps outlined earlier to add money using the desired method.
Transfer money: If you want to transfer money from your Apple Pay balance to a linked bank account, you can do so. Open the Wallet app, tap on the Apple Cash card, then tap on the “Transfer to Bank” option. Follow the prompts to initiate the transfer.
Send and receive money: With Apple Pay and Apple Cash, you can easily send money to friends and family or receive money from them. Open the Messages app, start a new conversation, and tap on the Apple Pay icon to send or request money.
Set spending limits: To better manage your Apple Pay transactions, you can set spending limits for yourself. Open the Settings app on your device, go to Wallet & Apple Pay, and tap on the “Apple Pay Cash” option. From there, you can set a daily transaction limit to control your spending.
Review transaction history: If you want to keep track of your Apple Pay transactions, you can review your transaction history. Open the Wallet app, tap on the Apple Cash card, and scroll down to see your recent transactions.
By actively managing your Apple Pay balance, you can stay on top of your finances and make the most of the convenient features offered by Apple Pay and Apple Cash. Whether you need to check your balance, add funds, transfer money, or review transactions, the Wallet app provides all the tools you need to manage your Apple Pay balance effectively.
Use Apple Pay to send and receive money with Apple Cash
Apple Pay, coupled with Apple Cash, makes it incredibly easy to send and receive money with friends and family. Here’s how you can utilize Apple Pay to seamlessly transfer funds:
Sending Money:
1. Open the Messages app on your iPhone or iPad and select the conversation with the person you want to send money to.
2. Tap on the Apple Pay icon located in the conversation toolbar.
3. Enter the amount you wish to send, and you can even add a message if needed.
4. Authenticate the transaction using either Touch ID, Face ID, or your device passcode.
5. Once confirmed, the money is sent instantly to the recipient, and they can use it through their Apple Pay balance.
Receiving Money:
1. When someone sends you money through Apple Pay, you will receive a message in the conversation thread.
2. Tap on the “Accept” or “Add” button within the message to add the money to your Apple Cash balance.
3. If you haven’t set up Apple Cash yet, you will be prompted to do so before adding the money.
4. Once you’ve accepted the money, it is instantly added to your Apple Pay balance and can be used for future purchases or transferred to your bank account.
It’s important to note that while Apple Pay is a convenient way to send and receive money, there may be limits on the amount of money you can send or receive. These limits are typically set by your bank or the terms of your Apple Pay account.
With Apple Pay and Apple Cash, transferring money has never been easier. Whether you’re splitting a bill, paying a friend back, or sending a gift, you can rely on the seamless integration of Apple Pay to handle your financial transactions quickly and securely.
Use Apple Pay for purchases
Apple Pay offers a convenient and secure way to make purchases in-store, online, and in-app. Here’s how you can use Apple Pay to streamline your shopping experience:
In-Store Purchases:
1. Look for the contactless payment symbol at the store’s checkout terminal.
2. Hold your iPhone or Apple Watch near the contactless reader, or double-click the side button on your iPhone to use Face ID to authenticate the transaction.
3. On your Apple Watch, double-click the side button and hold the display near the contactless reader.
4. Wait for the transaction to be verified, and a subtle vibration or beep will confirm the payment’s success.
Online Purchases:
1. When making a purchase on a supported website or app, select Apple Pay as the payment option.
2. Authenticate the transaction using Touch ID or Face ID on your iPhone or iPad, or by double-clicking the side button on your Apple Watch.
3. Verify the transaction details and confirm the payment.
In-App Purchases:
1. When making a purchase within a supported app, tap the Apple Pay button at checkout.
2. Authenticate the transaction using Touch ID or Face ID on your iPhone or iPad, or by double-clicking the side button on your Apple Watch.
3. Verify the transaction details and confirm the payment.
Using Apple Pay for purchases offers several benefits. Firstly, it eliminates the need to carry physical credit or debit cards, as your payment information is securely stored in your device. Secondly, Apple Pay uses tokenization and encryption to protect your financial data, providing enhanced security compared to traditional payment methods.
Apple Pay is widely accepted by both large retailers and small businesses, making it easier than ever to make quick and secure purchases. By taking advantage of Apple Pay, you can speed up your checkout process, enjoy a seamless shopping experience, and have peace of mind knowing that your payment information is safeguarded.