
Checking Compatibility
Before setting up Apple Pay on your iPhone 13, it's essential to ensure that your device is compatible with this convenient payment method. Apple Pay is supported on various Apple devices, including the iPhone 13, but it's always wise to double-check compatibility to avoid any hiccups during the setup process.
To determine if your iPhone 13 is compatible with Apple Pay, follow these simple steps:
-
Device Compatibility: First and foremost, ensure that your iPhone 13 supports Apple Pay. The iPhone 13 series, including the iPhone 13, iPhone 13 mini, iPhone 13 Pro, and iPhone 13 Pro Max, all come equipped with the necessary hardware and software to enable Apple Pay.
-
Operating System: Check that your iPhone 13 is running the latest version of iOS. Apple Pay is seamlessly integrated into the iOS operating system, so it's crucial to have the most up-to-date software to access this feature. To verify this, navigate to Settings > General > Software Update and ensure that your device is running the latest iOS version.
-
Region and Issuing Bank: Apple Pay availability varies by region and the participating issuing banks. Ensure that Apple Pay is supported in your country or region and that your bank is compatible with the service. You can easily check this information on Apple's official website or by contacting your bank directly.
By confirming these key points, you can rest assured that your iPhone 13 is fully compatible with Apple Pay, setting the stage for a seamless setup process and the convenience of making secure and efficient payments with just a tap of your device.
With compatibility confirmed, you're ready to move on to the next steps of adding credit or debit cards to your Apple Pay wallet and unlocking the full potential of this innovative payment solution on your iPhone 13.
Adding Credit or Debit Cards
Now that you've confirmed the compatibility of your iPhone 13 with Apple Pay, the next step is to add your credit or debit cards to the Apple Wallet. This process is straightforward and can be completed in just a few simple steps, allowing you to enjoy the convenience of making secure and contactless payments using your iPhone 13.
Here's how to add your credit or debit cards to Apple Pay:
-
Accessing the Wallet App: Begin by opening the Wallet app on your iPhone 13. This app serves as the central hub for managing your payment cards, boarding passes, and more. It's represented by an icon featuring a stylized blue, green, and white wallet.
-
Initiating the Card Addition Process: Once inside the Wallet app, look for the option to "Add Credit or Debit Card." This can typically be found at the top or bottom of the screen, depending on your device's settings. Tapping on this option will kickstart the process of adding a new card to your Apple Pay wallet.
-
Scanning the Card Details: To streamline the card addition process, Apple has incorporated a convenient scanning feature. When prompted, position your iPhone 13's camera over the front of your credit or debit card. The device will automatically capture and process the card details, including the card number and expiration date.
-
Verification and Security: Following the scanning process, you may be required to complete a verification step to ensure the security of the card addition. This could involve entering the card's security code or receiving a verification code via SMS or email, depending on your card issuer's requirements.
-
Agreeing to Terms and Conditions: As with any digital payment service, it's essential to review and accept the terms and conditions associated with adding your card to Apple Pay. This step typically involves acknowledging the card issuer's terms and confirming your consent to add the card to your Apple Wallet.
-
Confirmation and Activation: Once you've completed the above steps, your credit or debit card will be successfully added to your Apple Wallet. You'll receive a confirmation message indicating that the card is ready for use with Apple Pay. At this point, the card is activated and can be used for contactless payments at supported retailers, both in-store and online.
By following these simple instructions, you can seamlessly add your credit or debit cards to Apple Pay, transforming your iPhone 13 into a versatile digital wallet. With your payment cards securely stored in the Apple Wallet, you're now prepared to explore the various ways to utilize Apple Pay for effortless and secure transactions.
Next, let's delve into the process of setting up Apple Cash, another valuable feature that enhances the functionality of Apple Pay on your iPhone 13.
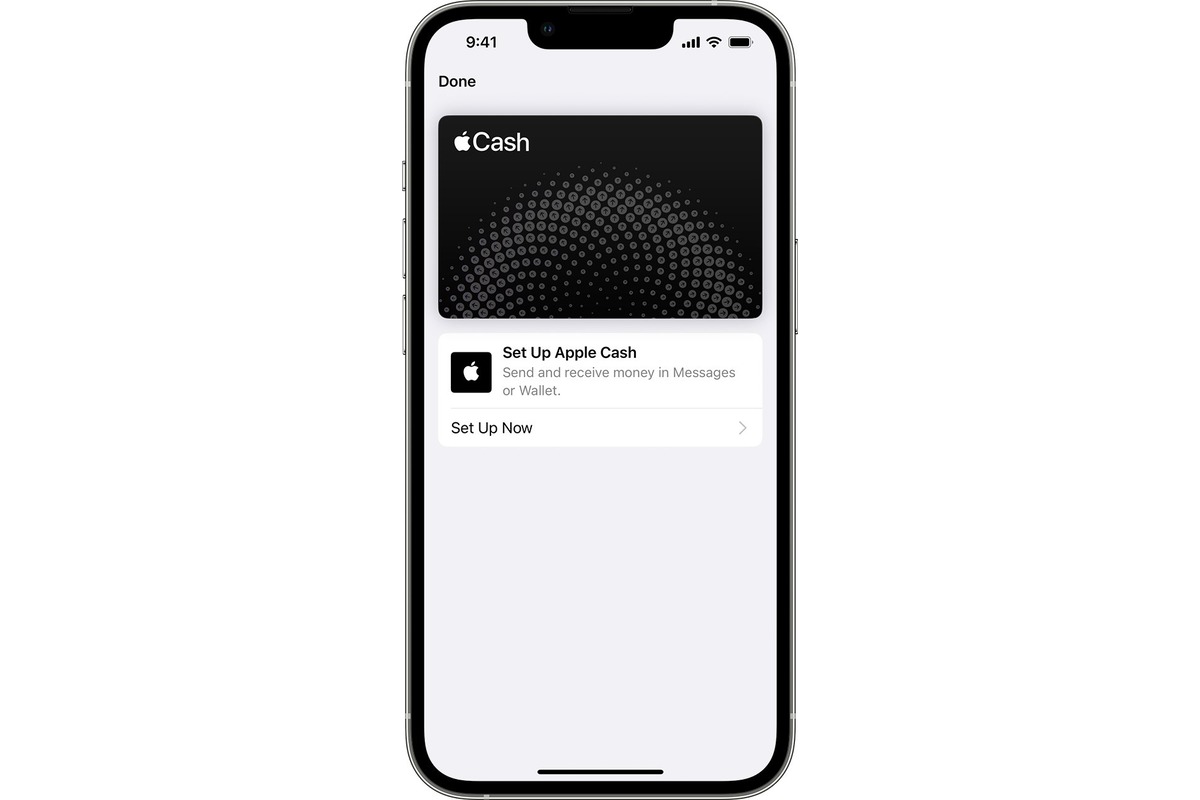
Setting Up Apple Cash
Setting up Apple Cash is a seamless process that enhances the versatility of Apple Pay on your iPhone 13. Apple Cash allows you to send, receive, and request money from friends and family directly through iMessage or by asking Siri. Additionally, it enables you to make purchases in stores, apps, and on the web, as well as transfer money to your bank account.
To set up Apple Cash on your iPhone 13, follow these straightforward steps:
-
Accessing the Wallet App: Begin by opening the Wallet app on your iPhone 13. This app serves as the central hub for managing your payment methods and financial transactions.
-
Selecting Apple Cash: Within the Wallet app, locate and tap on the option to add a new card or payment method. From the available choices, select "Apple Cash" to initiate the setup process.
-
Verifying Your Identity: Depending on your region and local regulations, you may be prompted to verify your identity to use Apple Cash. This typically involves providing personal information such as your full name, date of birth, and Social Security number.
-
Agreeing to Terms and Conditions: Review and accept the terms and conditions associated with Apple Cash. This step ensures that you understand the features, limitations, and responsibilities related to using Apple Cash as part of your Apple Pay ecosystem.
-
Confirmation and Activation: Once you've completed the setup process, you'll receive a confirmation message indicating that Apple Cash is now available for use. At this point, you can begin sending, receiving, and requesting money using Apple Cash, adding a new dimension of convenience to your digital payment experience.
By following these steps, you can seamlessly set up Apple Cash on your iPhone 13, unlocking the full potential of Apple Pay and expanding your ability to manage financial transactions directly from your device. With Apple Cash at your fingertips, you're empowered to effortlessly handle person-to-person payments, make purchases, and transfer funds, all within the secure and user-friendly environment of the Apple ecosystem.
Using Apple Pay in Stores
Using Apple Pay in stores offers a seamless and secure payment experience, leveraging the advanced technology embedded in your iPhone 13 to streamline transactions at retail locations. With Apple Pay, you can leave your physical wallet at home and rely on your device to make contactless payments effortlessly. Here's a detailed guide on how to use Apple Pay in stores with your iPhone 13:
Step 1: Accessing the Wallet
To initiate a payment using Apple Pay, simply double-click the side button of your iPhone 13 when it's locked or asleep. This action will bring up your default payment card on the screen.
Step 2: Authenticating the Transaction
Once the payment card is displayed, use Face ID, Touch ID, or your device's passcode to authenticate the transaction. This ensures that only authorized users can complete payments, adding an extra layer of security to the process.
Step 3: Completing the Transaction
Hold your iPhone 13 near the contactless reader at the store. Your device will recognize the payment terminal and prompt you to confirm the transaction. Once confirmed, the payment is processed, and you'll receive a subtle vibration and a confirmation message on your device, indicating that the payment was successful.
Step 4: Verifying the Payment
For added peace of mind, you can verify the payment details in the Wallet app on your iPhone 13. This allows you to review recent transactions, including those made using Apple Pay, ensuring transparency and enabling you to track your expenses conveniently.
Benefits of Using Apple Pay in Stores
-
Security: Apple Pay employs advanced security features, including tokenization and biometric authentication, to safeguard your payment information. This significantly reduces the risk of unauthorized transactions and protects your sensitive financial data.
-
Convenience: With Apple Pay, you can streamline the checkout process by eliminating the need to fumble for physical cards or cash. The simplicity and speed of contactless payments enhance the overall shopping experience, saving you time and effort at the point of sale.
-
Privacy: Apple Pay prioritizes user privacy by minimizing the exposure of personal and financial details during transactions. Your actual card numbers are not shared with merchants, reducing the likelihood of potential data breaches or misuse.
By leveraging Apple Pay in stores, you can enjoy the convenience, security, and efficiency of contactless payments, transforming your iPhone 13 into a versatile digital wallet that simplifies your everyday transactions. With the ability to securely and effortlessly make purchases at a wide range of retail outlets, Apple Pay enhances the overall payment experience, offering a modern and user-friendly alternative to traditional payment methods.
Using Apple Pay in Apps and Websites
Utilizing Apple Pay in apps and on websites offers a seamless and secure method for making purchases and processing transactions within the digital realm. With the integration of Apple Pay, iPhone 13 users can enjoy the convenience of completing payments with just a touch or glance, eliminating the need to manually enter payment and shipping details. Here's a comprehensive guide on how to leverage Apple Pay in apps and on websites with your iPhone 13:
In Apps:
When making purchases within supported apps, Apple Pay simplifies the checkout process, providing a swift and secure payment experience. To use Apple Pay in apps on your iPhone 13, follow these steps:
-
Selecting Apple Pay: When ready to complete a purchase, look for the Apple Pay option during the checkout process within the app. This may be represented by the familiar Apple Pay logo or a dedicated button labeled "Apple Pay."
-
Authenticating the Transaction: Upon selecting Apple Pay as the payment method, your iPhone 13 will prompt you to authenticate the transaction using Face ID, Touch ID, or your device's passcode. This ensures that only authorized users can authorize payments, enhancing security.
-
Confirmation and Completion: Once authenticated, the payment is processed, and you'll receive a confirmation message indicating that the transaction was successful. The app will then proceed to fulfill your order, and you can seamlessly continue with your digital purchase.
On Websites:
When shopping on websites that support Apple Pay, the process of completing transactions is similarly streamlined and secure. Here's how to use Apple Pay on websites with your iPhone 13:
-
Selecting Apple Pay at Checkout: When you're ready to finalize your purchase on a supported website, look for the Apple Pay option during the checkout process. This may be presented as a dedicated Apple Pay button or a selectable payment method.
-
Authenticating the Transaction: After choosing Apple Pay, your iPhone 13 will prompt you to authenticate the transaction using Face ID, Touch ID, or your device's passcode. This step ensures that the payment is authorized securely and efficiently.
-
Confirmation and Verification: Once authenticated, the payment is processed, and you'll receive a confirmation message indicating that the transaction was successful. The website will then proceed to process your order, and you can expect a seamless and expedited checkout experience.
By leveraging Apple Pay in apps and on websites, iPhone 13 users can enjoy the benefits of streamlined transactions, enhanced security, and the convenience of completing purchases with a simple touch or glance. This seamless integration of Apple Pay into the digital shopping landscape elevates the overall user experience, offering a modern and efficient alternative to traditional payment methods.
Managing Apple Pay Cards and Transactions
Managing your Apple Pay cards and transactions on your iPhone 13 is a crucial aspect of maximizing the convenience and security offered by this innovative payment solution. With the ability to add, remove, and organize your payment cards, as well as review and track your transaction history, you can effectively oversee your digital wallet and ensure a seamless payment experience.
Adding and Removing Cards
The process of adding and removing cards from Apple Pay is designed to be intuitive and user-friendly. To add a new card, simply access the Wallet app on your iPhone 13, tap on the option to add a credit or debit card, and follow the on-screen instructions to complete the setup. Conversely, if you need to remove a card from Apple Pay, navigate to the Wallet app, select the card you wish to remove, and choose the option to delete or remove the card from your digital wallet.
Organizing and Managing Cards
Apple Pay allows you to organize and manage your payment cards efficiently, providing the flexibility to designate a default card for transactions and categorize cards for personal or business use. Within the Wallet app, you can easily reorder your cards, set a preferred payment method, and assign specific labels or identifiers to streamline your payment options.
Reviewing Transaction History
The ability to review your transaction history directly within the Wallet app empowers you to monitor your spending, track purchases, and verify the details of each transaction made using Apple Pay. By accessing the transaction log, you can gain insights into your financial activity, including the date, time, location, and amount of each transaction, enhancing transparency and enabling you to manage your expenses effectively.
Managing Notifications and Alerts
Apple Pay offers customizable notification settings, allowing you to receive alerts for transactions, account activity, and potential security-related events. By configuring your notification preferences within the Wallet app, you can stay informed about your payment activity and promptly address any unauthorized or suspicious transactions, bolstering the security of your digital wallet.
Security and Privacy Measures
Apple Pay prioritizes the security and privacy of your payment information, employing robust encryption and tokenization to safeguard your card details during transactions. Additionally, the integration of biometric authentication methods, such as Face ID and Touch ID, adds an extra layer of protection, ensuring that only authorized users can access and utilize Apple Pay on your iPhone 13.
By actively managing your Apple Pay cards and transactions, you can optimize the functionality and security of this digital payment platform on your iPhone 13, empowering you to make secure and efficient payments with confidence and ease. With the ability to oversee your digital wallet, track your spending, and customize your notification preferences, Apple Pay offers a comprehensive and user-centric approach to managing your payment cards and transactions seamlessly.