
Set up your email account
Before you can start sending new emails with the iPhone Mail app, you need to set up your email account. Here’s a step-by-step guide on how to do it:
- Go to the settings on your iPhone and scroll down until you find the “Mail” option. Tap on it.
- Under the “Accounts” section, tap on “Add Account.”
- You will see a list of popular email providers like Gmail, Yahoo, and Outlook. Select your email provider, or if it’s not listed, tap on “Other.”
- Enter your email address and password in the provided fields. Tap “Next” to proceed.
- The Mail app will now try to automatically configure your email settings. If it succeeds, you’re good to go. If not, you will need to manually enter the email server settings. You can find these settings from your email provider or IT department.
- Once your account is verified, you can choose which aspects of your email to sync with your iPhone, such as contacts and calendar. Toggle the options according to your preferences.
- Tap “Save” to complete the setup process.
With your email account successfully set up on your iPhone, you are now ready to start composing and sending new emails using the Mail app. Let’s move on to the next section to learn how.
Open the Mail app
Once you have your email account set up on your iPhone, you can easily access the Mail app to start sending new emails. Here’s how to open the Mail app:
- Locate the Mail app on your iPhone’s home screen. It’s represented by an envelope icon with the word “Mail” underneath it.
- Tap on the Mail app icon to open it. The app will launch, and you will be taken to the Inbox folder, where you can see all your received emails.
- If you have multiple email accounts set up, you can switch between them by tapping on the “Mailboxes” button located at the top-left corner of the screen. This will display a list of all your email accounts.
- To access a specific email folder, such as Sent, Drafts, or Trash, tap on the “Mailboxes” button and then select the desired folder from the list.
Now that you have successfully opened the Mail app on your iPhone, let’s move on to the next section to learn how to compose a new email.
Compose a new email
When you need to send a new email using the iPhone Mail app, follow these simple steps to compose your message:
- Open the Mail app on your iPhone by tapping on the envelope icon with the word “Mail” underneath it.
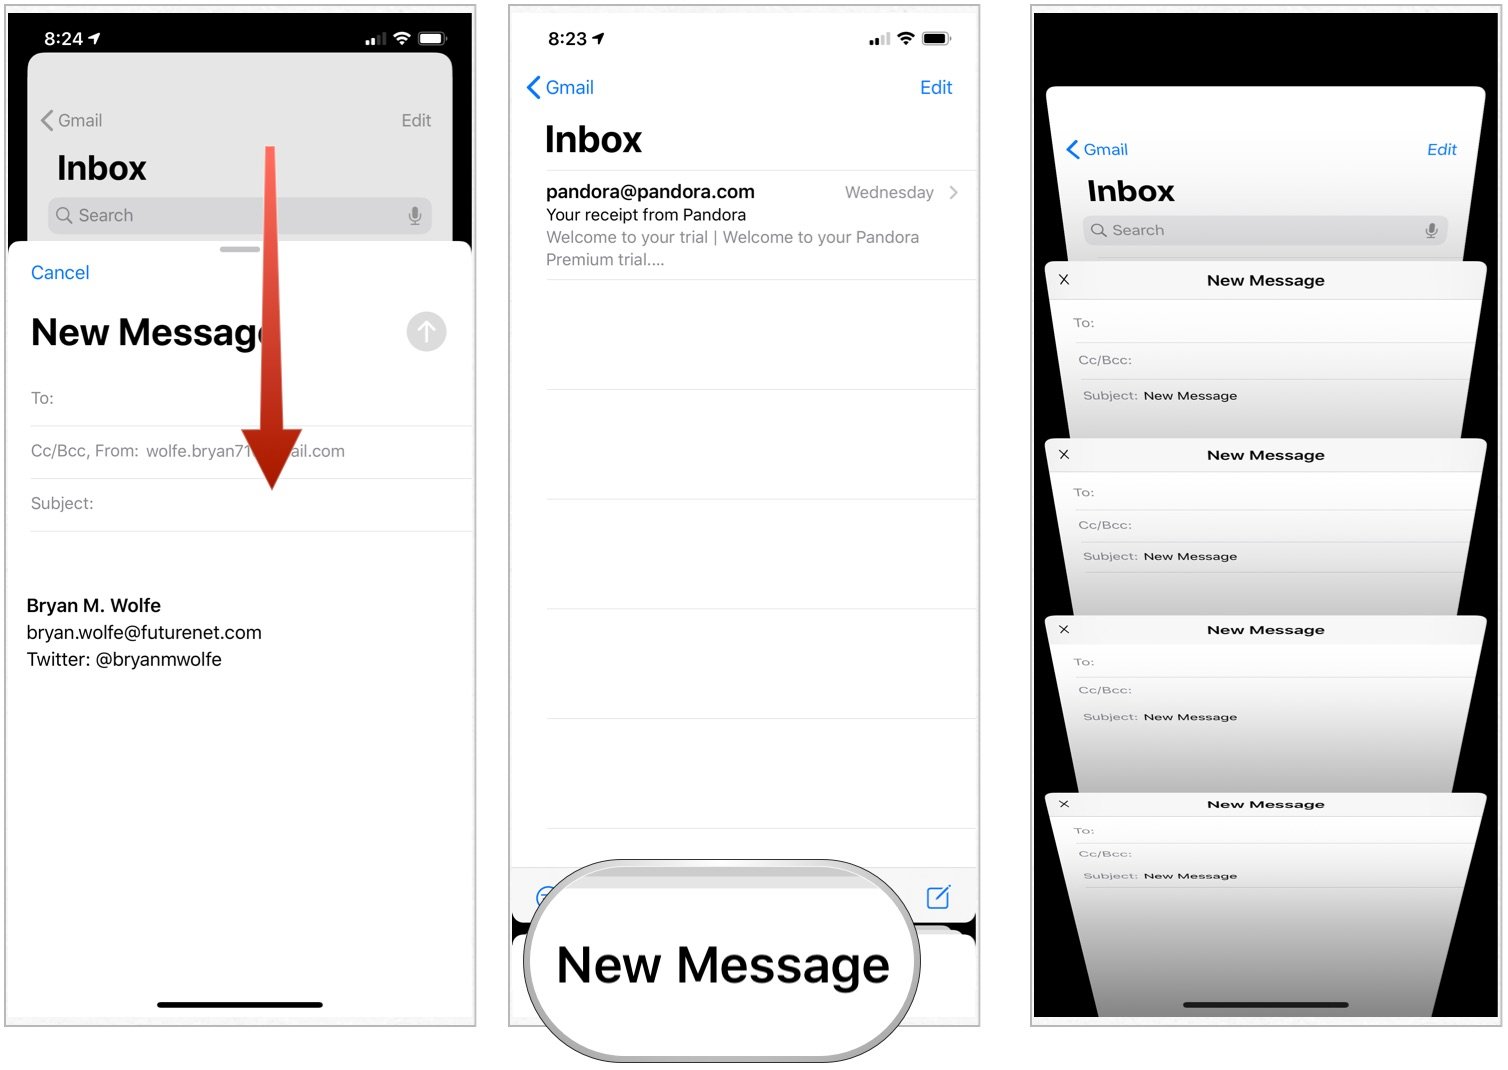
- In the bottom right corner of the Mail app, you will see a square icon with a pen inside. Tap on this icon to start composing a new email.
- A new blank email window will appear, allowing you to enter your email details.
- Start by entering the recipient’s email address in the “To” field. You can also tap on the “+” icon to select email addresses from your contacts or recent recipients.
- If you want to add additional recipients, such as CC or BCC, tap on the respective fields and enter the email addresses.
- Next, tap on the “Subject” field and enter a concise and descriptive subject line for your email. This helps the recipient understand the purpose of your message.
- Now, you can proceed to write the content of your email message. Tap inside the body of the email and use the on-screen keyboard to type your message.
- If you want to format your text, highlight the desired section and tap on the formatting options that appear above the keyboard, such as bold, italics, or underline.
- Once you have composed your email, you can review it by scrolling up and down. Make sure to check for any grammatical errors or misspellings.
- Finally, when you’re ready to send the email, tap on the send button, which is typically represented by an arrow pointing upwards or a paper airplane icon.
That’s it! You have successfully composed a new email using the iPhone Mail app. In the next section, we will explore how to add recipients to your email.
Add recipients
When composing a new email with the iPhone Mail app, you need to add recipients to ensure that the message reaches the intended individuals. Here’s how you can add recipients:
- Open the Mail app on your iPhone and click on the “Compose” button to start a new email.
- In the “To” field, enter the email address of the primary recipient. You can also tap on the “+” icon to choose recipients from your contacts or recent recipients.
- If you need to add additional recipients, such as CC (carbon copy) or BCC (blind carbon copy), tap on the respective fields and enter the email addresses.
- To add recipients from your contacts, tap on the “+” icon next to the “To” field, and a list of your contacts will appear. Select the desired contact(s) and tap “Done” to add them to the email.
- If you want to include recipients from your recent contacts, tap on the “Recents” tab and select the contact(s) you want to add. You can also search for a specific contact using the search bar.
- For CC and BCC recipients, tap on the “CC/BCC” field and enter the email addresses of the additional recipients. Keep in mind that CC recipients can see each other’s email addresses, while BCC recipients cannot.
- Once you have added all the recipients, you can proceed with writing the subject and body of your email.
- After composing your email, proofread it and make sure the recipients’ email addresses are correctly entered.
- When everything looks good, tap on the send button to deliver your email to the recipients.
With the recipients properly added, you are ready to send the email using the iPhone Mail app. In the next section, we will discuss how to fill in the subject line for your email.
Fill in the subject line
When sending a new email with the iPhone Mail app, filling in the subject line is essential to provide a concise summary of the email’s content. Follow these steps to effectively fill in the subject line:
- Open the Mail app on your iPhone and begin composing a new email by tapping on the “Compose” button.
- Locate the “Subject” field, usually located just below the recipient’s email address.
- Tap inside the “Subject” field to activate it and start typing your subject line.
- Keep your subject line clear and concise, summarizing the content or purpose of your email in a few words.
- A strong subject line grabs the recipient’s attention and helps them understand the importance or urgency of the email.
- Avoid leaving the subject line blank, as it may cause confusion or make your email appear unimportant.
- If your email pertains to a specific project or topic, you can include a relevant keyword or phrase in the subject line.
- Ensure that your subject line is relevant and accurately reflects the content of the email.
- If appropriate, you can add a sense of urgency to your subject line by using words like “Important” or “Urgent.”
- Before sending your email, review the subject line to ensure it effectively conveys the purpose of your message.
Filling in the subject line of your email helps recipients understand its contents at a glance. In the next section, we will discuss how to write the body of your email message.
Write your email message
When composing a new email using the iPhone Mail app, writing a clear and effective email message is crucial to convey your thoughts and intentions. Follow these steps to write your email message:
- Open the Mail app on your iPhone and click on the “Compose” button to start a new email.
- In the body of the email, tap to activate the text area where you can begin typing your message.
- Start by addressing the recipient(s) in a polite and professional manner. For example, you can begin with “Dear [Recipient’s Name]” or a more casual “Hi [Recipient’s Name]” if appropriate for the relationship.
- Be concise and clear about the purpose of your email. State your main point or request early in the message to grab the recipient’s attention.
- Organize your thoughts in a logical manner, using paragraphs or bullet points to break up the text and make it easier to read.
- Keep your language professional and formal, or adapt to a more casual tone depending on the nature of the email and your relationship with the recipient.
- Be respectful and considerate in your words, ensuring that your message is polite and free from any offensive or disrespectful language.
- Communicate your message clearly and concisely, avoiding unnecessary repetition or rambling.
- If necessary, provide any relevant context or background information to help the recipient understand the topic or request.
- Make sure to proofread your email for any grammatical or spelling errors before sending it.
By following these guidelines, you can ensure that your email message is well-written, professional, and effectively communicates your intentions to the recipient(s). In the next section, we will discuss how to format your email for better readability.
Format your email
When composing a new email using the iPhone Mail app, formatting your email can enhance its readability and make it more visually appealing. Follow these steps to effectively format your email:
- Open the Mail app on your iPhone and begin composing a new email.
- Use paragraphs to separate different ideas or sections of your email. This makes it easier for the recipient to read and understand your message.
- Use bullet points or numbered lists to organize information that requires a structured format or is a list of items.
- Bold or italicize important words or phrases to emphasize their significance.
- Use headers or subheadings to break up longer email messages into sections. This helps to improve readability and allows the recipient to quickly skim through the email if necessary.
- If applicable, include hyperlinks in your email by highlighting the text you want to link and tapping on the link icon in the formatting options.
- Avoid using excessive colors, fonts, or other formatting elements that may make your email appear unprofessional or difficult to read.
- Ensure that the font size is appropriate and readable for the recipient, especially if they are viewing the email on a mobile device.
- Consider using proper punctuation and capitalization to convey the intended tone and professionalism in your email.
- Proofread your email after formatting to check for any errors or inconsistencies.
By formatting your email effectively, you can improve its readability and ensure that your message is conveyed in a clear and organized manner. In the next section, we will discuss how to add attachments to your email.
Add attachments
Attaching files to your email can be useful when you need to share documents, photos, or other files with the recipient. Follow these steps to add attachments to your email using the iPhone Mail app:
- Open the Mail app on your iPhone and begin composing a new email.
- Tap on the body of the email to activate the cursor.
- To add an attachment from your iPhone’s storage, tap on the arrow pointing upwards inside a square icon located at the bottom of the screen.
- A pop-up menu will appear, giving you different options to add attachments. You can choose to take a photo or video using your iPhone’s camera, select an existing photo or video from your Photos app, or browse for other types of files to attach from apps like Files or iCloud Drive.
- If you are attaching a photo or video from your Photos app, tap on “Choose Photo” or “Choose Video” and select the desired item(s) from your library.
- If you want to attach a file from another source, tap on “Browse” or “Locations” and navigate to the file you want to attach.
- Once you have selected the file(s) you want to attach, they will appear as attachments below the body of your email.
- If necessary, you can add additional attachments following the same steps.
- You can also preview the attachments by tapping on them. This allows you to verify that you have attached the correct files.
- Proofread your email and make sure all attachments are included before sending.
By following these steps, you can easily add attachments to your email using the iPhone Mail app. In the next section, we will discuss the importance of proofreading your email before sending it.
Proofread your email
Before hitting the send button, it’s crucial to take a moment to proofread your email. Proofreading ensures that your message is clear, professional, and free from any grammatical or spelling errors. Follow these steps to proofread your email before sending:
- Read through your email from start to finish, paying attention to the overall flow and logical sequence of your ideas.
- Check for any grammatical or spelling mistakes. Look out for common errors such as missing punctuation, incorrect verb tense, or misspelled words.
- Pay extra attention to the recipient’s name, email address, and any other crucial details that need to be accurate.
- Ensure that your sentences are clear and concise. Avoid long, convoluted sentences that may confuse the reader.
- Double-check the subject line to confirm that it accurately reflects the content of your email.
- Review any attachments you’ve added to verify that they are the correct files and are properly referenced in your email.
- Consider the tone of your email. Make sure it is appropriate for the recipient and the purpose of your message.
- If applicable, double-check any hyperlinks you’ve included to ensure they are working correctly.
- Read your email aloud to catch any awkward phrasing or unclear statements.
- If possible, ask a colleague or trusted individual to read your email and provide feedback.
- Make any necessary revisions or corrections based on your proofreading process.
Taking the time to proofread your email can help you avoid embarrassing mistakes and ensure effective communication. By following these steps, you can send a polished and error-free email using the iPhone Mail app. Now, you’re ready to hit that send button!
Send your email
After composing, proofreading, and formatting your email, it’s time to send it to the recipient(s) using the iPhone Mail app. Follow these steps to successfully send your email:
- Review your email one final time to ensure everything is accurate, clear, and professional.
- Double-check that you have included all necessary attachments, if applicable.
- If you have multiple email accounts set up, make sure you’re sending the email from the correct account. You can change the sending account by tapping on your email address at the top of the email composition screen.
- Once you are ready to send the email, locate the send button. It is usually represented by an arrow pointing upwards or a paper airplane icon. The location of the send button may vary depending on the version of the Mail app you are using.
- Tap on the send button to initiate the sending process.
- The email will be sent from your iPhone’s Mail app to the intended recipient(s). You may see a progress indicator or a pop-up message indicating the successful sending of the email.
- Wait for a few moments to see if you receive any notifications or confirmations that the email was successfully delivered.
- If required, you can navigate to the “Sent” folder within the Mail app to review your sent emails and confirm that the email you just sent is listed there.
- Once the email is sent, it is up to the recipient(s) to check their inbox and read your message.
Congratulations! You have successfully sent your email using the iPhone Mail app. Now, you can sit back and await a response or continue with other tasks. Remember to check your inbox regularly for any replies or further communication regarding the email you sent.