
Tips for Joining a Wireless Network from Any Device
Joining a wireless network is essential for accessing the internet on various devices. Whether you’re using a laptop, smartphone, or tablet, the process of connecting to a Wi-Fi network is relatively straightforward. In this guide, we will explore some useful tips to help you seamlessly join a wireless network from any device.
1. Understanding the Basics of Wireless Networks: Before connecting to a Wi-Fi network, it’s important to understand some basic terms. Familiarize yourself with terms like SSID (network name), MAC address filtering, and encryption types, such as WPA2 and WEP.
2. Finding and Selecting a Wi-Fi Network: On your device, navigate to the Wi-Fi settings. You will see a list of available networks. Select the desired network from the list. Ensure that you connect to a trusted and secure network.
3. Connecting to a Wi-Fi Network on Windows Devices: On Windows devices, click on the Wi-Fi icon in the system tray. Select your desired network, enter the password if required, and click “Connect.” Wait for the device to establish a connection.
4. Connecting to a Wi-Fi Network on macOS Devices: On macOS devices, click on the Wi-Fi icon in the menu bar. Choose the network you want to join and enter the password if prompted. Click “Join” and wait for the device to connect.
5. Connecting to a Wi-Fi Network on iOS and iPadOS Devices: On iPhones and iPads, go to Settings, tap on Wi-Fi, and toggle it on. Select the desired network, enter the password if required, and tap “Join.” Wait for the device to connect.
6. Connecting to a Wi-Fi Network on Android Devices: On Android devices, go to Settings, tap on Wi-Fi, and toggle it on. Select the network you want to join from the list, enter the password, if prompted, and tap “Connect.”
7. Troubleshooting Connection Issues: If you encounter connection issues, try restarting your device, resetting network settings, or contacting your network administrator for assistance. Ensure you are within the range of the Wi-Fi network.
8. Enhancing Wireless Network Security: Protect your network by changing the default router password, enabling network encryption, and regularly updating your device’s firmware and security patches.
9. Using Public Wi-Fi Networks Safely: When connecting to a public Wi-Fi network, exercise caution. Avoid accessing sensitive information, use a VPN for added security, and disable auto-connect to unknown networks.
10. Tips for Optimizing Wi-Fi Performance on Any Device: Place your router in a central location, away from obstructions, and minimize interference. Regularly check for firmware updates, and consider using Wi-Fi extenders or mesh networks for better coverage.
By following these tips, you can easily join a wireless network from any device and enjoy a seamless internet browsing experience. Stay mindful of network security and take necessary precautions while connecting to public Wi-Fi networks.
Understanding the Basics of Wireless Networks
Before connecting to a wireless network, it’s essential to have a basic understanding of how these networks function. Here are some key terms and concepts to familiarize yourself with:
SSID (Service Set Identifier): The SSID is the name of the wireless network. When you search for available networks on your device, you will see a list of SSIDs to choose from.
MAC Address Filtering: MAC (Media Access Control) addresses are unique identifiers assigned to network devices. Some routers allow administrators to specify which devices can connect based on their MAC addresses, enhancing network security.
Encryption: Encryption is used to protect the data transmitted over a wireless network from unauthorized access. Common encryption types include WPA2 (Wi-Fi Protected Access 2) and WEP (Wired Equivalent Privacy).
When connecting to a wireless network, look for networks that use strong encryption, such as WPA2, to safeguard your data.
Understanding these basics will help you make informed decisions when connecting to wireless networks and ensure a secure and reliable connection.
Finding and Selecting a Wi-Fi Network
When you’re ready to connect to a Wi-Fi network, the first step is to find and select the network you want to join. Here’s how:
1. Open the Wi-Fi settings on your device. This can usually be found in the settings menu or by clicking on the Wi-Fi icon in the system tray or menu bar.
2. A list of available Wi-Fi networks will appear. These networks are identified by their SSIDs (Service Set Identifiers).
3. Look for the network you want to join and select it from the list. Ensure that the network you choose is trustworthy and secure.
4. If the network is secured, a password may be required to join. Enter the password carefully, making sure to observe capitalization and special characters if applicable.
5. Some devices may provide additional options when connecting to a network, such as the ability to automatically connect to the network when in range or the option to forget a saved network.
6. Once you’ve entered the password and made any desired selections, click or tap “Connect” to establish a connection with the selected Wi-Fi network. Your device will attempt to connect to the network, and a confirmation message will appear once the connection is successful.
It’s important to select networks that you trust when connecting to Wi-Fi, especially when connecting to public or unfamiliar networks. Be mindful of network names that closely resemble trusted networks, as these may be attempts to trick users into connecting to malicious networks.
By following these steps, you will be able to find and select a Wi-Fi network easily, ensuring a smooth and secure internet connection on your device.
Connecting to a Wi-Fi Network on Windows Devices
Connecting to a Wi-Fi network on Windows devices is a straightforward process. Here’s how you can do it:
1. Click on the Wi-Fi icon in the system tray, typically located in the bottom right corner of your screen. The icon usually looks like a series of bars or a Wi-Fi symbol.
2. A list of available Wi-Fi networks will appear. Select the network you want to join from the list. Ensure that you choose a trusted and secure network.
3. If the network is secured, a pop-up window will prompt you to enter the network password. Type in the password carefully, observing capitalization and any special characters if necessary.
4. Check the box that says “Connect automatically” if you want your device to automatically connect to this Wi-Fi network whenever it’s in range.
5. Click on the “Connect” button to establish a connection with the selected Wi-Fi network. Your device will attempt to connect, and a notification will appear once the connection is successful.
If you encounter any issues while connecting to a Wi-Fi network on Windows, try the following troubleshooting steps:
– Make sure your Wi-Fi is turned on. You can check this by going to the “Network & Internet” settings in the Control Panel.
– Restart your device and try connecting again.
– If the issue persists, try resetting your network settings by going to the “Network & Internet” settings and clicking on the “Network reset” option.
– Contact your network administrator or the Wi-Fi network provider for further assistance, especially if you’re connecting to a network in a public place or a workplace.
By following these steps and troubleshooting tips, you can easily connect to a Wi-Fi network on your Windows device and enjoy uninterrupted internet access.
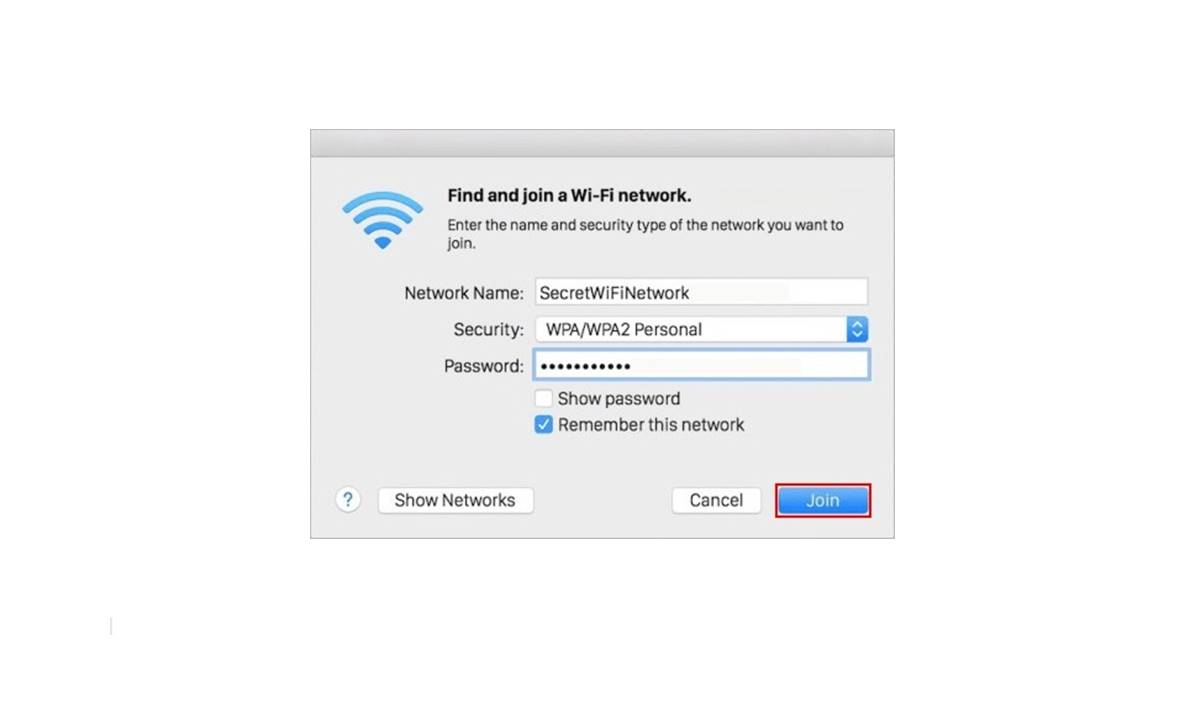
Connecting to a Wi-Fi Network on macOS Devices
Connecting to a Wi-Fi network on macOS devices, such as MacBooks and iMacs, is a simple process. Here’s how you can do it:
1. Click on the Wi-Fi icon in the menu bar at the top right corner of your screen. The icon looks like a series of curved lines or a Wi-Fi symbol.
2. A drop-down menu will appear, showcasing the available Wi-Fi networks within range. Select the network you want to join from the list. Ensure that you choose a trusted and secure network.
3. If the network is password-protected, a prompt will appear asking you to enter the network password. Carefully type in the password, taking note of capitalization and any special characters.
4. Check the box that says “Remember this network” if you want your macOS device to automatically connect to this Wi-Fi network whenever it’s in range.
5. Click on the “Join” button to establish a connection with the selected Wi-Fi network. Your device will attempt to connect, and a notification will appear once the connection is successful.
If you encounter any issues while connecting to a Wi-Fi network on macOS, consider the following troubleshooting steps:
– Restart your device and try connecting again.
– Verify that your Wi-Fi is turned on by going to the Network preferences in System Preferences. Ensure that the Wi-Fi option is selected.
– If the issue persists, try removing the Wi-Fi network from your preferred networks list and add it back again. This can be done by going to the Network preferences, selecting Wi-Fi, and clicking on the “Advanced” button.
– Contact your network administrator or the Wi-Fi network provider for further assistance, especially if you’re connecting to a network in a public place or a workplace.
By following these steps and troubleshooting suggestions, you can easily connect to a Wi-Fi network on your macOS device and enjoy seamless internet connectivity.
Connecting to a Wi-Fi Network on iOS and iPadOS Devices
Connecting to a Wi-Fi network on iOS and iPadOS devices, such as iPhones and iPads, is a straightforward process. Here’s how you can do it:
1. Open the Settings app on your device and tap on “Wi-Fi”.
2. Toggle the Wi-Fi option to the “On” position if it’s not already enabled.
3. A list of available Wi-Fi networks will appear under “Choose a Network”. Select the network you want to join. Ensure that you choose a trusted and secure network.
4. If the network is password-protected, a prompt will appear asking you to enter the network password. Carefully type in the password, taking note of capitalization and any special characters.
5. Tap on the “Join” button to establish a connection with the selected Wi-Fi network. Your device will attempt to connect, and a checkmark will appear next to the network once the connection is successful.
If you encounter any issues while connecting to a Wi-Fi network on iOS or iPadOS devices, consider the following troubleshooting steps:
– Make sure your Wi-Fi is turned on by going to the Settings app and navigating to “Wi-Fi”.
– Restart your device and try connecting again.
– Forget the Wi-Fi network by tapping on the (i) icon next to the network name in the Wi-Fi settings, then select “Forget This Network”. Reconnect to the network and enter the password again.
– If the issue persists, reset your network settings by going to the Settings app, selecting “General”, then “Reset”, and finally “Reset Network Settings. Note that this will remove any saved Wi-Fi passwords.
– Contact your network administrator or the Wi-Fi network provider for further assistance, especially if you’re connecting to a network in a public place or a workplace.
By following these steps and troubleshooting suggestions, you can easily connect to a Wi-Fi network on your iOS or iPadOS device and enjoy seamless internet accessibility.
Connecting to a Wi-Fi Network on Android Devices
Connecting to a Wi-Fi network on Android devices is a simple process. Here’s how you can do it:
1. Open the Settings app on your Android device and find the “Wi-Fi” option. It’s usually located under the “Network & Internet” or “Connections” section.
2. Make sure the Wi-Fi option is turned on by toggling the switch to the “On” position. This will enable your device to scan for available Wi-Fi networks.
3. A list of available Wi-Fi networks will appear. Select the network you want to join from the list. Ensure that you choose a trusted and secure network.
4. If the network is password-protected, a prompt will appear asking you to enter the network password. Carefully type in the password, taking note of capitalization and any special characters.
5. Tap on the “Connect” button to establish a connection with the selected Wi-Fi network. Your device will attempt to connect, and a notification will appear once the connection is successful.
If you encounter any issues while connecting to a Wi-Fi network on your Android device, consider the following troubleshooting steps:
– Restart your device and try connecting again.
– Forget the Wi-Fi network by long-pressing on the network name in the Wi-Fi settings and selecting “Forget network”. Reconnect to the network and enter the password again.
– If the issue persists, tap on the “Advanced” option in the Wi-Fi settings and select “Reset Wi-Fi, mobile & Bluetooth”. This will reset your device’s network settings, including Wi-Fi passwords.
– Contact your network administrator or the Wi-Fi network provider for further assistance, especially if you’re connecting to a network in a public place or a workplace.
By following these steps and troubleshooting suggestions, you can easily connect to a Wi-Fi network on your Android device and enjoy uninterrupted internet connectivity.
Troubleshooting Connection Issues
While connecting to a Wi-Fi network is usually a smooth process, you may occasionally encounter connection issues. Here are some troubleshooting steps you can take to resolve these issues:
1. Restart your device: Sometimes, a simple restart can fix connectivity problems. Turn off your device, wait a few seconds, and then turn it back on.
2. Verify Wi-Fi settings: Ensure that your Wi-Fi is turned on and that you’re within the range of the Wi-Fi network. Check that the network you’re trying to connect to is functioning properly.
3. Forget and reconnect to the network: Go to your device’s Wi-Fi settings and “Forget” the network that’s giving you trouble. Then, reconnect to it by selecting it from the list of available networks and entering the necessary information, such as the password, if required.
4. Reset network settings: If you’re experiencing persistent connectivity issues, you can try resetting your network settings. This option is usually available in the Wi-Fi or Network settings menu of your device. Keep in mind that resetting network settings will remove saved Wi-Fi networks and their corresponding passwords.
5. Check your router: Ensure that your router is functioning properly. Restart it by unplugging it from power, waiting for a few seconds, and then plugging it back in. Also, make sure that the router’s firmware is up to date.
6. Move closer to the Wi-Fi router: If you’re encountering weak signal strength, try moving closer to the Wi-Fi router. Physical obstructions, such as walls or furniture, can weaken the Wi-Fi signal, so eliminating or reducing these obstructions can improve connectivity.
7. Contact your network administrator: If you’re connecting to a Wi-Fi network at an organization or public place, reach out to the network administrator or IT department for assistance. They will be able to provide specific troubleshooting steps or investigate any network issues.
Remember that connectivity issues can also be caused by factors outside of your control, such as issues with the Internet service provider or temporary network outages. If the problem persists, it may be worth contacting your ISP or waiting for the connectivity issue to be resolved.
By following these troubleshooting steps, you can effectively address common connection issues and enjoy a stable and reliable Wi-Fi connection.
Enhancing Wireless Network Security
Ensuring the security of your wireless network is crucial to protect your data and prevent unauthorized access. Here are some tips to enhance the security of your wireless network:
1. Change the default router password: When you set up your router, change the default username and password. Use a strong and unique password that includes a combination of upper and lower case letters, numbers, and special characters.
2. Enable network encryption: Use the highest level of encryption supported by your router, such as WPA2 or WPA3. This will encrypt the data transmitted over your network and add an extra layer of security.
3. Update router firmware: Regularly update your router’s firmware to ensure that it has the latest security patches and improvements. Check the manufacturer’s website for firmware updates or enable automatic updates if available.
4. Disable remote management: Remote management allows you to access your router’s settings from outside your local network. Disable this feature unless you specifically need it, as it can be a potential security vulnerability.
5. Enable MAC address filtering: MAC address filtering allows you to specify which devices can connect to your network based on their unique MAC addresses. Add the MAC addresses of your trusted devices to the router’s whitelist, preventing unauthorized devices from connecting.
6. Enable network firewalls: Use the built-in firewall feature in your router to filter incoming and outgoing network traffic. Configure the firewall to block any unnecessary or suspicious connections.
7. Disable WPS: Wi-Fi Protected Setup (WPS) is a convenience feature that simplifies the process of connecting devices to a Wi-Fi network. However, it can also be a security risk. Disable WPS in your router settings to prevent unauthorized access.
8. Regularly review connected devices: Monitor the list of connected devices in your router settings to ensure that all the devices are authorized. If you spot any unfamiliar or suspicious devices, investigate and take appropriate action.
Remember, a strong and secure wireless network not only protects your own data but also prevents unauthorized use of your network, ensuring the privacy and security of your online activities. By implementing these security measures, you can have peace of mind knowing that your wireless network is secure.
Using Public Wi-Fi Networks Safely
Using public Wi-Fi networks can be convenient, but it also poses security risks. Follow these tips to ensure your safety when connecting to public Wi-Fi networks:
1. Avoid accessing sensitive information: Public Wi-Fi networks are often unsecured, making it easier for hackers to intercept your data. Avoid accessing sensitive information, such as online banking or personal accounts, while connected to public Wi-Fi.
2. Use a VPN: A Virtual Private Network (VPN) encrypts your internet connection, providing an added layer of security. Use a reputable VPN service to protect your data and ensure privacy when using public Wi-Fi.
3. Disable auto-connect to unknown networks: Turn off the auto-connect feature on your device to prevent automatic connections to unknown or unsecured networks. This will give you control over which networks you connect to.
4. Verify network legitimacy: Ensure that you are connecting to the correct public Wi-Fi network. Hackers may set up fake networks with names that closely resemble legitimate networks in order to deceive users. Ask for the correct network name from an authorized source if in doubt.
5. Enable firewall: Activate the firewall on your device to block unauthorized incoming connections and protect your device from potential threats.
6. Keep your device updated: Regularly update your device’s operating system, applications, and antivirus software. These updates often include security patches that can help protect your device from known vulnerabilities.
7. Be cautious of public file sharing: Avoid sharing files, especially sensitive ones, on public Wi-Fi networks. Unauthorized users may be able to access and download your files.
8. Stay vigilant: Be aware of your surroundings when using public Wi-Fi networks. Avoid entering sensitive information if you notice suspicious behavior or individuals nearby.
Remember, public Wi-Fi networks are inherently less secure than private networks. By following these safety precautions, you can minimize the risks and enjoy using public Wi-Fi networks more securely.
Tips for Optimizing Wi-Fi Performance on Any Device
Having a strong and reliable Wi-Fi connection is essential for a seamless internet experience. Here are some tips to help you optimize Wi-Fi performance on any device:
1. Place your router strategically: Position your router in a central location within your home or office to maximize coverage. Avoid placing it near obstacles like walls, furniture, or electronic devices that can interfere with the signal.
2. Upgrade your router: Older routers may not support the latest Wi-Fi standards or offer the best performance. Consider upgrading to a newer router with advanced features like dual-band capability and beamforming technology for better signal strength and coverage.
3. Reduce interference: Keep your router away from other wireless devices, cordless phones, baby monitors, and microwave ovens. These devices can cause interference and degrade your Wi-Fi signal.
4. Change Wi-Fi channels: If you are experiencing interference from neighboring Wi-Fi networks, switch to a less crowded channel. Most routers have an option to manually select channels in their settings.
5. Use Wi-Fi extenders or mesh networks: If you have a large home or office with dead spots or weak signal areas, consider using Wi-Fi extenders or a mesh network system. These devices help extend coverage and improve signal strength throughout your space.
6. Reduce bandwidth congestion: Limit the number of devices connected to your Wi-Fi network, especially those that require high bandwidth, like video streaming or gaming devices. Distribute bandwidth usage evenly across devices for a smoother browsing experience.
7. Keep your router firmware up to date: Ensure that your router’s firmware is updated regularly. Manufacturers often release firmware updates to improve performance, security, and compatibility.
8. Secure your Wi-Fi network: Protect your Wi-Fi network with a strong and unique password. Prevent unauthorized users from accessing your network, which can impact performance and compromise your security.
9. Monitor connected devices: Regularly check the connected devices list in your router settings. Remove any unknown devices to ensure that only authorized devices are using your Wi-Fi network.
10. Consider wired connections: For devices that require a stable and fast connection, such as gaming consoles or desktop computers, consider using Ethernet cables for a direct wired connection to your router.
By implementing these tips, you can optimize your Wi-Fi performance on any device and enjoy a faster, more reliable internet connection.