
Reasons to Format a Hard Drive in Windows
Formatting a hard drive in Windows can serve various purposes, from optimizing performance to resolving issues with data corruption. Whether you are setting up a new computer or troubleshooting existing problems, formatting can be a useful solution. Here are several reasons why you might want to format a hard drive in Windows:
- Optimizing Performance: Over time, hard drives can become fragmented, resulting in slower read and write speeds. By formatting the drive, you can reorganize the file system, improving overall performance.
- Resolving Software Issues: Formatting can help eliminate software-related problems such as malware infections or corrupt system files. By starting fresh with a clean installation of Windows, you can ensure a stable and reliable operating system.
- Preparing for a New Installation: If you are upgrading your operating system or installing a new one, formatting the hard drive is often necessary. This ensures a clean installation without any remnants from the previous operating system.
- Removing Sensitive Data: If you are getting rid of your computer or selling it, formatting the hard drive is essential to protect your personal information. It ensures that the data is completely erased and unrecoverable.
- Cleaning Up Your Storage: Formatting allows you to start with a clean slate, removing unnecessary files and freeing up storage space. This is particularly useful if your hard drive is running low on space and you want to reclaim it.
Regardless of the reason, it is important to note that formatting a hard drive will erase all data stored on it. Therefore, it is crucial to back up any important files and documents before proceeding with the formatting process.
Back Up Your Data
Before you format a hard drive in Windows, it is crucial to back up any important data that you have stored on it. Formatting will erase all the data on the drive, so it’s essential to take precautions to avoid losing valuable files. Here are some recommended steps to back up your data:
- Identify and Prioritize: Start by identifying the files and folders that you want to back up. This could include documents, photos, videos, music, and any other files that are important to you. Prioritize your data based on its importance and size so that you can allocate appropriate space for storage.
- Choose a Backup Method: There are several backup methods available, such as using an external hard drive, cloud storage services, or a network-attached storage (NAS) device. Consider the size of your data and the convenience of access when selecting the backup method that suits your needs.
- External Hard Drive: If you have a large amount of data to back up, an external hard drive can provide ample storage space. Connect the external hard drive to your computer and copy and paste or use backup software to transfer the files to the drive.
- Cloud Storage: Cloud storage services like Google Drive, Dropbox, and OneDrive offer a convenient way to back up your data securely. Sign up for an account, install the client software, and upload your files to the cloud. Ensure that you have enough space available or consider upgrading your storage plan if needed.
- NAS (Network-Attached Storage): If you have multiple devices on a network, a NAS device can provide centralized storage and backup capabilities. Set up the NAS device according to the manufacturer’s instructions, create shared folders, and copy your important files to them.
- Regularly Scheduled Backups: Make it a habit to back up your data regularly to ensure that you have the latest versions of your files. Schedule automatic backups or set reminders to manually initiate backup processes to keep your data protected at all times.
Remember, backing up your data is crucial to prevent irreversible data loss during the formatting process. Take the time to safeguard your files before proceeding to format your hard drive in Windows.
Check for Compatibility
Before formatting a hard drive in Windows, it’s important to ensure compatibility with your system. Checking compatibility helps avoid potential issues and ensures a smooth formatting process. Here are some steps to follow when checking for compatibility:
- Operating System: Verify that the operating system you plan to install on the formatted hard drive is compatible with your computer. Check the system requirements and ensure that your hardware meets or exceeds the minimum specifications.
- Hardware Support: If you are formatting an external or secondary hard drive, make sure your computer supports the necessary ports and connectivity options. For instance, if you are using a USB external hard drive, ensure that your computer has USB ports and supports the USB version of the drive.
- File System: Determine the file system you want to use after formatting the hard drive. Windows supports different file systems, such as NTFS, FAT32, and exFAT. Consider the file system limitations and compatibility with other devices that may need to access the formatted drive.
- Backup Compatibility: If you have backed up your data on an external storage device or a cloud service, ensure that the backup is compatible with the system you will be using after formatting. Verify the software or method used for backup and ensure it is compatible with the new operating system you plan to install.
- Device Drivers: Check for compatibility with the necessary device drivers for your hardware. Ensure that you have the drivers readily available or can download them for your specific hardware components, such as graphics cards, network adapters, or sound cards.
By performing these compatibility checks, you can save time and avoid potential issues during the formatting process. It ensures that your system is ready for the formatting operation, and the new configuration will be fully functional and compatible with your hardware and software requirements.
Partition Your Hard Drive
Partitioning your hard drive is an important step when formatting in Windows. It involves dividing the drive into multiple sections, each acting as a separate storage unit. Partitioning offers several benefits, such as efficient data organization, improved system performance, and the ability to install multiple operating systems. Here’s how you can partition your hard drive:
- Open Disk Management: Press the Windows key + R on your keyboard, type “diskmgmt.msc” into the Run dialog, and press Enter. This will open the Disk Management utility.
- Select the Hard Drive: In the Disk Management window, you will see a list of available drives. Right-click on the drive you want to partition and select “Shrink Volume.” This will analyze the drive to determine how much space can be allocated for partitioning.
- Specify the Partition Size: In the Shrink dialog box, enter the amount of space (in MB) you want to allocate for the new partition. Windows will automatically calculate the maximum amount of space available for shrinking.
- Create the Partition: After specifying the partition size, click on the “Shrink” button. This will create unallocated space on the hard drive, ready to be used for the new partition.
- Format the Partition: Right-click on the unallocated space and select “New Simple Volume.” Follow the on-screen instructions to specify the volume size, assign a drive letter, and format the partition using the desired file system (such as NTFS or FAT32).
- Repeat the Process: If you want to create additional partitions, repeat steps 2 to 5 for the remaining unallocated space on the hard drive. You can allocate different sizes for each partition based on your needs.
Partitioning your hard drive allows you to separate your data into distinct sections, making it easier to organize and locate files. It also provides flexibility when installing multiple operating systems, as each partition can have a different OS installed. However, keep in mind that partitioning will divide the available storage space, so allocate the partitions wisely based on your storage requirements.
Choose a Formatting Method
When it comes to formatting a hard drive in Windows, you have different methods to choose from. Each method offers specific advantages and is suited for different scenarios. Understanding the available formatting methods will help you decide which one is most appropriate for your needs. Here are the commonly used formatting methods:
- Quick Format: The quick format option allows you to format the hard drive quickly by deleting the file system without thoroughly scanning the drive for errors or bad sectors. It is ideal when you want to format a drive that is in good condition and doesn’t require a deep scan.
- Full Format: A full format performs a more comprehensive scan of the hard drive, checking for bad sectors and errors. It takes significantly longer to complete compared to a quick format. This method is recommended if you suspect issues with the drive or if you want to ensure a thorough scan for errors.
- Format with Operating System Installation: Formatting the hard drive during the installation of a new operating system is a common approach. During the installation process, you will be given the option to format the drive as part of the setup. This method is convenient if you are installing a fresh copy of the operating system.
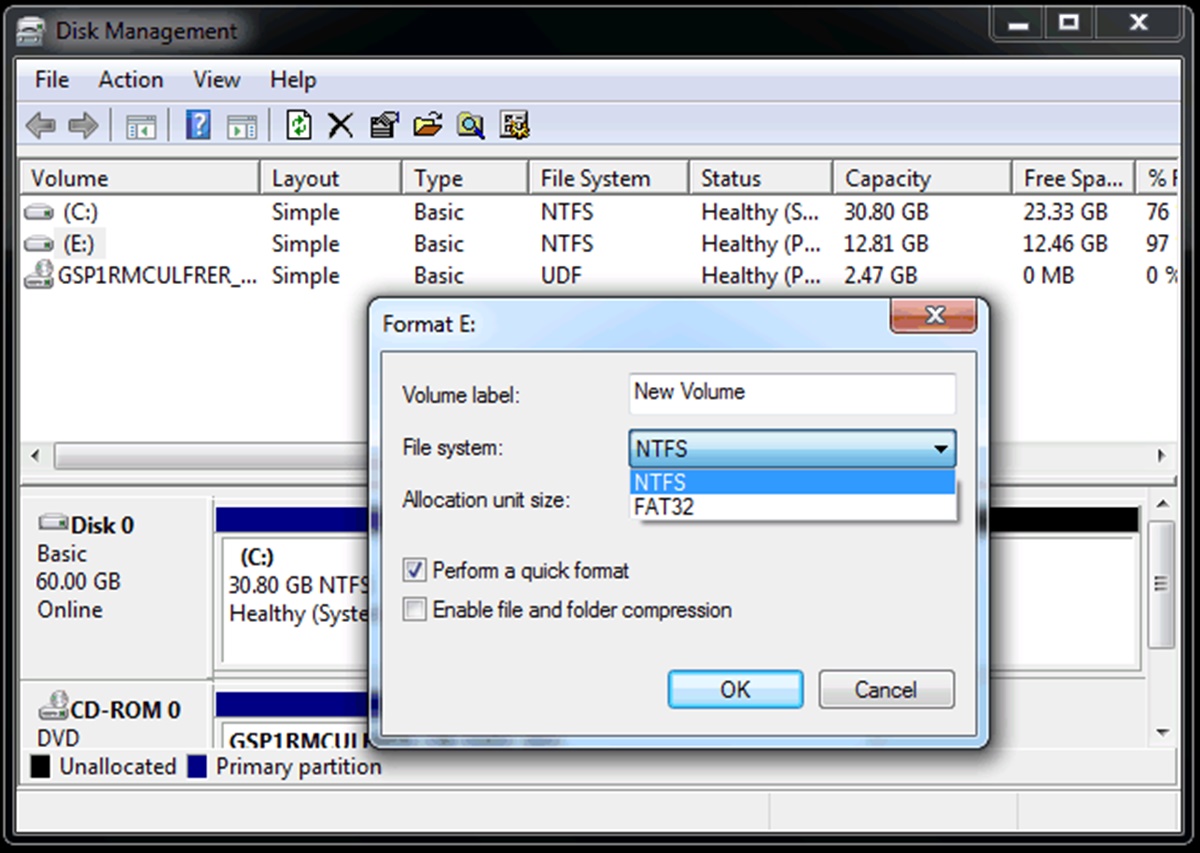
- Format with Disk Management: The Disk Management utility in Windows allows you to format a hard drive manually. This method provides more control over the formatting process, allowing you to choose the file system, allocation unit size, and volume label. It is suitable for advanced users who prefer a more customized approach.
- Command Prompt Format: For those comfortable with using command-line interfaces, formatting a hard drive through Command Prompt offers greater flexibility and advanced options. Command-line tools like Diskpart provide precise control over the formatting process, allowing for more specific configurations.
Consider the condition of your hard drive, the level of thoroughness required, and your familiarity with the formatting process when choosing the appropriate method. Always ensure you have appropriate backups before proceeding with any formatting method to prevent data loss.
Formatting Options
When formatting a hard drive in Windows, you have several formatting options to consider. These options allow you to customize the formatting process according to your specific needs. Here are some of the common formatting options:
- File System: Selecting the appropriate file system is crucial when formatting a hard drive. Windows supports various file systems, including NTFS (New Technology File System), FAT32 (File Allocation Table 32), and exFAT (Extended File Allocation Table). NTFS is the recommended choice for most situations due to its advanced features, security, and compatibility with larger file sizes and volumes.
- Allocation Unit Size: The allocation unit size, also known as cluster size, refers to the smallest unit of disk space that can be allocated for storing files. When formatting a hard drive, you can choose the allocation unit size based on the type of files you intend to store. Smaller allocation unit sizes are more efficient for storing numerous small files, while larger sizes are better suited for larger files.
- Volume Label: The volume label is a name or label that you can assign to the formatted hard drive. It helps you identify the drive easily and provides a meaningful name to represent its contents. Use a descriptive label that reflects the purpose or contents of the drive to make it easier to recognize in the future.
- Quick Format: As mentioned earlier, the quick format option allows you to format the hard drive quickly by deleting the file system without thoroughly scanning for errors or bad sectors. It is a faster option but may not detect or repair potential disk issues.
- Full Format: If you want a more thorough formatting process that checks for bad sectors and errors, choose the full format option. It performs a complete scan of the hard drive and takes more time to complete compared to a quick format. This option is recommended if you suspect issues with the drive or want to ensure a thorough scan for errors.
Consider your specific requirements and the purpose of the formatted hard drive when selecting these formatting options. Understanding these options will help you tailor the formatting process to suit your needs and ensure optimal performance and compatibility.
Quick Format or Full Format?
When formatting a hard drive in Windows, you will come across the choice between a quick format and a full format. Each option has its advantages and considerations, so it’s important to understand the differences to make an informed decision. Here are some factors to consider when choosing between a quick format or a full format:
- Time: The main advantage of a quick format is speed. It is significantly faster than a full format as it only deletes the file system on the drive without thoroughly scanning for errors or bad sectors. If you are short on time or have a large drive with no known issues, a quick format may be the preferred choice.
- Data Security: If you are concerned about data security, a full format provides a more thorough approach. It performs a comprehensive scan of the hard drive, checking for bad sectors and errors. This ensures that any potential issues are detected and repaired, resulting in a more reliable drive. If you suspect or have experienced issues with the drive, a full format is recommended.
- Data Recovery: It’s important to note that neither a quick format nor a full format provides complete data erasure. Formatting simply removes the file system, and data recovery tools can potentially recover the files. If you are disposing of the drive or passing it on to someone else, additional measures such as secure data erasure or disk wiping software should be considered.
- Data Loss: Both quick and full formats will erase all the data on the drive. Therefore, it is crucial to back up any important files before proceeding with either option to prevent permanent data loss. Ensure that you have a reliable backup of your data before initiating the formatting process.
In summary, a quick format is suitable when you need to quickly prepare a drive for use or when there are no known issues with the drive. It is faster but may not detect or repair potential disk issues. On the other hand, a full format is recommended when you want a more thorough scan for errors and bad sectors. It takes longer to complete but provides a more reliable drive. Regardless of the option you choose, ensure you have appropriate backups and consider additional measures for data security if needed.
NTFS or FAT32?
When formatting a hard drive in Windows, you have the choice between two primary file systems: NTFS (New Technology File System) and FAT32 (File Allocation Table 32). Each file system has its own advantages and considerations, so it’s important to understand the differences to make an informed decision. Here’s a comparison of NTFS and FAT32:
- File System Features: NTFS is the more advanced file system with a range of features not available in FAT32. NTFS supports larger file sizes, better security permissions, file encryption, and improved reliability. It also includes features like journaling that help recover data in case of unexpected system shutdowns or power failures.
- Compatibility: FAT32, being an older file system, offers better compatibility with a wide range of devices and operating systems, including older versions of Windows, Linux, and macOS. NTFS, however, is the default file system for modern versions of Windows and may not be fully compatible with non-Windows systems without additional software or drivers.
- File Size Limit: FAT32 has a maximum file size limitation of 4GB, which means you cannot store files larger than 4GB on a FAT32-formatted drive. NTFS, on the other hand, supports file sizes up to 16TB, allowing for the storage of large files, such as high-definition videos or disk images.
- Volume Size Limit: Another limitation of FAT32 is the maximum volume size it can handle. FAT32 has a volume size limit of 2TB (terabytes) for most versions of Windows. If you are formatting a drive larger than 2TB, you will need to use NTFS to utilize the full capacity of the drive.
- Efficiency and Fragmentation: NTFS generally offers better disk performance and efficient use of storage space compared to FAT32. NTFS uses a more advanced file allocation structure that minimizes fragmentation and improves overall system performance.
Consider your specific requirements and compatibility needs when choosing between NTFS and FAT32. If you primarily use Windows and need support for larger file sizes and volumes, NTFS is recommended. If you require broad compatibility with different devices and operating systems, or if you are formatting a drive smaller than 2TB, FAT32 may be more suitable. Remember to consider the limitations and features of each file system to make a well-informed decision.
Perform a Quick Format
Performing a quick format is a straightforward and efficient way to format a hard drive in Windows. It is suitable when you want to quickly prepare a drive for use or when there are no known issues with the drive. Here’s a step-by-step guide on how to perform a quick format:
- Open File Explorer: Open File Explorer by clicking on the folder icon in the taskbar or by pressing the Windows key + E on your keyboard.
- Select the Drive: From the left pane in File Explorer, right-click on the drive you want to format and select “Format” from the context menu. This will open the Format dialog box.
- Choose File System: In the Format dialog box, select the desired file system for the formatted drive. NTFS is recommended for most situations due to its advanced features and compatibility with larger file sizes and volumes.
- Select Quick Format: Check the box next to “Quick Format” to opt for a quick format. This will delete the file system on the drive without performing a thorough scan for errors or bad sectors.
- Provide a Volume Label: Optionally, you can provide a volume label for the formatted drive. The volume label is a name or description that helps identify the drive easily.
- Start the Format: Once you have chosen the file system, selected the quick format option, and provided a volume label if desired, click on the “Start” button to begin the quick format process.
- Confirm the Format: A warning message will appear, informing you that all data on the drive will be permanently deleted. Ensure that you have backed up any important files and confirm by clicking the “OK” button.
- Wait for Completion: The quick format process will commence, and you will see a progress bar indicating the formatting status. The time it takes to complete will vary depending on the size of the drive.
- Format Complete: Once the quick format process is finished, you will receive a notification confirming the completion. The drive is now formatted and ready for use.
Remember that a quick format only deletes the file system on the drive without performing a thorough scan for errors or bad sectors. It is essential to back up any important data before proceeding with the quick format process.
Perform a Full Format
If you want to perform a more comprehensive scan of your hard drive and ensure a thorough formatting process, a full format is recommended. Unlike a quick format, a full format checks for bad sectors and errors, providing a more reliable drive. Here’s a step-by-step guide on how to perform a full format in Windows:
- Open File Explorer: Open File Explorer by clicking on the folder icon in the taskbar or by pressing the Windows key + E on your keyboard.
- Select the Drive: From the left pane in File Explorer, right-click on the drive you want to format and select “Format” from the context menu. This will open the Format dialog box.
- Choose File System: In the Format dialog box, select the desired file system for the formatted drive. NTFS is recommended for most situations due to its advanced features and compatibility with larger file sizes and volumes.
- Uncheck Quick Format: Make sure the checkbox next to “Quick Format” is unchecked. This will initiate a full format instead of a quick format.
- Provide a Volume Label: Optionally, you can provide a volume label for the formatted drive. The volume label is a name or description that helps identify the drive easily.
- Start the Format: Once you have chosen the file system, unchecked the quick format option, and provided a volume label if desired, click on the “Start” button to begin the full format process.
- Confirm the Format: A warning message will appear, informing you that all data on the drive will be permanently deleted. Ensure that you have backed up any important files and confirm by clicking the “OK” button.
- Wait for Completion: The full format process will commence, and you will see a progress bar indicating the formatting status. Keep in mind that a full format takes longer to complete compared to a quick format.
- Format Complete: Once the full format process is finished, you will receive a notification confirming the completion. The drive is now fully formatted and ready for use.
Performing a full format ensures a thorough scan for bad sectors and errors, making it a more reliable option. However, it is important to note that a full format takes longer to complete compared to a quick format. Remember to back up any important data before proceeding with the full format process, as all data on the drive will be permanently deleted.
Convert a Partition to NTFS
Converting a partition to NTFS is a useful process when you want to change the file system of a partition from FAT32 or exFAT to NTFS. NTFS (New Technology File System) offers advanced features, improved security, and compatibility with larger file sizes and volumes. Here’s a step-by-step guide on how to convert a partition to NTFS in Windows:
- Open File Explorer: Open File Explorer by clicking on the folder icon in the taskbar or by pressing the Windows key + E on your keyboard.
- Identify the Partition: From the left pane in File Explorer, identify the partition that you want to convert to NTFS. Ensure that you have selected the correct partition, as the process is irreversible.
- Backup Important Data: Before proceeding with the conversion, it is crucial to back up any important data on the selected partition. Converting the file system has the potential to result in data loss, so make sure you have a reliable backup.
- Open Command Prompt: Right-click on the Start button and select “Command Prompt” from the context menu. Make sure to run Command Prompt as an administrator to have the necessary permissions.
-
Run the Conversion Command: In the Command Prompt window, type the following command and press Enter:
convert drive_letter: /fs:ntfsReplace “drive_letter” with the actual drive letter of the partition you want to convert. For example, if you want to convert the D: drive, the command will beconvert D: /fs:ntfs - Confirm the Conversion: A message will appear, informing you that converting the file system will format the partition and delete all data on it. Ensure that you have backed up any important data and type “Y” to confirm the conversion process.
- Wait for Completion: The conversion process will begin, and you will see a progress indicator in the Command Prompt window. The time it takes to complete will vary depending on the size of the partition.
- Conversion Complete: Once the conversion process is finished, you will receive a notification confirming the completion. The partition is now formatted with the NTFS file system.
Converting a partition to NTFS allows you to take advantage of the advanced features and compatibility offered by NTFS. However, it’s important to note that the conversion process will format the partition and delete all data on it. Therefore, it is crucial to back up any important data before proceeding with the conversion.
Convert a Partition to FAT32
Converting a partition to FAT32 can be helpful when you want to change the file system of a partition from NTFS to FAT32. FAT32 (File Allocation Table 32) offers better compatibility with different devices and operating systems, making it useful for situations where broad compatibility is required. Here is a step-by-step guide on how to convert a partition to FAT32 in Windows:
- Open File Explorer: Open File Explorer by clicking on the folder icon in the taskbar or by pressing the Windows key + E on your keyboard.
- Identify the Partition: From the left pane in File Explorer, identify the partition that you want to convert to FAT32. Ensure that you have selected the correct partition, as the process is irreversible.
- Backup Important Data: Before proceeding with the conversion, it is essential to back up any important data on the selected partition. Converting the file system can result in data loss, so make sure you have a reliable backup.
- Open Command Prompt: Right-click on the Start button and select “Command Prompt” from the context menu. Make sure to run Command Prompt as an administrator to have the necessary permissions.
-
Run the Conversion Command: In the Command Prompt window, type the following command and press Enter:
convert drive_letter: /fs:fat32Replace “drive_letter” with the actual drive letter of the partition you want to convert. For example, if you want to convert the D: drive, the command will beconvert D: /fs:fat32. - Confirm the Conversion: A warning message will appear, informing you that converting the file system will format the partition and delete all data on it. Ensure that you have backed up any important data and type “Y” to confirm the conversion process.
- Wait for Completion: The conversion process will begin, and you will see a progress indicator in the Command Prompt window. The time it takes to complete will vary depending on the size of the partition.
- Conversion Complete: Once the conversion process is finished, you will receive a notification confirming the completion. The partition is now formatted with the FAT32 file system.
Converting a partition to FAT32 allows for better compatibility with different devices and operating systems. However, it’s important to note that the conversion process will format the partition and delete all data on it. Therefore, it is crucial to back up any important data before proceeding with the conversion.
Troubleshooting Common Issues
While formatting a hard drive in Windows is generally a straightforward process, you may encounter some common issues along the way. These can range from formatting errors to compatibility problems. Here are some troubleshooting tips to help you overcome these common issues:
- Formatting Error: If you encounter formatting errors, such as “Cannot format the drive” or “Windows was unable to complete the format,” ensure that the drive is not in use by any application or process. Close any open programs accessing the drive and try formatting again. If the issue persists, try using an alternative formatting method (e.g., Disk Management or Command Prompt) or restart your computer and attempt formatting again.
- Drive Not Recognized: If the drive is not being recognized by Windows during formatting, ensure that the drive is properly connected. Check the cables, power source, and connections to make sure everything is secure. If the drive is an external one, try connecting it to a different USB port or using a different USB cable. Alternatively, you can also try the drive on another computer to see if it is recognized there.
- Drive Write-protected: If you receive an error stating that the drive is write-protected and cannot be formatted, check if the drive has a physical write protection switch or button. Make sure it is in the unlocked position. If there is no physical switch, you can try using disk partitioning software or Command Prompt with administrative privileges to remove the write protection. Be cautious when modifying disk partitions to prevent data loss.
- Incompatibility with Older Operating Systems: If you are formatting a drive to be used with older operating systems that have limited file system compatibility (such as FAT32), ensure that you select the appropriate file system during formatting. Some older Windows versions or non-Windows operating systems may not recognize or be compatible with newer file systems like NTFS.
- Bad Sectors or Disk Errors: If you suspect bad sectors or disk errors on the drive, consider running disk repair or diagnostic tools provided by the drive manufacturer or third-party software. These tools can help identify and repair disk errors, allowing you to proceed with the formatting process successfully.
If you continue to experience issues while formatting a hard drive in Windows, it’s advisable to consult support forums or seek assistance from technical experts with expertise in data recovery and disk management. Remember to back up important data before attempting any troubleshooting steps to minimize the risk of data loss.