
Check your backup
Before formatting your Mac hard drive, it is essential to ensure that you have a recent and reliable backup of all your important files and documents. Formatting the hard drive will erase all data, so taking the time to check and verify your backup is crucial for safeguarding your information.
Firstly, locate your backup drive or external storage device. This could be an external hard drive, a network-attached storage (NAS) device, or cloud storage services like iCloud or Dropbox. Make sure the backup is up-to-date and contains all the files you need. If you aren’t certain about the adequacy of your backup, it’s a good idea to perform a manual check by opening a few random files and confirming their integrity.
Remember to also back up any additional software or applications that are not easily reinstalled. Custom configurations, preferences, or special settings associated with your applications should be carefully saved. Take note of any license keys, serial numbers, or login credentials required to reinstall software or activate purchased applications.
In addition to personal files and applications, consider any unique system settings you’ve customized. These could include preferences for desktop appearance, keyboard shortcuts, or specific driver installations. Keeping a record of these settings will save you time and effort in the future when you restore your Mac.
Lastly, once you are confident in the backup’s completeness and accuracy, ensure that it is easily accessible during the formatting process. Test the connection or network access to the backup source to avoid any unexpected issues or delays.
By diligently checking and verifying your backup, you can proceed with confidence knowing that your important data and settings are protected. With this crucial step complete, you are now prepared to move on to the next phase of formatting your Mac hard drive.
Prepare for formatting
Before you can begin formatting your Mac hard drive, it’s important to make a few preparations to ensure a smooth and successful process. Taking the time to prepare will help you avoid unnecessary complications and potential data loss.
The first step in preparing for formatting is to disconnect any external devices connected to your Mac. This includes USB drives, external hard drives, printers, and any other peripherals. Disconnecting these devices will minimize the chances of accidentally formatting the wrong drive or causing conflicts during the formatting process.
Next, ensure that your Mac is connected to a stable power source throughout the formatting process. Sudden power interruptions can interrupt the formatting procedure and potentially cause data corruption. It’s best to connect your Mac to a power outlet using the charging cable or keep it plugged in if you’re using a desktop computer.
It’s also important to close any open applications and save any unsaved work before proceeding. Formatting the hard drive will erase all data, including open files, so it’s crucial to save your work to prevent any loss of important information or progress.
Additinally, it’s a good idea to gather any installation media or recovery disks that may be necessary to reinstall your operating system after the formatting process is complete. These may come in the form of a USB drive or DVD. Keep these installation media readily accessible as you will need them during the later stages of restoring your Mac.
Lastly, make sure you have a copy of your Mac’s operating system, either on a separate partition or on an installation media. This will make it easier to reinstall the operating system and get your Mac up and running again after the formatting is complete.
By completing these preparations, you are setting a solid foundation for the formatting process. Taking these steps will ensure a smooth and successful experience and help minimize any potential risks or complications. With your Mac properly prepared for formatting, you can proceed to the next step of accessing Disk Utility to begin the formatting process.
Access Disk Utility
When it comes to formatting your Mac hard drive, Disk Utility is the built-in tool that you will need to access. Disk Utility allows you to manage and format various storage devices connected to your Mac.
To open Disk Utility, you can follow these simple steps:
- Click on the Apple menu in the top-left corner of the screen.
- Select “System Preferences” from the drop-down menu.
- In the System Preferences window, click on “Disk Utility.” This will open the Disk Utility application.
Alternatively, if you prefer using Spotlight, you can open Disk Utility by pressing Command + Space to activate Spotlight and then typing “Disk Utility” in the search bar. Click on the Disk Utility search result to open the application.
Once you have opened Disk Utility, you will see a list of storage devices connected to your Mac displayed in the sidebar. This includes your Mac’s internal hard drive, external drives, and any other storage devices that are currently connected.
To continue with the formatting process, select the hard drive that you want to format from the list in the sidebar. Be cautious and double-check that you have selected the correct drive to avoid accidentally formatting the wrong one.
Once you have selected the desired drive, you will have access to several options and tools within Disk Utility. These options include formatting, partitioning, and repairing your drive. For now, focus on the formatting process as we move forward with erasing and preparing your hard drive for a fresh start.
Now that you have successfully accessed Disk Utility and selected the appropriate hard drive, you are ready to proceed with the formatting process. In the next section, we will cover the necessary steps to erase the hard drive and prepare it for a new file system.
Select the hard drive
After accessing Disk Utility, the next step in formatting your Mac hard drive is to select the specific drive that you want to format. This ensures that you are targeting the correct drive and avoiding any accidental data loss.
- In the Disk Utility sidebar, locate the list of storage devices connected to your Mac.
- Take a moment to assess the names and sizes of the drives to help you identify the one you want to format.
- Click on the drive’s name to select it.
It is crucial to double-check the drive you have selected before proceeding. Formatting a drive will erase all its data, so make sure you have selected the correct drive and not an external device or another partition by mistake.
If you are uncertain about which drive to select, you can easily verify it based on its size. Compare the size of the drive you wish to format with the information displayed in Disk Utility. This will help you confirm that you have chosen the right one.
Please exercise caution and be absolutely certain of your selection before proceeding. Once you have confirmed that you have selected the correct drive, you can move on to the next step: erasing the hard drive.
By selecting the appropriate hard drive, you are taking an important step towards ensuring a smooth and successful formatting process. With the correct drive identified, you can now focus on erasing and preparing the hard drive for the next phase of formatting.
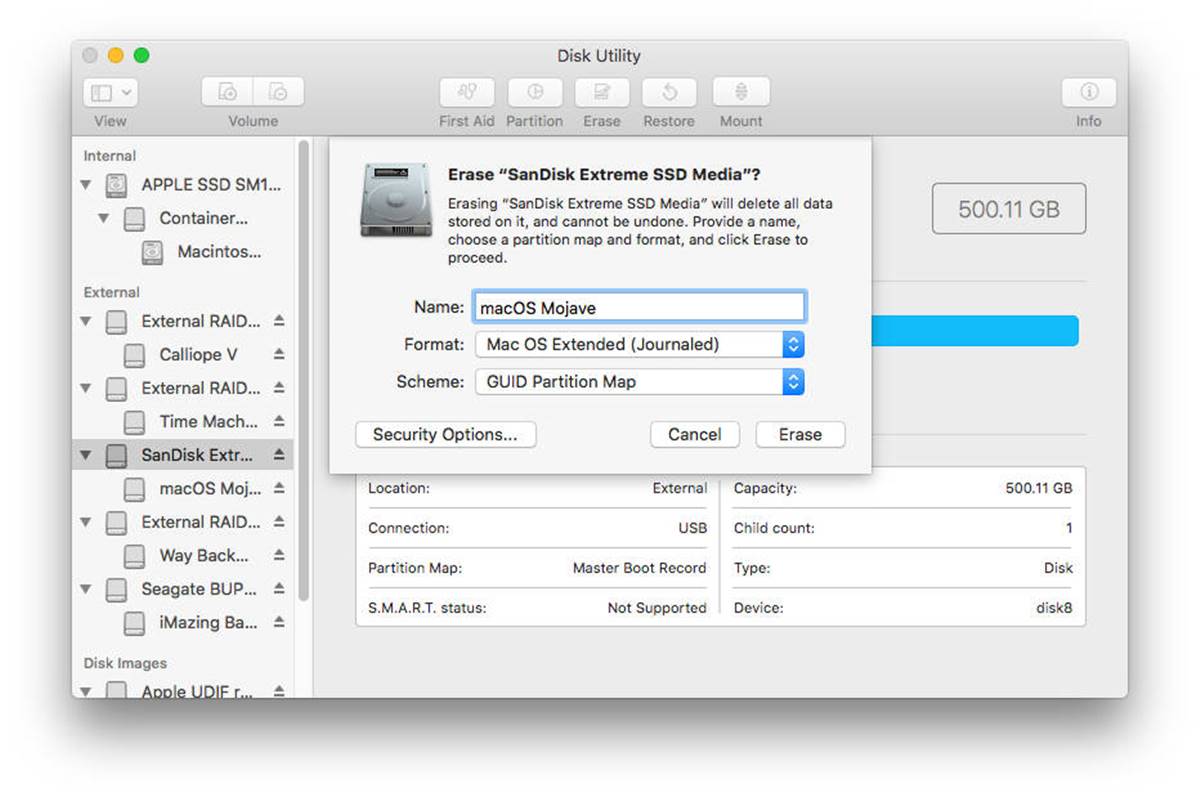
Erase the hard drive
After selecting the hard drive that you want to format, the next step is to erase the drive, which will remove all existing data and prepare it for a fresh start. Disk Utility provides a straightforward process to accomplish this:
- Ensure that the selected hard drive is still highlighted in the Disk Utility sidebar.
- Click on the “Erase” button, located in the toolbar at the top of the Disk Utility window.
- A new window will appear, allowing you to specify the formatting options for the drive. Begin by choosing the desired format for your new file system.
Disk Utility offers several format options, including:
- Mac OS Extended (Journaled): This is the standard format for Mac hard drives and is recommended for most users.
- APFS (Apple File System): This format is optimized for SSDs and provides enhanced performance and security features.
Choose the format that best suits your needs and preferences. If you plan to use the drive solely on a Mac, Mac OS Extended (Journaled) is usually the safest choice.
Next, enter a name for the formatted hard drive in the “Name” field. This name will be displayed when the drive is connected to your Mac.
Optionally, you can also select the “Scheme” option. This determines the type of partition map used on the drive. For most users, the default “GUID Partition Map” is a suitable choice.
Once you have selected the desired format, entered a name, and chosen a scheme if needed, click on the “Erase” button to begin the erasing process.
A warning message will appear, notifying you that erasing the drive will delete all data permanently. Double-check that you have selected the correct drive and review the information once more before proceeding.
Click on the “Erase” button in the warning message to confirm and start the erasing process. Disk Utility will then begin formatting the hard drive according to the specified options.
The time taken to erase the drive depends on its size and the selected format. Once the process is complete, Disk Utility will display a message confirming that the erasing was successful.
With the hard drive now erased, you have completed a significant step in the formatting process. The next section will guide you through the necessary steps to choose a new file system.
Choose a new file system
After successfully erasing the hard drive, the next step in the formatting process is to choose a new file system. A file system is responsible for organizing and managing data on your hard drive, determining how files are stored, accessed, and managed.
Disk Utility offers two main file system options for formatting your Mac hard drive:
- Mac OS Extended (Journaled): Also known as HFS+, this is the traditional and widely supported file system for Mac OS. It offers stability, compatibility, and efficient storage management.
- APFS (Apple File System): Introduced in macOS High Sierra, APFS is specifically designed for solid-state drives (SSDs) and offers improved performance, reliability, and security features.
Consider the following factors when choosing a file system:
- Compatibility: If you plan to use the drive primarily on a Mac and need compatibility with older macOS versions, Mac OS Extended is the ideal choice.
- Performance: If your Mac has an SSD or if you prioritize performance, APFS is recommended due to its optimization for solid-state drives.
- Security and Encryption: APFS offers native support for optional encryption and file-level encryption, providing enhanced security for your data.
To choose a file system:
- In Disk Utility, select the erased hard drive from the sidebar if it’s not already selected.
- Click on the “Format” dropdown menu located in the Disk Utility sidebar.
- From the dropdown menu, select either “Mac OS Extended (Journaled)” or “APFS” as your desired file system.
After selecting the file system, you can proceed to the next step: renaming the hard drive. Providing a descriptive name for your newly formatted drive will help you easily identify and locate it when connected to your Mac.
By choosing a new file system, you are taking a significant step towards optimizing data management and storage on your Mac. The next section will guide you through the process of renaming the hard drive.
Rename the hard drive
After selecting the file system for your freshly formatted hard drive, the next step is to give it an appropriate and descriptive name. Renaming the hard drive will help you easily identify it when connected to your Mac and differentiate it from other drives.
To rename the hard drive, follow these steps:
- In Disk Utility, make sure that the formatted hard drive is selected in the sidebar.
- Click on the “Name” field located below the format dropdown menu.
- Enter the desired name for your hard drive.
When choosing a name, be as descriptive as possible. This will make it easier to identify the drive and differentiate it from other connected drives.
It’s worth noting that the name you choose can contain alphanumeric characters, spaces, and most punctuation symbols. However, it’s generally recommended to avoid using special characters or symbols that may cause compatibility issues with certain systems.
Once you have entered the desired name, make sure to double-check for any typos or errors. Accurate naming is important not only for convenience but also to avoid confusion when managing multiple drives or when restoring backups.
After verifying the name, you can proceed to the next step: finalizing the formatting process by performing the actual formatting of the hard drive.
By renaming the hard drive, you are personalizing it and making it easier to identify in your system. The next section will guide you through the process of formatting the hard drive.
Format the hard drive
After selecting the file system and renaming the hard drive, the next crucial step is to format the drive. Formatting will apply the chosen file system and prepare the hard drive for use with your Mac.
To format the hard drive, follow these steps:
- Ensure that the renamed hard drive is still selected in the Disk Utility sidebar.
- Click on the “Erase” button located in the toolbar at the top of the Disk Utility window.
- Confirm that the formatting options are set correctly – the desired file system and name should already be selected based on your previous choices.
- Double-check that the selected hard drive is indeed the one you want to format. Formatting will erase all data on the drive permanently.
- Click on the “Erase” button in the prompt to begin the formatting process.
The formatting process may take some time, depending on the size and speed of the hard drive. A progress bar will indicate the status of the formatting process.
While the drive is being formatted, it is important to avoid interrupting or disconnecting it. Doing so can result in data corruption, incomplete formatting, or other issues. Allow the process to complete without interruption.
Once the formatting process is finished, Disk Utility will display a message confirming that the drive has been successfully formatted with the chosen file system and name. You can now proceed to the next step: verifying the formatting process.
By formatting the hard drive, you have created a clean, organized, and functional storage space for your files and data. The upcoming section will guide you through the process of verifying the formatting to ensure its success.
Verify the formatting process
After formatting the hard drive, it is important to verify the formatting process to ensure that it was successful and that the drive is now ready for use. Verifying the formatting will help identify any potential issues or errors that may have occurred during the process.
To verify the formatting process, follow these steps:
- In Disk Utility, locate the formatted hard drive in the sidebar.
- Click on the “First Aid” button located in the toolbar at the top of the Disk Utility window.
- A new window will open, displaying options for running the First Aid tool.
- Click on “Run” to start the verification process.
The First Aid tool will examine the formatted hard drive for any potential errors or inconsistencies. It will check the integrity of the file system and ensure that it has been successfully applied to the drive.
During the verification process, Disk Utility will provide detailed information about the progress and any issues encountered. It will notify you if it finds any errors and attempt to repair them if possible.
Once the verification process is complete, Disk Utility will display a message indicating whether the formatting was successful or if any errors were found and repaired. Take note of any information provided by Disk Utility, as it may help troubleshoot potential issues in the future.
If no errors are detected, the formatting process can be considered successful, and the hard drive is now ready for use. However, if errors were encountered and could not be repaired, it may be necessary to repeat the formatting process or seek further assistance.
Verifying the formatting process is an essential step to ensure that your hard drive is in good working condition. By confirming the success of the formatting and resolving any potential errors, you can have peace of mind knowing that your drive is ready for the next phase: restoring data from your backup.
Restore data from backup
Now that you have successfully formatted and verified your hard drive, the final step is to restore your data from the backup you previously created. Restoring your data will bring back your files, applications, and settings, allowing you to continue working with your Mac as before.
To restore data from your backup, follow these steps:
- Connect the backup device or access your backup source, such as an external hard drive, network-attached storage (NAS), or cloud storage service.
- Open the backup location and locate the files and folders you wish to restore. You can use Finder or the backup software associated with your backup solution.
- Select the files and folders you want to restore and copy them to your newly formatted hard drive.
- If you were using a backup software or utility, follow its specific instructions for restoring the backup files.
When restoring your data, it is important to prioritize and selectively restore what you need. This will help you avoid cluttering your Mac with unnecessary files and save time during the restoration process.
As you restore files, ensure that they are organized in a way that makes sense to you. Create folders and directories as needed to help keep your files organized and easily accessible.
Once you have successfully restored your files and folders, it is also a good time to reinstall any software or applications that may not have been included in the backup. Refer to your previous notes or license information to ensure that you have the necessary details to reinstall them.
Take the opportunity to test your restored files and applications to ensure that they are working correctly. Open a few files and launch your applications to verify that everything is functioning as expected.
With your data fully restored and verified, you can now continue using your Mac with confidence, knowing that your important files and settings are back in place.
By following these steps to restore your data, you have successfully completed the entire process of formatting your Mac hard drive and restoring your files. Your Mac is now fresh, organized, and ready to serve you efficiently.