
What is a Fusion Drive?
A Fusion Drive is a storage solution that combines the use of both a traditional hard drive (HDD) and a solid-state drive (SSD) in a Mac computer. It works by intelligently managing and storing data on the two different drives, allowing for optimized performance and storage capacity.
The primary purpose of a Fusion Drive is to provide users with the best of both worlds – the speed and responsiveness of an SSD, combined with the large storage capacity of an HDD. This hybrid setup allows for faster boot times, snappier application launches, and improved overall system performance.
The concept behind a Fusion Drive is to move frequently accessed files and programs onto the SSD portion of the drive, while less frequently used data remains on the HDD. This way, the most critical data is readily available for quick access, while the less crucial files are still accessible but at a slightly slower speed.
One of the key advantages of a Fusion Drive is its ability to automatically manage and optimize data placement based on usage patterns. The system analyzes which files are accessed more frequently and moves them to the SSD for faster retrieval. Conversely, files that are rarely accessed are automatically migrated to the HDD to free up space on the SSD for more frequently used data.
It’s important to note that Fusion Drives are typically found on older models of Mac computers, as recent models often come equipped with a pure SSD or PCIe-based flash storage. However, if your Mac supports it, setting up a Fusion Drive can still be a viable option to enhance your storage performance.
Overall, a Fusion Drive offers a balance between speed and storage capacity, making it an attractive option for users who require both performance and ample storage space. By combining the benefits of SSD and HDD technologies, Fusion Drives provide a cost-effective solution for Mac users looking to optimize their system’s performance without sacrificing storage capacity.
Benefits of Setting Up a Fusion Drive
Setting up a Fusion Drive in your Mac computer can bring about several benefits that enhance both performance and storage capacity. Here are some advantages of choosing a Fusion Drive:
1. Improved Speed: The integration of a solid-state drive (SSD) with a traditional hard drive (HDD) in a Fusion Drive configuration allows for faster boot times, quicker application launches, and overall snappier performance. Frequently accessed files are stored on the SSD portion, enabling rapid data retrieval.
2. Optimized Storage: With a Fusion Drive, you can enjoy the benefits of a large storage capacity provided by an HDD while still benefiting from the speed and responsiveness of an SSD. The system intelligently manages data placement to ensure that frequently accessed files are on the faster SSD portion, while less frequently used data remains on the HDD.
3. Automatic Data Tiering: The built-in intelligence of a Fusion Drive ensures that files are automatically moved between the SSD and HDD based on usage patterns. This means that the most frequently accessed files are stored on the faster SSD for quick retrieval, while less frequently used files are stored on the HDD to free up space on the SSD.
4. Cost-Effective Solution: Fusion Drives offer a cost-effective storage solution, particularly for older Mac models that may not come with pure SSD or PCIe-based flash storage options. By combining the benefits of both SSD and HDD technologies, Fusion Drives provide a balance between performance and storage capacity at a more affordable price point.
5. Easy Setup: Setting up a Fusion Drive is relatively straightforward. With the help of the disk utility, you can easily combine the SSD and HDD into a single logical volume. The system takes care of managing the data placement automatically, so you don’t have to worry about complicated manual configurations.
6. Seamless Integration: A Fusion Drive seamlessly integrates into the macOS system, allowing you to enjoy the benefits without needing to install additional software or manage complex settings. It functions as a single drive, making it hassle-free to work with and manage your files.
In summary, setting up a Fusion Drive on your Mac offers several advantages, including improved speed, optimized storage, automatic data tiering, cost-effectiveness, easy setup, and seamless integration with the macOS system. By combining the strengths of SSD and HDD technologies, Fusion Drives provide a compelling storage solution that enhances performance without compromising on storage capacity.
Requirements for Setting Up a Fusion Drive
Before setting up a Fusion Drive on your Mac computer, you need to ensure that you meet certain requirements. Here are the key prerequisites for setting up a Fusion Drive:
1. Compatible Mac Model: Not all Mac models support Fusion Drives, so it’s important to check if your Mac is compatible. Fusion Drive support is typically available on older models, such as iMac and Mac mini models from 2012 and 2013. You can verify compatibility by checking Apple’s official documentation or contacting Apple support.
2. Internal SSD and HDD: To create a Fusion Drive, you need an internal solid-state drive (SSD) and a traditional hard drive (HDD) in your Mac. The SSD should have a minimum capacity of 128GB to allow for effective data tiering. Ideally, the SSD capacity should be larger to accommodate frequently used files.
3. macOS Version: Fusion Drive functionality requires macOS 10.8 Mountain Lion or later. Ensure that your Mac is running a compatible version of macOS before attempting to set up a Fusion Drive. Updating to the latest version of macOS is recommended for optimal performance and compatibility.
4. Backup: Before setting up a Fusion Drive, it is crucial to back up your Mac. Combining and configuring drives can involve data manipulation, and there is always a risk of data loss. Creating a comprehensive backup ensures that your data is safe in case of any unforeseen issues during the Fusion Drive setup process.
5. Disk Utility: Disk Utility is a built-in macOS tool that enables the creation and management of Fusion Drives. Ensure that you have access to Disk Utility, which is typically located in the Utilities folder within the Applications folder. Disk Utility will be used to format and combine the SSD and HDD into a single logical volume.
6. Storage Requirements: Consider your storage needs when setting up a Fusion Drive. Assess the amount of data you currently have and anticipate future storage requirements. Fusion Drives offer a balance between speed and capacity, but it’s important to ensure that the combined capacity of the SSD and HDD will meet your storage demands.
Remember to consult official Apple documentation or online resources specific to your Mac model for accurate and up-to-date information on Fusion Drive requirements. By meeting these prerequisites, you can proceed confidently with the Fusion Drive setup process and enjoy the benefits of enhanced performance and storage capacity on your Mac.
Backup Your Mac
Before embarking on setting up a Fusion Drive on your Mac, it is imperative to create a comprehensive backup of your data. While the Fusion Drive setup process is generally safe, there is always a risk of unforeseen issues that could result in data loss. Taking the time to backup your Mac ensures that your important files and documents are protected and can be easily recovered if necessary.
Here are some important steps to follow when backing up your Mac:
1. Time Machine: Use Apple’s built-in backup software, Time Machine, to create a complete backup of your Mac. Time Machine allows you to easily restore files or even your entire system in case of data loss or hardware failure. Connect an external hard drive or use a network-attached storage (NAS) device to store your Time Machine backups.
2. Verify Backup Drive: Ensure that the backup drive you are using is in good working condition and has enough storage capacity to accommodate your files. You can use Disk Utility to verify the integrity of the backup drive and repair any errors, if necessary. Additionally, make sure the backup drive is compatible with macOS and properly formatted for Time Machine.
3. Select Backup Options: Customize the Time Machine backup settings according to your preferences. You can choose to exclude certain folders or files from the backup if they are not crucial or if they occupy a significant amount of space. Time Machine also allows you to set up automatic backups at regular intervals, ensuring that your data is continuously protected.
4. Start the Backup: Once you have set up the backup options, initiate the backup process by clicking the “Back Up Now” button in the Time Machine preferences. Depending on the amount of data to be backed up, this process may take some time. It’s best to ensure that your Mac is connected to a power source during the backup to prevent any interruptions.
5. Monitoring the Backup: Keep an eye on the backup progress to ensure that it proceeds smoothly. Time Machine provides a visual indicator to show the status of the backup and estimated time remaining. You can also access the Time Machine menu icon in the menu bar to easily monitor and control the backup process.
By following these steps and creating a solid backup of your Mac using Time Machine, you can have peace of mind knowing that your data is safeguarded. In the event of any unexpected issues during the Fusion Drive setup or other data-related emergencies, you will be able to restore your Mac to its previous state and prevent any data loss. Take the time to regularly back up your Mac to ensure that your important files are protected and easily recoverable.
Clear Out Unnecessary Files
Prior to setting up a Fusion Drive on your Mac, it’s a good idea to clear out unnecessary files to optimize your storage space. By removing unnecessary files, you can ensure that only essential data is migrated to the Fusion Drive and avoid cluttering your storage with unused or outdated files. Here are some steps you can take to clear out unnecessary files:
1. Perform a System Cleanup:
Start by performing a system cleanup to remove temporary and cache files that accumulate over time. You can use built-in tools like macOS’s Disk Utility and CleanMyMac to delete system temporary files, cached data, and logs. This will free up valuable space on your existing drives.
2. Organize and Delete Unused Applications:
Review your installed applications and remove any that you no longer use. Uninstalling unnecessary applications can free up significant space on your drive. Use Launchpad or the Applications folder to easily identify and remove applications you no longer need.
3. Sort and Delete Large Files:
Identify and delete large files that are taking up significant storage space. Use macOS Finder or third-party file management applications to sort your files by size and easily identify large files such as videos, old backups, or downloads that are no longer needed. Consider moving important large files to an external storage solution or cloud storage to free up space on your Mac.
4. Empty Trash and Deleted Files:
Empty your trash folder to permanently delete files you no longer need. Deleted files that are left in the trash still occupy storage space on your drives. By emptying the trash, you can recover this space and maximize storage efficiency.
5. Remove Language Packs:
Certain applications come with multiple language packs, which take up unnecessary space. Use third-party applications like Monolingual to remove unused language packs and free up storage. Be cautious when using these tools and ensure that you’re only removing the language packs you don’t need.
6. Delete Unused Downloads:
Review your downloads folder and delete files that are no longer needed. Downloads often accumulate over time and can take up a significant amount of space on your drive. Sort files by date to quickly identify and remove outdated or unnecessary downloads.
By following these steps to clear out unnecessary files, you can optimize your storage space and prepare your Mac for the Fusion Drive setup. Removing unused applications, large files, and junk files not only creates more room for important data but also improves the efficiency and performance of your system. Take the time to periodically clean up your Mac to ensure smooth operations and maximize the benefits of a Fusion Drive setup.
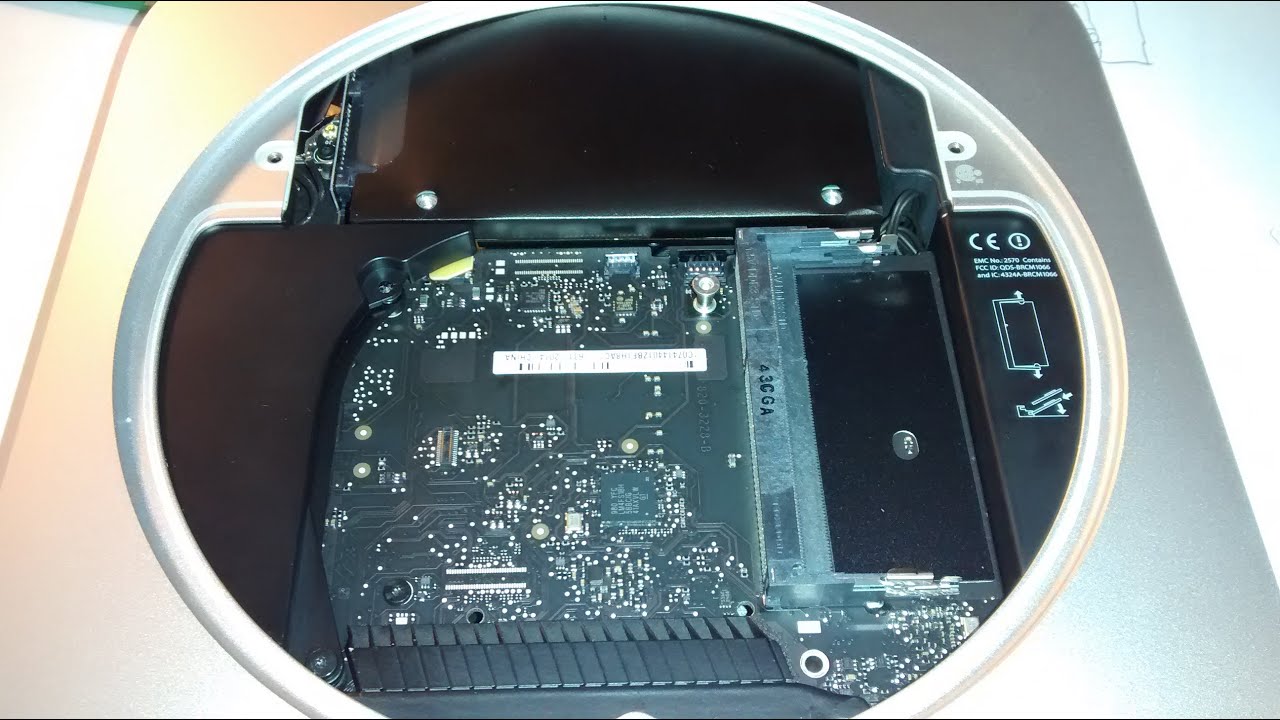
Identify the Drives
Before setting up a Fusion Drive on your Mac, it is important to identify the drives that will be used for the setup. By understanding and recognizing the specific drives in your Mac, you can ensure a smooth and accurate Fusion Drive creation process. Here are the key steps to identify the drives:
1. Launch “About This Mac”: Start by clicking on the Apple logo on the top left corner of your screen and selecting “About This Mac.” This will open a window displaying basic information about your Mac, including the macOS version and the overview of your system’s hardware.
2. Access “System Report”: In the “About This Mac” window, click on the “System Report” button. This will open the System Information window, providing you with detailed information about various components of your Mac.
3. Navigate to “Storage”: In the System Information window, navigate to the sidebar on the left and click on “Storage” under the “Hardware” section. This will display detailed information about your Mac’s storage devices.
4. Identify the SSD and HDD: In the Storage section, you will find a list of available storage devices on your Mac. Look for the SSD (solid-state drive) and HDD (hard disk drive) among the listed devices. Note their respective names, capacities, and connection interfaces (e.g., SATA, PCIe).
5. Verify Capacities and Types: Double-check that the capacities of the SSD and HDD match the expectations and meet the Fusion Drive requirements. Confirm that the SSD is a solid-state drive and the HDD is a traditional mechanical hard drive. It’s also worth ensuring that both drives are functioning properly and are not displaying any warning signs or errors.
6. External Drive Considerations: If you plan to use an external SSD or HDD as part of your Fusion Drive setup, connect the drive to your Mac and verify that it is recognized by the system. Check the drive’s capacity and ensure it is in good working condition.
By following these steps, you can easily identify the drives in your Mac system and gather the necessary information needed to create a Fusion Drive. Understanding the specific drives and their capabilities enables you to make informed decisions during the Fusion Drive setup process. Take the time to confirm the drives to ensure a successful integration and optimal performance of your Fusion Drive configuration.
Preparing the Drives for Fusion
Once you have identified the drives that will be used for setting up a Fusion Drive on your Mac, it is necessary to prepare them for the fusion process. This involves formatting the drives and preparing them to be combined into a single logical volume. Here are the steps to prepare the drives for Fusion:
1. Backup Your Data: Before proceeding with any drive preparation, it is crucial to back up any important data that is currently stored on the drives. This ensures that your data is safe and can be easily restored in case of any issues during the drive preparation or fusion process.
2. Disk Utility: Open Disk Utility, which is located in the Utilities folder within the Applications folder. Disk Utility is a built-in macOS tool that allows you to format, partition, and manage your drives.
3. Select the SSD and HDD: In Disk Utility, locate and select the SSD and HDD drives that you identified earlier. Be cautious when selecting the drives, as formatting will erase all data on the selected drives.
4. Erase the Drives: With the drives selected, click on the “Erase” button in Disk Utility. Choose a suitable format for the drives, such as APFS (Apple File System) or Mac OS Extended (Journaled). Give each drive a distinct name to differentiate between the SSD and HDD during the Fusion Drive setup.
5. Create Partitions (Optional): If you want to create multiple partitions on either the SSD or HDD, you can do so at this stage. Partitions can be useful for organizing your data or having separate sections for specific purposes. However, keep in mind that once the Fusion Drive is created, the partitions will be merged into a single logical volume.
6. Confirm Formatting and Erasing: Double-check the selected drives, format settings, and drive names before proceeding with erasing and formatting. Once you are certain about the settings, click on the “Erase” button to start the process. Be patient, as formatting and erasing the drives may take some time depending on their size and speed.
7. Verify the Formatting: After the formatting process is complete, verify that both drives have been successfully formatted and are now shown as separate volumes in Disk Utility. The SSD and HDD should be ready to be combined into a Fusion Drive.
By following these steps, you can properly prepare the SSD and HDD drives for the Fusion Drive setup. Formatting and erasing the drives ensure they are ready to be combined into a single logical volume. It is crucial to exercise caution during this process, as any data on the drives will be permanently erased. Once the drives are properly prepared, you can proceed with creating the Fusion Drive and enjoy the benefits of speed and storage capacity optimization.
Creating the Fusion Drive
After preparing the SSD and HDD drives for fusion, you are ready to create the Fusion Drive on your Mac. This process involves combining the drives into a single logical volume that offers the benefits of both the SSD’s speed and the HDD’s storage capacity. Here are the steps to create a Fusion Drive:
1. Open Terminal: Launch the Terminal application on your Mac. You can find Terminal in the Utilities folder within the Applications folder or by using Spotlight search.
2. Enter the Command: In the Terminal window, enter the following command to start the Fusion Drive creation process:
diskutil list
This command will display a list of all connected drives and their identifiers.
3. Identify the Drives: From the list of drives displayed, identify the identifiers for the SSD and HDD that you want to combine into the Fusion Drive. Take note of the identifiers, such as disk0 and disk1.
4. Create the Logical Volume Group: In Terminal, enter the following command to create a logical volume group that will serve as the foundation of the Fusion Drive:
diskutil cs create Fusion disk identifier1 identifier2
Replace “identifier1” and “identifier2” with the identifiers of the SSD and HDD, respectively. For example:
diskutil cs create Fusion disk0 disk1
5. Verify the Logical Volume Group: Once the logical volume group creation process is complete, enter the command:
diskutil cs list
This command will display information about the logical volume group, such as the size, status, and unique identifier.
6. Create the Fusion Drive: With the logical volume group created, enter the following command to create the Fusion Drive:
diskutil cs createVolume fusion APFS “FusionDriveName” 100%
Replace “FusionDriveName” with the desired name for your Fusion Drive.
7. Confirm and Begin the Process: Terminal will display a summary of the Fusion Drive setup. Verify the details and type “yes” to confirm and begin the Fusion Drive creation process.
8. Wait for Completion: The creation process may take some time, depending on the size of the drives. Monitor the progress in Terminal and wait until the process is complete.
9. Verify the Fusion Drive: Once the process is finished, you can verify the existence of the Fusion Drive in Disk Utility or by entering the command:
diskutil list
The Fusion Drive should be listed as a single volume.
By following these steps and creating the Fusion Drive, you have successfully combined the SSD and HDD into a logical volume that offers improved performance and storage capacity. The Fusion Drive will now act as a unified storage solution with data automatically managed between the SSD and HDD based on usage patterns. Enjoy the benefits of enhanced speed and efficient storage on your Mac with the newly created Fusion Drive.
Transferring Data to the Fusion Drive
Once you have successfully created the Fusion Drive on your Mac, the next step is to transfer your data to the new unified storage solution. Moving your files and applications to the Fusion Drive ensures that you can take full advantage of the improved performance and storage capacity. Here’s how you can transfer data to the Fusion Drive:
1. Update macOS: Before transferring data, ensure that your Mac is running the latest version of macOS. Keeping your operating system up to date ensures compatibility and stability when working with the Fusion Drive.
2. Time Machine Restore (Optional): If you have a Time Machine backup, you can restore your data directly to the Fusion Drive. Connect the Time Machine backup drive, launch the Migration Assistant, and follow the prompts to restore your files, applications, and settings to the Fusion Drive.
3. Manual Data Transfer: If you don’t have a Time Machine backup or prefer to transfer data manually, you can do so by following these steps:
– Copying Files: Start by copying your important files, such as documents, photos, and videos, from their original locations to the appropriate folders on the Fusion Drive. You can use macOS Finder to drag and drop files from one location to another.
– Moving Applications: Next, you can move applications to the Fusion Drive. To do this, create a new “Applications” folder on the Fusion Drive, and then manually move the applications from the original “Applications” folder on your Mac to the new location. Remember to close any running applications before moving them.
– Reinstalling Applications: Some applications may require a reinstallation rather than a simple move. In this case, download the installation files from the original source, launch the installer, and follow the instructions to install the application on the Fusion Drive.
– Updating Preferences: If you have customized preferences for certain applications, be sure to update them to reflect the new location on the Fusion Drive. Preferences are typically stored within the “Library” folder in your user directory.
4. Verification: After transferring your data to the Fusion Drive, double-check that everything has been successfully moved. Open files, launch applications, and test their functionality to ensure a smooth transition.
5. Clean Up Old Drives: Once you have confirmed that all your data has been safely transferred to the Fusion Drive, you can clean up the old drives. This involves deleting unnecessary files and applications from the original drives to free up disk space.
It’s important to note that during the initial period of using the Fusion Drive, the system will learn your usage patterns and automatically optimize data placement between the SSD and HDD. Therefore, you may notice improved performance over time as the Fusion Drive adapts to your specific usage habits.
By following these steps, you can successfully transfer your data to the Fusion Drive and fully utilize its enhanced performance and storage capacity. Whether you choose to restore from a Time Machine backup or transfer data manually, ensure that everything is properly transferred and functioning smoothly on the Fusion Drive. Enjoy the benefits of the unified storage solution and the improved performance it brings to your Mac.
Verifying and Maintaining the Fusion Drive
After setting up the Fusion Drive on your Mac and transferring your data, it’s essential to periodically verify and maintain the health and performance of the Fusion Drive. Regular maintenance ensures that it continues to operate optimally and provides the expected speed and storage capacity benefits. Here are some steps to verify and maintain your Fusion Drive:
1. Verify Fusion Drive Status: To confirm that the Fusion Drive is functioning correctly, open Disk Utility and check the status of the Fusion Drive. It should be listed as a single volume, with both the SSD and HDD components combined.
2. Check Available Space: Monitor the available space on your Fusion Drive regularly to ensure that it’s not filling up. You can do this by selecting the Fusion Drive volume in Finder and checking the available space at the bottom of the window. If the available space becomes limited, consider deleting unnecessary files or moving large files to external storage solutions.
3. Update macOS and Drivers: Keep your macOS and drivers up to date to benefit from the latest features, bug fixes, and performance enhancements. Regularly check for updates using the Software Update feature in the System Preferences or by opening the App Store and navigating to the Updates tab.
4. Maintain a Backup Strategy: Don’t rely solely on the Fusion Drive as your only data source. It’s crucial to maintain a backup strategy by regularly backing up your data to an external storage device or cloud-based services. This protects your data in the event of hardware failures or accidental deletions.
5. Monitor Drive Health: Use utilities like Disk Utility or third-party applications to monitor the health of both the SSD and HDD components of the Fusion Drive. Check for any signs of issues or errors and address them promptly to ensure the longevity and stability of the drives.
6. Optimize Data Placement: The Fusion Drive automatically optimizes data placement based on usage patterns. However, if you notice any performance issues or want to manually optimize data placement, consider using third-party software like Drive Genius, which offers advanced features for managing and optimizing drive performance.
7. Regularly Clean Up and Organize: Take the time to regularly clean up your Fusion Drive by removing unnecessary files, deleting duplicate files, and organizing your data. This not only helps to free up storage space but also ensures that your data is easily accessible and well-organized.
8. Keep an Eye on Performance: Monitor the performance of your Fusion Drive by observing the speed of application launches, file transfers, and overall system responsiveness. If you notice any significant slowdowns or abnormalities, consider troubleshooting or seeking professional assistance.
By following these steps to verify and maintain your Fusion Drive, you can ensure its longevity, performance, and storage capacity. Regular monitoring, maintenance, and optimization will help you make the most of the Fusion Drive’s benefits and enjoy the improved speed and storage efficiency it provides on your Mac.