
What is Mac Recovery HD Volume?
Mac Recovery HD Volume is a hidden partition on your Mac’s hard drive that contains essential tools and resources to troubleshoot and repair your Mac. It serves as a built-in safety net when your Mac encounters issues that prevent it from starting up or performing optimally.
When you encounter problems with your Mac’s operating system, such as frequent crashes, slow performance, or system errors, you can rely on Mac Recovery HD Volume to help resolve these issues. It provides access to a range of utilities that can be used to reinstall the macOS, troubleshoot hardware and software problems, and perform maintenance tasks.
Mac Recovery HD Volume is created during the installation of macOS and is automatically updated with new versions of the operating system. It is separate from your main macOS partition, which means that even if your Mac’s main partition becomes corrupted or inaccessible, you can still access Mac Recovery HD Volume to perform repairs or reinstall the operating system.
To access Mac Recovery HD Volume, you need to restart your Mac and hold down the Command (⌘) and R keys while it boots up. This will boot your Mac into the recovery environment, where you can access the various tools and utilities provided by Mac Recovery HD Volume.
Overall, Mac Recovery HD Volume is a crucial component of your Mac’s operating system that provides the necessary resources to troubleshoot and repair your Mac. It offers a convenient way to reinstall the macOS, perform maintenance tasks, and resolve common software and hardware issues. Understanding how to access and utilize Mac Recovery HD Volume can greatly help in keeping your Mac running smoothly and efficiently.
How to Access Mac Recovery HD Volume
Accessing Mac Recovery HD Volume is essential when you need to troubleshoot and repair your Mac. Follow these steps to access it:
- Restart your Mac: Click on the Apple menu and select “Restart” or hold down the power button and choose “Restart” from the pop-up menu.
- Press and hold Command (⌘) + R: As your Mac restarts, press and hold the Command (⌘) and R keys simultaneously until the Apple logo or a spinning globe appears on the screen. This will boot your Mac into the recovery environment.
- Release the keys: Once you see the Apple logo or spinning globe, you can release the Command (⌘) and R keys. Your Mac will continue to boot into the recovery environment.
- Choose language: In the recovery environment, you will be prompted to select your language. Choose the language you prefer and click “Next.”
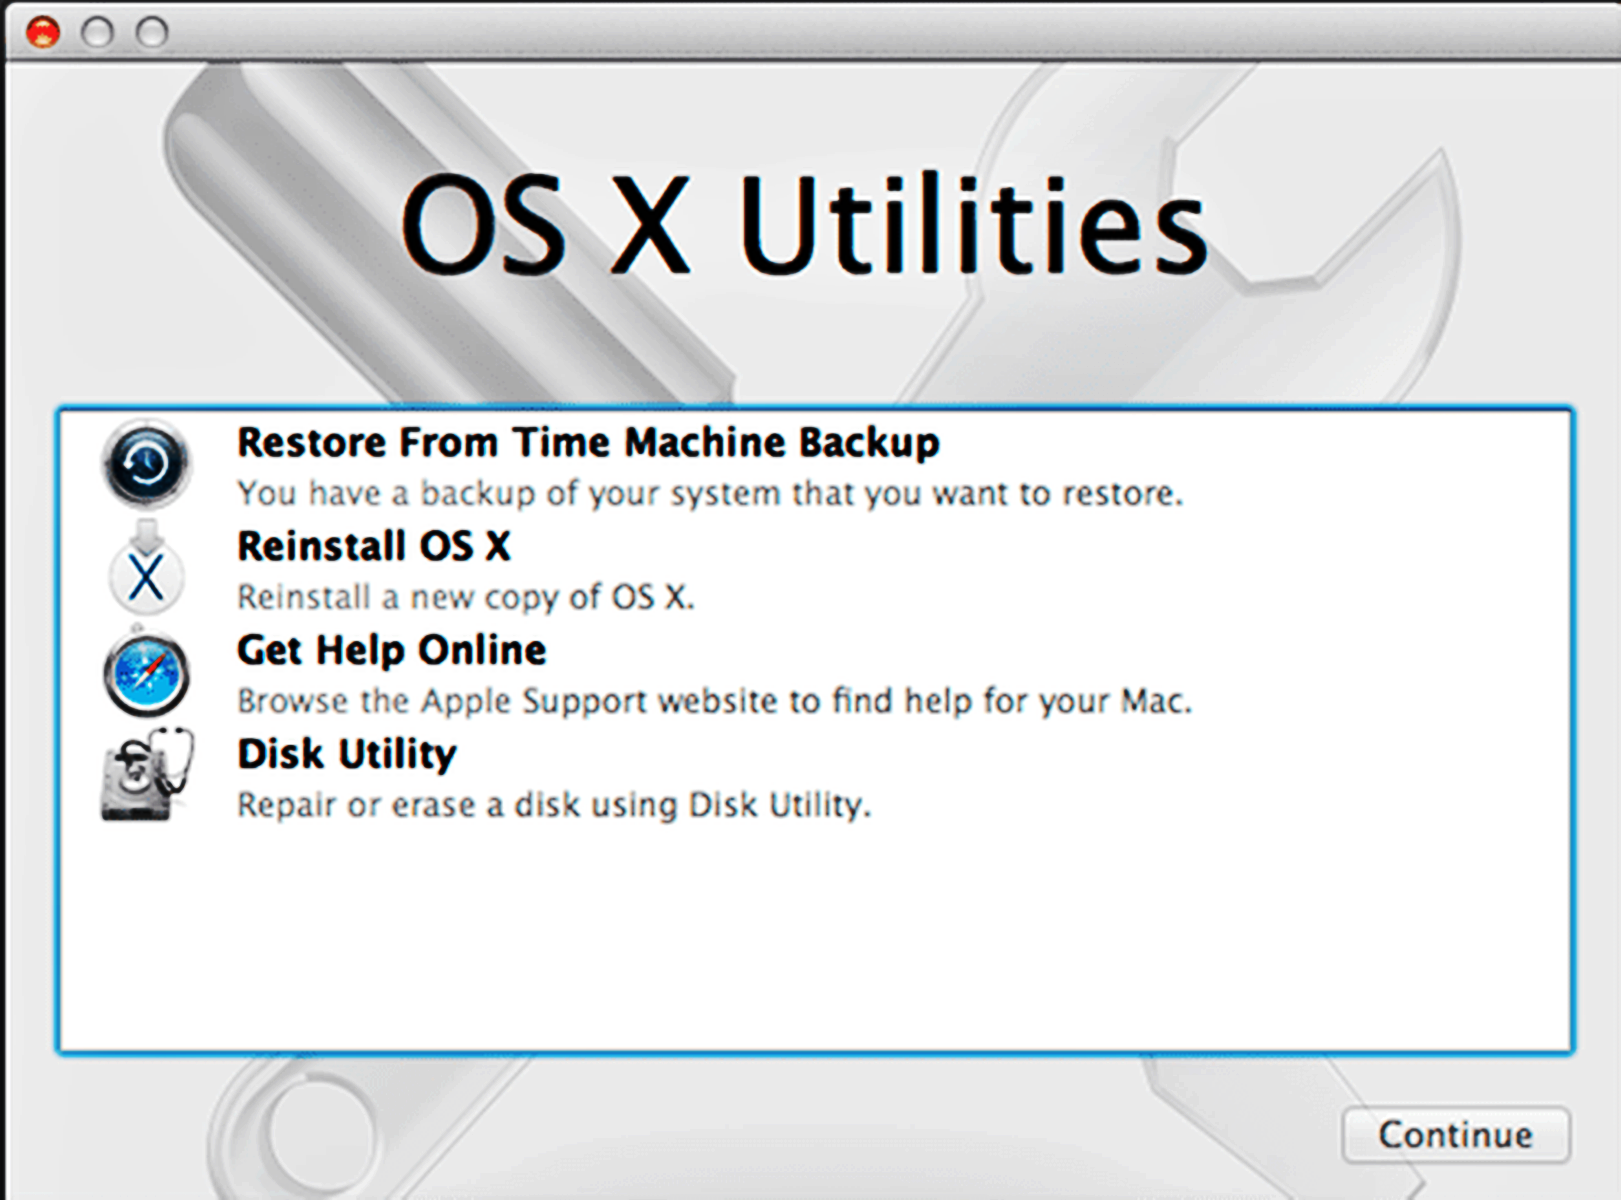
- Access Mac Recovery HD Volume: After selecting your language, you will see the macOS Utilities window. This is where you can access Mac Recovery HD Volume and its various tools and utilities.
By following these steps, you can easily access Mac Recovery HD Volume and start using its features to troubleshoot and repair your Mac. It’s important to note that the specific keys and steps may vary depending on your Mac model and version of macOS.
In addition to accessing Mac Recovery HD Volume during startup, you can also access it by selecting “Restart” and then immediately holding down the Command (⌘) and R keys until you see the Apple logo or spinning globe. This is useful if you are already logged in to your Mac and want to access the recovery environment without restarting.
Remember, Mac Recovery HD Volume is a powerful tool that can help you resolve various issues with your Mac. Familiarize yourself with the steps to access it so that you can quickly and efficiently troubleshoot and repair your Mac when needed.
Reinstalling macOS using Mac Recovery HD Volume
If you’re experiencing persistent issues with your Mac’s operating system, reinstalling macOS using Mac Recovery HD Volume can often resolve them. Follow these steps to reinstall macOS:
- Access Mac Recovery HD Volume: Restart your Mac and hold down the Command (⌘) and R keys until the Apple logo or spinning globe appears. This will boot your Mac into the recovery environment.
- Select “Reinstall macOS”: In the macOS Utilities window, click on “Reinstall macOS” and then click “Continue.”
- Choose a destination disk: If your Mac has multiple disks or partitions, you’ll be prompted to choose a destination for the reinstallation. Select the disk you want to install macOS on and click “Continue.”
- Agree to the terms: Read the macOS license agreement and click “Agree” to proceed.
- Start the installation: Click “Install” and macOS will begin installing on the selected disk. Your Mac may restart during the process.
- Set up macOS: After the installation is complete, your Mac will restart and prompt you to set up macOS as if it were a new Mac. Follow the on-screen instructions to create a user account, select your preferences, and set up services like iCloud.
It’s important to note that reinstalling macOS using Mac Recovery HD Volume will replace the existing operating system and erase all the data on the selected disk. Therefore, ensure you have a backup of your important files before proceeding with the reinstallation.
Reinstalling macOS can help resolve issues caused by software glitches, corrupted system files, or incompatible software. It’s a comprehensive solution that essentially gives your Mac a fresh start with a clean installation of the operating system.
By following these steps, you can reinstall macOS using Mac Recovery HD Volume and potentially resolve persistent issues with your Mac’s operating system.
Troubleshooting using Mac Recovery HD Volume
Mac Recovery HD Volume provides a range of tools and utilities that can be instrumental in troubleshooting and resolving various issues with your Mac. Here are some common troubleshooting tasks you can perform using Mac Recovery HD Volume:
- Disk Utility: Disk Utility is a powerful tool accessible through Mac Recovery HD Volume that allows you to diagnose and repair disk-related issues. You can use it to verify and repair disk permissions, run disk First Aid to fix disk errors, and even format and partition your hard drive.
- Safe Mode: If your Mac is experiencing startup issues or behaving strangely, booting into Safe Mode can help isolate and resolve the problem. To access Safe Mode, restart your Mac and hold down the Shift key until the Apple logo appears.
- Resetting NVRAM or PRAM: NVRAM (Non-Volatile Random Access Memory) or PRAM (Parameter Random Access Memory) stores certain settings that can affect the performance and behavior of your Mac. If you’re facing issues related to display resolution, sound volume, or startup disk selection, you can reset NVRAM or PRAM using Mac Recovery HD Volume.
- Resetting user password: If you’ve forgotten your Mac’s user password, Mac Recovery HD Volume allows you to reset it. You can use the Reset Password utility to change the password associated with your user account.
- Restoring from Time Machine backup: In case of data loss or system corruption, you can restore your Mac to a previous state by utilizing the Time Machine backup feature. Mac Recovery HD Volume provides the option to restore your files or even the entire system from a Time Machine backup.
- Terminal: For advanced users, Mac Recovery HD Volume offers access to the Terminal, which allows you to execute commands and perform tasks that may not be available through the graphical user interface. This can be useful for troubleshooting complex issues or performing system maintenance.
By utilizing the tools and utilities provided by Mac Recovery HD Volume, you can effectively troubleshoot and resolve a wide range of issues with your Mac. From disk repairs to resetting passwords, Mac Recovery HD Volume gives you the resources to get your Mac up and running smoothly again.
Resetting NVRAM or PRAM using Mac Recovery HD Volume
If you are experiencing issues with settings related to display resolution, sound volume, startup disk selection, or other parameters on your Mac, resetting NVRAM (Non-Volatile Random Access Memory) or PRAM (Parameter Random Access Memory) can often resolve the problem. Here’s how you can reset NVRAM or PRAM using Mac Recovery HD Volume:
- Access Mac Recovery HD Volume: Restart your Mac and hold down the Command (⌘) and R keys until the Apple logo or spinning globe appears. This will boot your Mac into the recovery environment.
- Launch Terminal: In the macOS Utilities window, click on “Utilities” in the menu bar and select “Terminal.”
- Enter the reset command: In the Terminal, type the following command and press Enter:
nvram -corsudo nvram -c(if prompted for a password, enter your administrator password). - Confirm the reset: Once the reset command is executed, the NVRAM or PRAM will be reset to its default values. You can now exit Terminal and restart your Mac as usual.
Resetting NVRAM or PRAM can help resolve issues caused by incorrect or corrupted settings. By resetting these parameters, your Mac will start with the default settings, which can often resolve issues related to display, sound, and startup disk selection.
It’s important to note that resetting NVRAM or PRAM will not delete or alter any of your files or documents. It only resets the system settings to their default values. If you’re experiencing other issues with your Mac, such as software glitches or hardware problems, additional troubleshooting steps may be required.
By following these steps, you can easily reset NVRAM or PRAM using Mac Recovery HD Volume and potentially resolve issues related to system settings on your Mac.
Erasing and Reformatting Mac Hard Drive using Mac Recovery HD Volume
If you’re planning to sell or give away your Mac, or if you want to start with a clean slate, erasing and reformatting the Mac hard drive is necessary. Mac Recovery HD Volume provides the tools needed to securely erase your data and reformat the hard drive. Here’s how you can do it:
- Access Mac Recovery HD Volume: Restart your Mac and hold down the Command (⌘) and R keys until the Apple logo or spinning globe appears. This will boot your Mac into the recovery environment.
- Launch Disk Utility: In the macOS Utilities window, click on “Disk Utility” and then click “Continue.”
- Select the hard drive: In the Disk Utility window, you’ll see a list of available drives on the left. Select the hard drive you want to erase and reformat.
- Erase the hard drive: Click on the “Erase” button in the toolbar at the top of the Disk Utility window.
- Choose the erasure method: In the Erase window, you can choose the format and name for the hard drive, as well as the security options. If you’re planning to sell or give away the Mac, it’s recommended to choose “Mac OS Extended (Journaled, Encrypted)” as the format and enable the “Zero Out Data” security option for a more secure erase.
- Start the erasure process: Once you’ve made your selections, click the “Erase” button to begin the erasure process. Disk Utility will securely erase the data on the hard drive and reformat it according to your chosen format.
- Exit Disk Utility: Once the erasure process is complete, you can click on “Done” to exit Disk Utility. You can now proceed with reinstalling macOS or any other necessary steps.
It’s important to note that erasing and reformatting the hard drive will permanently delete all data on it. Make sure you have a backup of any important files before proceeding with this process. Additionally, be cautious when selecting the erasure method and format, as it will determine the compatibility and usage of the hard drive in the future.
By following these steps, you can easily erase and reformat your Mac’s hard drive using Mac Recovery HD Volume, ensuring your data is securely removed and your Mac is ready for a fresh start.
Repairing Disk Errors using Mac Recovery HD Volume
Disk errors can cause a variety of issues on your Mac, including slow performance, unexpected crashes, and application errors. Luckily, Mac Recovery HD Volume provides a powerful tool called Disk Utility that can help diagnose and repair these disk errors. Here’s how you can repair disk errors using Mac Recovery HD Volume:
- Access Mac Recovery HD Volume: Restart your Mac and hold down the Command (⌘) and R keys until the Apple logo or spinning globe appears. This will boot your Mac into the recovery environment.
- Launch Disk Utility: In the macOS Utilities window, click on “Disk Utility” and then click “Continue.”
- Select the affected disk: In the Disk Utility window, you’ll see a list of available drives on the left. Select the disk that is experiencing the errors.
- Click on “First Aid”: In the toolbar at the top of the Disk Utility window, click on the “First Aid” button.
- Run First Aid: Click on the “Run” button to start the First Aid process. Disk Utility will scan the disk for errors and repair them if any are found.
- Wait for the process to complete: The First Aid process may take some time depending on the size of the disk and the severity of the errors. It’s important to let the process finish without interrupting it.
- Verify the repair: Once the repair process is complete, Disk Utility will display a summary of the repairs performed. Verify that the errors were successfully repaired.
- Exit Disk Utility: If the repairs were successful, you can click on “Done” to exit Disk Utility. If any errors could not be repaired, you may need to seek further assistance or consider restoring your data from a backup.
Repairing disk errors using Mac Recovery HD Volume and Disk Utility can help resolve a range of issues caused by disk corruption or errors. It’s recommended to run First Aid periodically or whenever you suspect disk errors to ensure the optimal performance and stability of your Mac.
By following these steps, you can easily repair disk errors using Mac Recovery HD Volume, helping to restore your Mac’s performance and stability.
Resetting User Password using Mac Recovery HD Volume
If you’ve forgotten your user password on your Mac or need to change it for any reason, Mac Recovery HD Volume provides a simple way to reset your password. Follow these steps to reset your user password using Mac Recovery HD Volume:
- Access Mac Recovery HD Volume: Restart your Mac and hold down the Command (⌘) and R keys until the Apple logo or spinning globe appears. This will boot your Mac into the recovery environment.
- Launch Terminal: In the macOS Utilities window, click on “Utilities” in the menu bar and select “Terminal.”
- Reset the user password: In the Terminal, type the following command and press Enter:
resetpassword - Choose the user account: The Reset Password utility will open, displaying a list of user accounts on your Mac. Select the user account for which you want to reset the password.
- Set a new password: Enter a new password for the selected user account, then confirm the new password by entering it again in the “Verify” field. Optionally, you can add a password hint to help you remember the password in the future.
- Reset the password: Once you’ve set the new password, click on the “Save” button to reset the user password.
- Exit the Reset Password utility: You can now exit the Reset Password utility and Terminal.
- Restart your Mac: After resetting the password, you can restart your Mac and use the newly set password to log in to your user account.
Resetting the user password using Mac Recovery HD Volume can be a lifesaver if you’re locked out of your Mac due to a forgotten password. It allows you to regain access to your user account and continue using your Mac without any data loss.
It’s important to note that resetting the user password requires administrative privileges. If you’re not the owner or administrator of the Mac, you may need to seek the owner’s permission or contact Apple Support for further assistance.
By following these steps, you can easily reset your user password using Mac Recovery HD Volume and regain access to your Mac’s user account.
Restoring Data from Time Machine Backup using Mac Recovery HD Volume
If you have a Time Machine backup of your Mac’s data, you can easily restore files, documents, and even your entire system using Mac Recovery HD Volume. Follow these steps to restore data from a Time Machine backup:
- Access Mac Recovery HD Volume: Restart your Mac and hold down the Command (⌘) and R keys until the Apple logo or spinning globe appears. This will boot your Mac into the recovery environment.
- Launch Time Machine: In the macOS Utilities window, click on “Restore from Time Machine Backup” and then click “Continue.”
- Choose a backup source: Time Machine will search for available backups. Select the Time Machine backup source that contains the data you want to restore and click “Continue.”
- Select the backup: Time Machine will display a timeline of available backups. Choose the specific backup date and time that you want to restore from and click “Continue.”
- Select the files to restore: Time Machine will present a visual interface that allows you to navigate through your files and folders as they existed at the time of the backup. Browse through the backup and select the files or folders you want to restore.
- Restore the selected data: After choosing the files or folders to restore, click on the “Restore” button. Time Machine will begin the process of restoring the selected data to your Mac.
- Wait for the restoration to complete: The restoration process may take some time depending on the size and complexity of the data being restored. Make sure not to interrupt the process until it is fully completed.
- Restart your Mac: Once the restoration is complete, you can restart your Mac and access the restored data as it was at the time of the backup.
Restoring data from a Time Machine backup using Mac Recovery HD Volume is a reliable way to recover lost files, revert to a previous system state, or migrate data to a new Mac. It ensures that your important files and documents are not permanently lost in case of accidental deletion or system failure.
It’s worth noting that the availability and scope of data restoration may vary depending on the specific backup and the options selected during the restoration process.
By following these steps, you can easily restore data from a Time Machine backup using Mac Recovery HD Volume and have peace of mind knowing that your important files are secure and recoverable.
Using Disk Utility in Mac Recovery HD Volume
Disk Utility is a powerful tool available in Mac Recovery HD Volume that allows you to manage and troubleshoot your Mac’s storage devices. It provides various features to perform tasks such as formatting, partitioning, repairing disk errors, and managing disk images. Here’s how you can use Disk Utility in Mac Recovery HD Volume:
- Access Mac Recovery HD Volume: Restart your Mac and hold down the Command (⌘) and R keys until the Apple logo or spinning globe appears. This will boot your Mac into the recovery environment.
- Launch Disk Utility: In the macOS Utilities window, click on “Disk Utility” and then click “Continue.”
- Select a disk: In the Disk Utility window, you’ll see a list of available disks on the left sidebar. Select the disk you want to manage or troubleshoot.
- Perform disk-related tasks: Disk Utility offers a range of options for managing your disk. Here are some common tasks you can perform:
- First Aid: Use First Aid to scan and repair disk errors, resolve issues related to disk permissions, and fix common disk-related problems.
- Erase: Format and erase a disk or partition, allowing you to prepare it for use or restore it to its original factory state.
- Partition: Split a single disk into multiple partitions, creating separate storage areas with different file systems and sizes.
- Restore: Restore from a disk image or clone a disk or partition to create a duplicate.
- Mount or Unmount: Mount or unmount disks or disk images, allowing you to access or disconnect them from your system.
- Perform the desired task: Select the appropriate option in Disk Utility and follow the on-screen prompts to perform the desired task on the selected disk.
- Exit Disk Utility: Once you’ve completed the necessary disk-related tasks, you can click on “Quit Disk Utility” to exit the utility and return to the macOS Utilities window.
Using Disk Utility in Mac Recovery HD Volume gives you the ability to manage and troubleshoot your Mac’s storage devices effectively. It’s an essential tool for maintaining the health and integrity of your disk as well as addressing disk-related issues.
Remember to exercise caution when performing disk-related tasks, especially when formatting or partitioning, as these actions can result in data loss. Always ensure you have backed up important data before making any changes to your disk.
By following these steps, you can utilize Disk Utility in Mac Recovery HD Volume to manage and troubleshoot your Mac’s disks with ease.
Using Terminal in Mac Recovery HD Volume
Terminal is a powerful command-line interface available in Mac Recovery HD Volume that allows you to execute commands and perform advanced tasks on your Mac. It provides a direct way to interact with your system, perform troubleshooting, and execute various commands. Here’s how you can use Terminal in Mac Recovery HD Volume:
- Access Mac Recovery HD Volume: Restart your Mac and hold down the Command (⌘) and R keys until the Apple logo or spinning globe appears. This will boot your Mac into the recovery environment.
- Launch Terminal: In the macOS Utilities window, click on “Utilities” in the menu bar and select “Terminal.”
- Start executing commands: Once Terminal opens, you can start executing commands by typing them in and pressing Enter. You can use various commands to perform tasks like managing files and directories, network troubleshooting, disk management, and much more.
- Refer to command line documentation: If you’re unsure about a specific command or need help with its usage, you can refer to the command’s documentation. Use the
mancommand followed by the name of the command to access its manual page with detailed information and options. - Perform advanced troubleshooting: Terminal provides a way to perform advanced troubleshooting tasks that may not be accessible through the graphical user interface. For example, you can use Terminal to reset certain system preferences, fix network issues, repair disk permissions, and more.
- Exit Terminal: After you’ve executed the desired commands or performed necessary tasks, you can exit Terminal by selecting “Quit Terminal” from the Terminal menu or by pressing Command (⌘) and Q.
Using Terminal in Mac Recovery HD Volume gives you precise control over your Mac and allows you to perform advanced tasks quickly and efficiently. It’s particularly useful for experienced users and developers who are comfortable working with the command line interface.
When using Terminal, exercise caution as executing incorrect commands or making unintended changes can have unintended consequences. Always ensure that you understand the consequences of a command before executing it, and consider creating backups of important data before making any system-level changes.
By following these steps, you can effectively use Terminal in Mac Recovery HD Volume to execute commands, perform advanced troubleshooting, and carry out various tasks on your Mac.
Exiting Mac Recovery HD Volume
Once you have completed the necessary tasks in Mac Recovery HD Volume and no longer need to use its tools and utilities, it’s time to exit the recovery environment and return to your normal macOS setup. Here’s how you can exit Mac Recovery HD Volume:
- Complete your tasks: Make sure you have finished using the tools and utilities available in Mac Recovery HD Volume. Whether you have reinstalled macOS, repaired disk errors, reset passwords, or performed any other tasks, ensure that you have accomplished your objectives.
- Save any open files or documents: If you have any open files or documents within Mac Recovery HD Volume, save your work as necessary. It’s important to note that any changes made within the recovery environment may not carry over to your normal macOS setup.
- Restart your Mac: Click on the Apple menu in the top-left corner of the screen and select “Restart.” Alternatively, you can hold down the power button and choose the “Restart” option from the pop-up menu. Your Mac will soon begin the restart process.
- Release the Command (⌘) and R keys: As your Mac starts up, ensure that you no longer hold down the Command (⌘) and R keys. These keys are specifically used to enter Mac Recovery HD Volume, and releasing them allows your Mac to boot into the regular macOS setup.
- Proceed with the regular macOS setup: After exiting Mac Recovery HD Volume, your Mac will boot into the normal macOS environment. Depending on your system preferences, you may be prompted to enter your user password, fingerprint, or other authentication methods to proceed.
- Resume using your Mac: Once you have successfully exited Mac Recovery HD Volume and are back in your normal macOS setup, you can resume using your Mac as you normally would. Your applications, files, and settings should be accessible and functional.
Exiting Mac Recovery HD Volume allows you to return to your regular macOS environment and continue using your Mac as usual. It’s important to note that the recovery environment is specifically designed for troubleshooting, repairs, and maintenance tasks, and is not meant to be used as a long-term operating system.
By following these steps, you can easily exit Mac Recovery HD Volume and transition back to your regular macOS setup, ensuring that your Mac is ready for normal use again.