
What is Recovery Mode?
Recovery Mode is a powerful troubleshooting feature built into macOS that allows you to fix various software issues on your Mac. It provides a range of tools and options to diagnose and repair problems that may be preventing your Mac from functioning properly.
When your Mac is in Recovery Mode, it boots into a special hidden partition on your hard drive that contains a minimal version of the macOS operating system. This stripped-down version includes essential utilities and resources that can help you resolve common issues, such as disk errors, startup problems, or even reinstalling the operating system.
Recovery Mode is especially useful when your Mac fails to start up normally, displays error messages, or experiences performance issues. It offers a safety net that allows you to attempt repairs without risking data loss or having to resort to third-party recovery software.
In addition to its troubleshooting capabilities, Recovery Mode offers other useful features. For example, you can use it to restore your Mac from a Time Machine backup, erase the hard drive securely, reformat the disk, or even reinstall the entire macOS from scratch.
Overall, Recovery Mode is an essential feature for any Mac user. It empowers you to take control of your system’s health and perform crucial maintenance tasks without the need for advanced technical knowledge. Whether you’re facing a stubborn software issue or simply need to perform routine maintenance, Recovery Mode ensures that you have the tools you need to keep your Mac running smoothly.
Reasons for Using Recovery Mode
Recovery Mode on macOS is a valuable tool that can help you tackle a variety of issues. Here are some of the common reasons why you might need to use Recovery Mode:
- Troubleshooting Startup Problems: If your Mac fails to start up or gets stuck on the Apple logo, Recovery Mode can be a lifesaver. It enables you to diagnose and repair underlying issues that may be preventing your Mac from booting correctly.
- Repairing Disk Errors: Disk errors can lead to data corruption, slow performance, and system crashes. Recovery Mode’s Disk Utility allows you to check and repair errors on your Mac’s hard drive, ensuring the stability and integrity of your files.
- Reinstalling macOS: Sometimes, a fresh installation of macOS is necessary to resolve persistent software issues or clean up a cluttered system. In Recovery Mode, you can easily reinstall the macOS operating system without losing your personal files and settings.
- Restoring from Time Machine: Accidentally deleted files or experiencing a catastrophic failure? Recovery Mode allows you to restore your Mac from a Time Machine backup. This feature ensures that you can retrieve lost data and bring your system back to a previous state.
- Secure Disk Erase and Formatting: When it’s time to sell or repurpose your Mac, you need to securely erase your personal data. Recovery Mode offers options to erase and format your disk, giving you peace of mind that your sensitive information is permanently removed.
These are just a few examples of why you might need to access Recovery Mode. It serves as a versatile toolset that empowers you to maintain the health and functionality of your Mac. Regardless of the specific issue you’re facing, Recovery Mode provides the necessary tools and options to get your Mac back on track.
How to Access Recovery Mode on a Mac
Accessing Recovery Mode on a Mac is a straightforward process. Here’s how you can do it:
- Start by shutting down your Mac. If it’s already turned on, click on the Apple menu in the top-left corner of the screen and select “Shut Down.”
- Once your Mac is completely powered off, press the power button to turn it back on.
- As soon as you press the power button, immediately press and hold down the Command and R keys together. Keep holding them until you see the Apple logo or a spinning globe on the screen.
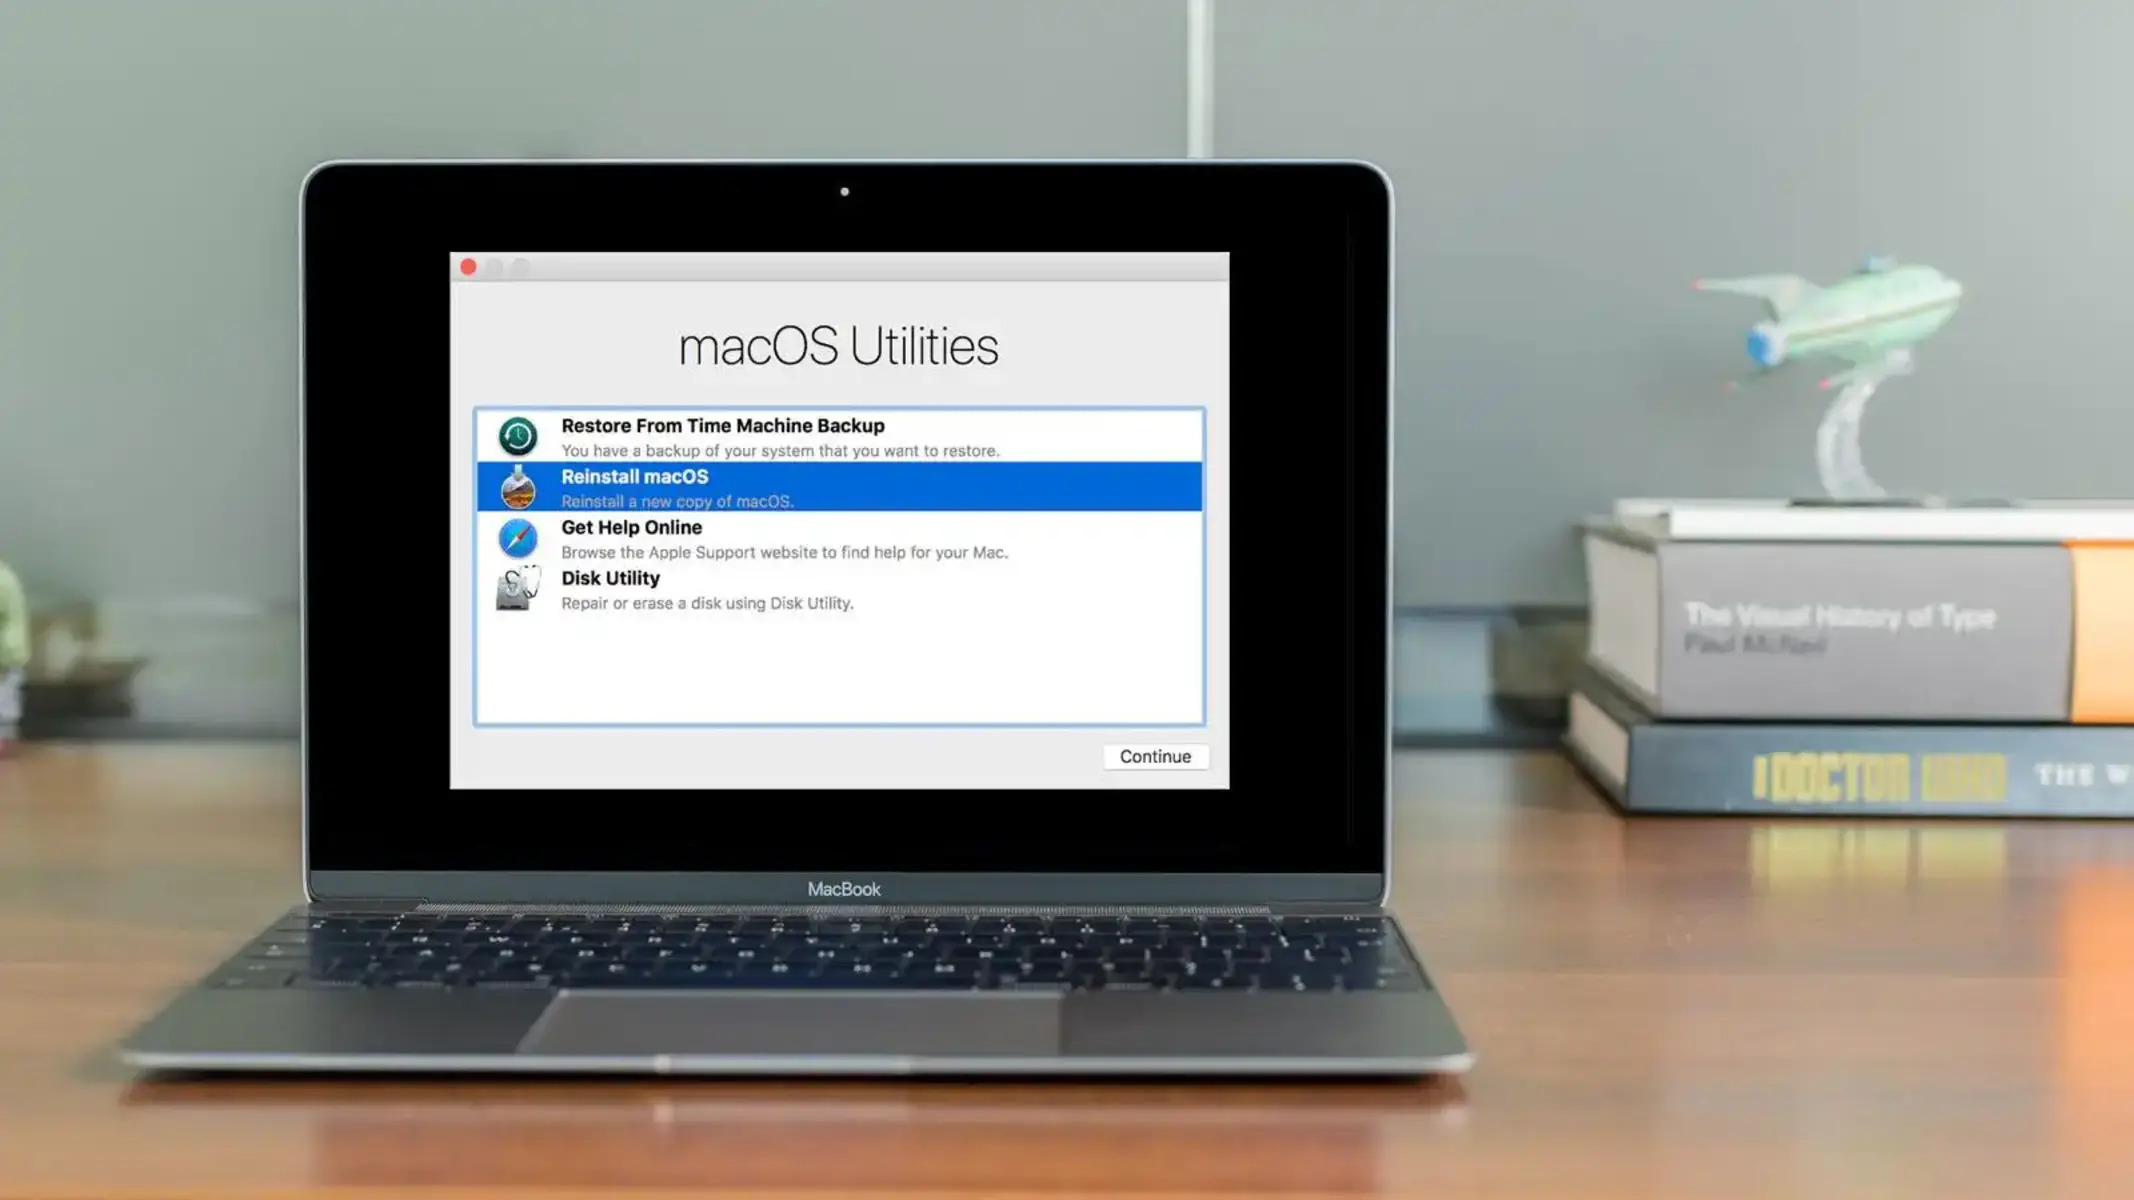
- After a short while, your Mac will boot into Recovery Mode. You’ll see a window with options to choose from.
- Use the mouse or trackpad to navigate through the available options in Recovery Mode.
- To select an option, click on it. For example, you can use the “Disk Utility” option to repair disk errors or the “Reinstall macOS” option to reinstall the macOS operating system.
- Once you’ve finished using Recovery Mode, you can either select the “Restart” option from the Apple menu or shut down your Mac and turn it on again without pressing any special keys to boot into normal mode.
Keep in mind that the precise steps to access Recovery Mode may vary slightly depending on the version of macOS you’re running or the type of Mac you own. If the above method doesn’t work for you, consult Apple’s official documentation or do a quick search online for instructions specific to your macOS version and Mac model.
Accessing Recovery Mode is a crucial skill every Mac user should know. It’s a reliable and convenient way to troubleshoot and resolve various issues on your Mac, giving you peace of mind and ensuring your system remains in optimal condition.
Using Disk Utility in Recovery Mode
Disk Utility is a powerful tool available in Recovery Mode that allows you to manage and repair your Mac’s disks and storage devices. Here’s how you can use Disk Utility:
- Start by booting your Mac into Recovery Mode (refer to the previous section for instructions on how to access Recovery Mode).
- In the window that appears, select “Disk Utility” and click “Continue.”
- In Disk Utility, you’ll see a list of available drives and volumes on the left-hand side of the window. Select the disk or volume you want to manage or repair.
- Once you’ve selected the disk or volume, you’ll have various options available.
- First Aid: This option checks and repairs errors on the selected disk or volume. It’s useful for fixing common disk-related issues, such as file system errors or directory corruption. Click on the “First Aid” button to initiate the scanning and repair process.
- Erase: If you want to erase a disk or volume securely, select it and click on the “Erase” button. This option allows you to choose a file system format and securely erase the selected disk or volume, ensuring that the data cannot be recovered.
- Partition: If you need to divide a disk into multiple partitions or merge existing partitions, select the disk and click on the “Partition” button. From there, you can create, delete, and resize partitions according to your needs.
- Restore: If you have a disk image file (.dmg) that you want to restore onto a disk or volume, select the target disk or volume and click on the “Restore” button. Follow the prompts to select the disk image and start the restoration process.
Using Disk Utility in Recovery Mode gives you more control over your Mac’s storage devices and allows you to fix disk-related issues without booting into the regular macOS environment. It’s a vital tool for maintaining the health and performance of your Mac’s storage system.
Remember, advanced disk operations such as partitioning or erasing can result in data loss, so it’s crucial to backup important files before making any changes with Disk Utility.
Reinstalling macOS in Recovery Mode
If you’re experiencing persistent software issues on your Mac or simply want to start fresh, you can reinstall macOS using Recovery Mode. Reinstalling macOS is a straightforward process:
- Boot your Mac into Recovery Mode (refer to the earlier section for instructions on accessing Recovery Mode).
- In the Recovery Mode window, select “Reinstall macOS” and click “Continue.”
- Follow the on-screen prompts to proceed with the reinstallation process.
- You’ll be presented with the macOS installer window. Read and agree to the license agreement.
- Next, select the target disk (usually your Mac’s internal storage) where you want to install macOS. If necessary, you can reformat the disk using Disk Utility before proceeding.
- Click on the “Install” button to start the reinstallation process.
- Depending on your internet connection and the version of macOS you’re installing, the process may take some time. Be patient and let it complete.
- Once the installation is finished, your Mac will restart, and you’ll be greeted with the initial setup screen.
- Follow the on-screen prompts to set up macOS, including selecting your language, creating a user account, and configuring any additional settings.
Reinstalling macOS in Recovery Mode provides a clean slate and can resolve software-related issues that may be causing instability or performance problems. However, it’s important to note that reinstalling macOS will remove all personal data and applications from your Mac. Therefore, it’s crucial to have a recent backup of your important files before proceeding with the reinstallation process.
By reinstalling macOS, you ensure that your system is running the latest version of the operating system, with all the necessary updates and fixes. It’s a useful step to troubleshoot persistent software issues, get a fresh start, or prepare your Mac for resale or upgrade.
Restoring from a Time Machine Backup in Recovery Mode
If you’ve encountered data loss or want to revert your Mac to a previous state, you can restore your system from a Time Machine backup using Recovery Mode. Here’s how:
- Start by booting your Mac into Recovery Mode (refer to the earlier section for instructions on accessing Recovery Mode).
- In the Recovery Mode window, select “Restore from Time Machine Backup” and click “Continue.”
- Next, you’ll see a list of available Time Machine backups. Choose the backup from the desired date or select the external storage device that contains the backup.
- Click on the “Continue” button and wait for the restore process to begin.
- Depending on the size of the backup and the speed of your storage device, the restoration process may take some time. Be patient and let it complete.
- Once the restore process is finished, your Mac will restart, and you’ll be prompted to set up macOS.
- Follow the on-screen prompts to complete the setup, including selecting your language, creating a user account, and configuring any additional settings.
Restoring from a Time Machine backup allows you to retrieve lost or deleted files, revert your system to a previous state, or set up a replacement Mac with all your data and settings intact. It’s a valuable feature that helps protect your important files and allows for easy recovery in case of data loss or system issues.
Keep in mind that restoring from a Time Machine backup replaces your current system with the state captured in the backup. Any changes made after the backup was created will be lost. Therefore, make sure you have a recent Time Machine backup before proceeding to prevent the loss of any important data.
Restoring from a Time Machine backup in Recovery Mode provides a convenient way to recover your files and return your Mac to a known working state. It’s an essential tool for data recovery and ensures that you can easily retrieve your important files in the event of accidental deletion, hardware failure, or other data loss scenarios.
Repairing Disk Permissions in Recovery Mode
Repairing disk permissions is a common troubleshooting step that can help resolve certain issues on your Mac. In Recovery Mode, you have the option to repair disk permissions using Disk Utility. Here’s how:
- Boot your Mac into Recovery Mode (refer to the earlier section for instructions on accessing Recovery Mode).
- In the Recovery Mode window, select “Disk Utility” and click “Continue.”
- In Disk Utility, select your Mac’s startup disk or the disk where you want to repair permissions.
- Click on the “First Aid” button in the toolbar.
- Disk Utility will now scan your disk for errors, including permission issues. This may take some time.
- If any permission issues are found, click on the “Repair Disk Permissions” button to fix them.
- Once the process is complete, restart your Mac and check if the issues you were experiencing have been resolved.
Repairing disk permissions can be helpful when certain system files or applications exhibit unexpected behavior. It ensures that the correct permissions are set for various files and folders on your Mac, allowing them to function properly.
However, in recent versions of macOS, the significance of repairing disk permissions has diminished, as the operating system now handles permissions automatically. It’s worth noting that repairing disk permissions may not always resolve all issues, and it’s recommended to explore other troubleshooting steps if the problem persists.
While repairing disk permissions can be a useful step in certain situations, it’s important to have a backup of your important files before attempting any disk-related repairs. This helps ensure that you can recover your data in case any unexpected issues arise during the process.
By repairing disk permissions in Recovery Mode, you can address certain software issues and promote the stability and optimal functioning of your Mac. It’s a valuable tool in your troubleshooting arsenal, especially if you’re encountering permissions-related problems.
Using Terminal in Recovery Mode
Terminal is a powerful command-line interface that allows you to execute a wide range of commands on your Mac. In Recovery Mode, you can access Terminal to perform various advanced troubleshooting tasks. Here’s how:
- Boot your Mac into Recovery Mode (refer to the earlier section for instructions on accessing Recovery Mode).
- In the Recovery Mode window, select “Utilities” and click on “Terminal.”
- The Terminal window will open, providing you with a command-line interface.
- You can now enter commands using Terminal to perform a variety of tasks, such as repairing disk permissions, resetting passwords, or managing files and folders.
- It’s important to note that using Terminal requires familiarity with command-line syntax and specific commands. Make sure to execute commands carefully and double-check the syntax to avoid unintended consequences.
- Refer to official documentation, online resources, or specific command guides to learn more about the commands you need for your troubleshooting or maintenance tasks.
Terminal in Recovery Mode gives you a high level of control over your Mac’s system and allows you to perform advanced maintenance and troubleshooting tasks that may not be accessible through other graphical user interfaces.
However, caution is advised when using Terminal, especially if you’re not familiar with command-line interfaces. Incorrectly entered commands or improper use of Terminal can potentially cause data loss or system instability.
Before using Terminal in Recovery Mode, it’s recommended to have a recent backup of your important files and consider consulting official documentation, reputable online resources, or seeking assistance from knowledgeable individuals.
Using Terminal in Recovery Mode unleashes the full power of command-line interfaces and allows for advanced troubleshooting and customization. It’s a valuable tool for experienced users who want precise control over their Mac’s system and the ability to perform complex tasks beyond the capabilities of graphical interfaces.
Exiting Recovery Mode
Once you’ve completed the necessary tasks or troubleshooting in Recovery Mode, it’s important to properly exit and return to the normal macOS environment. Here’s how you can exit Recovery Mode:
- In the menu bar at the top of the screen, click on the Apple menu symbol, usually located in the top-left corner.
- Select the “Restart” option from the dropdown menu.
- Your Mac will now restart, and it will boot into the regular macOS environment.
Alternatively, you can also shut down your Mac in Recovery Mode and then turn it on again without pressing any special keys to boot into normal mode.
It’s important to note that exiting Recovery Mode will not affect any changes or repairs you made during your time in Recovery Mode. The changes or repairs will persist in the regular macOS environment.
If you encountered any issues or errors during your troubleshooting in Recovery Mode, make sure to verify that they have been fixed or resolved after exiting and returning to normal mode. This will ensure that your Mac is functioning properly.
Exiting Recovery Mode is a simple process that allows you to transition back to the familiar macOS interface. It marks the end of your troubleshooting journey and allows you to resume normal usage of your Mac.