
What Are Startup Settings?
Startup settings refer to a set of options that control how your computer boots and launches the operating system. These settings allow you to customize and optimize the startup process according to your preferences.
When you power on your computer, it goes through a sequence of steps to initialize the hardware and software necessary for the operating system to run. Startup settings provide you with the ability to modify certain aspects of this process, giving you more control over how your computer starts up and functions.
One of the most crucial components of startup settings is the boot order. This determines the sequence in which your computer looks for an operating system to load. By default, the boot order is set to prioritize the computer’s internal hard drive. However, you can change this order to boot from a USB drive, DVD, or network server if needed.
Startup settings also allow you to manage startup programs. These are applications and services that launch automatically when your computer starts up. By enabling or disabling specific startup programs, you can control which applications load during the boot process. This can help improve the overall performance and speed of your computer.
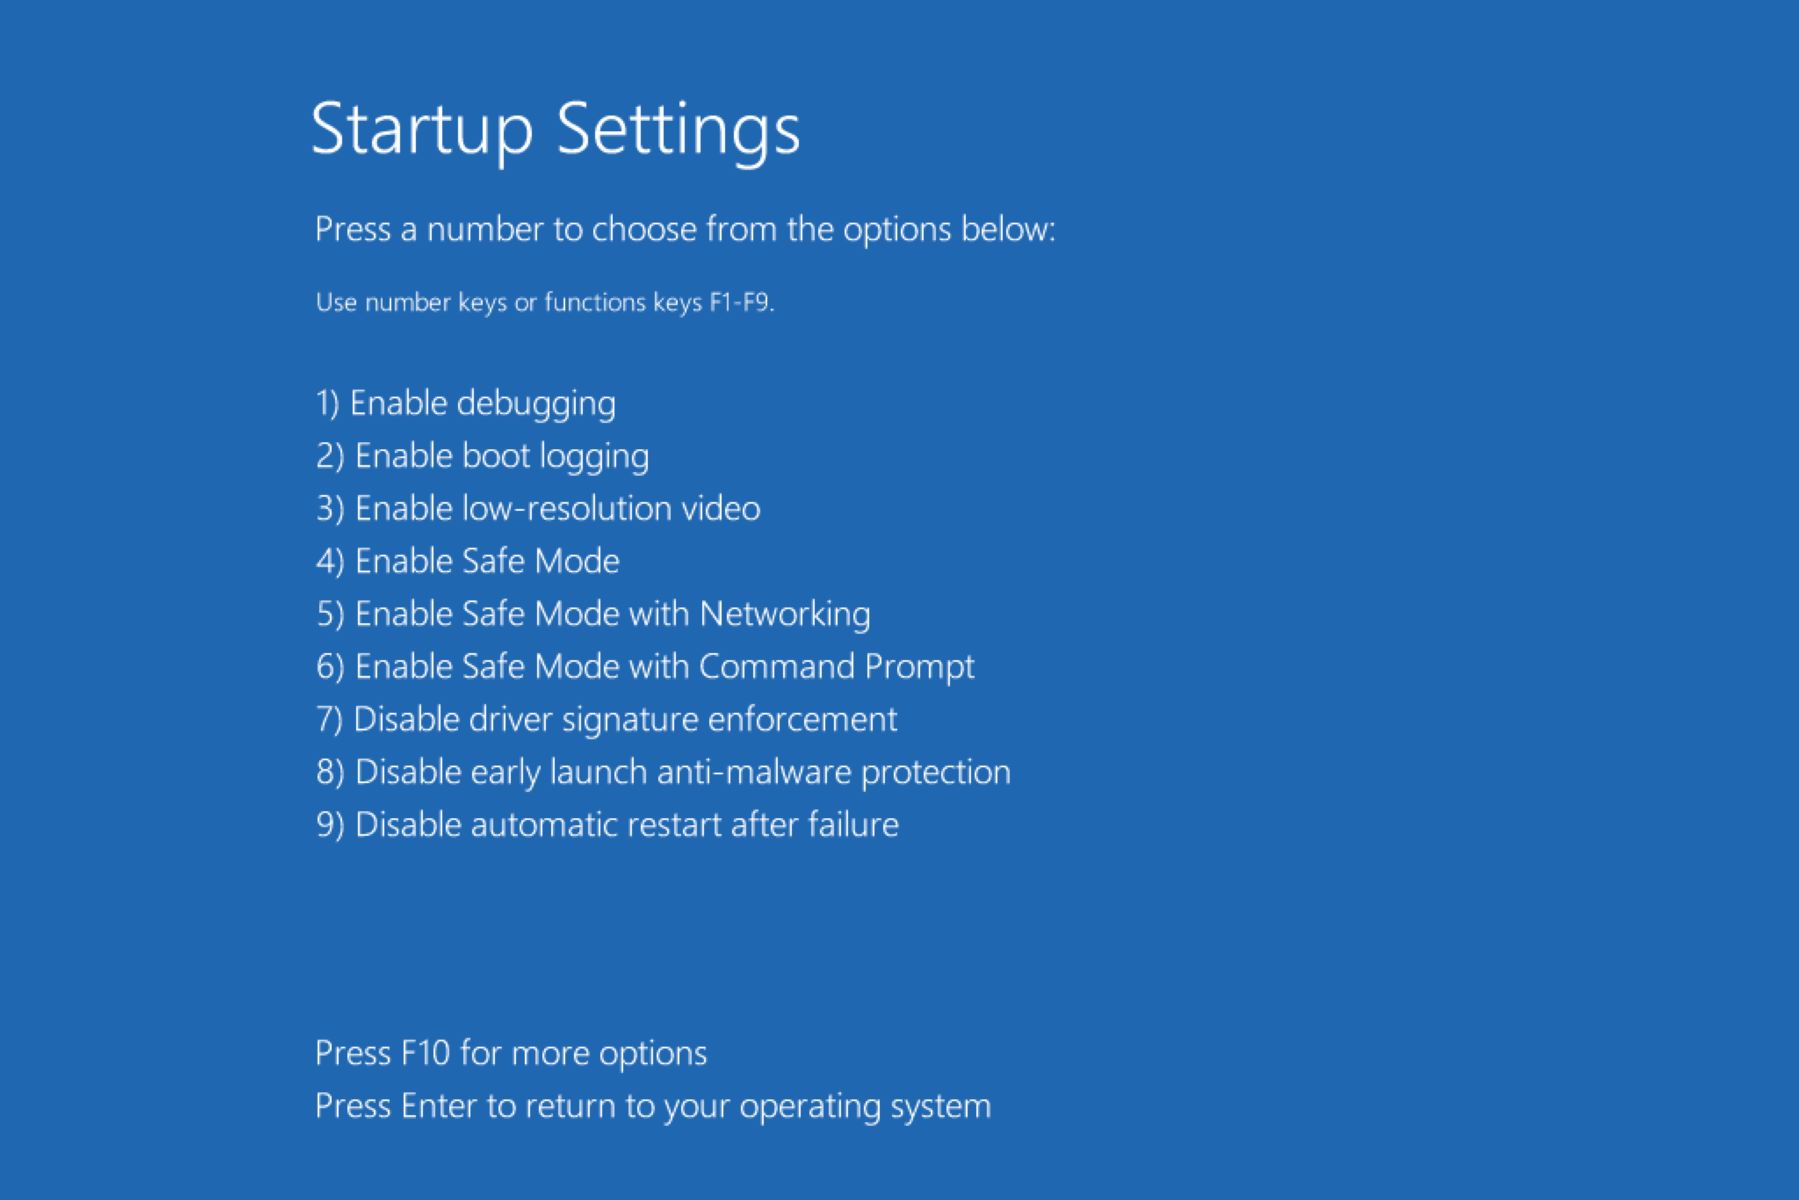
Another crucial startup setting is the option to enter Safe Mode. Safe Mode is a diagnostic mode that starts your computer with only the essential drivers and services necessary to run the operating system. It is particularly useful when troubleshooting issues or removing problematic software.
Furthermore, startup settings include the ability to enable or disable Fast Startup. Fast Startup is a feature in Windows that allows your computer to start up more quickly by saving the system state to a hibernation file instead of fully shutting down. This feature can significantly reduce startup times, especially on computers with traditional hard drives.
Startup settings are essential for system optimization, troubleshooting, and customization. The ability to tweak the boot order, manage startup programs, enter Safe Mode, and enable or disable Fast Startup provides users with greater control over their computer’s startup process and overall performance.
Why Are Startup Settings Important?
Startup settings play a crucial role in the functionality and performance of your computer. Understanding the importance of these settings can help you optimize your system and troubleshoot any startup issues effectively.
One of the primary reasons why startup settings are important is the ability to control the boot order. By specifying the order in which your computer looks for an operating system, you can ensure that it boots from the desired device, such as a USB drive or DVD. This is particularly useful when installing a new operating system or recovering data from a different storage device.
Managing startup programs is another advantage of startup settings. When too many programs launch during startup, it can significantly slow down your computer’s boot time and overall performance. By disabling unnecessary startup programs, you can optimize system resources and improve the speed at which your computer starts up.
Entering Safe Mode is a vital troubleshooting feature provided by startup settings. Safe Mode starts your computer with minimal drivers and services, making it easier to identify and resolve issues, such as software conflicts or driver errors. It provides a stable environment for diagnosing and fixing problems without interference from third-party applications.
Fast Startup, a feature available in Windows, is designed to minimize the time it takes for your computer to boot. By saving the system state to a hibernation file, Fast Startup reduces the need for a full system initialization during startup. This can significantly improve the startup time, especially on computers with traditional hard drives.
Furthermore, startup settings allow you to reset the configurations to their default values. If you encounter major issues with your computer’s startup process, reverting to the default settings can resolve compatibility problems or conflicts caused by incorrect configurations.
How to Access Startup Settings
Accessing startup settings on your computer depends on the operating system you are using. Here are the steps to access startup settings on different platforms:
Windows 10:
- Click on the “Start” button and select the “Settings” gear icon.
- In the Settings window, click on “Update & Security.”
- From the left sidebar, select “Recovery.”
- Under the Advanced Startup section, click on the “Restart Now” button.
- Your computer will restart, and the Advanced Startup menu will appear.
Windows 8/8.1:
- Press the Windows key + C to open the Charms bar.
- Click on “Settings” and then select “Change PC settings.”
- In the PC settings window, click on “Update and recovery.”
- Under the Recovery section, click on the “Restart now” button under Advanced Startup.
- Your computer will restart, and the Advanced Startup menu will appear.
Windows 7:
- Click on the “Start” button and select “Restart” while holding the Shift key.
- A system recovery options screen will appear.
- Select “Repair Your Computer” to access the Advanced Startup menu.
Mac:
- Restart your Mac.
- Immediately press and hold the Option (ALT) key as the computer starts up.
- A screen will appear showing available startup disks.
- Use the arrow keys to select the startup disk, then press Enter.
Linux (Ubuntu):
- Restart your Linux computer.
- As the system boots, press and hold the Esc key.
- A menu will appear, allowing you to choose the startup options.
Chrome OS:
- Turn off your Chromebook.
- Press and hold the Esc and Refresh (circular arrow) keys simultaneously.
- Press the Power button while keeping the other keys held down.
- Release the keys when a yellow exclamation mark appears on the screen.
- Press Ctrl + D to access the developer mode.
Accessing startup settings may vary slightly depending on your computer’s manufacturer and specific model. It’s always a good idea to consult your device’s documentation or the manufacturer’s website for detailed instructions.
How to Enter Safe Mode
Safe Mode is a diagnostic mode that starts your computer with minimal drivers and services, allowing you to troubleshoot issues or remove problematic software. Here’s how to enter Safe Mode on different operating systems:
Windows 10:
- Click on the “Start” button and select the “Settings” gear icon.
- In the Settings window, click on “Update & Security.”
- From the left sidebar, select “Recovery.”
- Under the Advanced Startup section, click on the “Restart Now” button.
- Your computer will restart, and the Advanced Startup menu will appear.
- Click on “Troubleshoot.”
- On the Troubleshoot screen, select “Advanced options.”
- Choose “Startup Settings” and click on the “Restart” button.
- Upon restart, a list of startup settings will appear.
- Press the corresponding number or function key for Safe Mode (usually F4 or 4).
Windows 8/8.1:
- Press the Windows key + C to open the Charms bar.
- Click on “Settings” and then select “Change PC settings.”
- In the PC settings window, click on “Update and recovery.”
- Under the Recovery section, click on the “Restart now” button under Advanced Startup.
- Your computer will restart, and the Advanced Startup menu will appear.
- Click on “Troubleshoot.”
- On the Troubleshoot screen, select “Advanced options.”
- Choose “Startup Settings” and click on the “Restart” button.
- Upon restart, a list of startup settings will appear.
- Press the corresponding number or function key for Safe Mode (usually F4 or 4).
Windows 7:
- Restart your computer.
- Press the F8 key repeatedly before the Windows logo appears.
- A menu will appear with various boot options.
- Use the arrow keys to select “Safe Mode” or “Safe Mode with Networking.”
- Press Enter to start in Safe Mode.
Mac:
- Restart your Mac.
- Immediately press and hold the Shift key as the computer starts up.
- Release the Shift key when the login window appears.
- Your Mac will now boot into Safe Mode.
Entering Safe Mode may differ slightly depending on your computer’s manufacturer and model. It’s recommended to consult the documentation or support website for your specific device to access Safe Mode properly.
How to Disable Startup Programs
Disabling unnecessary startup programs can help improve the boot time and overall performance of your computer. Here’s how to disable startup programs on different operating systems:
Windows 10:
- Right-click on the taskbar and select “Task Manager.”
- In the Task Manager window, click on the “Startup” tab.
- You will see a list of programs that launch during startup.
- Right-click on the program you want to disable and select “Disable.”
- Repeat the above step for any other programs you wish to disable.
- Close the Task Manager.
Windows 8/8.1:
- Press Ctrl + Shift + Esc to open the Task Manager.
- Click on the “Startup” tab.
- You will see a list of programs that launch during startup.
- Right-click on the program you want to disable and select “Disable.”
- Repeat the above step for any other programs you wish to disable.
- Close the Task Manager.
Windows 7:
- Click on the “Start” button and type “msconfig” in the search box.
- Press Enter to open the System Configuration window.
- Go to the “Startup” tab.
- You will see a list of programs that launch during startup.
- Uncheck the box next to the program you want to disable.
- Repeat the above step for any other programs you wish to disable.
- Click on “Apply” and then “OK.”
- Restart your computer for the changes to take effect.
Mac:
- Click on the Apple menu and select “System Preferences.”
- In the System Preferences window, click on “Users & Groups.”
- Select your user account from the left sidebar.
- Go to the “Login Items” tab.
- You will see a list of programs that launch during startup.
- Select the program you want to disable and click on the “-” button below the list.
- Repeat the above step for any other programs you wish to disable.
- Close the System Preferences window.
By disabling unnecessary startup programs, you can streamline the boot process and ensure that only essential applications load when you start your computer.
How to Change Boot Priority
Changing the boot priority allows you to control the sequence in which your computer looks for an operating system to load. Here’s how to change the boot priority on different operating systems:
Windows:
- Restart your computer.
- During startup, look for a message that indicates which key to press to enter the BIOS or UEFI firmware settings. It is usually displayed as “Press [key] to enter Setup” or “Press [key] to enter BIOS.”
- Press the indicated key (e.g., F2, Del, Esc) to access the BIOS or UEFI firmware settings.
- In the BIOS or UEFI settings, navigate to the “Boot” or “Boot Priority” section.
- Use the arrow keys to rearrange the boot order. Move your preferred boot device to the top of the list.
- Save the changes and exit the BIOS or UEFI settings. This is usually done by pressing the F10 key and then selecting “Yes” or using the designated key or option.
- Your computer will now restart using the new boot priority.
Mac:
- Restart your Mac.
- Immediately press and hold the Option (ALT) key as the computer starts up.
- A screen will appear showing available startup disks.
- Use the arrow keys to select the startup disk you want to use.
- Press Enter to start booting from the selected disk.
Linux:
- Restart your computer.
- During startup, look for a message that indicates which key to press to enter the BIOS or UEFI firmware settings. The key may vary depending on the manufacturer.
- Press the indicated key to access the BIOS or UEFI settings.
- In the BIOS or UEFI settings, navigate to the “Boot” or “Boot Priority” section.
- Use the arrow keys to change the boot order. Move your desired boot device to the top of the list.
- Save the changes and exit the BIOS or UEFI settings.
- Your computer will now restart according to the new boot priority.
Changing the boot priority allows you to prioritize booting from a specific device, such as a USB drive or DVD, which can be useful during operating system installations or troubleshooting.
How to Enable or Disable Fast Startup
Fast Startup is a feature available in Windows that helps reduce startup times by saving the system state to a hibernation file. Enabling or disabling Fast Startup is a simple process. Here’s how to do it:
Windows 10:
- Click on the “Start” button and select the “Settings” gear icon.
- In the Settings window, click on “System.”
- From the left sidebar, select “Power & sleep.”
- Scroll down to the “Related settings” section and click on “Additional power settings.”
- In the Power Options window, click on “Choose what the power buttons do” from the left sidebar.
- Click on “Change settings that are currently unavailable.”
- Scroll down to the “Shutdown settings” section.
- If the “Turn on fast startup” option is available, check the box to enable it. If it is already checked, it means Fast Startup is already enabled.
- Save the changes and exit the Power Options window.
Windows 8/8.1:
- Press the Windows key + X and select “Power Options.”
- In the Power Options window, click on “Choose what the power buttons do” from the left sidebar.
- Click on “Change settings that are currently unavailable.”
- Scroll down to the “Shutdown settings” section.
- If the “Turn on fast startup” option is available, check the box to enable it. If it is already checked, it means Fast Startup is already enabled.
- Save the changes and exit the Power Options window.
Enabling Fast Startup can significantly reduce the time it takes for your computer to start up, especially on machines with traditional hard drives. However, there may be situations where you need to disable Fast Startup, such as when troubleshooting startup issues or performing certain actions during system updates.
To disable Fast Startup, follow the same steps as above, but uncheck the “Turn on fast startup” option in the Power Options settings. Save the changes and exit the Power Options window. Keep in mind that disabling Fast Startup may increase the startup time of your computer.
How to Reset Startup Settings to Default
Resetting startup settings to their default values can be beneficial if you are experiencing issues with your computer’s startup process or if you have made changes that you want to revert. Here’s how to reset startup settings to default on different operating systems:
Windows 10:
- Click on the “Start” button and select the “Settings” gear icon.
- In the Settings window, click on “Update & Security.”
- From the left sidebar, select “Recovery.”
- Under the Advanced Startup section, click on the “Restart Now” button.
- Your computer will restart, and the Advanced Startup menu will appear.
- Click on “Troubleshoot.”
- On the Troubleshoot screen, select “Advanced options.”
- Choose “Startup Repair” and follow the on-screen instructions to reset the startup settings to default.
- Restart your computer after the process completes.
Windows 8/8.1:
- Press the Windows key + C to open the Charms bar.
- Click on “Settings” and then select “Change PC settings.”
- In the PC settings window, click on “Update and recovery.”
- Under the Recovery section, click on the “Restart now” button under Advanced Startup.
- Your computer will restart, and the Advanced Startup menu will appear.
- Click on “Troubleshoot.”
- On the Troubleshoot screen, select “Advanced options.”
- Choose “Startup Repair” and follow the on-screen instructions to reset the startup settings to default.
- Restart your computer after the process completes.
Mac:
- Restart your Mac.
- Immediately press and hold the Command (⌘) and R keys as the computer starts up.
- Release the keys when the Apple logo or a spinning globe appears.
- Wait for the macOS Utilities window to appear.
- Click on “Reinstall macOS” or “Reinstall OS X,” depending on your macOS version.
- Follow the on-screen instructions to reinstall the operating system and reset the startup settings to default.
By resetting the startup settings to default, you can resolve issues related to system configurations or incorrect changes made to startup options. However, be aware that this process will reset any customizations you have made, so it’s essential to back up your data before proceeding.
How to Troubleshoot Startup Issues
Encountering startup issues can be frustrating, but there are several troubleshooting steps you can take to diagnose and resolve the problem. Here’s how to troubleshoot startup issues on different operating systems:
Windows:
- Check your power source: Ensure that your computer is properly connected to a power source and that the power supply is functioning correctly.
- Disconnect external devices: Remove any external devices, such as USB drives or printers, and restart your computer to see if the issue persists.
- Start in Safe Mode: Enter Safe Mode to determine if the problem is caused by a third-party software or driver. If your computer starts successfully in Safe Mode, it indicates that the issue is likely caused by a recently installed program or driver.
- Run Startup Repair: Access the Advanced Startup menu and select “Startup Repair.” This tool can automatically detect and fix startup issues.
- Check disk errors: Use the Command Prompt or a disk utility program to scan and repair any disk errors that could be preventing your computer from starting up.
- Restore to a previous restore point: If you have system restore points created, you can revert your computer’s settings back to a previous state when it was functioning properly.
Mac:
- Check your power source: Ensure that your Mac is properly connected to a power source and that the power cable is working.
- Reset the SMC (System Management Controller): For Macs with a non-removable battery, shut down your Mac, then press and hold the Shift + Control + Option + Power buttons for 10 seconds. Release the keys and then press the Power button to turn on your Mac.
- Reset NVRAM/PRAM: Restart your Mac and immediately press and hold the Command + Option + P + R keys. Release the keys after you hear the startup sound for the second time.
- Run Disk Utility: Use Disk Utility to verify and repair disk permissions or errors that may be causing the startup issue.
- Boot into Safe Mode: Start your Mac in Safe Mode to check if the problem persists. Safe Mode disables non-essential startup items and performs a basic check of your Mac’s system files.
- Reinstall macOS: If none of the above steps resolve the issue, consider reinstalling macOS using the recovery partition or a bootable installer.
Troubleshooting startup issues may require a combination of these steps or additional troubleshooting methods specific to your situation. It’s recommended to refer to the documentation or support resources provided by your device manufacturer for more detailed troubleshooting instructions.