
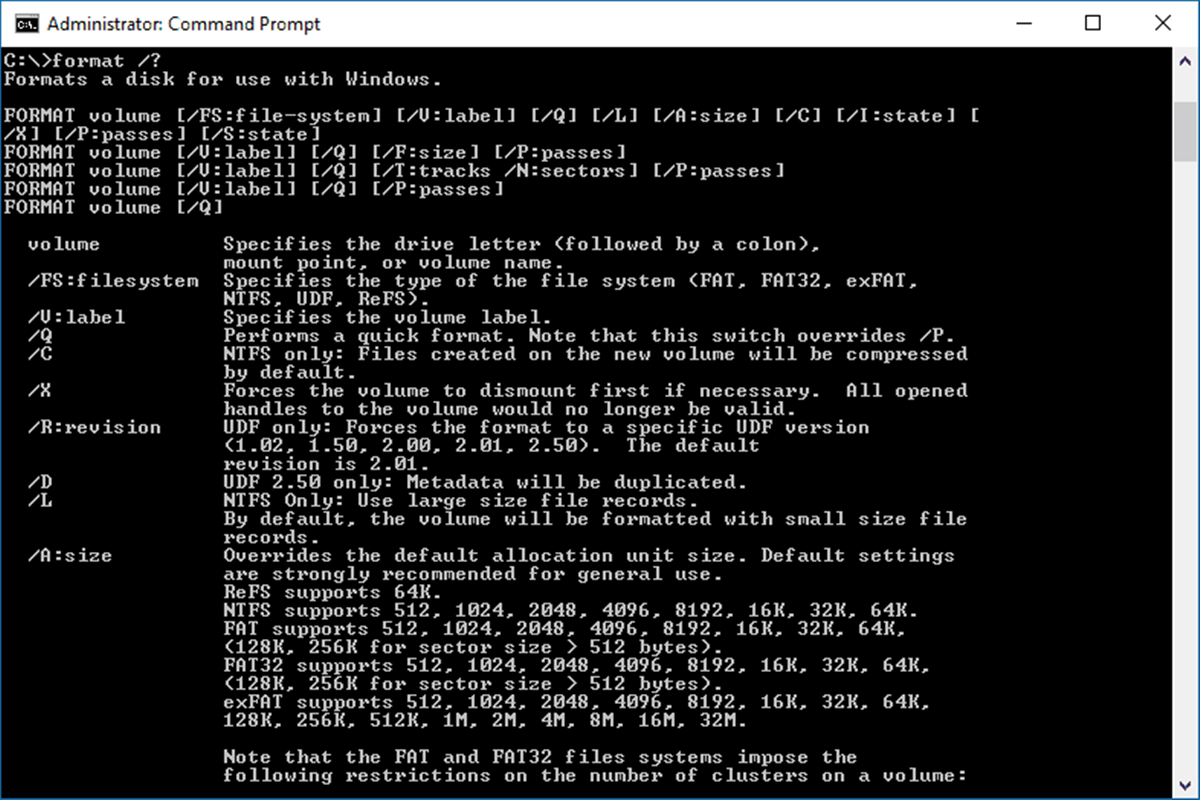
Examples of using the format command
The format command is a powerful tool in Windows that allows you to format various types of storage devices, such as disks, hard drives, USB drives, partitions, and volumes. Here are some examples of how you can use the format command:
- Formatting a disk: To format a disk, open the Command Prompt and type “format X:” (replace X with the letter of the disk you want to format). Press Enter and follow the on-screen instructions to complete the formatting process.
- Formatting a hard drive: To format a hard drive, open the Command Prompt and type “format C:” (replace C with the letter of the hard drive you want to format). Press Enter and confirm the formatting process when prompted.
- Formatting a USB drive: To format a USB drive, connect it to your computer and open the Command Prompt. Type “format X:” (replace X with the letter of the USB drive) and press Enter. Follow the instructions to complete the formatting process.
- Formatting a partition: To format a partition, open the Command Prompt and type “format X:” (replace X with the letter of the partition you want to format). Press Enter and confirm the formatting process when prompted.
- Formatting a volume: To format a volume, open the Command Prompt and type “format X:” (replace X with the letter of the volume you want to format). Press Enter and follow the on-screen instructions to complete the formatting process.
These are just a few examples of how you can use the format command in Windows. Depending on your specific needs and the type of storage device you want to format, you may need to use additional options, switches, or parameters with the format command. Experimenting with the command in a controlled environment will give you a better understanding of its functionality and help you effectively format your storage devices.
Remember, formatting a storage device erases all data on it, so it’s crucial to make sure you have a backup of any important files before proceeding with the format command. Additionally, double-check the device letter before using the format command to avoid accidentally formatting the wrong device.
Formatting a disk using the format command
The format command in Windows provides an efficient way to format disks and prepare them for use. Follow these steps to format a disk using the format command:
- Open the Command Prompt by pressing Win + R, typing “cmd,” and pressing Enter.
- Connect the disk you want to format to your computer.
- Type “format X:” in the Command Prompt (replace X with the letter assigned to the disk you want to format).
- Press Enter to execute the format command and initiate the formatting process.
- Windows will display a warning regarding data loss. Ensure you have backed up any important files before proceeding.
- Type “y” and press Enter to confirm the action and start formatting the disk.
- The format command will begin formatting the disk, and the progress will be displayed.
- Once the formatting process is complete, you will see a message stating “Format Complete.”
- You can now use the formatted disk for storage or other purposes.
It’s important to note that formatting a disk erases all existing data. Therefore, it is crucial to ensure you have a backup of any important files before proceeding with the format command. Additionally, double-check the assigned letter for the disk to avoid accidentally formatting the wrong disk.
The format command provides various options and parameters to customize the formatting process. These include file system selection (/fs), quick format (/q), volume label assignment (/v), and more. Experimenting with these options can help you tailor the formatting process to your specific requirements.
Remember to use the format command with caution and ensure you are formatting the correct disk to prevent data loss. Following these steps will enable you to effectively format a disk using the format command in Windows.
Formatting a hard drive using the format command
The format command in Windows can also be used to format a hard drive, which is a useful task when you want to prepare the hard drive for a fresh installation of the operating system or to remove all data from the drive. Here are the steps to format a hard drive using the format command:
- Open the Command Prompt by pressing Win + R, typing “cmd,” and pressing Enter.
- Type “format C:” in the Command Prompt (replace C with the letter assigned to the hard drive you want to format).
- Press Enter to execute the format command.
- Before proceeding, make sure you have backed up any important files on the hard drive, as the formatting process will erase all data.
- A warning message will appear, indicating that all data on the hard drive will be lost. Enter “y” to confirm.
- The format command will begin formatting the hard drive. The progress will be displayed in the Command Prompt.
- Once the formatting process is complete, you will see a message confirming “Format Complete.”
- The hard drive is now formatted and ready for use.
Formatting a hard drive using the format command permanently erases all data on the drive. Therefore, it is crucial to ensure that you have safely backed up any important files before proceeding with the format command.
The format command also provides various options and switches that can be used with the /fs parameter to specify the file system to be used during formatting, such as NTFS or FAT32.
Remember that formatting a hard drive erases all existing data, so caution must be taken to ensure you are formatting the correct drive. Double-check the assigned letter of the hard drive before executing the format command.
By following these steps, you can effectively format a hard drive using the format command in Windows, ensuring that it is ready for a fresh installation or to remove all data from the drive.
Formatting a USB drive using the format command
If you have a USB drive that needs to be formatted, the format command in Windows provides a convenient and straightforward way to accomplish this task. Here’s a step-by-step guide on how to format a USB drive using the format command:
- Connect the USB drive to your computer.
- Open the Command Prompt by pressing Win + R, typing “cmd,” and pressing Enter.
- Type “format X:” in the Command Prompt (replace X with the letter assigned to the USB drive you want to format).
- Press Enter to execute the format command.
- Before proceeding, ensure you have backed up any important files from the USB drive, as the formatting process will erase all data.
- A warning message will appear, indicating that all data on the USB drive will be lost. Type “y” and press Enter to confirm.
- The format command will begin formatting the USB drive, and the progress will be displayed in the Command Prompt.
- Once the formatting process is complete, a message will confirm “Format Complete.”
- The USB drive is now formatted and ready for use.
It is essential to note that formatting a USB drive using the format command permanently erases all data on the drive. Therefore, make sure to back up any important files before proceeding.
Additional options can be used with the format command to customize the formatting process. For example, the /fs parameter can be used to specify the file system to be used during formatting, such as NTFS or FAT32.
Always double-check the assigned letter of the USB drive before executing the format command to ensure you are formatting the correct drive.
By following these steps, you can easily and effectively format a USB drive using the format command in Windows, making it ready for use or preparing it for a specific purpose.
Formatting a partition using the format command
If you have a partition on your hard drive that needs to be formatted, the format command in Windows offers a convenient way to accomplish this task. Here’s a step-by-step guide on how to format a partition using the format command:
- Open the Command Prompt by pressing Win + R, typing “cmd,” and pressing Enter.
- Type “format X:” in the Command Prompt (replace X with the letter assigned to the partition you want to format).
- Press Enter to execute the format command.
- Before proceeding, ensure you have backed up any important files located on the partition, as the formatting process will erase all data.
- A warning message will appear, indicating that all data on the partition will be lost. Type “y” and press Enter to confirm.
- The format command will begin formatting the partition, and the progress will be displayed in the Command Prompt.
- Once the formatting process is complete, a message will confirm “Format Complete.”
- The partition is now formatted and ready for use.
Formatting a partition using the format command permanently erases all data on that partition. Therefore, it’s crucial to make sure that you have safely backed up any important files before proceeding.
The format command allows you to use various options and switches to customize the formatting process. For example, you can specify the file system to be used during formatting by using the /fs parameter, such as NTFS or FAT32.
Double-check the assigned letter of the partition before executing the format command to ensure that you are formatting the correct partition. Formatting the wrong partition can result in data loss.
By following these steps, you can effectively format a partition using the format command in Windows, allowing you to prepare it for use or perform other necessary actions.
Formatting a volume using the format command
The format command in Windows provides an effective way to format volumes, which are logical storage units that can span across multiple disks or partitions. Here’s a step-by-step guide on how to format a volume using the format command:
- Open the Command Prompt by pressing Win + R, typing “cmd,” and pressing Enter.
- Type “format X:” in the Command Prompt (replace X with the letter assigned to the volume you want to format).
- Press Enter to execute the format command.
- Ensure you have backed up any important files on the volume, as the formatting process will erase all data.
- A warning message will appear, indicating that all data on the volume will be lost. Type “y” and press Enter to confirm.
- The format command will start formatting the volume, and the progress will be displayed in the Command Prompt.
- Once the formatting process is complete, a message will confirm “Format Complete.”
- The volume is now formatted and ready for use.
Formatting a volume using the format command removes all data on that volume, so it is crucial to back up any important files before proceeding.
The format command offers various options and switches that can be used in conjunction with the /fs parameter to specify the file system to be used during formatting, such as NTFS or FAT32.
Before executing the format command, double-check the assigned letter of the volume to make sure you are formatting the correct volume. Formatting the wrong volume can result in data loss.
By following these steps, you can effectively format a volume using the format command in Windows, allowing you to prepare it for use or perform other necessary tasks.
Using the /fs option with the format command
The format command in Windows supports the use of the /fs option, which allows you to specify the file system to be used during the formatting process. The file system determines how data is organized, stored, and accessed on the formatted storage device. Here’s a closer look at using the /fs option with the format command:
By default, when you execute the format command without specifying the /fs option, Windows uses the default file system for the selected storage device. This default file system is typically NTFS for hard drives and exFAT or FAT32 for USB drives.
To utilize the /fs option, follow these steps:
- Open the Command Prompt by pressing Win + R, typing “cmd,” and pressing Enter.
- Type “format X: /fs:FileSystem” in the Command Prompt (replace X with the letter assigned to the storage device, and FileSystem with the desired file system, such as NTFS, exFAT, or FAT32).
- Press Enter to execute the format command with the specified file system.
- Wait for the formatting process to complete.
- The storage device is now formatted with the specified file system.
Using the /fs option gives you flexibility in choosing the appropriate file system based on your needs. Here are some commonly used file systems:
- NTFS: This file system offers robust security, file encryption, and support for large file sizes and partition sizes. It is ideal for internal hard drives and large external storage devices.
- exFAT: exFAT is a lightweight file system that provides compatibility with both Windows and macOS. It is suitable for external storage devices and allows for larger file sizes compared to FAT32.
- FAT32: FAT32 is an older file system that offers wide compatibility with different operating systems and devices. However, it has limitations, such as a maximum file size of 4GB, making it more suitable for smaller USB drives or devices with limited functionality.
When specifying the file system with the /fs option, it’s crucial to ensure compatibility with the operating systems and devices you intend to use the formatted storage device with.
By utilizing the /fs option with the format command, you can easily format a storage device with the desired file system, allowing for efficient data management and compatibility with your specific requirements.
Using the /q option with the format command
The format command in Windows provides the /q option, which stands for “quick format.” This option allows you to perform a faster formatting process by skipping the complete scan and verification of bad sectors on the storage device. Here’s an overview of using the /q option with the format command:
By default, when you execute the format command without specifying the /q option, Windows performs a full format. A full format checks the entire storage device for bad sectors, verifies data integrity, and marks any faulty sectors to prevent further use.
To perform a quick format using the /q option, follow these steps:
- Open the Command Prompt by pressing Win + R, typing “cmd,” and pressing Enter.
- Type “format X: /q” in the Command Prompt (replace X with the letter assigned to the storage device you want to format).
- Press Enter to execute the format command with the /q option.
- Wait for the formatting process to complete.
- The storage device is now quick-formatted and ready for use.
Using the /q option offers a faster way to format storage devices, especially for devices that are already in good condition or have been recently formatted. However, it’s important to note that a quick format does not scan for or mark bad sectors, which can impact the long-term reliability of the device. If you suspect any issues with the storage device, it’s recommended to perform a full format to ensure data integrity.
Additionally, when using the /q option, make sure to back up any important data on the storage device beforehand, as the quick format process still erases all existing data. It is always better to be safe and have a backup to avoid accidental data loss.
By utilizing the /q option with the format command, you can quickly format a storage device, saving time and providing a convenient solution for devices that are in good condition or have recently been formatted.
Using the /v option with the format command
The format command in Windows offers the /v option, which allows you to specify a volume label during the formatting process. A volume label is a name or identifier assigned to a storage device or partition, providing a user-friendly way to identify and manage the formatted device. Here’s a closer look at using the /v option with the format command:
By default, when you execute the format command without specifying the /v option, Windows assigns a generic volume label based on the file system, such as “New Volume” or “Untitled.”
To specify a custom volume label using the /v option, follow these steps:
- Open the Command Prompt by pressing Win + R, typing “cmd,” and pressing Enter.
- Type “format X: /v:Label” in the Command Prompt (replace X with the letter assigned to the storage device you want to format, and Label with the desired volume label).
- Press Enter to execute the format command with the specified volume label.
- Wait for the formatting process to complete.
- The storage device is now formatted with the specified volume label.
Using the /v option with the format command allows you to provide a descriptive and meaningful label to the formatted storage device. A clear volume label helps in easily identifying and organizing multiple storage devices or partitions.
When selecting a custom volume label, it’s essential to follow certain guidelines. The label should be concise, descriptive, and avoid using special characters or spaces. Use alphanumeric characters and underscores, if needed, to ensure compatibility across different operating systems.
By default, Windows supports up to 32 characters for a volume label. However, some storage devices or file systems may have specific limits, so it’s advisable to check the documentation or specifications of the device or file system you are using.
Remember that the volume label is not a mandatory requirement for formatting a storage device. You can choose to omit the /v option if you don’t need or want to assign a specific label.
By utilizing the /v option with the format command, you can easily assign a custom volume label to a formatted storage device, making it more identifiable and organized in your system.
Using the /a option with the format command
The format command in Windows provides the /a option, which stands for “allocation unit size.” The allocation unit size refers to the cluster size or the amount of disk space that is allocated to store data on a storage device. Understanding and selecting the appropriate allocation unit size can impact the overall efficiency and performance of the formatted device. Here’s a closer look at using the /a option with the format command:
By default, when you execute the format command without specifying the /a option, Windows assigns a default allocation unit size based on the selected file system and the storage device’s size.
To specify a custom allocation unit size using the /a option, follow these steps:
- Open the Command Prompt by pressing Win + R, typing “cmd,” and pressing Enter.
- Type “format X: /a:Size” in the Command Prompt (replace X with the letter assigned to the storage device you want to format, and Size with the desired allocation unit size).
- Press Enter to execute the format command with the specified allocation unit size.
- Wait for the formatting process to complete.
- The storage device is now formatted with the specified allocation unit size.
Choosing the appropriate allocation unit size is essential, as it affects the file system’s efficiency and the amount of disk space wasted due to cluster size. Different scenarios may call for different allocation unit sizes:
- Default: The default allocation unit size recommended by Windows is usually suitable for most general purposes, providing a balance between storage efficiency and performance.
- Small-sized files: If the storage device is primarily used for small-sized files, such as documents or text files, selecting a smaller allocation unit size can reduce wasted disk space.
- Large-sized files: On the other hand, if the storage device mainly handles large-sized files, such as videos or multimedia, selecting a larger allocation unit size can enhance performance.
It’s important to note that changing the allocation unit size may require more time for file operations and can impact the overall performance of the storage device. It’s recommended to consider the specific use case and balance between storage efficiency and performance when selecting a custom allocation unit size.
By utilizing the /a option with the format command, you can easily specify a custom allocation unit size when formatting a storage device, ensuring optimal performance and efficiency based on your specific needs.
Using the /p option with the format command
The format command in Windows offers the /p option, which allows you to perform a secure wipe of a storage device by overwriting its contents with zeros. This option provides an added layer of security when formatting a storage device, ensuring that data is fully erased and not recoverable. Here’s an in-depth look at using the /p option with the format command:
By default, when you execute the format command without specifying the /p option, Windows performs a regular format, which erases the file system information but does not overwrite the actual data. Regular formats still leave traces of the previous data on the storage device, which may be recoverable using specialized tools or techniques.
To perform a secure wipe using the /p option, follow these steps:
- Open the Command Prompt by pressing Win + R, typing “cmd,” and pressing Enter.
- Type “format X: /p:passes” in the Command Prompt (replace X with the letter assigned to the storage device you want to format, and passes with the number of overwrite passes you want to perform).
- Press Enter to execute the format command with the specified number of overwrite passes.
- Wait for the formatting process to complete.
- The storage device is now securely wiped and ready for further use or disposal.
The “passes” value specified after the /p option determines the number of times the storage device’s data is overwritten with zeros. A higher number of passes increases the security level but also extends the formatting process duration.
It’s important to note that performing a secure wipe with the /p option takes significantly more time compared to a regular format. In some cases, the duration can be hours or even days, depending on the size of the storage device and the number of passes chosen.
Using the /p option with the format command is particularly useful when you need to dispose of a storage device or ensure that sensitive data cannot be recovered. By securely wiping the device, you can prevent unauthorized access to your data and maintain privacy and security.
Keep in mind that the /p option is irreversible, and the data on the storage device will be permanently erased. Make sure to back up any important files before proceeding with the secure wipe to avoid data loss.
By utilizing the /p option with the format command, you can easily perform a secure wipe of a storage device, ensuring the complete removal of data and enhancing privacy and security.
Using the /x option with the format command
The format command in Windows provides the /x option, which permits you to force dismount a storage device before formatting it. This option ensures that all active connections or processes accessing the device are terminated, allowing for a successful and uninterrupted formatting process. Here’s a closer look at using the /x option with the format command:
By default, when you execute the format command without specifying the /x option, Windows attempts to dismount the storage device automatically. However, if there are any active connections or programs accessing the device, Windows may prompt you to close those connections before proceeding with the format.
To force dismount a storage device using the /x option, follow these steps:
- Open the Command Prompt by pressing Win + R, typing “cmd,” and pressing Enter.
- Type “format X: /x” in the Command Prompt (replace X with the letter assigned to the storage device you want to format).
- Press Enter to execute the format command with the /x option.
- If there are any open connections or processes accessing the device, Windows will prompt you to confirm the dismount. Enter “y” and press Enter to proceed.
- Wait for the formatting process to complete.
- The storage device is now successfully dismounted and ready for formatting.
Using the /x option with the format command ensures that all active connections or processes are closed before formatting the storage device. This prevents any data corruption or errors that may occur due to ongoing access.
It’s important to note that forcing dismount may result in an interruption of ongoing tasks or loss of unsaved data for programs currently using the storage device. Therefore, it is recommended to save and close any open files or applications on the device before executing the format command with the /x option.
By utilizing the /x option, you can ensure a successful and uninterrupted formatting process for a storage device, minimizing the chances of errors or data corruption caused by active connections or processes.
Using the /r option with the format command
The format command in Windows supports the /r option, which allows you to perform a surface scan on a storage device during the formatting process. This option checks the entire surface of the device for any bad sectors and attempts to repair or mark them for future avoidance. Here’s an overview of using the /r option with the format command:
By default, when you execute the format command without specifying the /r option, Windows does not perform a surface scan during the formatting process. A regular format only erases the file system information but does not thoroughly check for bad sectors.
To perform a surface scan using the /r option, follow these steps:
- Open the Command Prompt by pressing Win + R, typing “cmd,” and pressing Enter.
- Type “format X: /r” in the Command Prompt (replace X with the letter assigned to the storage device you want to format).
- Press Enter to execute the format command with the /r option.
- Wait for the formatting process to complete.
- The storage device is now formatted, and any detected bad sectors are marked or repaired.
Performing a surface scan with the /r option adds an extra layer of protection by identifying and attempting to correct any potential issues on the storage device. This can help prevent data loss or corruption caused by bad sectors, which may result from physical damage or normal wear and tear.
It’s important to note that performing a surface scan with the /r option can significantly increase the time required for the formatting process. This is because the command scans each sector of the storage device, which can take a considerable amount of time depending on the size and condition of the device.
When using the /r option, make sure to back up any important data on the storage device beforehand, as the scan and repair process may result in the loss of some data stored within the bad sectors.
By utilizing the /r option with the format command, you can perform a surface scan during the formatting process, helping to identify and address any bad sectors on the storage device and ensuring the overall health and integrity of the device.
Using the /d option with the format command
The format command in Windows offers the /d option, which allows you to provide a new volume label during the formatting process. This option gives you the flexibility to assign a different label to the storage device or partition being formatted. Here’s a look at using the /d option with the format command:
By default, when you execute the format command without specifying the /d option, Windows uses the current volume label assigned to the storage device or assigns a default label based on the file system.
To provide a new volume label using the /d option, follow these steps:
- Open the Command Prompt by pressing Win + R, typing “cmd,” and pressing Enter.
- Type “format X: /d:Label” in the Command Prompt (replace X with the letter assigned to the storage device or partition you want to format, and Label with the desired new volume label).
- Press Enter to execute the format command with the specified new volume label.
- Wait for the formatting process to complete.
- The storage device or partition is now formatted with the new volume label.
The new volume label provided with the /d option allows you to assign a descriptive and meaningful name to the storage device or partition. This can be helpful for identification purposes and organizational needs.
When selecting a new volume label, it’s important to follow certain guidelines. The label should be concise, descriptive, and not contain any special characters or spaces. Alphanumeric characters and underscores are typically allowed for compatibility across different operating systems.
Keep in mind that the maximum length of a volume label varies depending on the file system and the storage device. It’s recommended to check the documentation or specifications of the device or file system you are using to determine the maximum length allowed.
By utilizing the /d option with the format command, you can easily provide a new volume label during the formatting process, giving your storage device or partition a customized and identifiable name.
Using the /n option with the format command
The format command in Windows supports the /n option, which allows you to set a specific file system label during the formatting process. This option provides the ability to assign a custom name to the file system itself, rather than the volume label. Here is an overview of using the /n option with the format command:
By default, when you execute the format command without specifying the /n option, Windows assigns a default file system label based on the selected file system. For example, NTFS formatted drives are labeled as “NTFS,” exFAT formatted drives are labeled as “exFAT,” and so on.
To set a specific file system label using the /n option, follow these steps:
- Open the Command Prompt by pressing Win + R, typing “cmd,” and pressing Enter.
- Type “format X: /n:Label” in the Command Prompt (replace X with the letter assigned to the storage device you want to format, and Label with the desired file system label).
- Press Enter to execute the format command with the specified file system label.
- Wait for the formatting process to complete.
- The storage device is now formatted with the custom file system label.
Using the /n option allows you to set a distinct label for the file system, which can provide additional information or be used for identification purposes. It is important to note that the file system label does not affect the display name of the storage device or volume. It represents the underlying file system itself.
When selecting a file system label, make sure to follow any specified restrictions set by the file system or device. Typically, alphanumeric characters, spaces, and some special characters are allowed, but there may be limitations or specific guidelines regarding the length or composition of the label.
By utilizing the /n option with the format command, you can easily set a specific file system label during the formatting process, allowing for enhanced organization and identification of the file system on the formatted storage device.
Using the /f option with the format command
The format command in Windows provides the /f option, which allows you to force the formatting of a storage device, even if it appears to be in use or is write-protected. The /f option ensures that the formatting process proceeds without any interruptions. Here’s a closer look at using the /f option with the format command:
By default, when you execute the format command without specifying the /f option, Windows checks if the storage device is currently in use or write-protected. If it detects any activity or write protection, Windows prompts you for confirmation before proceeding with the format.
To force the formatting of a storage device using the /f option, follow these steps:
- Open the Command Prompt by pressing Win + R, typing “cmd,” and pressing Enter.
- Type “format X: /f” in the Command Prompt (replace X with the letter assigned to the storage device you want to format).
- Press Enter to execute the format command with the /f option.
- Wait for the formatting process to complete.
- The storage device is now formatted, ignoring any use or write-protection warnings.
Using the /f option allows you to bypass any checks or warnings and proceed with the formatting process, ensuring that the storage device is formatted as intended.
It’s essential to exercise caution when using the /f option, as it can lead to data loss if you accidentally format the wrong storage device. Always double-check the assigned letter of the storage device and make sure you have a backup of any important files before proceeding with the format command using the /f option.
Additionally, keep in mind that forcing the format process using the /f option may not always be possible if there are physical write-protection mechanisms on the storage device itself.
By utilizing the /f option with the format command, you can force the formatting of a storage device, bypassing any use or write-protection warnings, and ensuring the completion of the formatting process.
Using the /c option with the format command
The format command in Windows supports the /c option, which allows you to specify a specific character to fill the formatted storage device with. This option enables you to overwrite the existing data on the device with a particular character, ensuring it cannot be easily recovered. Here’s an in-depth look at using the /c option with the format command:
By default, when you execute the format command without specifying the /c option, Windows does not fill the formatted storage device with any specific character. The format command simply removes the existing file system and prepares the device for new data to be written.
To specify a specific character using the /c option, follow these steps:
- Open the Command Prompt by pressing Win + R, typing “cmd,” and pressing Enter.
- Type “format X: /c:Character” in the Command Prompt (replace X with the letter assigned to the storage device you want to format, and Character with the desired character you want to fill the formatted device with).
- Press Enter to execute the format command with the specified character.
- Wait for the formatting process to complete.
- The storage device is now formatted, and the specified character has overwritten the existing data.
Using the /c option with the format command allows you to add an additional layer of security by overwriting the data on the storage device with a specific character. This process makes it more challenging for anyone to recover the previously stored data.
When selecting a character to fill the formatted device with, it’s common to use random or non-printable characters that are not easily associated with sensitive or recognizable data. This makes it more difficult for recovery tools to interpret or reconstruct the overwritten data.
It’s important to note that the length of time required to fill the storage device with the specified character using the /c option depends on the size of the device and the speed of the formatting process. The larger the storage device, the longer the process may take.
By utilizing the /c option with the format command, you can specify a character to fill the formatted storage device, enhancing the security of your data by making it more challenging to recover the overwritten information.
Using the /f:udf option with the format command
The format command in Windows provides the /f:udf option, which allows you to format a storage device with the Universal Disk Format (UDF) file system. UDF is a versatile file system that offers compatibility across different operating systems and supports large file sizes and volumes. Here’s a closer look at using the /f:udf option with the format command:
By default, when you execute the format command without specifying the /f:udf option, Windows formats the storage device with the default file system according to its size and type. This is typically NTFS for hard drives and exFAT for USB drives.
To format a storage device with the UDF file system using the /f:udf option, follow these steps:
- Open the Command Prompt by pressing Win + R, typing “cmd,” and pressing Enter.
- Type “format X: /fs:udf” in the Command Prompt (replace X with the letter assigned to the storage device you want to format).
- Press Enter to execute the format command with the /f:udf option.
- Wait for the formatting process to complete.
- The storage device is now formatted with the UDF file system.
The UDF file system is designed to provide compatibility across different operating systems, making it useful for sharing files between Windows, macOS, and other devices. It supports larger file sizes and volumes, which is beneficial when dealing with high-capacity drives or large multimedia files.
Keep in mind that not all devices or operating systems may fully support the UDF file system, so it’s essential to verify compatibility before using the /f:udf option. Additionally, UDF may not be suitable for certain scenarios or specialized use cases, such as bootable drives or compatibility with older devices.
By utilizing the /f:udf option with the format command, you can easily format a storage device with the UDF file system, enabling compatibility across different platforms and accommodating larger file sizes and volumes as needed.
Using the /z option with the format command
The format command in Windows provides the /z option, which allows you to zero out the sectors during the formatting process. This option ensures that all data on the storage device is overwritten with zeros, offering an extra layer of security by preventing data recovery. Here’s a closer look at using the /z option with the format command:
By default, when you execute the format command without specifying the /z option, Windows does not zero out the sectors during the formatting process. The format command removes the file system information and prepares the storage device for new data to be written.
To zero out the sectors during the formatting process using the /z option, follow these steps:
- Open the Command Prompt by pressing Win + R, typing “cmd,” and pressing Enter.
- Type “format X: /z” in the Command Prompt (replace X with the letter assigned to the storage device you want to format).
- Press Enter to execute the format command with the /z option.
- Wait for the formatting process to complete.
- The storage device is now formatted, and all data on the device has been overwritten with zeros.
Using the /z option with the format command provides an additional layer of security by ensuring that the previous data on the storage device cannot be easily recovered. Overwriting the sectors with zeros makes it significantly more challenging for data recovery tools to retrieve any traces of the previous data.
It’s important to note that zeroing out the sectors during the formatting process using the /z option may increase the time required for the formatting process to complete. This is because each sector of the storage device needs to be overwritten with zeros before moving on to the next step.
By utilizing the /z option with the format command, you can ensure that all data on the storage device is securely overwritten with zeros, providing an extra layer of protection to prevent data recovery by unauthorized parties. Remember to exercise caution and back up any important files before proceeding with the format command using the /z option.
Using the /l option with the format command
The format command in Windows supports the /l option, which allows you to specify the volume label during the formatting process. This option enables you to assign a custom name or identifier to the volume, providing a user-friendly way to identify and manage the formatted storage device. Here’s a closer look at using the /l option with the format command:
By default, when you execute the format command without specifying the /l option, Windows assigns a generic volume label based on the file system and device type. For example, “New Volume” or “Untitled” may be used as the default label.
To specify a custom volume label using the /l option, follow these steps:
- Open the Command Prompt by pressing Win + R, typing “cmd,” and pressing Enter.
- Type “format X: /l:Label” in the Command Prompt (replace X with the letter assigned to the storage device you want to format, and Label with the desired custom volume label).
- Press Enter to execute the format command with the specified volume label.
- Wait for the formatting process to complete.
- The storage device is now formatted with the custom volume label.
Using the /l option allows you to assign a distinctive and meaningful name or identifier to the volume, aiding in easy identification and management of the formatted storage device. This can be particularly useful when dealing with multiple drives or partitions.
When selecting a custom volume label, ensure the label is concise, descriptive, and does not contain any special characters or spaces. Alphanumeric characters and underscores are typically allowed and ensure compatibility across different operating systems.
It’s important to note that the volume label represents the display name of the storage device rather than the underlying file system. The label can be changed or modified after formatting by accessing the device’s properties.
By utilizing the /l option with the format command, you can easily assign a custom volume label during the formatting process, making it convenient to identify and manage the formatted storage device.
Differences between quick and regular format
The format command in Windows offers two options for formatting a storage device: quick format and regular format. Understanding the differences between these two options can help you choose the most appropriate formatting method for your needs. Here are the main distinctions between quick and regular format:
1. Time: Quick format is significantly faster than regular format. Quick format only erases the file system information on the storage device, whereas regular format performs a deeper scan and writes zeros on every sector of the device. As a result, regular format takes considerably more time to complete, especially for larger storage devices.
2. Data deletion: Quick format does not erase the actual data on the storage device. It simply marks the space previously occupied by files as available for new data to be written. Regular format, on the other hand, overwrites the entire storage device with zeros, effectively eliminating any traces of the previous data. Regular format is recommended when you want to ensure that the data cannot be easily recovered.
3. Disk checking: Regular format performs a thorough check of the storage device for bad sectors, ensuring the integrity of the device. Quick format does not check for bad sectors. If you suspect any issues with the storage device, regular format is a better option to identify and handle any potential problems.
4. Recovery: Quick format allows you to recover files using specialized software since the data is not overwritten. Regular format, with its complete overwriting of data, makes it significantly more difficult to recover any files after the formatting process.
5. Caution: Due to the speed and minimal data deletion involved, quick format should be used with caution if you plan to sell, donate, or dispose of the storage device. Regular format is more secure in such cases, as it ensures that the data cannot be easily retrieved by unauthorized individuals.
When choosing between quick and regular format, consider the time required, data security concerns, and the condition of the storage device. If you want a faster format and only need to change the file system or remove the file structure, quick format may be adequate. For complete data erasure and a more thorough device scan, regular format is the recommended option.
Remember to back up any important data before initiating the formatting process, as formatting irreversibly deletes all data on the storage device, regardless of the format type chosen.
Common errors and issues with the format command
The format command in Windows is generally reliable, but like any system tool, it can encounter errors or issues. Understanding common errors and issues associated with the format command can help you troubleshoot and resolve any problems that may arise. Here are some common errors and issues you may encounter:
1. Device in Use: You may encounter an error stating that the device is in use when you attempt to format it. This can occur if any files or applications are actively accessing the device. Make sure to close all open files and applications before attempting to format the device.
2. Write Protection: Some storage devices, such as USB drives, can have a physical write protection switch or setting. If you receive a write protection error, check if the device has a write protection feature enabled or a physical switch turned on. Disable the write protection before formatting the device.
3. Incorrect Device Selection: Double-check the assigned letter or path of the storage device you want to format. Formatting the wrong device can result in data loss. Use caution and ensure you have selected the correct device before proceeding with the format command.
4. Insufficient Permissions: If you receive an error indicating insufficient permissions, try running the Command Prompt as an administrator. Right-click on the Command Prompt icon and select “Run as Administrator” to ensure you have the necessary permissions to format the device.
5. Unexpected Format Interruption: Occasionally, the formatting process may be interrupted due to power loss, system shutdown, or other unforeseen circumstances. This can result in an incomplete format and potential data loss. Always ensure you have a stable power source and maintain system stability while formatting a device.
6. Physical Damages: If a storage device contains physical damages, such as bad sectors or hardware failures, the format command may not be able to resolve these issues. In such cases, it’s advisable to run diagnostic tools or seek professional assistance to identify and address the hardware problems.
If you encounter errors or issues while using the format command, it’s essential to troubleshoot the specific problem and explore possible solutions. In some cases, using alternative formatting methods, updating device drivers, or using disk management tools can help resolve formatting errors.
Always ensure you have backed up any important data before formatting a storage device to prevent data loss. Additionally, it’s advisable to read the documentation or seek support from relevant resources, such as official Windows forums, for specific errors or issues you might encounter with the format command.
Alternative methods for formatting a disk or drive in Windows
While the format command in Windows provides a convenient way to format disks and drives, there are alternative methods available that offer different features and functionalities. Here are some alternative methods for formatting a disk or drive in Windows:
1. Graphical User Interface (GUI) Tools: Windows offers a built-in Disk Management utility that provides a graphical interface for disk management tasks, including formatting. To access Disk Management, right-click on “This PC” or “My Computer,” select “Manage,” and navigate to “Disk Management.” From there, you can right-click on the target disk or drive, select “Format,” and follow the on-screen prompts to format the device.
2. Third-party Formatting Tools: There are several third-party disk formatting tools available with advanced features and options. Tools like EaseUS Partition Master, MiniTool Partition Wizard, or Acronis Disk Director provide additional functionalities, such as partition resizing, disk cloning, and advanced formatting options. These tools often offer more flexibility and control over the formatting process compared to the built-in Windows methods.
3. Bootable Disk Tools: Some disk formatting tasks may require booting from a separate media. Bootable tools, such as GParted or Parted Magic, provide a complete disk management environment that allows you to format disks or drives independently of the operating system. These tools are useful when you encounter formatting issues or want to perform more complex disk management tasks.
4. File Explorer (Quick Format): In addition to the format command, you can also use the File Explorer in Windows to perform a quick format. To do this, navigate to the target disk or drive, right-click on it, and select the “Format” option. Choose the desired file system and formatting options, and click “Start” to initiate the quick format process.
When using alternative methods for formatting a disk or drive, it’s important to note that all data on the device will be permanently erased. Make sure to back up any important files before formatting.
Each alternative method has its own advantages and functionalities. Consider the specific requirements of your formatting task, such as partition resizing or advanced formatting options, when deciding which method is most suitable for your needs.
Exploring alternative methods allows you to choose the most appropriate tool for your disk or drive formatting requirements, ensuring efficient and effective disk management in your Windows environment.