
The Quick Access Toolbar
The Quick Access Toolbar in Microsoft Word is a handy feature that allows you to customize and access frequently used commands with just a click. Located at the top left corner of the Word window, it provides quick access to various commands, saving you valuable time and effort. Let’s take a closer look at some of the commands available in the Quick Access Toolbar.
1. Save: The Save command allows you to save your document with a single click. It is essential to save your work regularly to avoid losing any changes.
2. Undo/Redo: The Undo command undoes the last action you performed, while the Redo command allows you to redo an action that you have previously undone. These commands are useful when you make a mistake or want to revert back to a previous version of your document.
3. Cut/Copy/Paste: These commands are widely used for editing text. Cut removes the selected text or object and places it on the clipboard, Copy duplicates the selected text or object to the clipboard, and Paste inserts the text or object from the clipboard into your document.
4. Font Formatting: The Quick Access Toolbar also includes commands for font formatting, such as Bold, Italic, Underline, and Font Color. These commands allow you to quickly change the appearance of your text without navigating through various menus.
5. Bullets/Numbering: If you often create lists in your documents, the Bullets and Numbering commands in the Quick Access Toolbar can be a real time-saver. They allow you to quickly apply bullet points or numbering to your text.
6. Find/Replace: The Find and Replace commands help you locate specific words or phrases in your document and replace them with another word or phrase. These commands are particularly useful when working with lengthy documents.
7. Print: The Quick Access Toolbar also provides a Print command, allowing you to start the printing process with a single click. This saves you from having to navigate through multiple menus to access the print options.
These are just a few examples of the commands available in the Quick Access Toolbar. You can customize this toolbar by adding or removing commands to suit your workflow. To do this, simply right-click on the Quick Access Toolbar and select “Customize Quick Access Toolbar.” From there, you can choose from a wide range of commands to add to the toolbar.
Ribbon Commands
The Ribbon in Microsoft Word is a powerful feature that provides a wide range of commands organized into tabs and groups. It is designed to make it easier for users to access various functionalities and tools. Let’s explore some of the commonly used commands available in the Ribbon.
1. Home Tab: The Home tab is where you’ll find the most frequently used commands for formatting and editing your document. It includes commands for font formatting, paragraph alignment, bullets and numbering, and styles.
2. Insert Tab: The Insert tab contains commands for adding different types of content to your document, such as pictures, tables, shapes, charts, and hyperlinks. It also includes headers and footers, page numbers, and other page layout options.
3. Page Layout Tab: The Page Layout tab is where you can find commands related to the overall appearance and layout of your document. It includes commands for setting margins, page orientation, page color, columns, and themes.
4. References Tab: The References tab includes commands for adding citations, footnotes, and endnotes to your document. It also provides tools for creating a table of contents, indexes, and bibliographies.
5. Review Tab: The Review tab is where you can access commands for reviewing and editing your document. It includes tools for spell checking, grammar checking, tracking changes, and adding comments.
6. View Tab: The View tab offers commands for changing the view of your document. You can switch between different modes like Print Layout, Full Screen, and Web Layout. It also provides zoom options for adjusting the document’s magnification.
7. Developer Tab: If you’re an advanced user or a developer, you can enable the Developer tab in the Ribbon. This tab includes commands for creating and managing macros, adding form controls, and accessing XML features.
These are just a few examples of the commands available in the Ribbon. Each tab contains multiple groups of related commands to help you accomplish specific tasks efficiently. The Ribbon can be customized by adding or removing commands and even creating custom tabs, allowing you to tailor it to your specific needs.
Keyboard Shortcuts
Keyboard shortcuts in Microsoft Word are a great way to increase your productivity and navigate through various commands quickly. Instead of using the mouse to access specific features, you can simply press a combination of keys to perform the desired action. Here are some commonly used keyboard shortcuts in Microsoft Word:
1. Ctrl + S: This combination saves your document. It’s a quick way to ensure your work is saved without interrupting your flow.
2. Ctrl + Z: Undo the last action. If you make a mistake, press this combination to revert back to the previous state of your document.
3. Ctrl + Y: Redo an action that you have previously undone. You can use this shortcut to restore a change that you wish to bring back.
4. Ctrl + C: Copy selected text or objects to the clipboard. This command allows you to duplicate content for pasting elsewhere in your document.
5. Ctrl + X: Cut selected text or objects and move them to the clipboard. This combination eliminates the need to use the mouse for cutting content.
6. Ctrl + V: Paste content from the clipboard into your document. This shortcut efficiently inserts copied or cut content without the need to navigate through menus.
7. Ctrl + B: Apply bold formatting to selected text. It makes the text appear thicker and more prominent.
8. Ctrl + I: Italicize selected text. This shortcut adds a slant to the text for emphasis or stylistic purposes.
9. Ctrl + U: Underline selected text. This combination is commonly used to highlight or emphasize specific words or phrases.
10. Ctrl + F: Open the Find dialog box. It allows you to search for specific words or phrases within your document.
Remember, these are just a few examples of keyboard shortcuts in Word. There are many more shortcuts available for various commands, formatting options, and navigation tasks. You can also customize or create your own keyboard shortcuts by going to the “Customize Keyboard” option in the Word settings.
Using keyboard shortcuts can significantly speed up your workflow and reduce the need to constantly switch between mouse and keyboard. Practice these shortcuts regularly, and they’ll become second nature, boosting your efficiency and productivity when working in Microsoft Word.
Customizing Macros
Macros in Microsoft Word allow you to automate repetitive tasks by recording a sequence of commands and actions. However, you can also customize macros to suit your specific needs and make them even more powerful and efficient. Let’s explore how you can customize macros in Word.
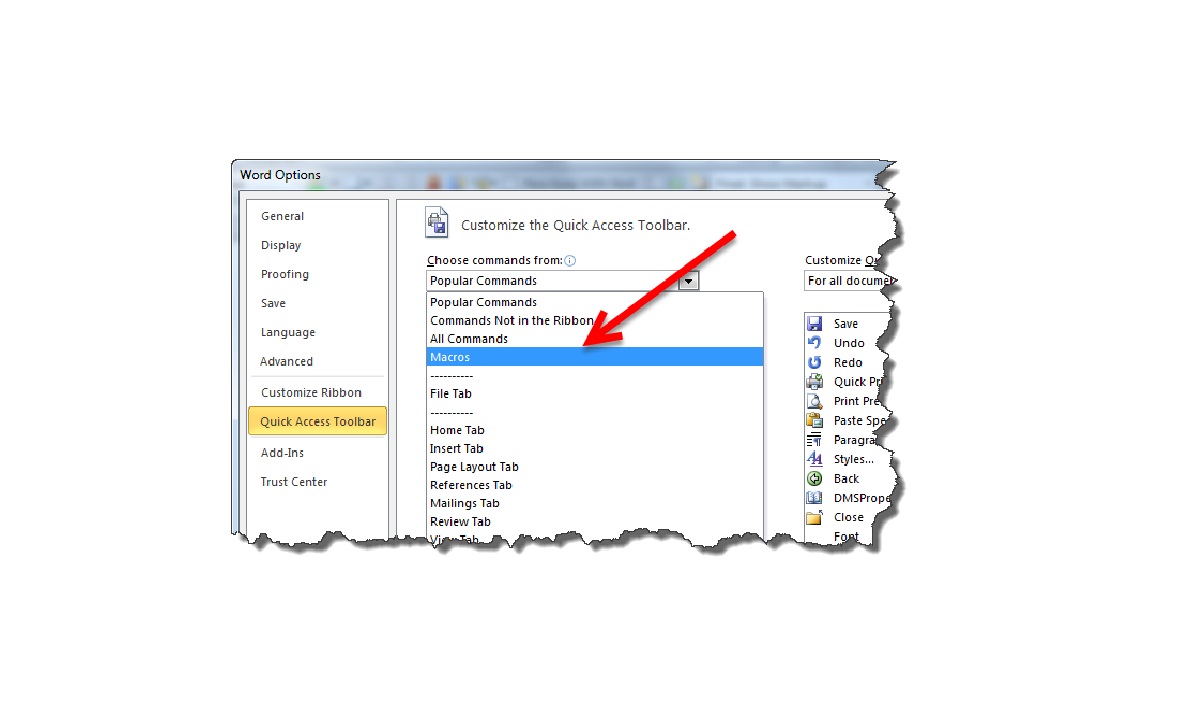
1. Assigning Macro to a Button: By default, macros are accessible through the “Macros” option in the “View” tab. However, to make them easily accessible, you can assign them to buttons on the Ribbon or the Quick Access Toolbar. This allows you to execute the macro with a simple click, saving you time and effort.
2. Creating Keyboard Shortcuts: If you prefer using keyboard shortcuts over buttons, you can assign your macros to specific key combinations. This allows you to trigger the macro by pressing the assigned keys, providing an even quicker way to execute your automated tasks.
3. Editing Macros: If you want to make changes to a recorded macro, you can access the Visual Basic for Applications (VBA) editor. This gives you full control over the macro’s code, allowing you to modify, add, or remove commands and actions as needed. By editing the macro, you can fine-tune its functionality and customize it to better suit your requirements.
4. Adding Arguments and Parameters: To make your macros more flexible and adaptable, you can add arguments and parameters. These allow you to pass values to the macro when it is executed, enabling you to perform different actions based on the provided inputs. Arguments and parameters make your macros more versatile and capable of handling various scenarios.
5. Organizing and Grouping Macros: As you create more macros, it’s a good idea to organize and group them for easier navigation. You can create custom macro groups in the “Macros” dialog box, allowing you to categorize and group related macros together. This organization helps you locate and manage your macros efficiently, especially when dealing with a large number of automated tasks.
Remember, the ability to customize macros requires a basic understanding of VBA programming. If you are new to VBA, there are plenty of resources available online to help you learn and enhance your skills. With a little practice and experimentation, you can unleash the full potential of macros and customize them to streamline your workflow in Microsoft Word.
Macros for Document Formatting
Macros in Microsoft Word can be incredibly useful for automating document formatting tasks. Whether you need to consistently apply specific formatting styles, adjust margins and spacing, or perform other formatting actions, macros can save you time and ensure consistent formatting across your documents. Let’s explore some macros that can help you with document formatting.
1. Apply Formatting Styles: If you frequently use specific formatting styles, you can create a macro to apply them with a single click. For example, you can record a macro that applies the “Heading 1” style to selected text, allowing you to quickly and consistently format headings throughout your document.
2. Adjust Margins and Spacing: Macros can also help you adjust margins, indentations, and line spacing in your document. For instance, you can create a macro that sets specific margin values or increases the line spacing to create more readable documents. These macros can be particularly useful when working with lengthy documents that require consistent formatting.
3. Insert Headers and Footers: Macros can automate the process of inserting headers and footers. You can create a macro that adds a predefined header or footer to your document, complete with the appropriate formatting and information. This saves you the time and effort of manually adding headers and footers to each page.
4. Table Formatting: Working with tables can be time-consuming, especially when you need to format them consistently. With macros, you can automate table formatting tasks. For example, you can create a macro that applies a specific table style, adjusts column widths, or adds and removes borders. These macros can greatly simplify the process of formatting tables in your documents.
5. Bullets and Numbering: Macros can streamline the process of applying bullets and numbering to your documents. You can create a macro that automatically applies a predefined bullet or numbering style to selected text or paragraphs. This saves you the hassle of manually adjusting indentation levels or changing bullet styles.
6. Page Numbering: If you need to insert and format page numbers, macros can simplify the task. You can create a macro that automatically inserts and formats page numbers according to your desired specifications. These macros can ensure consistency in page numbering across your entire document.
These are just a few examples of how macros can help with document formatting in Microsoft Word. By automating repetitive formatting tasks, macros can save you valuable time and ensure consistent formatting throughout your documents. Whether you’re working on a single document or managing multiple files, macros can be a valuable tool in your formatting arsenal.
Macros for Text Editing
Macros in Microsoft Word can be incredibly powerful when it comes to automating text editing tasks. From find and replace operations to manipulating text content, macros can save you time and effort while ensuring accuracy and consistency. Let’s explore some macros that can assist you with text editing.
1. Find and Replace: Macros can automate complex find and replace operations. For example, you can create a macro that finds specific words or phrases and replaces them with another word or phrase throughout your document. This can be especially helpful when working with large documents or when performing repetitive edits.
2. Text Formatting: Macros can automate text formatting tasks, such as changing font styles, sizes, or colors. For instance, you can create a macro that changes the formatting of selected text to bold, italic, or underline. This can save you time when applying consistent formatting throughout your document.
3. Remove Formatting: If you need to remove formatting from selected text or paragraphs, macros can help streamline the process. You can create a macro that removes all formatting and resets the text to its default style. This can be useful when copying and pasting content from different sources with various formatting styles.
4. AutoCorrect and AutoFormat: Macros can extend the functionality of AutoCorrect and AutoFormat features in Word. You can create macros to define and apply custom autocorrect rules or automate specific autocorrect actions. Similarly, macros can be used to create custom AutoFormat rules to automatically format text based on specific patterns or triggers.
5. Sort and Rearrange Text: Macros can automate the process of sorting and rearranging text. For example, you can create a macro that sorts a list of names alphabetically or rearranges paragraphs in a specific order. This can be beneficial when working with lengthy documents or when you need to organize text in a particular way.
6. Text Manipulation: Macros can assist in manipulating the content of your document in various ways. You can create macros to extract specific information, generate tables of contents based on document headings, or convert text to a different case (e.g., lowercase or uppercase). These macros can simplify tasks that would otherwise be time-consuming and error-prone.
These are just a few examples of how macros can enhance text editing in Microsoft Word. With the ability to automate repetitive tasks and apply complex operations, macros can help you work more efficiently and ensure consistency in your text editing processes.
Macros for Navigation and Selection
Macros in Microsoft Word can be incredibly useful for enhancing navigation and selection capabilities within your documents. Whether you need to quickly move around your document, select specific sections, or navigate through complex layouts, macros can save you time and effort. Let’s explore some macros that can assist you with navigation and selection tasks.
1. Go to Specific Page or Location: Macros can automate the process of navigating to a specific page or location within your document. You can create a macro that prompts you to enter a page number or a specific bookmark name and then jumps directly to that page or location. This saves you the time and effort of scrolling or searching manually.
2. Select Text with Specific Formatting: Macros can help you select text with specific formatting attributes. For example, you can create a macro that selects all text formatted with a particular font style or a specific color. This allows you to quickly identify and manipulate specific sections of your document.
3. Navigate Through Headings: If your document contains headings, macros can assist you in navigating through them. You can create a macro that jumps between different heading levels, allowing you to quickly move within the structure of your document. This is particularly useful when working with long documents or complex outlines.
4. Select Text by Styles: Macros can help you select text based on specific formatting styles. For instance, you can create a macro that selects all text formatted with a specific heading style or a particular paragraph style. This can be handy when you want to apply consistent formatting or make bulk changes to specific sections.
5. Navigate through Tables: Macros can automate navigation within tables. You can create a macro that moves the cursor to the next or previous cell, row, or column within a table. This makes it easier to navigate and manipulate tabular data without having to manually click and select each cell.
6. Select and Manipulate Objects: Macros are not limited to selecting and manipulating text. They can also help you select and interact with various objects in your document, such as images, shapes, and charts. You can create a macro that selects specific objects based on their properties or positions, allowing you to perform targeted actions on them.
These examples demonstrate how macros can enhance navigation and selection in Microsoft Word. By automating repetitive tasks and providing quick access to specific sections, macros can improve your efficiency and productivity when working with large or complex documents.
Macros for Tables and Lists
Macros in Microsoft Word can greatly assist in automating tasks related to tables and lists. Whether you need to create, modify, or format tables and lists, macros can save you time and effort by performing these repetitive actions for you. Let’s explore some macros that can help you with tables and lists in Word.
1. Create Tables: Macros can automate the process of creating tables. You can record a macro that inserts a pre-defined table structure or prompts you to enter the desired number of rows and columns. This saves you the time and effort of manually creating tables and ensures consistent formatting.
2. Format Tables: Macros can streamline the process of formatting tables. You can create a macro that applies a specific table style, adjusts cell borders, sets column widths, or performs other formatting actions. This ensures consistent formatting across multiple tables and saves you from manually adjusting each individual table.
3. Sort and Filter Table Data: Macros can assist in sorting and filtering table data. For example, you can create a macro that sorts table rows based on a specific column or applies custom filter criteria to display only specific data. This automation simplifies the management of large and complex tables.
4. Convert Lists to Tables and Vice Versa: Macros can automate the conversion of lists to tables and vice versa. You can create a macro that converts a bulleted or numbered list into a table or transforms a table into a list. This conversion process can be helpful when reorganizing data or changing the structure of your document.
5. Automatically Number Lists: Macros can automate list numbering. For instance, you can create a macro that automatically numbers each list item in a desired format or style. This saves you the time and effort of manually numbering each item and ensures consistency throughout your document.
6. Table and List Editing: Macros can simplify table and list editing tasks. You can create macros that insert or delete rows and columns, merge or split cells, or perform other editing actions. These macros streamline the editing process and reduce the need for manual adjustments.
These examples demonstrate the versatility and convenience of macros when working with tables and lists in Microsoft Word. By automating repetitive tasks and providing consistent formatting, macros can improve efficiency and productivity when dealing with structured data in your documents.
Macros for Headers and Footers
Macros in Microsoft Word can be incredibly helpful when working with headers and footers in your documents. Whether you need to automate the insertion of headers and footers, customize their content, or apply consistent formatting, macros can save you time and ensure uniformity. Let’s explore some macros that can assist you with headers and footers in Word.
1. Insert Headers and Footers: Macros can automate the process of inserting headers and footers into your document. You can create a macro that inserts a pre-defined header or footer with the desired content, such as page numbers, document title, or author name. This saves you the time and effort of manually inserting headers and footers on each page.
2. Customize Header and Footer Content: Macros can be used to customize the content of headers and footers. For example, you can create a macro that inserts the current date or time in the header, updates the document title with the file name, or includes a dynamic page count in the footer. This level of customization ensures that the header and footer content stays up to date without manual intervention.
3. Apply Conditional Headers and Footers: Macros can assist in applying different headers and footers based on specific conditions. For instance, you can create a macro that checks the document section or page number and inserts a different header or footer accordingly. This automation allows you to have different header and footer content for various sections or pages within your document.
4. Format Headers and Footers: Macros can simplify the process of formatting headers and footers. You can create a macro that applies consistent formatting, such as font styles, colors, or alignments, to headers and footers throughout your document. This ensures a professional and cohesive look for the headers and footers.
5. Update Headers and Footers: Macros can automate the updating of headers and footers across your document. You can create a macro that updates the header or footer content, such as the date or page numbers, throughout the entire document with a single click. This eliminates the need to manually update each individual header or footer when changes occur.
6. Delete Headers and Footers: Macros can assist in removing headers and footers from your document. You can create a macro that deletes or clears the header and footer content, allowing you to start fresh or remove unwanted headers and footers from specific sections or pages.
These examples demonstrate the power of macros in handling headers and footers in Microsoft Word. By automating the process of insertion, customization, formatting, and updating, macros can save you time and effort while ensuring consistency and professionalism in your document headers and footers.
Macros for Page Layout
Macros in Microsoft Word can be incredibly valuable when it comes to managing page layout in your documents. Whether you need to automate tasks related to margins, page orientation, page size, or other layout settings, macros can save you time and ensure consistency. Let’s explore some macros that can assist you with page layout in Word.
1. Set Margins and Indentation: Macros can automate the process of setting margins and indentation in your document. You can create a macro that adjusts the top, bottom, left, and right margins according to your desired specifications. Additionally, you can create macros that set indentation levels for paragraphs, saving you the effort of manually adjusting margins and indentation.
2. Change Page Orientation: Macros can assist in changing the page orientation of your document. You can create a macro that switches between landscape and portrait orientation with a single click. This automation can be useful when you have a section or page that needs a different orientation than the rest of your document.
3. Adjust Page Size: Macros can automate the process of adjusting the page size of your document. You can create a macro that sets the page size to a predefined value or prompts you to enter custom dimensions. This saves you from manually changing the page size and ensures uniformity throughout your document.
4. Apply Page Breaks: Macros can streamline the insertion of page breaks in your document. You can create a macro that automatically inserts a page break at a specific point, such as after a particular paragraph or section. This automation ensures proper page breaks and eliminates the need for manual adjustments.
5. Add Watermarks: Macros can assist in adding watermarks to your document. You can create a macro that inserts predefined text or images as watermarks on each page or at specific locations. This automation enhances the look and feel of your document without the hassle of manually adding watermarks.
6. Customize Headers and Footers for Odd/Even Pages: Macros can automate the customization of headers and footers for odd and even pages. You can create a macro that applies different header or footer content or formatting to odd and even pages, providing further customization and versatility to your document.
These examples showcase how macros can enhance page layout management in Microsoft Word. By automating tasks related to margins, orientation, page size, page breaks, watermarks, and header/footer customization, macros can save you time and ensure consistency and professionalism in your document’s page layout.
Macros for Reviewing and Editing
Macros in Microsoft Word can greatly enhance the process of reviewing and editing your documents. From spell checking to tracking changes, macros can automate repetitive tasks, improve efficiency, and ensure accuracy. Let’s explore some macros that can assist you with reviewing and editing in Word.
1. Spell Check: Macros can help in automating the spell check process. You can create a macro that runs the spell check on your document, identifies misspelled words, and suggests corrections. This saves you the time and effort of manually checking each word for spelling errors.
2. Grammar Check: Macros can assist in automating grammar checks. You can create a macro that analyzes your document for grammar errors, such as sentence structure or word usage. This automation helps in improving the overall grammar and readability of your document.
3. Track Changes: Macros can be helpful in automating the tracking of changes in your document. You can create a macro that enables track changes and highlights the revisions made in the document. This automation simplifies the reviewing and editing process, especially when collaborating with other users.
4. Apply Formatting Consistency: Macros can ensure consistency in formatting throughout your document. You can create a macro that applies a predefined formatting style, such as font size or paragraph spacing, to selected text or paragraphs. This saves you the time and effort of manually adjusting formatting inconsistencies.
5. Find and Replace: Macros can streamline the find and replace operations in your document. You can create a macro that finds specific words or phrases and replaces them with another word or phrase throughout the document. This automation helps in making bulk changes and saves you from manually searching and replacing each occurrence.
6. AutoSummarize: Macros can assist in summarizing large documents. You can create a macro that generates a summarized version of your document, highlighting key points or important information. This automation enables you to quickly review the main content of your document without reading it in its entirety.
These examples demonstrate how macros can enhance the reviewing and editing process in Microsoft Word. By automating spell checks, grammar checks, tracking changes, formatting consistency, find and replace, and summarization tasks, macros ensure accuracy, improve efficiency, and save you time and effort during the reviewing and editing stages of your document.
Macros for Mail Merge
Macros in Microsoft Word can significantly enhance the mail merge process, allowing you to automate the creation of personalized documents, such as letters, envelopes, or labels. By leveraging macros in mail merge, you can streamline repetitive tasks, customize content, and improve efficiency. Let’s explore some macros that can assist you with mail merge in Word.
1. Data Source Connection: Macros can automate the process of connecting to your data source. You can create a macro that establishes the connection to your database, spreadsheet, or other data file. This saves you the time and effort of manually selecting and linking the data source for your mail merge.
2. Field Mapping: Macros can assist in mapping fields from your data source to the placeholders in your mail merge document. You can create a macro that automatically maps the appropriate fields, ensuring accurate data transfer. This automation eliminates the need for manual field mapping for each merge.
3. Conditional Mail Merge: Macros can automate the process of applying conditions to your mail merge. For example, you can create a macro that performs different actions based on specific criteria in the data source, such as excluding certain records or formatting content differently based on data values. This automation allows for dynamic and personalized document generation.
4. Content Customization: Macros can help in customizing the content of the mail merge documents. You can create a macro that dynamically inserts personalized information from the data source, such as names, addresses, or other details. This automation ensures individualized content for each recipient without manual intervention.
5. Document Generation: Macros can streamline the generation of multiple merged documents. You can create a macro that automatically performs the merge process for each record in the data source, saving each document with a unique file name or formatting it for printing. This automation eliminates the need for manual generation of each individual merged document.
6. Document Formatting: Macros can assist in formatting the merged documents. You can create a macro that applies consistent formatting, such as font styles, headers, footers, or page numbering, to each merged document. This automation ensures a professional and unified look across all the merged documents.
These examples illustrate how macros can enhance the mail merge process in Microsoft Word. By automating data source connections, field mapping, conditional merge, content customization, document generation, and formatting, macros simplify the creation of personalized and bulk documents, improving efficiency and saving you time and effort.
Macros for Printing
Macros in Microsoft Word can greatly enhance the printing process, allowing you to automate various tasks and customize print options. Whether you need to print multiple documents, apply specific settings, or automate the entire print workflow, macros can save you time and improve efficiency. Let’s explore some macros that can assist you with printing in Word.
1. Print Multiple Documents: Macros can streamline the process of printing multiple documents. You can create a macro that opens and prints a list of selected documents or all documents in a specific folder. This automation saves you the effort of individually opening and printing each document.
2. Print Selected Pages: Macros can assist in printing specific pages within a document. For example, you can create a macro that prompts you to enter the desired page range and then prints only those pages. This automation allows for selective printing, eliminating the need to print the entire document.
3. Set Print Options: Macros can automate the process of setting print options. You can create a macro that defines specific settings such as paper size, orientation, margins, or number of copies. This automation ensures consistent print settings across multiple documents, saving you the time and effort of adjusting settings for each print job.
4. Print Preview: Macros can help in automating the print preview process. You can create a macro that displays the print preview of the current document, allowing you to review the layout and make necessary adjustments before printing. This automation ensures accurate printing and prevents wasted paper and ink.
5. Print Customization: Macros can assist in customizing the printing process. You can create a macro that applies specific formatting or page setup options before printing. This automation allows for special print customization such as duplex printing, watermarks, or scaling, without manually adjusting the settings each time.
6. Print Automation: Macros can automate the entire printing workflow. For example, you can create a macro that performs a sequence of actions, such as opening a document, adjusting print settings, previewing the document, and finally printing it. This automation simplifies the printing process, especially when dealing with multiple documents or complex print jobs.
These examples demonstrate how macros can enhance the printing experience in Microsoft Word. By automating tasks such as printing multiple documents, setting print options, customizing the print process, and streamlining the print workflow, macros save you time, effort, and ensure efficient and accurate printing.
Macros for File Operations
Macros in Microsoft Word can be incredibly valuable for automating various file operations, allowing you to streamline tasks related to file management and organization. Whether you need to create, save, open, rename, or delete files, macros can save you time and effort by performing these repetitive actions for you. Let’s explore some macros that can assist you with file operations in Word.
1. Create New Documents: Macros can automate the process of creating new documents. You can create a macro that opens a pre-defined template or prompts you to enter specific information to create a new document. This automation saves you the time and effort of manually setting up a new document each time.
2. Save Documents: Macros can assist in automating the process of saving documents. You can create a macro that automatically saves the current document with a predefined file name or in a specific location. This automation ensures that your work is saved without the need for manual interaction.
3. Open Documents: Macros can streamline the process of opening documents. You can create a macro that opens a specific document from a predefined location or allows you to browse and select a file to open. This automation saves you time and effort by eliminating the need to navigate through multiple folders.
4. Rename Documents: Macros can automate the process of renaming documents. You can create a macro that prompts you to enter a new file name and automatically renames the current document accordingly. This automation ensures that your files are accurately and consistently named.
5. Delete Documents: Macros can help in automating the deletion of documents. You can create a macro that prompts you to confirm the deletion of the current document and immediately moves it to the recycle bin or permanently deletes it. This automation simplifies the process of cleaning up and managing your files.
6. File Organization: Macros can assist in organizing files within folders. You can create a macro that moves documents to specific folders based on predefined criteria or prompts you to select a folder for file organization. This automation helps in keeping your files organized and easily accessible.
These examples illustrate how macros can enhance file operations in Microsoft Word. By automating tasks such as creating new documents, saving, opening, renaming, deleting, and file organization, macros save you time and effort in managing and maintaining your files efficiently.
Macros for Automating Tasks
Macros in Microsoft Word are incredibly powerful for automating a wide range of tasks, helping you save time, improve efficiency, and streamline your workflow. From automating repetitive actions to performing complex operations, macros are a valuable tool for increasing productivity. Let’s explore some macros that can assist you in automating tasks in Word.
1. Formatting Automation: Macros can automate formatting tasks, such as applying consistent styles, fonts, or colors throughout your document. You can create a macro that applies pre-defined formatting to selected text or paragraphs, saving you the time and effort of manually adjusting formatting repeatedly.
2. Data Entry Automation: Macros can simplify data entry tasks by automating the input process. For example, you can create a macro that prompts you to enter specific data and automatically copies it to the desired location in your document. This automation eliminates the need for repetitive typing and ensures accuracy in data entry.
3. Report Generation: Macros can automate the process of generating reports. You can create a macro that compiles and organizes data from multiple sources, formats it, and generates a comprehensive report. This automation saves you the time and effort of manually collecting and formatting data for each report.
4. Task Sequencing: Macros can assist in automating a sequence of tasks. You can create a macro that performs a series of actions, such as opening specific documents, applying formatting, performing calculations, and saving the results. This automation simplifies complex tasks by reducing manual intervention and ensuring consistency.
5. Data Analysis: Macros can streamline data analysis tasks. You can create a macro that performs calculations, sorts and filters data, applies formulas, and generates reports or charts based on the analysis. This automation saves you time and effort in analyzing data and provides you with meaningful insights.
6. Email Automation: Macros can automate email-related tasks. You can create a macro that generates pre-defined email templates, inserts personalized content, attaches files, and sends the emails automatically. This automation streamlines the process of sending repetitive emails and improves communication efficiency.
These are just a few examples of how macros can automate tasks in Microsoft Word. With the ability to automate formatting, data entry, report generation, task sequencing, data analysis, and email-related tasks, macros empower you to work more efficiently and effectively.