
Clear Your Gmail App Storage
If your Gmail app on Android is running slow or if you’re running out of storage space, clearing the app’s storage can help to optimize its performance. Here’s how you can delete Gmail emails faster on your Android device:
1. Open the Settings app on your Android device.
2. Scroll down and tap on “Apps” or “Applications.”
3. Find and tap on “Gmail” in the list of installed apps.
4. Tap on “Storage” and then select “Clear Storage” or “Clear Data.”
5. A warning message will appear informing you that this will delete all the data associated with the Gmail app, including emails and attachments. Confirm the deletion by tapping on “OK” or “Clear.”
This process will remove all your Gmail account data from the app, including emails, attachments, and settings. However, please note that this won’t delete your emails from the Gmail server. You will still be able to access your emails from other devices or the Gmail web interface.
After clearing the app storage, you can reopen the Gmail app, sign in to your account, and the app will start fresh. This can help improve the app’s performance and resolve any issues you may have been experiencing.
Remember to back up any important emails or attachments before clearing the app storage, as this action is irreversible and will delete all local data. You can save important emails by forwarding them to another email address or by downloading attachments to your device.
By periodically clearing the Gmail app storage, you can ensure that your device has enough space for new emails and prevent any lag or slowdowns. It’s a simple and effective way to keep your Gmail app running smoothly on your Android device.
Use the “All Mail” Label to Delete Emails
If you want to delete Gmail emails faster on your Android device, using the “All Mail” label can be an efficient method. Follow these steps:
1. Launch the Gmail app on your Android device.
2. Tap on the menu icon (three horizontal lines) located at the top-left corner of the screen.
3. Scroll down the menu and tap on “All Mail.”
4. Here, you’ll find a list of all the emails in your Gmail account, including those that are archived or in other folders.
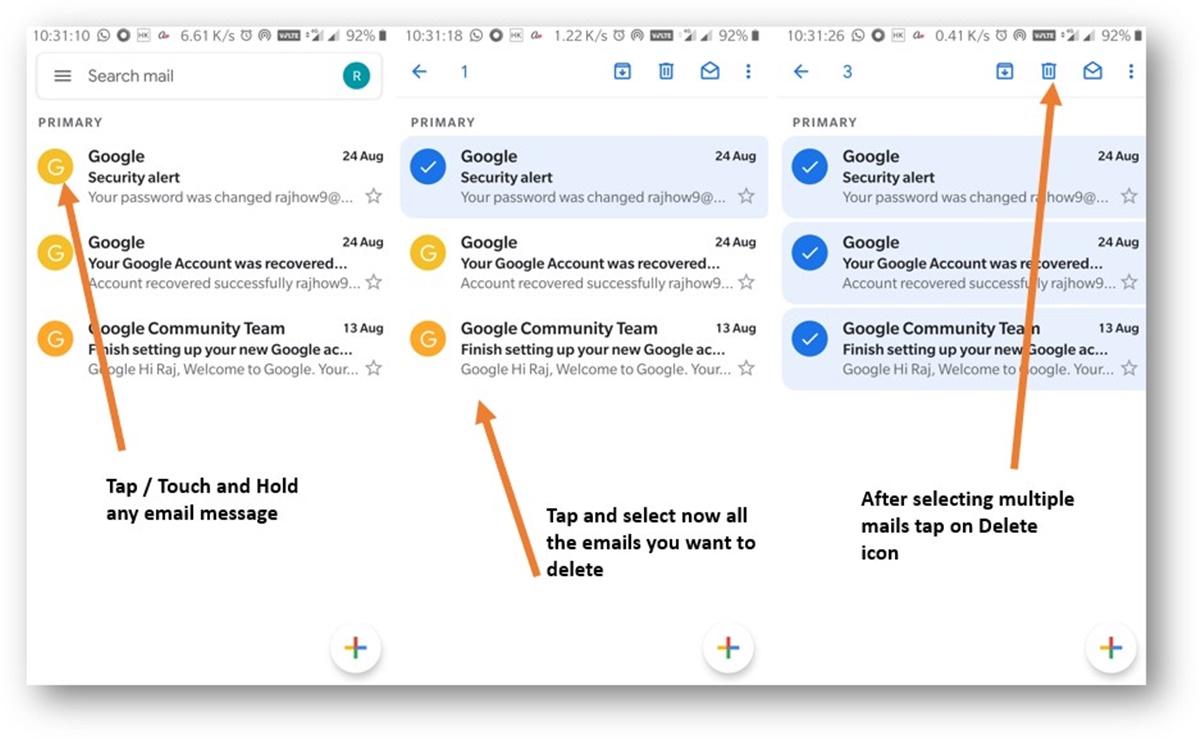
5. Select the emails you want to delete by tapping on the checkboxes next to each email. You can select multiple emails at once.
6. Once you’ve selected the emails you want to delete, tap on the trash bin icon or the delete icon, typically located at the top or bottom of the screen.
By using the “All Mail” label, you can view and select all your emails in one place, making it easier to delete multiple emails at once. This method is particularly useful when you want to clear out a significant number of emails without manually searching through various folders.
Remember that deleting emails using this method will permanently remove them from your Gmail account. Once deleted, these emails cannot be recovered. If you’re unsure about deleting certain emails, it’s a good idea to archive them instead.
Archiving emails allows you to remove them from your inbox without deleting them completely. Archived emails are moved to the “All Mail” folder, where they can be easily accessed if needed. To archive an email, simply select it and tap on the archive icon instead of the delete icon.
By utilizing the “All Mail” label in the Gmail app, you can efficiently delete unwanted emails from your Android device without the need to navigate through individual folders. It’s a convenient way to declutter your inbox and free up storage space, ensuring smooth and efficient email management.
Archive or Delete Multiple Emails at Once
If you want to streamline your email management and quickly declutter your inbox on your Android device, archiving or deleting multiple emails at once can be a time-saving solution. Here’s how you can accomplish this:
1. Launch the Gmail app on your Android device.
2. Go to your inbox or the desired label or folder where the emails you want to archive or delete are located.
3. Tap on the checkbox next to the first email you want to select. This will activate the selection mode.
4. Scroll through your inbox or swipe up/down to select additional emails. Each selected email will have a small checkbox next to it.
5. If you want to select all emails in the current view, tap on the checkbox icon located at the top or bottom of the screen.
6. Once you have selected the emails you want to archive or delete, tap on the archive icon or the trash bin icon, respectively.
Archiving emails removes them from your inbox and saves them in the “All Mail” folder. This allows you to keep your inbox organized while still having access to the archived emails when needed. Deleting emails, on the other hand, permanently removes them from your Gmail account.
It’s worth mentioning that archiving or deleting multiple emails at once may cause them to bypass the “Trash” folder and be permanently deleted. Ensure that you review the selected emails before proceeding to avoid unintentional permanent deletion.
If you accidentally archive or delete an email and want to undo it, you can shake your device immediately after the action, and a pop-up will appear asking if you want to undo the action. This feature provides a safety net in case of any accidental deletions or archivings.
By utilizing the option to archive or delete multiple emails at once, you can efficiently manage your inbox and maintain an organized email system on your Android device. It’s an effective way to stay on top of your emails and ensure a clutter-free and streamlined email experience.
Use Filters to Automatically Delete Emails
Managing a rapidly filling inbox can be challenging, but Gmail provides an effective solution through its filter feature. By creating filters, you can automatically delete specific types of emails, reducing manual effort and keeping your inbox organized. Follow these steps to set up filters on your Android device:
1. Open the Gmail app on your Android device.
2. Tap on the menu icon (three horizontal lines) located at the top-left corner of the screen.
3. Scroll down and tap on “Settings.”
4. Select your Gmail account from the list of accounts, if you have multiple accounts configured.
5. Tap on “Manage your Google Account.”
6. In the Google Account settings, go to “Data & personalization” and tap on “Manage your data.”
7. Scroll down to find “Gmail” and tap on it.
8. Under the “Gmail settings” section, tap on “Filters and blocked addresses.”
9. Tap on the plus icon (+) to create a new filter.
10. Specify the criteria for the filter, such as sender, recipient, subject, keywords, or other relevant attributes.
11. Once you have set the filter criteria, tap on “Create filter.”
12. Choose the action you want the filter to perform, such as “Delete it.”
13. Verify the filter settings and tap on “Create filter” to save it.
With filters set up, Gmail will automatically perform the specified actions on incoming emails that meet the filter criteria. This includes deleting them, keeping your inbox clutter-free without your intervention.
Remember that you can create multiple filters to handle different types of emails. For example, you can create filters to delete promotional emails, newsletters, or emails from specific senders or domains that you no longer wish to receive.
To review or modify your filters at any time, follow the same steps outlined above and select the desired filter to make changes.
Using filters to automatically delete emails is an efficient way to manage your inbox and reduce the time spent manually deleting unwanted emails. It helps you stay organized and ensures that your inbox contains only the most relevant and important messages on your Android device.
Enable Swipe Gestures to Quickly Delete Emails
If you’re looking for a faster and more convenient way to delete Gmail emails on your Android device, enabling swipe gestures can be a game-changer. By customizing swipe actions, you can swiftly delete emails with a simple swipe. Follow these steps to enable swipe gestures in the Gmail app:
1. Launch the Gmail app on your Android device.
2. Tap on the menu icon (three horizontal lines) located at the top-left corner of the screen.
3. Scroll down and tap on “Settings.”
4. Select your Gmail account from the list of accounts, if you have multiple accounts configured.
5. Tap on “General settings.”
6. In the “Swipe actions” section, tap on “Change.”
7. Choose the swipe action you want to set as “Delete.”
8. Tap on “Save” or “OK” to confirm the change.
Once you’ve enabled swipe gestures, you can now delete emails by swiping them in the specified direction. The exact swipe direction and customization options may vary depending on your device and Gmail app version.
For example, you can set a right swipe gesture to delete emails, allowing you to swiftly and effortlessly remove unwanted emails from your inbox. Alternatively, you may have the option to set swipe gestures for archiving, marking as read/unread, or other actions, depending on your preference.
Enabling swipe gestures saves you time and effort, as you no longer have to select emails individually and tap on the delete icon. With a simple swipe, you can quickly declutter your inbox and keep it organized on your Android device.
Remember that swipe gestures are customizable, and you can modify them to suit your preferences. If you change your mind or prefer a different action, you can revisit the swipe actions settings and adjust them accordingly.
By enabling swipe gestures in the Gmail app, you can streamline your email management and delete emails with a single swipe. It’s a convenient and efficient way to keep your inbox tidy and improve your overall email experience on your Android device.
Use the Search Bar to Find and Delete Emails
Searching for specific emails in your Gmail inbox can be a time-saving solution when you want to delete particular messages on your Android device. The search bar in the Gmail app allows you to quickly find and delete emails based on various criteria. Here’s how you can use the search bar effectively:
1. Open the Gmail app on your Android device.
2. Tap on the search bar located at the top of the screen.
3. Enter the search criteria for the emails you want to delete. This can include a sender’s name or email address, keywords, subject lines, or specific phrases.
4. As you type, Gmail will display the search results in real-time, narrowing down the list of emails based on your entered criteria.
5. Review the search results and select the emails you want to delete by tapping on the checkboxes next to each email.
6. Once you’ve selected the emails, tap on the trash bin icon or the delete icon to delete them.
The search bar makes it easy to locate specific emails, even if they are buried deep in your inbox. You can refine your search by using advanced search operators or filters such as “from:”, “to:”, “subject:”, “has:”, or “has:attachment” to narrow down the results further.
It’s important to note that when you delete emails using the search bar, they will be permanently removed from your Gmail account. Double-check your selection before deleting to avoid removing any important or necessary emails.
Using the search bar to find and delete emails is a time-efficient way to declutter your inbox and streamline your email management on your Android device. It allows you to target specific emails and remove them quickly and easily, ensuring a clean and organized inbox.
Remember to periodically check your deleted folder (Trash) to review and permanently delete any emails you no longer need. This action helps to free up storage space and keeps your Gmail account optimized for smooth performance.
By leveraging the search functionality within the Gmail app, you can easily locate and delete emails that match specific criteria, saving you valuable time and providing a hassle-free email management experience on your Android device.
Delete Emails from the Gmail Web Interface
If you prefer managing your Gmail emails from a web browser, the Gmail web interface provides a seamless way to delete emails. Here’s how you can delete emails from the Gmail web interface:
1. Open your preferred web browser on your computer.
2. Go to the Gmail website by typing “www.gmail.com” in the address bar and press Enter.
3. Sign in to your Gmail account using your email address and password.
4. Once you’re logged in, navigate to your inbox or the specific label or folder containing the emails you want to delete.
5. Select the emails you wish to delete by clicking on the checkboxes next to each email. You can select multiple emails at once.
6. Once you’ve selected the emails, click on the trash bin icon or the delete icon, typically located at the top or bottom of the inbox.
The selected emails will be moved to the “Trash” folder in your Gmail account. From there, they will be automatically deleted after 30 days, or you can manually empty the trash bin to permanently remove the emails.
In addition to deleting individual emails, you also have the option to delete entire conversations. By selecting a conversation and clicking on the delete icon, you can remove all the emails within that conversation, making it a convenient way to clean up group or ongoing email threads.
Remember that deleting emails from the Gmail web interface will also delete them from any devices where your Gmail account is synced, including your Android device. However, the emails will remain in the “Trash” folder for a certain period before being permanently deleted.
By using the Gmail web interface to delete emails, you can efficiently manage and declutter your inbox from the convenience of your computer. It provides all the necessary tools and functionalities to keep your Gmail account organized and optimized for an efficient email experience.
Ensure you double-check your selection before deleting any emails and regularly check the “Trash” folder to permanently delete unnecessary emails, keeping your Gmail account streamlined and free from clutter.
The Delete feature in the Gmail web interface makes it simple to remove unwanted emails and maintain an organized email system on your computer.
Remove Emails from the “Trash” Folder
When you delete emails in Gmail, they are moved to the “Trash” folder where they remain for a certain period of time. However, if you want to permanently remove emails from the “Trash” folder, you can do so easily. Here’s how you can remove emails from the “Trash” folder:
1. Open your preferred web browser on your computer.
2. Go to the Gmail website by typing “www.gmail.com” in the address bar and press Enter.
3. Sign in to your Gmail account using your email address and password.
4. On the left side of the Gmail interface, find and click on the “Trash” folder in the list of labels.
5. Here, you will see a list of emails that have been deleted and moved to the “Trash” folder.
6. Select the emails you want to remove from the “Trash” folder by clicking on the checkboxes next to each email. You can select multiple emails at once.
7. Once you’ve selected the emails, click on the delete icon or the trash bin icon to permanently remove them from the “Trash” folder.
When you remove emails from the “Trash” folder, they are permanently deleted from your Gmail account and cannot be recovered. It’s crucial to double-check your selection before removing any emails to avoid accidentally deleting important or necessary messages.
Keep in mind that removing emails from the “Trash” folder frees up storage space in your Gmail account and ensures that your inbox remains clutter-free. It’s a vital step in maintaining an organized and efficient email system.
If you accidentally remove an email from the “Trash” folder and later realize you need it, Gmail provides a limited window of time during which you can attempt to recover permanently deleted emails. To do this, click on the “Bin” icon in the left sidebar, then go to “Trash” and click on “Recover deleted items”
By regularly removing unwanted emails from the “Trash” folder, you can keep your Gmail account optimized and ensure smooth performance. It’s a simple yet essential practice for effective email management.
Remember to also empty your “Spam” folder periodically to completely remove unsolicited emails and further enhance the cleanliness of your Gmail account.
The ability to remove emails from the “Trash” folder allows you to permanently delete unwanted messages, keeping your Gmail account organized and free from unnecessary clutter.
Empty Your Gmail “Spam” Folder
The “Spam” folder in Gmail is designed to catch and filter out unsolicited or potentially harmful emails. Periodically emptying your “Spam” folder is an essential step in maintaining a clean and organized Gmail account. Here’s how you can empty your Gmail “Spam” folder:
1. Open your preferred web browser on your computer.
2. Go to the Gmail website by typing “www.gmail.com” in the address bar and press Enter.
3. Sign in to your Gmail account using your email address and password.
4. On the left side of the Gmail interface, find and click on the “Spam” folder in the list of labels.
5. Here, you will see a list of emails that have been marked as spam by Gmail’s filters.
6. Select all the emails in the “Spam” folder by clicking on the checkbox at the top of the list. You can also individually select specific emails by clicking on the checkboxes next to each email.
7. Once you’ve selected the emails, click on the delete icon or the trash bin icon to permanently remove them from the “Spam” folder.
Emptying your “Spam” folder helps to free up storage space in your Gmail account and ensures that your inbox remains uncluttered with unwanted or potentially harmful emails. The “Spam” folder is automatically cleared periodically by Gmail, but it’s beneficial to manually perform this action to stay on top of your email management.
Gmail’s sophisticated spam filters allow you to trust that the emails in the “Spam” folder are likely harmful or unwanted. However, it’s always good practice to quickly scan through the list before emptying the folder, in case any legitimate emails have been mistakenly marked as spam.
Emptying your “Spam” folder is especially important if you have sensitive or confidential information that may have ended up there by mistake. Double-checking and permanently deleting such emails ensures the security and privacy of your Gmail account.
In addition to emptying your “Spam” folder, it’s recommended to regularly review and update your spam settings in Gmail. This helps train the spam filters to better understand your email preferences and prevent false positives in the future.
By regularly emptying your “Spam” folder, you can maintain a clean and organized Gmail account, free from unwanted or potentially harmful emails. It’s an important step in keeping your inbox efficient and secure.