
How to Set Up Philips Hue Lights with Google Home
Setting up your Philips Hue lights with Google Home is a great way to control your lighting with voice commands and create a seamless smart home experience. Follow these simple steps to get started:
- Ensure Compatibility and Gather Required Materials: Before getting started, make sure that your Philips Hue lights and Google Home device are compatible. You will also need a Philips Hue Bridge, which acts as the central hub for your lights. Gather these materials before proceeding.
- Connect Philips Hue Lights to the Philips Hue Bridge: Plug in the Philips Hue Bridge to a power source and connect it to your home router using the provided Ethernet cable. Once connected, ensure that all your Philips Hue lights are properly powered on and within range of the bridge. The lights should automatically connect to the bridge.
- Set Up the Philips Hue Bridge: Download the Philips Hue app on your smartphone and follow the instructions to set up the bridge. The app will guide you through the process of connecting the bridge to your Wi-Fi network and creating a Philips Hue account.
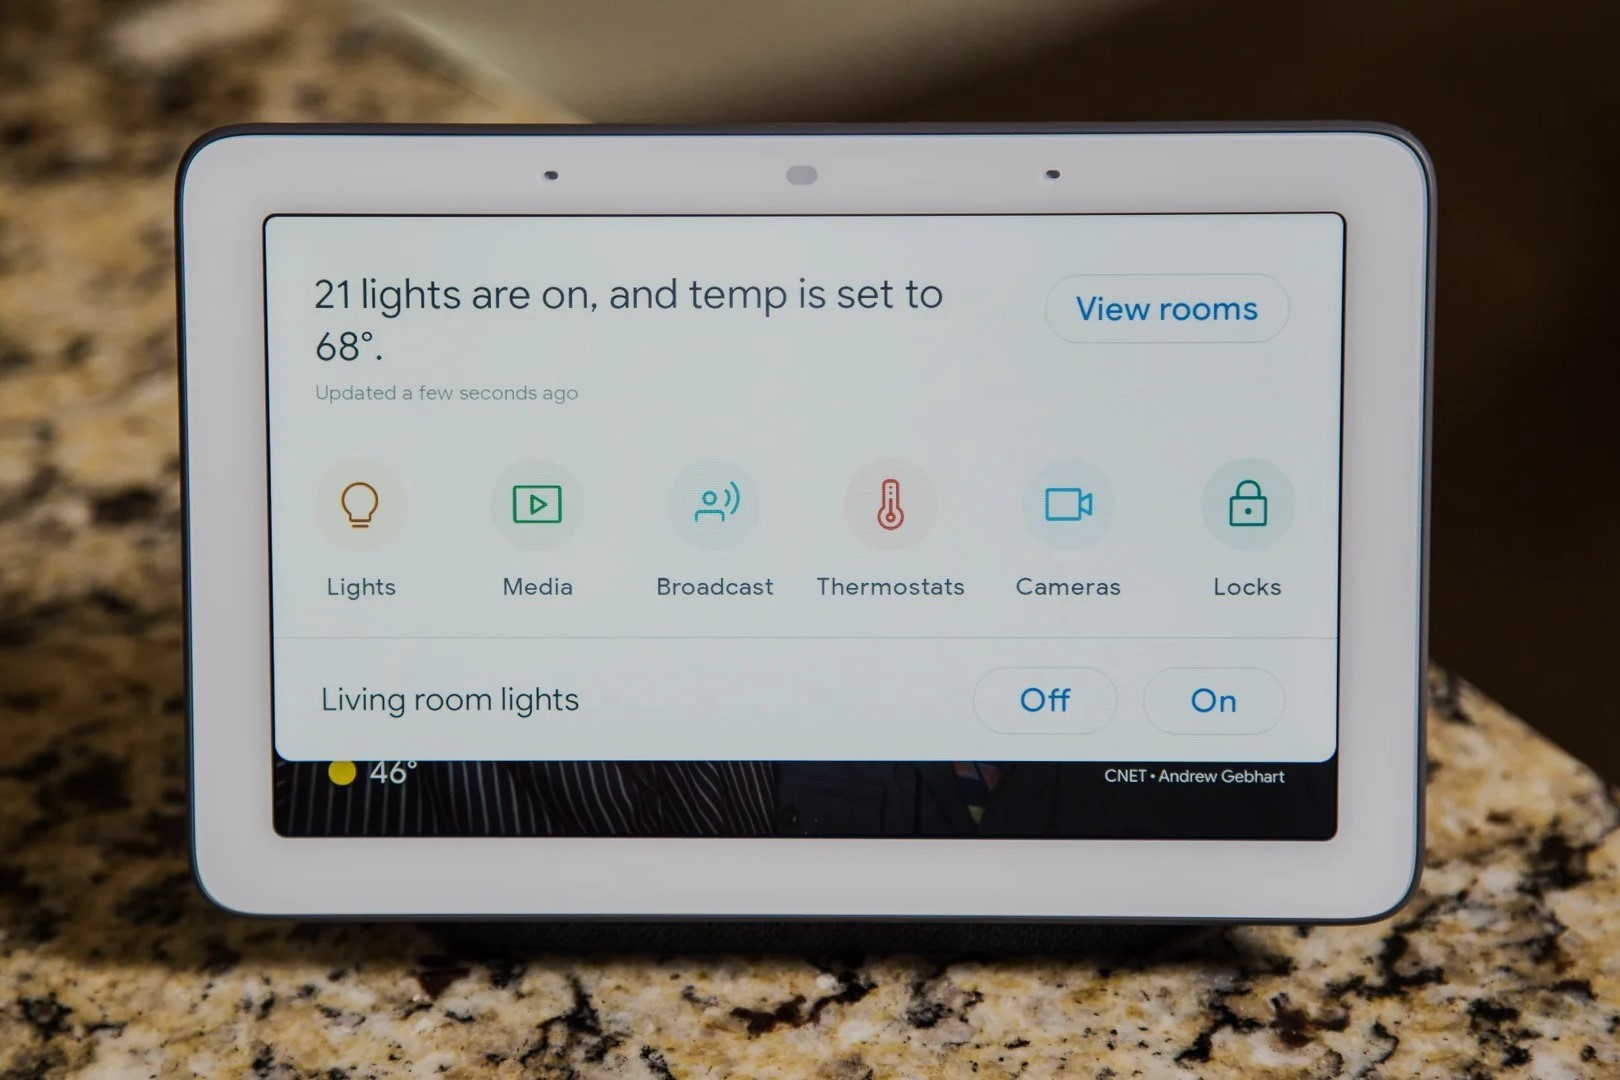
- Connect Philips Hue Bridge to Google Home App: Open the Google Home app on your smartphone and go to the Devices tab. Tap the ‘+’ button to add a new device and select “Set up device”. Choose “Have something already set up?” and search for “Philips Hue” in the list of compatible devices.
- Discover Philips Hue Lights in Google Home App: Follow the on-screen instructions to link your Philips Hue account with Google Home. Once linked, the Google Home app will automatically discover all the connected Philips Hue lights and add them to your device list.
- Control Philips Hue Lights with Google Assistant Voice Commands: Now you can control your Philips Hue lights using voice commands through your Google Home device. Simply say, “Hey Google, turn on/off [light name]” or “Hey Google, dim/brighten [light name]” to adjust the brightness level.
- Create Routines and Automations for Your Philips Hue Lights: Take your smart lighting experience to the next level by creating routines and automations. With the Google Home app, you can set up custom scenes, schedule lighting changes, and integrate your lights with other smart devices in your home.
By following these steps, you can easily set up your Philips Hue lights with Google Home and enjoy the convenience of controlling your lighting with simple voice commands. Get ready to transform your living space into a smart and vibrant environment!
Step 1: Ensure Compatibility and Gather Required Materials
Before you begin setting up your Philips Hue lights with Google Home, it’s important to ensure compatibility and gather the necessary materials. Here are the key steps you should follow:
Check Compatibility: The first thing you need to do is verify that your Philips Hue lights and your Google Home device are compatible with each other. Most Philips Hue lights, including bulbs, light strips, and lamps, are compatible with Google Home. However, it’s always a good idea to double-check the compatibility list on the official Philips Hue website before making any purchases.
Get the Required Materials: To set up your Philips Hue lights with Google Home, you will need a few essential items. First and foremost, you will need Philips Hue lights, which can be bulbs or light strips, depending on your preference. You will also need a Philips Hue Bridge, which serves as the central hub for controlling your lights. The bridge connects to your home router using an Ethernet cable, so make sure you have an available Ethernet port. Additionally, you will need a smartphone or tablet with the Philips Hue app and the Google Home app installed.
Optional Accessories: While not necessary, there are a few optional accessories that can enhance your Philips Hue experience. For example, you may consider purchasing a wireless dimmer switch or a motion sensor, which can provide additional control options for your lights. These accessories can be integrated into your setup and easily configured through the Philips Hue app.
Once you have confirmed compatibility between your Philips Hue lights and your Google Home device and have gathered all the necessary materials, you’re ready to progress to the next step in the setup process.
Step 2: Connect Philips Hue Lights to the Philips Hue Bridge
To successfully set up your Philips Hue lights with Google Home, you need to connect your lights to the Philips Hue Bridge. Follow these steps to ensure a seamless connection:
1. Plug in Your Philips Hue Bridge: Start by plugging the Philips Hue Bridge into a power outlet using the provided power adapter. Ensure that the bridge is placed in a central location within your home, as it acts as the communication hub for your lights.
2. Turn on Your Philips Hue Lights: Make sure that all the Philips Hue lights you want to connect are properly powered on. Check that the bulbs or light strips are securely screwed in or plugged in, and that there are no loose connections.
3. Position Your Lights within Bridge Range: Ensure that your lights are within range of the Philips Hue Bridge. The recommended range is typically 30 to 40 feet (9 to 12 meters), but this can vary depending on the layout of your home and the type of lights you have. If you encounter any connection issues, consider repositioning your lights closer to the bridge.
4. Allow the Lights to Connect: Once the Philips Hue Bridge is powered on and your lights are within range, give them a moment to connect. The lights will automatically pair with the bridge, establishing a direct communication link.
5. Confirm Successful Connection: To ensure that your Philips Hue lights are successfully connected to the bridge, open the Philips Hue app on your smartphone or tablet. The app will display a list of connected lights, confirming that the bridge has successfully recognized and paired with your lights.
By following these steps, you can easily connect your Philips Hue lights to the Philips Hue Bridge, laying the foundation for full control of your lights through Google Home.
Step 3: Set Up the Philips Hue Bridge
After connecting your Philips Hue lights to the Philips Hue Bridge, the next step is to set up the bridge itself. Here’s how to do it:
1. Download the Philips Hue App: Start by downloading the Philips Hue app from the App Store or Google Play Store onto your smartphone or tablet. The app is available for both iOS and Android devices.
2. Connect the Bridge to Power: Ensure that the Philips Hue Bridge is connected to a power source using the provided power adapter. Once plugged in, the bridge’s indicator lights will turn on.
3. Connect the Bridge to Your Network: Use the provided Ethernet cable to connect the Philips Hue Bridge to your home router or modem. This connection allows the bridge to communicate with your Wi-Fi network and control your lights.
4. Open the Philips Hue App: Launch the Philips Hue app on your smartphone or tablet. The app will guide you through the setup process.
5. Create a Philips Hue Account: If you don’t have a Philips Hue account, you will need to create one. This account will enable you to control your lights remotely and take advantage of additional features.
6. Follow the App’s Setup Instructions: The app will prompt you to press the button on the Philips Hue Bridge to initiate the setup process. Follow the on-screen instructions and press the button on the bridge when instructed. The app will then scan for the bridge and establish a connection.
7. Configure Bridge Settings: Once the app has successfully connected to the bridge, you will have the opportunity to configure various settings. This includes naming your bridge, selecting your preferred location, and customizing any advanced settings according to your preferences.
8. Firmware Updates: It’s recommended to check for any firmware updates for your Philips Hue Bridge. The app will notify you if updates are available, and you can proceed with the installation to ensure your bridge has the latest features and security patches.
With the Philips Hue Bridge set up and connected to your home network, you’re now ready to integrate it with the Google Home app for seamless control of your Philips Hue lights.
Step 4: Connect Philips Hue Bridge to Google Home App
To control your Philips Hue lights with Google Home, you need to connect the Philips Hue Bridge to the Google Home app. Follow these steps to link the two together:
1. Open the Google Home App: Launch the Google Home app on your smartphone or tablet. If you haven’t already installed it, you can download it from the App Store or Google Play Store.
2. Go to the Devices Tab: Tap on the Devices tab located at the bottom right corner of the Google Home app. This will take you to the Devices screen where you can manage and set up your connected devices.
3. Add a New Device: Tap on the ‘+’ button located at the top left corner of the Devices screen. This will open the Add and Set Up window where you can add new devices to the Google Home app.
4. Select “Set up device”: From the Add and Set Up window, select the option that says “Set up device”. This will allow you to connect and configure devices that are already set up.
5. Have something already set up?: In the next screen, choose the option that says “Have something already set up?”. This will allow you to connect devices that are already set up on their respective apps or hubs.
6. Search and Select Philips Hue: Scroll through the list of compatible devices and select “Philips Hue”. This will prompt Google Home to search for the Philips Hue Bridge on your network.
7. Link Your Philips Hue Account: The Google Home app will prompt you to sign in to your Philips Hue account. Enter your login credentials to link your account with Google Home.
8. Allow Access and Authorization: Grant the necessary permissions and allow Google Home to access your Philips Hue account. This will enable Google Home to discover and control your Philips Hue lights.
The Google Home app will establish a connection between the Philips Hue Bridge and your Google Home device. Once linked, you’ll be able to control your Philips Hue lights using voice commands through Google Assistant or directly from the Google Home app.
Step 5: Discover Philips Hue Lights in Google Home App
With the Philips Hue Bridge successfully connected to the Google Home app, the next step is to discover your Philips Hue lights within the app. Follow these steps to complete the discovery process:
1. Open the Google Home App: Launch the Google Home app on your smartphone or tablet. Make sure you are signed in with the same Google account used to set up your Google Home device.
2. Go to the Devices Tab: Tap on the Devices tab located at the bottom right corner of the Google Home app. This will take you to the Devices screen where you can manage your connected devices.
3. Select Philips Hue Bridge: Scroll through the list of devices until you locate your Philips Hue Bridge. Tap on it to access the settings and control options for your bridge.
4. Tap on the “…” Menu: Tap on the three-dot menu icon located at the top right corner of the Philips Hue Bridge screen. This will open a drop-down menu with various options.
5. Select “Settings”: From the drop-down menu, select the option that says “Settings”. This will allow you to further configure and manage your Philips Hue lights within the Google Home app.
6. Tap on “Devices”: In the Settings screen, tap on the “Devices” option. This will present you with a list of devices connected to your Philips Hue Bridge.
7. Discover Philips Hue Lights: Tap on the “Discover” button to initiate the discovery process. The Google Home app will scan your network and search for any available Philips Hue lights connected to the bridge.
8. Confirm Discovery: Once the discovery process is complete, the app will display a list of all the discovered Philips Hue lights. Review the list and ensure that all your lights are properly recognized by the app.
By completing the discovery process, you have made your Philips Hue lights visible and accessible within the Google Home app. Now you can control and manage your lights directly from the app or using voice commands through the Google Assistant on your Google Home device.
Step 6: Control Philips Hue Lights with Google Assistant Voice Commands
Now that you have your Philips Hue lights set up and discovered in the Google Home app, it’s time to take advantage of the power of voice control. Follow these steps to control your Philips Hue lights using Google Assistant voice commands:
1. Wake Up Google Assistant: Start by waking up Google Assistant on your Google Home device. You can do this by saying the wake phrase, “Hey Google” or “Okay Google”.
2. Issue Voice Commands: Once Google Assistant is activated, you can issue voice commands to control your Philips Hue lights. Here are examples of some common commands:
- “Hey Google, turn on [light name].”
- “Hey Google, turn off [light name].”
- “Hey Google, dim [light name] to 50%.”
- “Hey Google, set [light name] to blue.”
- “Hey Google, change [light name] to a warm white.”
3. Control Groups of Lights: If you have grouped your Philips Hue lights together in the Google Home app, you can control them collectively using voice commands. For example:
- “Hey Google, turn off the living room lights.”
- “Hey Google, dim the bedroom lights to 30%.”
4. Adjust Brightness and Color: You can easily adjust the brightness and color of your Philips Hue lights using voice commands. Experiment with different commands to find the perfect lighting for any occasion.
5. Use Advanced Commands: Google Assistant also allows you to create more complex voice commands using routines, automation, and scheduling. For example, you can set up a routine to turn on your Philips Hue lights in the morning and dim them in the evening.
Controlling your Philips Hue lights with Google Assistant voice commands provides a hands-free and intuitive way to manage your lighting. Enjoy the convenience and flexibility of adjusting your lights with just your voice, making your smart home experience even more effortless and enjoyable.
Step 7: Create Routines and Automations for Your Philips Hue Lights
To fully optimize your Philips Hue lights with Google Home, you can create routines and automations to enhance your lighting experience. Follow these steps to create personalized lighting schedules and automated actions:
1. Open the Google Home App: Launch the Google Home app on your smartphone or tablet. Ensure that you are signed in with the same Google account used to set up your Google Home device and Philips Hue lights.
2. Go to the Home Tab: Navigate to the Home tab located at the bottom center of the Google Home app. This is where you can access and manage your Home settings and smart devices.
3. Tap on the “+” Button: Look for the ‘+’ button at the top left corner of the Home tab. Tap on it to create a new routine or automation.
4. Select “Set up” under “Routines” or “Automations”: Depending on your preference, choose either “Routines” or “Automations” to start creating your custom lighting schedules and automated actions.
5. Follow the On-Screen Instructions: The Google Home app will guide you through the process of setting up your routine or automation. You can choose different triggers, such as a specific time or sunrise/sunset, to activate your Philips Hue lights.
6. Customize Actions: After selecting a trigger, you can customize the actions that will occur. This can include turning on or off specific Philips Hue lights, adjusting brightness levels, changing color schemes, or activating scenes.
7. Set Conditions (for Automations): If you are creating an automation, you can set conditions that need to be met for the action to occur. For example, you can specify that the lights should only activate if no motion is detected in a room.
8. Save and Enable: Once you have customized your routine or automation, save your settings and enable it within the Google Home app. This way, your Philips Hue lights will automatically respond according to the scheduled routines or triggered automations.
By creating routines and automations, you can simplify your daily routines, enhance security, and enjoy personalized lighting experiences tailored to your preferences. Take advantage of the flexibility and convenience that Google Home offers in managing your Philips Hue lights.