
Choose the Right Picture
Adding a background picture to your PowerPoint slides can instantly enhance the visual impact of your presentation. However, it is crucial to choose the right picture that aligns with the theme and message of your presentation. Here are some tips to help you choose the perfect background picture:
- Consider the content: The first step is to analyze the content of your presentation. Determine the subject matter and the emotions you want to evoke. For a professional presentation, consider using high-quality images related to your topic.
- Keep it relevant: Your background picture should be relevant to the content on your slides. It should support and reinforce your message, rather than distract the audience.
- Use high-resolution images: Ensure that the picture you choose is of high resolution. Low-quality images can appear pixelated and unprofessional. You can find high-resolution images on stock photo websites or use professional photography if it aligns with your presentation’s purpose.
- Maintain visual balance: Consider the visual balance of the picture. Avoid images that are heavily weighted on one side, as it can create an unbalanced look on your slides. Look for pictures with a symmetric composition or ones that can be cropped appropriately.
- Choose a suitable color scheme: Look for a background picture that complements the color scheme of your presentation. Consider the primary colors used in your slides and select a picture with similar or complementary tones.
- Avoid clutter: Avoid pictures that are too busy or cluttered. Clear and simple images work best as background pictures, as they provide a clean canvas for your content and keep the focus on your message.
- Test different options: Don’t settle for the first picture that catches your eye. Experiment with different pictures to see which one works best with your content and overall design.
By following these guidelines, you can choose a background picture that enhances the visual appeal of your PowerPoint slides and effectively communicates your message to the audience.
Access the Slide Master
The Slide Master in PowerPoint is a powerful tool that allows you to make global changes to the layout and design of your slides. To add a background picture to all slides in your presentation, you’ll need to access the Slide Master. Here’s how:
- Open PowerPoint: Launch PowerPoint and open the presentation you want to edit.
- Go to the View tab: In the top navigation menu, click on the “View” tab.
- Click on Slide Master: In the “Master Views” group, click on the “Slide Master” button. This will display the Slide Master view, which shows the master layout for all slides in your presentation.
Once you are in the Slide Master view, you will notice a larger slide at the top, which represents the master layout. This layout will be applied to all slides in your presentation, including the background picture. Any changes you make in the Slide Master view will be reflected in all slides.
Now that you have accessed the Slide Master, you are ready to add a background picture to your PowerPoint slides.
- Go to the Insert tab: In the top navigation menu, click on the “Insert” tab.
- Click on Picture: In the “Images” group, click on the “Picture” button. This will open a dialog box for you to browse and select the background picture you want to use.
- Select the picture: Navigate to the location of your desired background picture on your computer and select it. Click on the “Insert” button to add the picture to the Slide Master.
Once inserted, the background picture will be applied to the Slide Master. You can resize and reposition the picture as needed to ensure it fits well with your desired layout.
Remember to save your changes before exiting the Slide Master view. Your background picture will now be applied to all slides in your presentation, giving it a cohesive and visually appealing look.
Insert the Picture
After accessing the Slide Master in PowerPoint, you can easily insert a background picture to customize the look of your slides. Here’s how you can insert the picture:
- Select the desired slide layout: In the Slide Master view, you’ll notice various slide layouts on the left-hand side. Choose the layout where you want to insert the background picture. This could be the default layout or any other layout you prefer.
- Select the picture placeholder: On the selected slide layout, look for a picture placeholder or a content placeholder where you want to insert the background picture. Click on the placeholder to activate it.
- Go to the Insert tab: In the top navigation menu, click on the “Insert” tab.
- Click on Picture: In the “Images” group, click on the “Picture” button. This will open a dialog box for you to browse and select the background picture you want to use.
- Select the picture: Navigate to the location of your desired background picture on your computer and select it. Click on the “Insert” button to add the picture to the selected slide layout.
The picture will now be inserted into the selected slide layout as the background picture. It will be displayed in the picture placeholder or the content placeholder you activated earlier.
You can now adjust the size, position, and orientation of the picture to suit your preferences. Simply click on the picture, and handles will appear around it, allowing you to resize and reposition it as needed. You can also rotate or flip the picture using the rotation handle at the top.
Remember that the changes you make to the background picture in the Slide Master view will be applied to all slides using that particular layout. This ensures consistency throughout your presentation.
Once you are satisfied with the position and appearance of the picture, proceed to other slides and repeat the same process to insert the background picture as desired.
By inserting the picture into specific slide layouts, you have the flexibility to have different background pictures on different slides or maintain a consistent look throughout your presentation.
Adjust Picture Size and Position
Once you have inserted a background picture into your PowerPoint slide, you may need to adjust its size and position to achieve the desired visual effect. Here’s how you can easily make these adjustments:
- Select the picture: Click on the background picture you want to adjust to activate it. Handles will appear around the picture, indicating that it is selected.
- Resize the picture: To resize the picture, click and drag any of the handles inward or outward. Dragging a corner handle will maintain the original aspect ratio, preventing the picture from distorting. Dragging a side handle will resize the picture horizontally or vertically, allowing you to adjust its proportions as needed.
- Reposition the picture: To reposition the picture, click and drag it to a new location on the slide. You can move it up, down, left, or right to place it exactly where you want it to be.
- Align the picture: PowerPoint offers alignment tools to help you position the picture precisely. Use the alignment options available in the “Format” or “Picture Tools” tab to align the picture with other objects or to the slide itself. You can align it to the center, top, bottom, left, or right of the slide, or use distribution options to evenly space multiple pictures on the slide.
- Rotate or flip the picture: If you want to rotate the picture to a different angle, position your cursor outside the rotation handle (the green circle above the picture) until it changes to a curved arrow. Click and drag in the desired direction to rotate the picture. Additionally, you can click on the “Rotate” button in the “Format” or “Picture Tools” tab to choose from predefined rotation options. To flip the picture horizontally or vertically, click on the “Flip” button in the same tab and select the desired flip option.
By adjusting the size and position of the background picture, you can ensure that it fits well within the slide layout and enhances the overall visual appeal of your presentation.
Remember to apply consistent picture adjustments across slides, especially if you have inserted the same background picture on multiple slides. This will maintain a cohesive and professional look throughout your presentation.
Experiment with different sizes, positions, and effects to find the optimal arrangement for your background picture. Don’t be afraid to make adjustments until you achieve the desired result.
Once you are satisfied with the size and position of the picture, you can move on to the next step, which involves adding picture effects to further enhance its appearance and impact.
Add Picture Effects
Adding picture effects to your background picture in PowerPoint can take your presentation to the next level and make it more visually engaging. With a variety of effects available, you can transform a simple image into something more dynamic and eye-catching. Here’s how to add picture effects to your background picture:
- Select the background picture: Click on the picture you want to apply effects to. This will activate the picture and allow you to make changes.
- Go to the Format or Picture Tools tab: In the top navigation menu, click on the “Format” or “Picture Tools” tab. This tab will provide you with various options and tools to modify the appearance of the selected picture.
- Apply predefined picture effects: Depending on the version of PowerPoint you are using, you’ll find a “Picture Effects” or “Artistic Effects” button. Click on it to access a range of predefined effects, such as shadows, reflections, glows, bevels, and more. Explore different effects and select the ones that best suit your presentation’s style and message.
- Adjust effect options: Once you have applied an effect, you can further customize it by adjusting the effect options. Look for options like intensity, transparency, size, angle, and distance, among others. These options allow you to fine-tune the effect to achieve the desired visual impact.
- Experiment with multiple effects: You can apply multiple effects to a single picture to create a unique and customized look. Don’t hesitate to combine different effects and adjust their settings until you achieve the desired result. However, be cautious not to overuse effects, as it can make your presentation appear cluttered or distracting.
- Preview the effects: PowerPoint provides a live preview feature that allows you to see the effects in real-time before finalizing your changes. Take advantage of this feature to assess how the effects enhance or alter the background picture.
Remember to consider the overall theme and tone of your presentation when adding picture effects. The effects should complement the content and contribute to the visual storytelling without overpowering it.
By adding picture effects to your background picture, you can elevate the visual impact of your PowerPoint slides and capture your audience’s attention with stunning visuals.
Once you are satisfied with the picture effects, proceed to the next steps, which involve using picture styles and customizing the background picture settings to further enhance your presentation’s visual appeal.
Use Picture Styles
Picture styles in PowerPoint allow you to quickly apply attractive and professional-looking formatting options to your background picture. These styles include predefined combinations of effects, borders, and colors that can enhance the visual appeal of your presentation. Here’s how to utilize picture styles:
- Select the background picture: Click on the picture you want to apply a picture style to. This will activate the picture and allow you to make changes.
- Go to the Format or Picture Tools tab: In the top navigation menu, click on the “Format” or “Picture Tools” tab to access the formatting options for the selected picture.
- Find the Picture Styles gallery: Look for the “Picture Styles” or “Styles” group. This gallery displays various style options for your background picture.
- Select a picture style: Browse through the available picture styles and click on the one that best suits your presentation’s design and theme. A live preview feature allows you to see how the style will look on your picture before applying it.
- Customize the style options: PowerPoint also provides the flexibility to customize the picture style further. Within the Picture Styles gallery, you can find additional options like effects, borders, and colors that you can apply individually to the selected style.
- Experiment with different styles: Don’t be afraid to try different picture styles and combinations to find the one that best enhances your background picture and matches the overall style of your presentation. The goal is to create a cohesive and visually appealing look.
Picture styles offer a quick and efficient way to elevate the visual impact of your background picture without the need for complex manual adjustments. They provide consistency and professional formatting throughout your presentation.
Remember that picture styles are not set in stone, and you can easily switch or modify them as needed. If you change your mind or decide to explore different style options, you can always return to the Picture Styles gallery and make the necessary adjustments.
By utilizing picture styles, you can effectively add polish and visual flair to your background picture in PowerPoint, making it more engaging and captivating for your audience.
Once you have selected the appropriate picture style, you can move on to the next steps, which involve customizing the background picture settings and applying it to all or selected slides within your presentation.
Remove Background from Picture
Removing the background from a picture in PowerPoint can be useful when you want to isolate the main subject or remove any distracting elements. Fortunately, PowerPoint provides a built-in tool that makes the process quick and easy. Here’s how you can remove the background from a picture:
- Select the picture: Click on the picture from which you want to remove the background. This will activate the picture and allow you to make changes.
- Go to the Format or Picture Tools tab: In the top navigation menu, click on the “Format” or “Picture Tools” tab to access the formatting options for the selected picture.
- Click on the Remove Background button: Look for the “Remove Background” button in the “Adjust” or “Picture Styles” group. This button has an icon that resembles a person with a minus sign. Clicking on it will initiate the background removal process.
- Adjust the background removal: PowerPoint will automatically attempt to remove the background from the picture based on its analysis of the image. It will mark the area it believes is the background with a magenta color overlay. You can manually adjust the selection by dragging the handles and fine-tuning the edges to include or exclude parts of the image as necessary.
- Refine the selection: To further refine the background removal, PowerPoint offers additional options in the “Background Removal” tab that appears once you start removing the background. These options include “Mark Areas to Keep,” “Mark Areas to Remove,” and a “Preview” feature to help you review the changes before finalizing them.
- Finalize the background removal: Once you are satisfied with the background removal, click on the “Keep Changes” button in the “Background Removal” tab. PowerPoint will remove the selected background and display the resulting image with a transparent background.
Keep in mind that the success of background removal depends on the complexity of the image and the accuracy of PowerPoint’s automated analysis. For images with intricate or detailed backgrounds, manual adjustments may be needed to achieve the desired result.
Removing the background from a picture can help you create more visually appealing slides by focusing attention on the main subject. Once the background is removed, you can add new backgrounds, overlay multiple images, or place the image on different-colored slides to create interesting visual effects.
Now that you know how to remove the background from a picture in PowerPoint, you can experiment with this feature to make your presentations more engaging and impactful.
Apply the Background Picture to All Slides
Once you have chosen and customized a background picture for your PowerPoint presentation, you’ll likely want to apply it to all slides to maintain a consistent visual theme throughout. Applying the background picture to all slides is a straightforward process. Here’s how you can do it:
- Ensure you are in the Slide Master view: To apply the background picture to all slides, you need to be in the Slide Master view. If you are not already there, go to the “View” tab in the top navigation menu and click on the “Slide Master” button.
- Select the top-most slide: In the Slide Master view, locate and click on the top-most slide in the slide navigation pane on the left. This slide represents the overall layout and design of your presentation.
- Go to the Design or Slide Master tab: In the top navigation menu, click on the “Design” or “Slide Master” tab to access the design-related options for the Slide Master view.
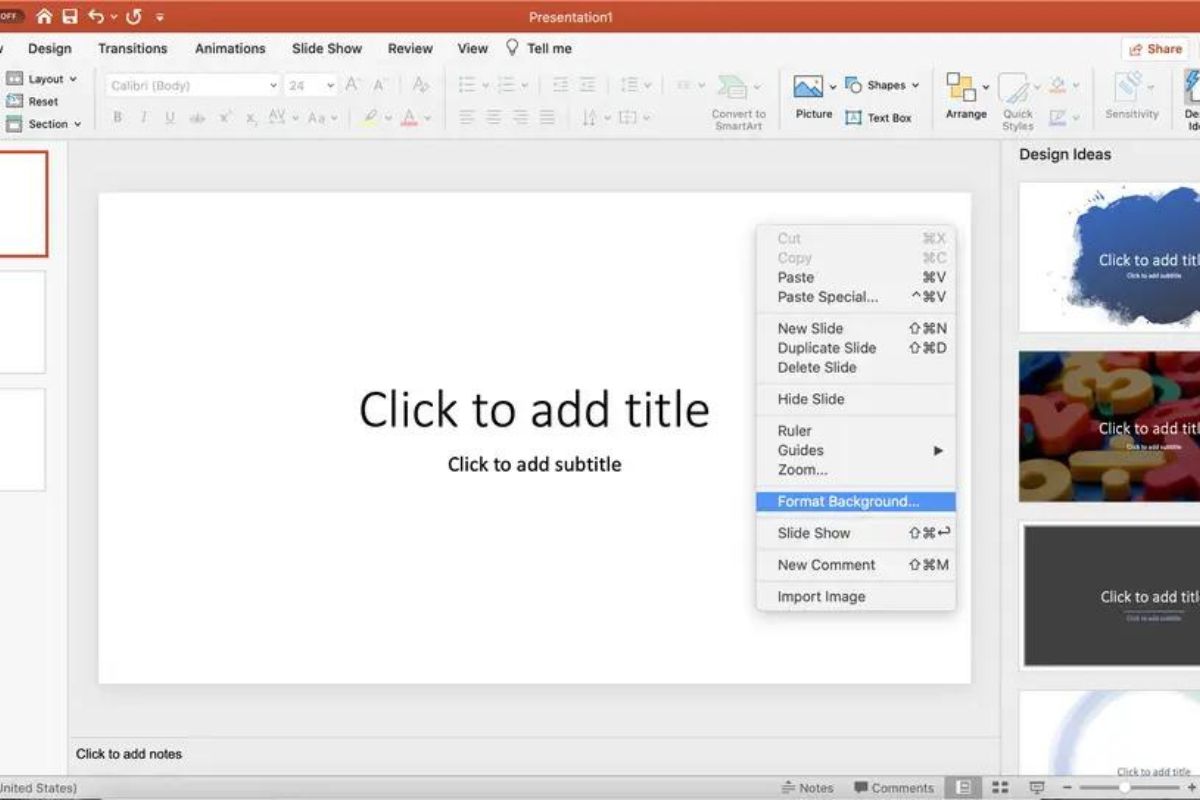
- Click on the “Background Styles” button: Look for the “Background Styles” button in the “Background” or “Master Layout” group. Depending on your PowerPoint version and theme, the button might have different appearances or names, such as “Background” or “Format Background.” Click on the button to open a drop-down menu with various background style options.
- Select “Format Background” or “Apply to All Slides”: In the drop-down menu, choose the option that allows you to apply the background picture to all slides. This option could be labeled as “Format Background” or “Apply to All Slides.” Clicking on this option will automatically apply the background picture to every slide in your presentation.
Once you have applied the background picture to all slides, you can exit the Slide Master view and return to the normal editing view to see the background picture in action. Every slide in your presentation will now feature the chosen background picture, maintaining a cohesive and visually appealing look throughout.
Remember to save your presentation after applying the background picture to all slides to ensure your changes are retained. You can also further customize individual slides or apply variations to specific slides as needed.
Applying the background picture to all slides not only enhances the overall aesthetic of your presentation but also ensures consistency and professionalism in your design. It creates a visually cohesive experience for your audience and reinforces the visual theme you are aiming to convey.
Next, we will explore how to apply the background picture to selected slides within your presentation for more targeted design choices.
Apply the Background Picture to Selected Slides
While applying the background picture to all slides in your PowerPoint presentation provides consistency, there may be instances where you want to apply a different background to specific slides. PowerPoint allows you to customize the background picture on selected slides, giving you more flexibility and design options. Here’s how you can apply the background picture to selected slides:
- Ensure you are in the normal editing view: To apply the background picture to selected slides, you need to be in the normal editing view. If you are in the Slide Master view, switch back to the normal editing view by clicking on the “Normal” or “Normal View” button in the view options at the bottom right of your PowerPoint window.
- Select the slides: In the slide navigation pane on the left, hold down the “Ctrl” key (Windows) or “Command” key (Mac) and click on the slides to which you want to apply the background picture. You can select multiple slides by clicking on each slide while holding down the key.
- Go to the Design or Format tab: In the top navigation menu, click on the “Design” or “Format” tab to access the design-related options for the selected slides.
- Click on the “Background Styles” button: Look for the “Background Styles” button in the “Background” or “Slide Background” group. Clicking on this button will open a drop-down menu with various background style options.
- Select “Format Background” or “Apply to Selected Slides”: In the drop-down menu, choose the option that allows you to apply the background picture to the selected slides only. This option could be labeled as “Format Background” or “Apply to Selected Slides.” Clicking on this option will apply the background picture to the slides you have selected.
After applying the background picture to the selected slides, you can see the changes immediately in the editing view. The selected slides will now have their unique background picture while the remaining slides retain the background picture applied to all slides.
This feature is particularly useful when you want to highlight specific content or create visual sections within your presentation. It allows you to convey different moods, emphasize key points, or differentiate between different sections.
Remember to save your presentation after applying the background picture to selected slides to retain your changes. You can further modify individual slides or revert back to the background picture applied to all slides for consistent design.
By applying the background picture to selected slides, you can achieve a more targeted and visually appealing presentation, ensuring that your design choices align with the content and message of each slide.
Next, let’s explore how you can customize the background picture settings to fine-tune its appearance and behavior within your PowerPoint presentation.
Customize Background Picture Settings
Customizing the background picture settings in PowerPoint allows you to fine-tune its appearance and behavior to suit your specific preferences. Whether you want to adjust the transparency, add a watermark, or change the picture’s positioning, PowerPoint provides a range of options to customize the background picture. Here’s how you can do it:
- Ensure you are in the normal editing view: To customize the background picture settings, make sure you are in the normal editing view. If you are in the Slide Master view or any other view, switch back to the normal editing view by clicking on the “Normal” or “Normal View” button in the view options at the bottom right of your PowerPoint window.
- Go to the Design or Format tab: In the top navigation menu, click on the “Design” or “Format” tab to access the design-related options for the background picture.
- Click on the “Format Background” button: Look for the “Format Background” button in the “Background” or “Slide Background” group. Clicking on this button will open a pane on the right side of the PowerPoint window with various formatting options for the background.
- Select the “Picture or Texture Fill” option: In the “Format Background” pane, click on the “Fill” tab. Then, choose the “Picture or Texture Fill” option to customize the background picture settings.
- Adjust the transparency: To adjust the transparency level of the background picture, move the “Transparency” slider to the desired opacity. This allows you to create a subtle or more pronounced effect, blending the picture with the slide background or other content elements.
- Add a watermark: If you want to add a watermark to the background picture, check the “Washout” checkbox. This will fade the picture, giving it a watermark-like appearance, while still retaining its visibility.
- Change the picture positioning: To reposition the background picture within each slide, use the “Tile” or “Offset X” and “Offset Y” options. Choosing “Tile” will repeat the picture across the slide, while adjusting the offset values will move the picture horizontally or vertically.
- Experiment with other options: Explore additional options in the “Picture or Texture Fill” settings, such as picture rotation, scaling, and aligning. Experiment with these settings to achieve the desired look and feel for your background picture.
Customizing the background picture settings gives you the flexibility to create a unique and visually appealing presentation. You can modify the settings to match your branding, align with your content, or create artistic effects.
Remember to save your changes after customizing the background picture settings to ensure they are applied to your PowerPoint presentation.
By customizing the background picture settings in PowerPoint, you can further enhance the visual impact of your slides and deliver a more engaging and polished presentation.
Now that you have customized the background picture settings, it’s time to save and share your PowerPoint presentation.
Save and Share Your PowerPoint Presentation
Once you have finished creating and customizing your PowerPoint presentation, it’s important to save it properly and share it with your intended audience. Here are the steps to save and share your presentation:
- Save your presentation: To save your presentation, click on the “File” tab in the top navigation menu. Then, click on the “Save” or “Save As” option to choose a location on your computer or cloud storage to save the file. Give your presentation a descriptive and memorable name that reflects its content.
- Select the appropriate file format: When saving your presentation, you’ll have the option to choose different file formats. The default format is usually the .pptx format, which is compatible with most versions of PowerPoint. However, consider saving a copy of your presentation in other formats like PDF or PPT if you anticipate different usage scenarios.
- Check compatibility and file size: Before sharing your presentation, verify its compatibility with the software and devices your audience will use. Additionally, be mindful of the file size, especially if you plan to share the presentation via email or other web-based platforms. Large file sizes may cause issues while uploading or downloading.
- Consider packaging or compressing your presentation: If your presentation contains large media files or intricate slide designs, it may be beneficial to compress the file or package it into a compressed folder. This helps reduce the file size and ensures that all necessary assets are included.
- Choose the appropriate sharing method: Decide how you want to share your presentation with your audience. Common methods include email attachments, cloud storage sharing, sharing via collaboration platforms like Microsoft Teams or Google Drive, or even presenting it live using screen sharing or video conferencing tools.
- Provide clear instructions: When sharing your presentation, consider providing clear instructions on how to view or interact with it. This includes any password protection, notes on presentation order, or specific instructions for animations or interactivity.
- Test the presentation: Before sharing it widely, test your presentation on different devices and software to ensure that it displays correctly and all elements are functional. This helps avoid any unexpected issues or compatibility errors when your audience views the presentation.
- Follow up and gather feedback: After sharing your presentation, it’s a good practice to follow up with your audience to gather feedback and address any questions or concerns. This gives you an opportunity to improve future presentations and ensure a successful knowledge transfer.
By following these steps, you can save and share your PowerPoint presentation effectively, ensuring that your audience can view and engage with your content seamlessly.
Remember to keep a backup copy of your presentation in a secure location, such as an external hard drive or cloud storage, to avoid data loss and have the ability to make future edits or revisions.
With your presentation saved and shared, you’re now ready to captivate your audience with your engaging content and visually appealing slides.
