
Selecting the Image in PowerPoint
When working on a presentation in PowerPoint, you may come across the need to make the background of an image transparent. This can be particularly useful when you want to overlay the image on top of other elements or when you want to integrate the image seamlessly into your slide design. Thankfully, PowerPoint provides an easy and straightforward way to accomplish this.
To get started, open your PowerPoint presentation and navigate to the slide where you want to make the image background transparent. Then, click on the “Insert” tab in the PowerPoint menu and select “Picture” to insert the image into your slide.
Once the image is inserted, click on it, and you will see a contextual tab called “Picture Format” appear in the PowerPoint menu. Click on this tab to reveal a variety of image editing options.
To ensure that the image is selected, you can also click on it and confirm that handles (small squares or circles) appear around the edges of the image. This confirms that the image is actively selected and ready for further editing.
By selecting the image, you are now ready to proceed with the next step of removing the background and making it transparent. This can be done using PowerPoint’s built-in “Remove Background” feature, which we will explore in the next section.
Removing the Background using the Remove Background Feature
PowerPoint offers a convenient “Remove Background” feature that allows you to remove the background of an image quickly. To access this feature, select the image you want to edit and navigate to the “Picture Format” tab in the PowerPoint menu.
Within the “Picture Format” tab, you will find a button labeled “Remove Background.” Click on this button to activate the background removal tool.
Once you click on the “Remove Background” button, PowerPoint analyzes the image and automatically generates a initial selection of the background that it believes you want to remove. You will notice that the image is surrounded by a selection marquee, with some areas marked with pink as a preview of what will be removed.
To refine the selection, PowerPoint provides several adjustment options. On the left side of the PowerPoint window, you will see a toolbar with buttons labeled “Mark Areas to Keep” and “Mark Areas to Remove.” These buttons allow you to manually mark areas in the image that you want to keep or remove, respectively.
Simply click on the “Mark Areas to Keep” button and use the cursor to draw lines around the areas that you want to protect from the background removal process. Conversely, click on the “Mark Areas to Remove” button and mark areas that should be removed from the image.
As you mark areas, PowerPoint will update the background removal preview to reflect your changes. This allows you to have greater control over the selection and ensure that important parts of the image are not accidentally removed.
In addition to manually marking areas, PowerPoint also provides options to adjust the size and position of the selection marquee. By clicking and dragging the handles on the marquee, you can resize or reposition it to include or exclude specific areas of the image.
Once you are satisfied with the selection, click on the “Keep Changes” button in the “Picture Format” tab. PowerPoint will apply the background removal and you will instantly see the background become transparent.
By using the “Remove Background” feature in PowerPoint, you can efficiently remove the background of an image and make it transparent. This allows you to integrate the image seamlessly into your slides and create captivating presentations.
Marking Areas to Keep or Remove in the Image
When using PowerPoint’s “Remove Background” feature to make an image background transparent, you have the ability to manually mark areas that you want to keep or remove. This feature allows for precise control over the background removal process, ensuring that essential parts of the image are protected and preserving the overall quality of the image.
To mark areas to keep or remove in the image, select the image you want to edit and activate the “Remove Background” tool from the “Picture Format” tab in the PowerPoint menu. You will see a selection marquee around the image, with certain areas marked with pink as a preview of the background removal outcome.
On the left side of the PowerPoint window, you will find a toolbar with buttons labeled “Mark Areas to Keep” and “Mark Areas to Remove.” Click on the appropriate button based on whether you want to protect or delete specific areas of the image.
To mark areas to keep, click on the “Mark Areas to Keep” button and use your cursor to draw lines around the parts of the image that should be preserved. For example, if you have a person in the image and want to keep them intact while removing the background, mark around the person’s outline and any other significant details that you wish to retain.
If there are areas you want to remove from the image, click on the “Mark Areas to Remove” button and mark those areas with your cursor. This is useful for eliminating unwanted background elements or blemishes that may interfere with the overall aesthetic or clarity of the image.
As you mark areas, PowerPoint will update the background removal preview to reflect your changes. This real-time feedback allows you to adjust and refine your selection until you are satisfied with the result.
If needed, you can also adjust the size and position of the selection marquee. By clicking and dragging the handles on the marquee, you can resize or reposition it to include or exclude specific areas of the image, providing even more control over the background removal process.
By utilizing the “Mark Areas to Keep” and “Mark Areas to Remove” tools in PowerPoint’s “Remove Background” feature, you can achieve precise and accurate background removal, resulting in a transparent background that seamlessly integrates your image into your slide design.
Adjusting the Marquee Size and Position
When working with PowerPoint’s “Remove Background” feature, you have the flexibility to adjust the size and position of the selection marquee. This allows you to fine-tune the area that you want to remove the background from, ensuring that your image is precisely edited and the final result meets your requirements.
After activating the “Remove Background” tool and selecting the image you want to edit, you will see a selection marquee around the image. This marquee acts as a boundary for the background removal process and indicates the areas that will either be kept or removed.
To adjust the size of the marquee, position your cursor near one of the handles located on the edges or corners of the marquee. Click and drag the handle to expand or shrink the size of the marquee. This allows you to include or exclude specific areas of the image, ensuring that the background removal is accurate and targeted.
The ability to adjust the size of the marquee is particularly useful when dealing with images that have complex or irregular shapes. By resizing the marquee, you can adapt it to fit the contours and intricacies of the image, making the background removal process more precise.
In addition to resizing, you can also reposition the marquee to achieve a more accurate selection. To do this, click inside the marquee (not on the handles) and drag it to a new location. This feature is beneficial when you have a specific section of the image that you want to focus on or when you need to exclude certain elements from the background removal process.
By adjusting the size and position of the marquee, you have greater control over the background removal process and can ensure that your image retains the desired elements while eliminating the background. This customization option guarantees that the final result aligns with your vision and complements the overall design of your presentation.
Refining the Selection using the Mark Areas to Keep or Mark Areas to Remove Tool
PowerPoint’s “Remove Background” feature provides a powerful toolset for refining the selection of an image and achieving precise background removal. The “Mark Areas to Keep” and “Mark Areas to Remove” tools allow you to further customize the selection, ensuring that the desired elements are preserved while the background is removed.
After activating the “Remove Background” tool and selecting the image, you will notice a toolbar on the left side of the PowerPoint window. This toolbar contains two buttons: “Mark Areas to Keep” and “Mark Areas to Remove.”
To refine the selection using these tools, click on the “Mark Areas to Keep” button if there are specific areas of the image that you want to protect from the background removal process. For example, if your image includes a person, you can mark around their outline and any other significant details that you wish to retain.
Conversely, if there are areas you want to remove from the image, click on the “Mark Areas to Remove” button and mark those areas with your cursor. These areas could include unwanted background elements, distractions, or blemishes that you want to eliminate.
As you mark areas, PowerPoint will update the background removal preview in real-time, reflecting your changes. This dynamic feedback allows you to refine your selection with precision, ensuring that the final result meets your requirements.
If needed, you can adjust the size and position of the selection marquee to further refine your selection. By clicking and dragging the handles on the marquee, you can resize or reposition it to include or exclude specific areas of the image. This level of control helps you achieve an accurate selection that aligns with your vision.
The “Mark Areas to Keep” and “Mark Areas to Remove” tools are invaluable for intricate or complex images where automatic background removal may not be sufficient. By manually marking areas, you have the power to customize the selection to your exact specifications.
By utilizing these tools, you can fine-tune the background removal process to ensure that the desired elements of the image are preserved while achieving a clean and transparent background. This refinement process guarantees that your image seamlessly integrates into your slide design, allowing you to create visually stunning presentations.
Using the Transparency Feature to Make the Background Transparent
Once you have successfully removed the background of an image using PowerPoint’s “Remove Background” feature, you can further enhance its visual impact by making the background transparent. This can be achieved through PowerPoint’s transparency feature, allowing you to seamlessly integrate the image into your presentation without any unwanted background elements.
To make the image background transparent, start by selecting the image you have edited. Navigate to the “Picture Format” tab in the PowerPoint menu, where you will find various image editing options.
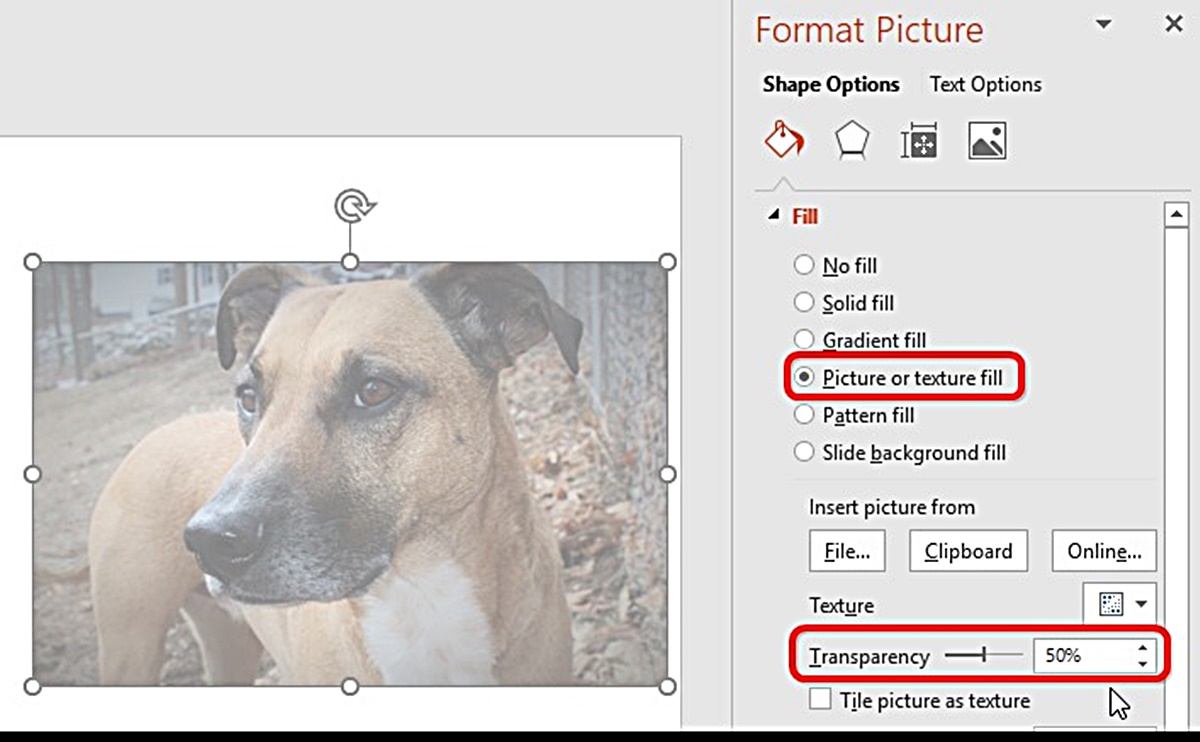
Within the “Picture Format” tab, look for the “Transparency” option. This option allows you to adjust the opacity of the image, making the background transparent while retaining the visibility of the foreground elements.
Click on the “Transparency” button to reveal a slider that you can use to control the level of transparency. Moving the slider towards the right will increase the transparency, gradually making the background less visible, while moving it towards the left will decrease the transparency, making the background more prominent.
As you adjust the transparency level, you will be able to see the changes in real-time, helping you find the perfect balance between the foreground and background elements of the image.
Experiment with different transparency settings until you achieve the desired effect. Depending on your slide design and the purpose of the image, you may want to make the background completely transparent or just slightly faded to create a subtle visual impact.
Additionally, it is worth noting that you can also apply different transparency levels to specific parts of the image by selecting portions or elements within the image and adjusting their transparency individually. This can be useful when you want certain areas of the image to be more or less visible than others.
By utilizing the transparency feature, you can make your image background transparent, allowing you to seamlessly incorporate it into your presentation. This feature enhances the professional appearance of your slides and ensures that your visual elements blend harmoniously with your content.
Saving the Image with a Transparent Background
Once you have successfully removed the background and made it transparent in PowerPoint, you may need to save the image with its transparent background. Saving the image correctly is essential to ensure that the transparency is preserved and can be used in other applications or platforms.
To save the image with a transparent background in PowerPoint, follow these steps:
- Select the image that has the transparent background.
- Click on the “File” tab in the PowerPoint menu.
- From the drop-down menu, select the “Save As” option.
- Choose a location on your computer where you want to save the image.
- In the “Save As” dialog box, select the desired image file format. Commonly used formats include PNG (Portable Network Graphics) and TIFF (Tagged Image File Format).
- Click on the “Save” button to save the image.
When saving the image, make sure to select a file format that supports transparency, such as PNG or TIFF. These formats preserve the transparency information of the image, allowing you to use it with a transparent background in other applications, such as graphic design software or web development tools.
It is important to note that saving the image in formats like JPG or BMP may result in the loss of transparency. These formats do not support transparency and will fill the transparent background with a solid color when the image is saved.
By choosing the appropriate file format that supports transparency and saving the image with that format, you can ensure that the transparency of the background is preserved. This allows you to use the image with its transparent background in various contexts, giving you the flexibility to integrate it seamlessly into your designs, presentations, or any other media where transparency is required.
Using the Image with a Transparent Background in Other Applications
After you have successfully saved an image with a transparent background from PowerPoint, you can utilize it in a variety of other applications to enhance your designs, presentations, or any creative project. The transparent background allows for seamless integration, giving you the flexibility to overlay the image on different backgrounds or incorporate it into various layouts.
Here are some ways you can make use of the image with a transparent background in other applications:
- Graphic Design Software: Import the image into graphic design software like Adobe Photoshop or Illustrator. With the transparent background, you can easily blend the image with other elements, apply different effects, and create stunning compositions.
- Presentations and Slides: Import the image into other presentation software, such as Google Slides or Keynote, to incorporate it seamlessly into your slides. The transparent background ensures that the image blends smoothly with your presentation design and maintains its visual integrity.
- Web Design and Development: Use the image with a transparent background in website design or development projects. The transparency allows you to overlay the image on different backgrounds or apply it as a part of the overall website layout, providing a visually appealing and professional touch.
- Social Media Graphics: Incorporate the image with a transparent background into social media graphics. Overlay the image on various backgrounds or use it as part of your branding elements. This can help create visually appealing and cohesive social media posts or profile graphics.
- Video Editing: Import the image into video editing software such as Adobe Premiere Pro or Final Cut Pro to overlay it on video clips. The transparent background enables you to seamlessly integrate the image within your video project, adding visual interest and enhancing the overall production value.
By leveraging the image with a transparent background in other applications, you can unlock a wealth of creative possibilities. From graphic design to presentations, web development to video editing, the transparency allows for seamless integration, ensuring that the image seamlessly blends with various media formats and enhances the overall visual impact.