
What is a Philips Hue Bridge?
The Philips Hue Bridge is the central hub that allows you to control and manage your Philips Hue smart lighting system. It serves as the bridge between your Philips Hue bulbs and the Philips Hue app, enabling you to control and customize your lighting settings with ease. The bridge acts as the brain of the entire system, allowing you to access your lights remotely, set schedules, create scenes, and even integrate them with other smart home devices.
This small and sleek device connects to your home’s Wi-Fi network, enabling seamless communication between your smartphone or tablet and the Philips Hue bulbs. By utilizing a secure wireless connection, the bridge ensures that your commands and settings are transmitted securely and accurately to the corresponding bulbs. It also acts as a translator, converting the signals from your mobile device into commands that the bulbs can understand.
One of the key features of the Philips Hue Bridge is its ability to connect and control multiple bulbs simultaneously. Whether you have a single bulb or an entire network of bulbs installed throughout your home, the bridge allows you to create a unified lighting experience. With the app, you can control individual bulbs, group them together, or even synchronize them to create stunning lighting effects.
Moreover, the Philips Hue Bridge is designed to be user-friendly and intuitive. The app provides a user-friendly interface that allows you to easily adjust the brightness, color, and hue of your lights. You can choose from a wide range of pre-set scenes or create your own personalized scenes to match any mood or occasion. Whether you want a bright and vibrant atmosphere for a party or a calm and relaxing ambiance for a cozy night in, the Philips Hue Bridge gives you the flexibility to create the perfect lighting environment.
Overall, the Philips Hue Bridge is the essential component that brings your Philips Hue bulbs to life. It not only provides convenience and control but also opens up a world of possibilities for creating personalized lighting experiences in your home. With its seamless integration with the Philips Hue app and its ability to connect multiple bulbs, the bridge allows you to transform your space with dynamic lighting that suits your every need and enhances your overall lifestyle.
Setting Up Your Philips Hue Bridge
Setting up your Philips Hue Bridge is a straightforward process that requires a few simple steps. Follow the instructions below to get started:
- Unbox your Philips Hue Bridge and connect it to a power source using the provided power adapter. Make sure the bridge is placed within a reasonable distance from your Wi-Fi router for a stable and reliable connection.
- Connect the bridge to your Wi-Fi network. Most bridges support both Ethernet and Wi-Fi connections. If you prefer a wired connection, use an Ethernet cable to connect the bridge to your router. If you want a wireless connection, follow the instructions provided to connect the bridge to your Wi-Fi network. Ensure that your network is stable and has a strong signal for optimal performance.
- Download the Philips Hue app on your smartphone or tablet. The app is available for both iOS and Android devices and can be found in the respective app stores. Install the app and open it once the installation is complete.
- Follow the on-screen instructions in the app to set up a new Philips Hue account. You will need to provide some basic information and agree to the terms and conditions. Once your account is created, sign in using your new credentials.
- The app will prompt you to search for the Philips Hue Bridge. Ensure that your smartphone or tablet is connected to the same Wi-Fi network as the bridge. The app will automatically detect the bridge and guide you through the pairing process. Follow the on-screen prompts to complete the setup.
- Once the bridge is paired successfully, you can start adding your Philips Hue bulbs to the system. Screw the bulbs into your desired light fixtures and turn them on. In the app, select the “Add Lights” option and follow the instructions to search for and add the bulbs to your bridge.
- After adding the bulbs, the app will ask you to assign them to specific rooms or areas in your home. This step helps you easily control and manage your lights based on their location. You can assign multiple bulbs to a room and even create custom groupings.
- Once the setup is complete, you can explore the app for various lighting options, including adjusting brightness, changing colors, setting schedules, and creating scenes to personalize your lighting experience.
By following these steps, you can quickly set up your Philips Hue Bridge and start enjoying the benefits of smart lighting control in your home. Remember to refer to the user manual for any specific instructions or troubleshooting tips if needed.
Connecting the Philips Hue Bridge to Your Wi-Fi Network
In order to control your Philips Hue lights remotely and enjoy the full range of features, it is essential to connect your Philips Hue Bridge to your Wi-Fi network. Follow these steps to successfully connect your bridge:
- Ensure that your Philips Hue Bridge is powered on and connected to a power source using the provided power adapter.
- If you prefer a wired connection, use an Ethernet cable to connect the bridge to your router. Insert one end of the Ethernet cable into the bridge’s Ethernet port and the other end into an available LAN port on your router.
- If you prefer a wireless connection, make sure your Wi-Fi network is active and has a strong signal. Take note of the network name (SSID) and password as you will need them during the setup process. Keep in mind that the bridge only supports 2.4GHz Wi-Fi networks, so ensure that your router is on the correct frequency.
- Open the Philips Hue app on your smartphone or tablet. Sign in or create a new account if you haven’t done so already.
- In the app, tap on the “Settings” icon, usually located in the lower-right or upper-right corner of the screen.
- Select “Hue Bridges” or “Add Hue Bridge” from the settings menu.
- The app will begin searching for available bridges. Once it detects your bridge, you will need to confirm the serial number on the back of the bridge to ensure that it is the correct device.
- Choose the connection method based on your preference – wired or wireless. If you’re using the wired method, the app will automatically detect the connection and prompt you to proceed. For a wireless connection, tap on “Wireless Connection” and follow the on-screen instructions to connect to your Wi-Fi network.
- If prompted, enter the Wi-Fi network name (SSID) and password. Make sure to double-check the information you provide to avoid any connection issues.
- Wait for the app to establish a connection between the bridge and your Wi-Fi network. This may take a few moments.
- Once the connection is established, you will receive a confirmation message. Your Philips Hue Bridge is now connected to your Wi-Fi network and ready to use.
It’s important to note that during the connection process, it is recommended to keep your mobile device close to the bridge to ensure a stable and uninterrupted connection. If you encounter any issues, consult the troubleshooting section of the Philips Hue app or refer to the user manual for further assistance.
Downloading the Philips Hue App
To fully utilize the features and functionalities of your Philips Hue smart lighting system, you need to download the Philips Hue app on your smartphone or tablet. The app is available for both iOS and Android devices and can be easily downloaded from the respective app stores. Here’s how you can get started:
- Open the app store on your device, either the App Store for iOS or Google Play Store for Android.
- In the search bar, type “Philips Hue” and tap on the search icon.
- Look for the official Philips Hue app and verify that it is developed by Signify.
- Tap on the app to view more details, such as the app description, ratings, and reviews.
- If the app meets your requirements and has positive reviews, tap on the “Download” or “Install” button.
- Wait for the app to download and install on your device. The duration will vary depending on your internet connection speed.
- Once the app is installed, locate the Philips Hue app icon on your home screen or app drawer and tap on it to launch the app.
- If you haven’t created a Philips Hue account yet, you will be prompted to do so. Follow the on-screen instructions to create a new account using your email address and password.
- If you already have an existing account, you can sign in using your registered email address and password.
- After signing in, the app will guide you through the process of searching for and connecting to your Philips Hue Bridge. Follow the on-screen prompts to complete the pairing process.
- Once the bridge is connected, you can start exploring the app’s features and functionalities. Customize your lighting settings, create scenes, set schedules, and even integrate your Philips Hue lights with other smart home devices.
The Philips Hue app provides a simple and intuitive interface to control and manage your smart lighting system. It allows you to adjust the brightness, color, and hue of your lights, create dynamic lighting effects, and personalize your lighting experience according to your mood and preferences.
Remember to keep your app up to date by regularly checking for updates in your app store. This ensures that you have access to the latest features and improvements provided by Philips Hue.
Setting Up Your Philips Hue Bulbs
Once you have set up your Philips Hue Bridge and downloaded the Philips Hue app, it’s time to set up your Philips Hue bulbs and integrate them into your lighting system. Follow the steps below to successfully set up your bulbs:
- Ensure that your Philips Hue Bridge is powered on and connected to your Wi-Fi network.
- Screw the Philips Hue bulbs into the desired light fixtures throughout your home. Make sure the bulbs are tightly secured but be cautious not to overtighten them.
- Turn on the light switch that controls the specific fixture where you installed the Philips Hue bulb.
- Open the Philips Hue app on your smartphone or tablet. Make sure you are logged in to your Philips Hue account.
- In the app, tap on the “Settings” icon, usually located in the lower-right or upper-right corner of the screen.
- Select “Light setup” or “Add Lights” from the settings menu. The app will begin searching for available lights.
- Once the app detects the Philips Hue bulbs, confirm their pairing by following the on-screen instructions. This may involve pressing the button on the Philips Hue Bridge or following a specific procedure depending on the bulb type.
- Assign the newly added bulbs to specific rooms or areas in your home using the app. This step will help you easily control and manage the lights based on their location.
- Test the functionality of the newly installed bulbs by turning them on and off or adjusting their brightness and color using the Philips Hue app.
- If desired, you can repeat the process for additional Philips Hue bulbs, adding them one by one to your system and assigning them to the appropriate rooms or areas.
By following these steps, you can successfully set up your Philips Hue bulbs and integrate them into your Philips Hue lighting system. Remember to install the bulbs in compatible fixtures and ensure a stable Wi-Fi connection for optimal performance. If you encounter any issues during the setup process, consult the troubleshooting section of the Philips Hue app or refer to the user manual for further guidance.
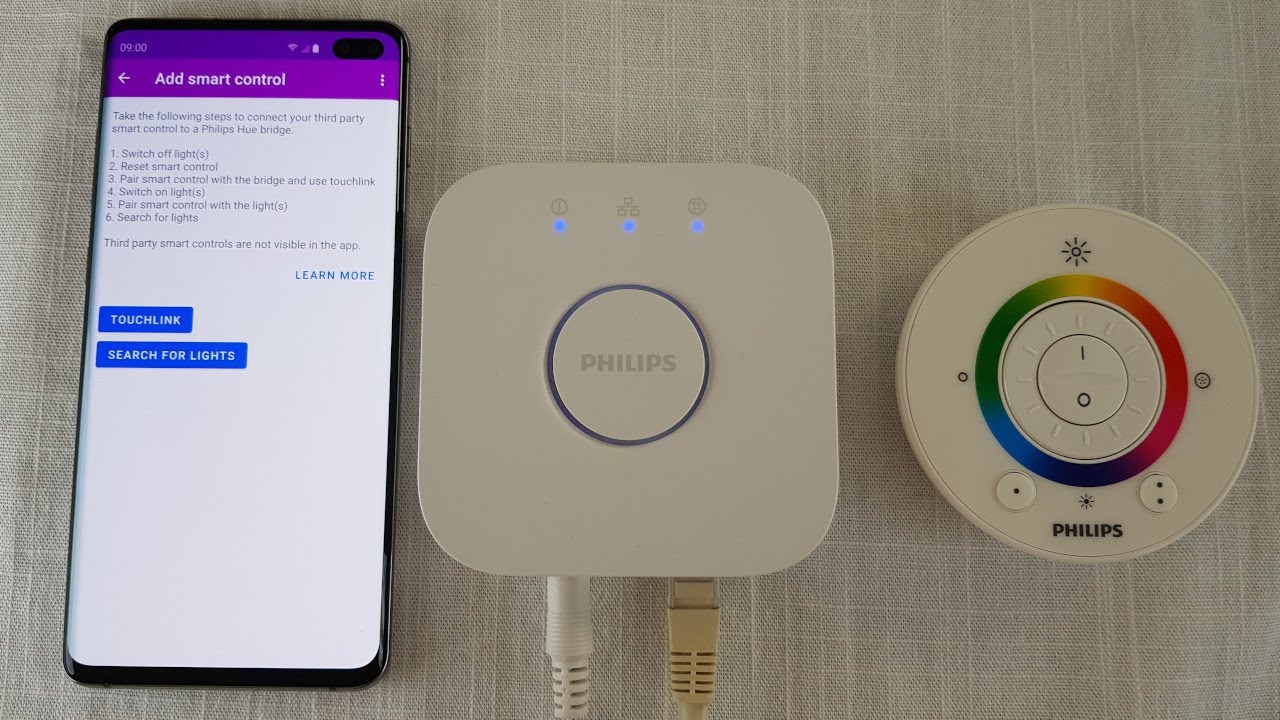
Pairing Your Philips Hue Bridge with the Philips Hue Bulbs
To fully experience the capabilities of your Philips Hue bulbs, it is essential to pair them with your Philips Hue Bridge. This allows for seamless control and synchronization of your lighting system. Follow these steps to successfully pair your bulbs with the bridge:
- Ensure that your Philips Hue Bridge is connected to your Wi-Fi network and powered on.
- Make sure the Philips Hue bulbs are installed in the desired light fixtures and turned on at the switch.
- Open the Philips Hue app on your smartphone or tablet. Ensure that you are logged in to your Philips Hue account.
- In the app, tap on the “Settings” icon, typically located in the lower-right or upper-right corner of the screen.
- Select “Light setup” or “Add Lights” from the settings menu. The app will start searching for available lights.
- Once the app detects the Philips Hue bulbs, it will prompt you to confirm the pairing process. This may involve pressing the button on the Philips Hue Bridge or following specific instructions depending on the type of bulb.
- Follow the on-screen instructions to complete the pairing process. The app will guide you through the necessary steps, such as pressing the button on the bridge or waiting for the bulbs to flash to indicate successful pairing.
- Once the bulbs are successfully paired, the app will prompt you to assign them to specific rooms or areas in your home. This helps you easily control and manage the lights based on their location.
- Repeat the pairing process for any additional bulbs you want to add to your system. The app will guide you through each pairing process, ensuring a seamless connection between the bulbs and the bridge.
- Test the functionality of the paired bulbs by using the app to turn them on and off, adjust their brightness, or change their colors. Ensure that all the bulbs respond as expected.
By following these steps, you can easily pair your Philips Hue bulbs with your Philips Hue Bridge. Once paired, you can unleash the full potential of your smart lighting system, customizing and controlling your lights with ease using the Philips Hue app. If you encounter any issues during the pairing process, consult the troubleshooting section of the app or refer to the user manual for further guidance.
Troubleshooting Pairing Issues
While pairing your Philips Hue Bridge with the Philips Hue bulbs is usually a seamless process, you may encounter some issues along the way. Here are some common troubleshooting steps that can help you resolve pairing issues:
- Ensure that the Philips Hue Bridge is properly connected to a power source and your Wi-Fi network. Check that the power adapter is securely plugged in and that the Ethernet or Wi-Fi connection is stable.
- Verify that the Philips Hue bulbs are installed correctly in the desired light fixtures and that they are turned on at the switch. Ensure that the bulbs are within range of the Philips Hue Bridge to establish a connection.
- Ensure that your smartphone or tablet is connected to the same Wi-Fi network as the Philips Hue Bridge. If you are experiencing issues, try disconnecting and reconnecting to the network or restarting your device.
- Press the button on the Philips Hue Bridge to ensure it is connected and functioning properly. This may help establish or re-establish the connection between the bridge and the bulbs.
- If you are using a wireless connection, verify that you have entered the correct Wi-Fi network name (SSID) and password during the setup process. Double-check the information and ensure that there are no typos or incorrect characters.
- If the Philips Hue bulbs are not being detected during the pairing process, try resetting them by turning them off and on again at the switch or using the app to turn them off and on. This can help refresh their connections and make them discoverable to the bridge.
- Make sure that there are no other devices or appliances in close proximity that may be causing interference with the signals between the bridge and the bulbs. Move any potential sources of interference, such as cordless phones or microwave ovens, away from the bridge and bulbs.
- Try restarting the Philips Hue app or, if needed, uninstalling and reinstalling it. This can help resolve any software glitches or conflicts that may be affecting the pairing process.
- If none of the above steps resolve the pairing issues, consult the Philips Hue support documentation or contact customer support for further assistance. They can provide specific troubleshooting steps based on your setup and help you resolve any persistent issues.
By following these troubleshooting steps, you can address most common pairing issues between the Philips Hue Bridge and the Philips Hue bulbs. Remember, patience and careful attention to detail are key, and don’t hesitate to seek assistance from Philips Hue’s support channels if needed.
Managing your Philips Hue Lights through the App
The Philips Hue app offers a wealth of features and functionalities for managing and controlling your Philips Hue lights. By using the app, you can easily customize and tailor your lighting experience to suit your preferences. Here are some key ways to manage your Philips Hue lights through the app:
- Adjust Brightness: With the Philips Hue app, you can easily adjust the brightness of your lights to create the perfect ambiance. Dim the lights for a cozy movie night or brighten them up for a lively gathering.
- Change Colors: Transform your space by choosing from a wide spectrum of colors available with the Philips Hue bulbs. Use the color picker in the app to select the exact hue you desire or choose from pre-set color scenes to match your mood or theme.
- Create Scenes: Create custom scenes to instantly set the perfect lighting for any occasion. With the app, you can save your preferred brightness, color, and timing settings as a scene, allowing you to recreate it effortlessly whenever needed.
- Set Schedules: Take advantage of the scheduling feature within the Philips Hue app to automate your lighting. Create schedules for your lights to turn on and off at specific times, making it appear as if someone is home, even when you’re away.
- Use Away from Home Control: Control your Philips Hue lights even when you are away from home. With this feature, you can remotely access and manage your lights through the app, providing you with peace of mind and the ability to adjust your lighting according to your preferences.
- Integrate with Smart Home Devices: The Philips Hue app allows you to integrate your Philips Hue lights with various smart home devices and platforms. Whether it’s voice control with Amazon Alexa or Google Assistant, or synchronization with other smart home systems, you can create a fully integrated and seamless home automation experience.
- Group Lights: The app enables you to group multiple Philips Hue lights together, allowing you to control them collectively with a single command. This is especially useful for areas such as living rooms or bedrooms where you may have multiple lights that you want to control simultaneously.
- Explore Pre-set Scenes: Discover a range of pre-set scenes in the Philips Hue app that are designed to evoke specific moods or themes. From energizing “Bright and Cool” scenes to calming “Soothing and Serene” scenes, there is a scene for every occasion and preference.
- Customize Routines: Routines in the Philips Hue app allow you to create personalized lighting experiences that can adapt to your daily routines. From waking up to going to bed, you can define the lighting settings that seamlessly transition with your daily activities.
By using the Philips Hue app to manage your lights, you have complete control over the brightness, color, schedules, and overall ambiance of your lighting settings. With the various features and options available, you can unleash your creativity and tailor your lighting experience to match your lifestyle and preferences.
Adding additional Philips Hue Bulbs to your existing system
If you already have a Philips Hue lighting system set up and want to expand it by adding more bulbs, the process is straightforward. Follow these steps to successfully add additional Philips Hue bulbs to your existing system:
- Ensure that your Philips Hue Bridge is powered on and connected to your Wi-Fi network.
- Unbox and screw in the new Philips Hue bulbs into the desired light fixtures. Make sure the bulbs are turned on at the switch.
- Open the Philips Hue app on your smartphone or tablet. Make sure you are signed in to your Philips Hue account.
- In the app, tap on the “Settings” icon typically located at the lower-right or upper-right corner of the screen.
- Select “Light setup” or “Add Lights” from the settings menu. The app will start searching for available lights.
- Once the available bulbs are detected by the app, tap on the bulbs you wish to add to select them. You can add multiple bulbs at the same time, or add them one by one.
- Follow the on-screen instructions to complete the pairing process for the new bulbs. This may involve pressing the button on the Philips Hue Bridge or following specific instructions based on the bulb type.
- Once the pairing is successful, the app will prompt you to assign the new bulbs to specific rooms or areas in your home. Choose the appropriate location for each bulb to facilitate easy control and management.
- Repeat the process to add more Philips Hue bulbs if desired. You can continue adding additional bulbs to your system following the same steps.
- Ensure that the new bulbs are functioning properly by testing them with the app. Turn them on and off, adjust their brightness or color, and ensure they respond to commands as expected.
By following these steps, you can easily expand your existing Philips Hue lighting system by adding more bulbs. Whether you want to illuminate additional rooms or enhance the lighting ambiance in specific areas, the app allows for seamless integration and control of all your Philips Hue bulbs.
It’s important to note that as you add more bulbs to your system, the performance of the Philips Hue Bridge may be affected. Consider the recommended maximum number of bulbs per bridge to ensure optimal performance. If you encounter any issues during the process, consult the Philips Hue app’s troubleshooting section or refer to the user manual for further guidance.
Updating Firmware on Your Philips Hue Bridge
Updating the firmware on your Philips Hue Bridge is important to ensure optimal performance and access to the latest features and improvements. Firmware updates typically address bugs, security vulnerabilities, and enhance compatibility with other devices. Follow these steps to update the firmware on your Philips Hue Bridge:
- Ensure that your Philips Hue Bridge is connected to a stable power source and powered on.
- Open the Philips Hue app on your smartphone or tablet. Make sure you are signed in to your Philips Hue account.
- In the app, tap on the “Settings” icon, usually found in the lower-right or upper-right corner of the screen.
- Select “Software Update” or “Bridge Update” from the settings menu. The app will check for available firmware updates for your bridge.
- If an update is available, the app will prompt you to download and install it. Follow the on-screen instructions to proceed with the update.
- During the update process, ensure that your bridge remains connected to the power source and do not unplug or interrupt the update. This can cause issues and potentially damage the bridge.
- Wait for the update to complete. The time required for the update will vary based on the size of the update and your internet connection speed. It is best to have a stable and strong internet connection during the update process.
- Once the update is finished, the app will notify you that the firmware update was successful. You can now enjoy the improved performance and features of your Philips Hue Bridge.
- If there are no available firmware updates at the time, it is recommended to check for updates periodically. Philips releases firmware updates periodically to enhance the functionality and security of their products.
Keeping your Philips Hue Bridge firmware up to date ensures that your smart lighting system operates smoothly and utilizes the latest enhancements. It is a simple process that can be done through the Philips Hue app, keeping your bridge up to date with the latest advancements from Philips.
If you encounter any issues during the firmware update process or need further assistance, consult the Philips Hue app’s support section or refer to the user manual for guidance.