
Why Add Rooms and Lights to Your Philips Hue Lighting System
Expanding your Philips Hue lighting system by adding rooms and lights offers numerous benefits, allowing you to create a personalized and immersive lighting experience in your home. Adding rooms and lights provides you with greater control and flexibility, enabling you to create different moods and ambiance in various areas. Here are a few reasons why you should consider adding rooms and lights to your Philips Hue lighting system:
- Enhanced customization: By adding rooms and lights, you can tailor the lighting in each area of your home to suit your preferences and needs. Whether you want bright, energizing lights for your workspace or warm, relaxing lighting in your living room, the ability to customize each room’s lighting ensures that you can create the perfect atmosphere for any occasion.
- Improved functionality: Adding rooms and lights allows you to control different areas of your home independently. This means that you can turn on or off specific lights or adjust their brightness level based on your activities or time of day. Whether you want to brighten up the kitchen while cooking or dim the bedroom lights before bedtime, the added functionality enhances convenience and efficiency.
- Seamless integration: With the Philips Hue lighting system, you can easily integrate various smart devices, such as voice assistants or motion sensors, to further enhance the functionality and automation of your home lighting. By adding rooms and lights, you can expand the scope of automation and effortlessly control your lighting setup.
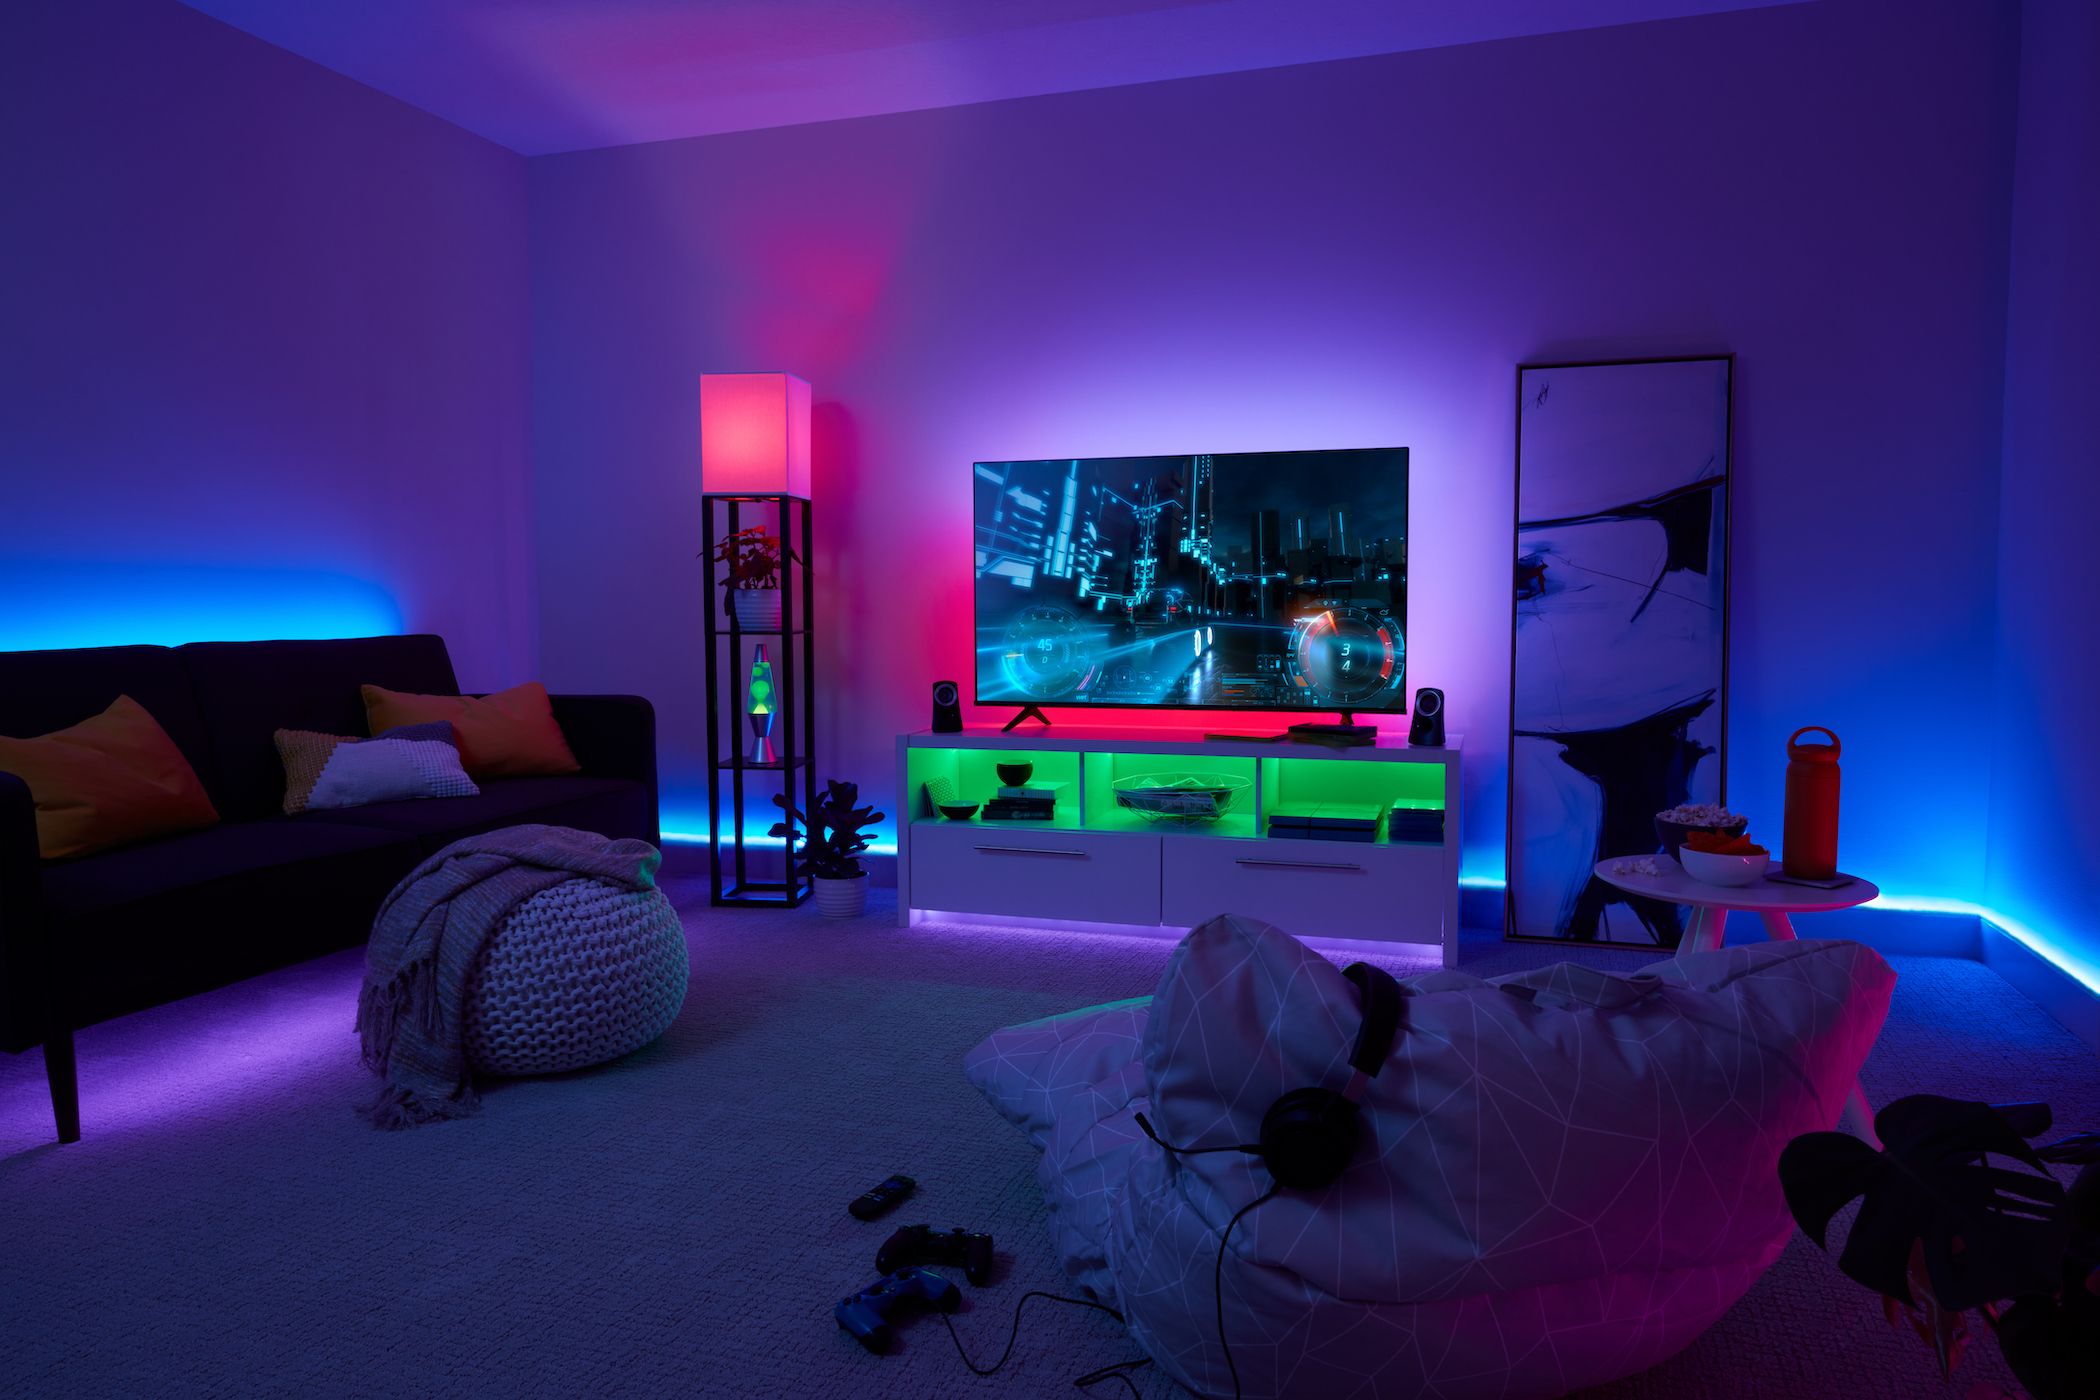
- Aesthetic appeal: Adding rooms and lights not only improves functionality but also enhances the visual appeal of your home. With the wide range of Philips Hue light options available, you can choose from a multitude of colors, hues, and brightness levels to complement your interior design and create stunning lighting effects that are sure to impress guests.
- Energy efficiency: The Philips Hue lighting system allows you to optimize your energy usage by scheduling lights to turn on or off automatically, adjusting brightness levels, and even integrating with smart sensors to detect occupancy. Adding rooms and lights gives you more control over energy-saving features, helping you reduce your environmental footprint and save on your energy bills.
So, whether you want to create a cozy reading nook, a vibrant entertainment area, or a serene sleeping environment, adding rooms and lights to your Philips Hue lighting system enables you to fully customize and control the lighting in your home, enhancing both functionality and aesthetics.
Step 1: Setting Up Your Philips Hue Bridge
Before you can add rooms and lights to your Philips Hue lighting system, the first step is to set up the Philips Hue Bridge. The Bridge acts as the central hub that connects and controls all the lights in your system. Here’s how you can set up the Philips Hue Bridge:
- Unbox and power up the Bridge: Start by unboxing the Philips Hue Bridge and connecting it to a power outlet using the included power adapter. Make sure the Bridge is placed in a central location to ensure optimal signal coverage.
- Connect the Bridge to your home network: Use the Ethernet cable provided to connect the Bridge to your home router or modem. Ensure a stable internet connection for seamless control of your Philips Hue lights.
- Download the Philips Hue app: Install the official Philips Hue app on your smartphone or tablet. The app is available for both iOS and Android devices and provides an intuitive interface for controlling your lights.
- Open the app and follow the instructions: Launch the Philips Hue app and follow the on-screen instructions to set up your Bridge. The app will guide you through the process of discovering and connecting to the Bridge on your home network.
- Press the button on the Bridge: During the setup process, you may be prompted to press the button on the Bridge to allow the app to connect. Press the button as instructed to complete the connection between the app and the Bridge.
- Create a Philips Hue account: If you don’t already have an account, you will be prompted to create one. This account will enable you to access and control your Philips Hue lights from anywhere, as well as enjoy additional features and integrations.
- Verify the connection: Once the app successfully connects to the Bridge, you will receive confirmation that the setup is complete. At this point, you are ready to start adding rooms and lights to your Philips Hue lighting system.
Setting up the Philips Hue Bridge is a crucial step in building your personalized lighting system. Ensure that you follow the instructions carefully to establish a stable connection between the Bridge and your home network. Once the Bridge is set up, you can move on to adding new rooms and lights to create the perfect lighting experience in your home.
Step 2: Adding New Rooms to Your Philips Hue System
Once you have set up your Philips Hue Bridge, you can start adding new rooms to your lighting system. Rooms allow you to group and control multiple lights together, providing a convenient way to manage specific areas in your home. Follow these steps to add new rooms to your Philips Hue system:
- Open the Philips Hue app: Launch the Philips Hue app on your smartphone or tablet. Ensure that you are connected to the same Wi-Fi network as your Bridge.
- Navigate to the Rooms section: In the app, navigate to the Rooms section, usually located in the main menu or on the home screen. This is where you can manage and add new rooms.
- Select the “Add Room” option: Look for the “Add Room” or similar button within the Rooms section. Tap on it to start the process of adding a new room.
- Choose a room name: Enter a name for the new room. This could be a descriptive name like “Living Room,” “Bedroom,” or any other appropriate name that helps you identify the area.
- Assign lights to the room: Select the lights that you want to add to the room from the list of available lights. You can choose multiple lights to be part of the room or add lights later if needed.
- Customize room settings: Customize the room settings to your preferences. You can choose an icon to represent the room, set the default brightness level, and configure any additional settings available in the app.
- Save the new room: Once you have finished customizing the room settings, save the new room by tapping the “Save” or similar button in the app.
By following these steps, you can easily add new rooms to your Philips Hue system and organize your lights according to different areas of your home. Adding rooms allows you to control multiple lights together with a single command or adjust their settings collectively. It provides a convenient way to manage and customize your lighting system, enhancing the overall experience and functionality in your home.
Step 3: Adding New Lights to Your Philips Hue System
Expanding your Philips Hue lighting system involves adding new lights to enhance the ambiance and functionality of your home. Whether you want to brighten up a specific area or add a touch of color to your living space, adding new lights to your Philips Hue system is a straightforward process. Follow these steps to add new lights:
- Prepare the new lights: Unbox the new Philips Hue lights and screw them into the desired light fixtures. Ensure that the lights are powered on and functioning correctly.
- Open the Philips Hue app: Launch the Philips Hue app on your smartphone or tablet and make sure it is connected to the same Wi-Fi network as your Bridge.
- Navigate to the Lights section: In the app, find the Lights section, often located in the main menu or on the home screen. This is where you can manage and add new lights to your system.
- Select the “Add Light” option: Look for the “Add Light” or similar button within the Lights section. Tap on it to initiate the process of adding a new light.
- Allow the app to search for new lights: Follow the app’s instructions to put the new lights into “discovery” or “pairing” mode. This typically involves turning the lights on and off or following specific button sequences.
- Wait for the new lights to be discovered: The Philips Hue app will scan for new lights and display them as they are found. This may take a few moments, so be patient during the discovery process.
- Name the new lights: Once the lights are discovered, assign them a name or location that helps you identify their placement. For example, you could name a light “Kitchen Pendant Light” or “Bedroom Ceiling Light.”
- Save the new lights: After naming the lights, save the new additions by tapping the “Save” or similar button in the app.
By following these steps, you can easily add new lights to your Philips Hue system and expand the lighting possibilities in your home. Remember to place the lights strategically to achieve the desired effect and make sure they are within range of your Philips Hue Bridge. With the ability to control and customize each light individually or collectively, you can create unique lighting setups that suit your preferences and complement various areas of your home.
Step 4: Pairing Your Lights with the Bridge
After adding new lights to your Philips Hue system, the next step is to pair them with the Bridge. Pairing your lights ensures that they are connected to the central hub and can be controlled through the Philips Hue app. Here’s how to pair your lights with the Bridge:
- Open the Philips Hue app: Launch the Philips Hue app on your smartphone or tablet. Make sure you are connected to the same Wi-Fi network as your Bridge.
- Navigate to the Lights section: In the app, go to the Lights section where you can manage and control your lights.
- Choose the light to pair: Tap on the light that you want to pair with the Bridge. You can pair one light at a time or select multiple lights to pair simultaneously.
- Select the “Pair” or “Connect” option: Look for the “Pair” or “Connect” button within the light settings. Tap on it to start the pairing process.
- Follow the on-screen instructions: The app will provide on-screen instructions to guide you through the pairing process. This may involve turning the light on and off or following specific button sequences on the light or Bridge.
- Wait for successful pairing: Once the pairing process is initiated, the app will attempt to establish a connection between the light and the Bridge. Wait for the process to complete, which usually takes a few seconds.
- Verify successful pairing: After pairing is successful, the light will be listed as connected within the app. You can test the control by turning the light on or off or adjusting its brightness from the app.
- Repeat for other lights: If you have additional lights to pair, repeat the same process for each light.
By following these steps, you can easily pair your new lights with the Philips Hue Bridge and integrate them into your lighting system. Take your time to ensure that each light is successfully paired before moving on to the next one. Once paired, you can control the lights individually or as part of a room, allowing you to create stunning lighting scenes, schedules, and automation.
Step 5: Configuring Your Rooms and Lights in the Philips Hue App
Once you have added rooms and lights to your Philips Hue system and paired them with the Bridge, it’s time to configure them in the Philips Hue app. The app provides a user-friendly interface that allows you to customize and manage your rooms and lights according to your preferences. Follow these steps to configure your rooms and lights in the Philips Hue app:
- Open the Philips Hue app: Launch the Philips Hue app on your smartphone or tablet. Make sure you are connected to the same Wi-Fi network as your Bridge.
- Navigate to the Rooms or Lights section: In the app, go to the Rooms or Lights section, depending on whether you want to configure an entire room or individual lights.
- Select the room or light to configure: Tap on the room or light that you want to configure. This will open the respective settings menu.
- Adjust room or light settings: Within the settings menu, you can customize various aspects of the room or light. This includes adjusting brightness, color, saturation, and even setting specific scenes or schedules.
- Set default settings: If you have specific preferences for a room or light, you can set the default settings. This ensures that each time you turn on the light or activate the room, it automatically adjusts to your desired configuration.
- Experiment with lighting scenes: The Philips Hue app provides a range of pre-set lighting scenes for different moods and occasions. Explore these scenes and select the ones that suit your preferences. You can also create custom scenes that reflect your unique style.
- Configure automation and scheduling: Take advantage of the app’s automation and scheduling features to automate your lighting system. Set up timers, routines, or integrate your lights with other smart devices for seamless control and convenience.
- Save your configurations: Once you have adjusted the settings and customized your rooms and lights, save the configurations by tapping the “Save” or similar button in the app.
By following these steps, you can configure your rooms and lights in the Philips Hue app to create the perfect lighting environment in your home. Take the time to explore and experiment with different settings, scenes, and automation options. With the app’s intuitive interface, you can easily customize your lighting system to suit your preferences and needs, providing a truly personalized and immersive lighting experience.
Step 6: Customizing Room and Light Settings
Once you have added and configured your rooms and lights in the Philips Hue app, the next step is to customize their settings to suit your preferences. This step allows you to fine-tune your lighting experience and create the perfect ambiance in your home. Here’s how you can customize room and light settings in the Philips Hue app:
- Open the Philips Hue app: Launch the Philips Hue app on your smartphone or tablet. Make sure you are connected to the same Wi-Fi network as your Bridge.
- Navigate to the Rooms or Lights section: Depending on whether you want to customize an entire room or individual lights, go to the respective section within the app.
- Select the room or light to customize: Tap on the room or light that you want to customize. This will open the settings for the selected room or light.
- Adjust brightness and color: Use the app’s controls to adjust the brightness and color of the room or light. You can choose from a spectrum of colors or select a specific color temperature to create the desired ambiance.
- Save favorite settings: If you have specific lighting settings that you enjoy, save them as your favorite. This allows you to easily recall and activate those settings with a single tap.
- Experiment with scenes: The Philips Hue app offers a variety of predefined scenes that you can try out. Explore different scenes for different moods and activities, such as “Energize,” “Relax,” or “Concentrate.” Customize the scenes to your liking, or create your own personalized scenes.
- Set schedules and timers: Take advantage of the app’s scheduling feature to automate your lighting. Set up timers for lights to turn on or off at specific times, or create schedules to simulate occupancy when you’re away from home.
- Explore advanced settings: The Philips Hue app may provide additional advanced settings, such as color looping, animation effects, or integration with other smart home devices. Explore these settings to further enhance and customize your lighting experience.
- Save your customizations: Once you have customized the settings to your liking, save your changes by tapping the “Save” or similar button in the app.
By following these steps, you can easily customize the settings of your rooms and lights in the Philips Hue app, allowing you to create the perfect lighting ambiance in your home. Take the time to explore the various options and experiment with different combinations to find what works best for you. With the ability to customize your lighting, you can create a personalized and enjoyable environment for any occasion.
Step 7: Grouping Rooms and Lights Together
Grouping rooms and lights together in your Philips Hue system allows you to control multiple lights simultaneously and create synchronized lighting effects throughout your home. This step enhances the convenience and flexibility of managing your lighting setup. Here’s how you can group rooms and lights together in the Philips Hue app:
- Open the Philips Hue app: Launch the Philips Hue app on your smartphone or tablet. Ensure that you are connected to the same Wi-Fi network as your Bridge.
- Navigate to the Rooms or Lights section: Go to the Rooms or Lights section within the app, depending on whether you want to group entire rooms or individual lights.
- Select the rooms or lights to group: Tap and hold on a room or light that you want to include in the group. After selecting the first room or light, continue to hold and select additional rooms or lights to include in the group.
- Create a group: Once you have selected all the rooms or lights for the group, look for the “Create Group” or similar option within the app. Tap on it to create a new group.
- Assign a name and icon: Provide a name and choose an icon that represents the group you just created. This helps you identify the group easily within the app.
- Configure group settings: Within the group settings, you can adjust the brightness, color, and other settings that apply to all the lights within the group. You can also assign specific scenes or schedules to the group.
- Save the group: After customizing the group settings, tap the “Save” or similar button in the app to save the newly created group.
- Control the group: Now, you can use the Philips Hue app to control the group of rooms or lights collectively. You can turn them on or off, adjust brightness and colors, or activate scenes that apply to the entire group.
- Repeat for other groups: If you have more rooms or lights to group together, repeat the same process to create additional groups.
By following these steps, you can easily group rooms and lights together in the Philips Hue app, giving you the ability to control multiple lights simultaneously and create unified lighting schemes. Take advantage of this feature to create different lighting moods in various areas of your home or synchronize the lighting effects throughout your living space. Grouping rooms and lights together enhances your overall lighting experience and makes it even more convenient to manage your Philips Hue system.
Step 8: Advanced Settings for Rooms and Lights
Once you have set up and configured your rooms and lights in the Philips Hue app, you can explore the advanced settings to further customize and enhance your lighting experience. These advanced settings offer additional functionality and options to fine-tune your Philips Hue system according to your preferences. Here are some of the advanced settings you can explore:
- Color looping: With color looping, you can create dynamic and ever-changing lighting effects. This setting allows your lights to smoothly transition through a range of colors, creating a captivating and mesmerizing display.
- Animation effects: The Philips Hue app may offer animation effects such as color fades, pulsating lights, or gentle transitions. These effects can add a playful and dynamic element to your lighting, enhancing the ambiance and creating a more immersive experience.
- Integration with other smart home devices: Explore the app’s capabilities to integrate your Philips Hue system with other smart home devices. This can enable you to synchronize your lighting with other features, such as motion sensors, voice control devices, or even music playback.
- Third-party apps and platforms: The Philips Hue ecosystem is supported by a wide range of third-party apps and platforms. These apps often offer advanced features, including dynamic scenes, music visualization, and even gamified lighting experiences. Browse through the available options to discover new ways to personalize and control your Philips Hue lights.
- Routines and automation: Take advantage of the app’s routines and automation features to set up custom lighting schedules and triggers. Create routines that automatically adjust your lights based on specific events, such as sunrise or sunset, or activate them when you arrive home.
- Explore additional settings: Depending on your specific Philips Hue products and the app version you are using, there may be other advanced settings available. These can include power-on behavior, light grouping options, or even control over the color temperature range. Take the time to explore the options and discover new ways to customize your lighting system.
By exploring these advanced settings, you can unlock the full potential of your Philips Hue system and create a truly immersive lighting experience. Experiment with different effects, integrate your lights with other devices, and use automation to simplify and enhance your everyday life. The advanced settings allow you to tailor your Philips Hue lights to your unique preferences, making your home lighting feel truly personalized.