
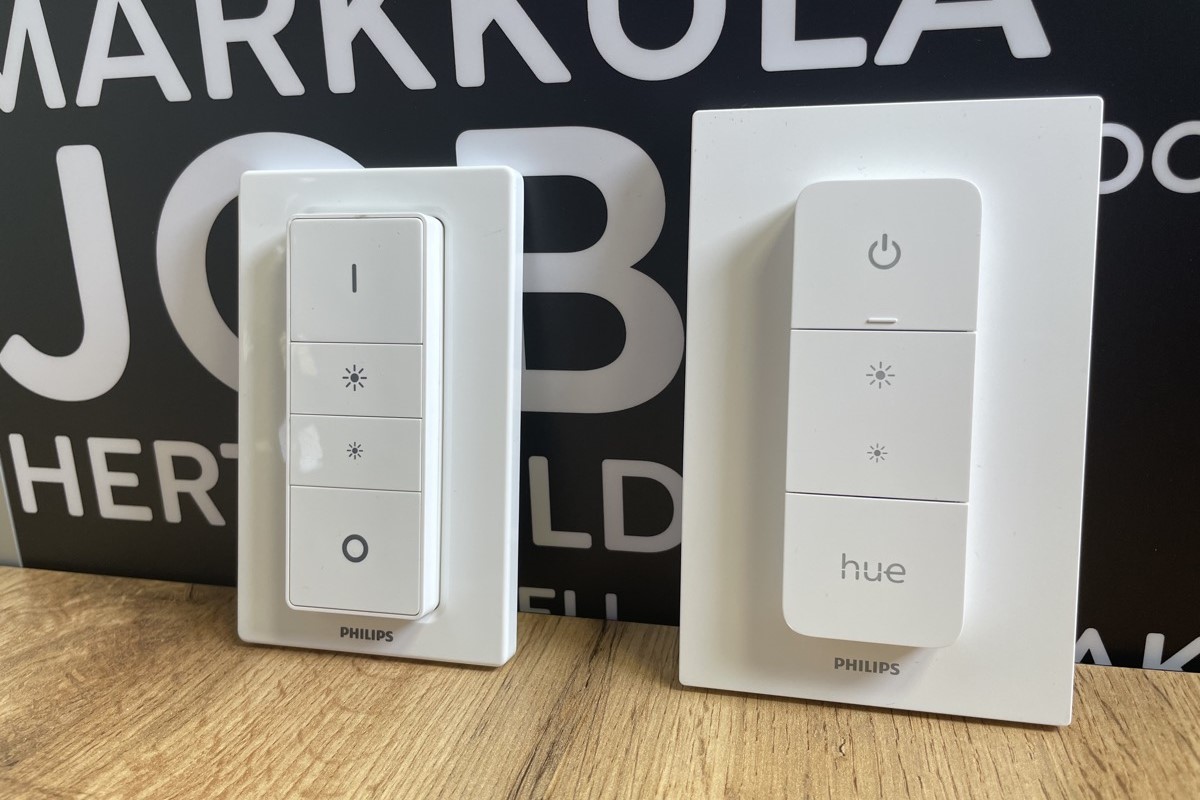
Overview of the Philips Hue Dimmer Switch
The Philips Hue Dimmer Switch is a wireless smart home device that allows you to control your Philips Hue lights with ease. Designed to replace traditional light switches, the dimmer switch provides a convenient way to adjust the brightness of your lights, create customizable lighting scenes, and even automate your lighting based on your preferences.
With the Philips Hue Dimmer Switch, you no longer have to fumble for your smartphone or use voice commands to control your lights. The compact and portable design of the dimmer switch makes it easy to place anywhere in your home, providing instant control whenever you need it.
One of the key features of the Philips Hue Dimmer Switch is its simplicity. The switch is battery-operated, eliminating the need for complicated wiring or the assistance of an electrician. It can be easily installed and set up by anyone, making it a user-friendly option for both tech-savvy individuals and those who are new to smart home devices.
The dimmer switch offers basic functionalities like on/off control and brightness adjustment. With just a press of a button, you can turn your lights on or off, or dim them to create the perfect ambiance for any occasion. The switch also includes additional buttons that can be programmed to activate your favorite lighting scenes or control other smart devices in your home, providing a customizable and versatile user experience.
Furthermore, the Philips Hue Dimmer Switch seamlessly integrates with the Philips Hue Bridge and the accompanying Philips Hue app. This allows you to further enhance your lighting experience by accessing advanced features such as scheduling, remote control, and voice control through popular smart assistants like Amazon Alexa, Google Assistant, and Apple HomeKit.
Whether you want to create a cozy atmosphere for a movie night, set an energizing light for a productive work session, or simply control your lights without reaching for your smartphone, the Philips Hue Dimmer Switch offers a convenient and efficient solution to meet your lighting needs. With its intuitive design, flexibility, and compatibility with the Philips Hue ecosystem, the dimmer switch is a valuable addition to any smart home setup.
Step 1: Unboxing and understanding the components
When you first receive your Philips Hue Dimmer Switch, it’s important to start by unboxing and familiarizing yourself with the different components included in the package. This will help you have a clear understanding of what you’re working with and ensure a smooth installation process.
Inside the box, you will find:
- The Philips Hue Dimmer Switch: This is the main device that will control your lights. It has a compact design with buttons for basic functions such as on/off control and brightness adjustment.
- A CR2450 battery: The dimmer switch is powered by a replaceable battery. Ensure that the battery is included and properly installed in the switch before proceeding.
- Mounting materials: Depending on your preference, the dimmer switch can be mounted on a wall or placed on a tabletop. The package should include adhesive tape and a bracket for wall mounting.
- Instruction manual: This essential guide provides detailed instructions on how to set up and use the Philips Hue Dimmer Switch. Make sure to read through the manual thoroughly before starting the installation process.
Before proceeding, it’s always a good idea to inspect the components and ensure that everything is in good condition. Check for any visible damages or missing parts and contact Philips customer support if needed.
By taking the time to unbox and understand the components, you will be well-prepared to move on to the next step of installing the Philips Hue Dimmer Switch. Having a clear understanding of the different parts and their functionality will make the installation process much more straightforward and help you avoid any potential issues along the way.
Step 2: Installing the Philips Hue Bridge
The Philips Hue Bridge is a central hub that connects your Philips Hue lighting system to your home Wi-Fi network. Before you can start using the Philips Hue Dimmer Switch, it’s important to set up and install the bridge as it serves as the backbone of your smart lighting setup.
To install the Philips Hue Bridge, follow these steps:
- Find a suitable location: The bridge should be placed in a central location within your home, ensuring that it is within range of your Wi-Fi router. This will help ensure a strong and reliable connection between the bridge and your smart lights.
- Connect the Bridge to power: Plug the provided power adapter into the back of the bridge and connect it to a power outlet. Make sure the bridge is powered on before proceeding.
- Connect the Bridge to your router: Use the provided Ethernet cable to connect the bridge to an available LAN port on your Wi-Fi router. Ensure a secure connection by firmly plugging in both ends of the cable.
- Wait for the lights to indicate connection: Once connected to power and your router, the lights on the bridge will start blinking. This indicates that the bridge is successfully connecting to your home network. Wait for a few moments until the lights stabilize and remain steady.
- Check for connection status: Confirm that the bridge is properly connected by opening the Philips Hue app on your smartphone or tablet. Follow the instructions on the app to confirm that the bridge is detected and connected. This may involve creating a new account or logging into an existing one.
Once the bridge is successfully installed and connected, you are now ready to proceed with setting up the Philips Hue Dimmer Switch. The bridge acts as the central control point for your smart lights and enables seamless communication between the switch, bridge, and your lighting system.
Remember to keep the bridge connected to power and your Wi-Fi router at all times to ensure uninterrupted access to your smart lighting features.
Step 3: Pairing the dimmer switch with the Philips Hue Bridge
Once you have installed and set up the Philips Hue Bridge, the next step is to pair the dimmer switch with the bridge. Pairing the switch allows it to communicate and control your Philips Hue lights, giving you seamless control over your smart lighting system.
To pair the dimmer switch with the Philips Hue Bridge, follow these steps:
- Ensure that the dimmer switch is within range: Make sure that the dimmer switch is within a reasonable distance from the Philips Hue Bridge. This will ensure a stable and responsive connection during the pairing process.
- Press and hold the set-up button on the switch: On the back of the dimmer switch, there is a small set-up button. Press and hold this button until the LED indicator on the front of the switch starts blinking.
- Open the Philips Hue app: On your smartphone or tablet, open the Philips Hue app. Ensure that you are connected to the same Wi-Fi network as the Philips Hue Bridge.
- Navigate to the Bridge settings: In the app’s navigation menu, navigate to the settings section for the Philips Hue Bridge. This may be labeled as “Bridge” or “Settings”.
- Select “Add a device”: Within the Bridge settings, look for the option to add a new device. Select this option to start the pairing process.
- Follow the on-screen instructions: The Philips Hue app will guide you through the pairing process. It may prompt you to press certain buttons on the dimmer switch or perform specific actions. Follow the on-screen instructions carefully to complete the pairing successfully.
- Wait for confirmation: Once the pairing process is complete, the Philips Hue app will confirm that the dimmer switch has been successfully paired with the bridge. You should now be able to control your Philips Hue lights using the switch.
It’s important to note that each dimmer switch can only be paired with one Philips Hue Bridge at a time. If you have multiple bridges in your home, ensure that you pair the switch with the correct bridge to have control over the desired set of lights.
By successfully pairing the dimmer switch with the Philips Hue Bridge, you have taken a crucial step in setting up your smart lighting system. The switch is now ready to be mounted and customized to your preferences, providing you with effortless control over your Philips Hue lights.
Step 4: Mounting the dimmer switch
After successfully pairing the Philips Hue Dimmer Switch with the Philips Hue Bridge, the next step is to mount the switch in a convenient and accessible location. Mounting the switch allows for easy access and ensures that it remains secure and within reach whenever you need to control your lights.
Follow these steps to mount the dimmer switch:
- Choose the mounting option: The Philips Hue Dimmer Switch comes with two mounting options – wall-mounted or placed on a tabletop. Consider your preferences and the layout of your space when deciding which option is best for you.
- Wall-mounting: If you choose to mount the switch on the wall, start by selecting a suitable location. Clean the wall surface and ensure it is dry before proceeding.
- Using the adhesive tape: Peel off the backing of the adhesive tape included in the package. Attach the tape to the back of the dimmer switch, aligning it with the corners or edges of the switch.
- Place the switch on the wall: Firmly press the dimmer switch onto the wall surface, ensuring that it is level and securely attached. Hold it in place for a few seconds to ensure proper adhesion.
- Tabletop placement: If you choose to place the dimmer switch on a tabletop, simply find a flat and stable surface to position it on. Make sure it is within reach and easily accessible.
When selecting the mounting location, consider the proximity to the lights you want to control. The switch should be within a reasonable distance to ensure optimal communication with the Philips Hue Bridge and the connected lights.
By mounting the Philips Hue Dimmer Switch, you are creating a dedicated control point for your smart lights. This ensures that the switch is easily accessible, eliminating the need to search for a misplaced remote or rely solely on smartphone or voice control.
Take your time to find the perfect spot for mounting the dimmer switch, considering the aesthetics and functionality of your space. With the switch securely in place, you are now ready to move on to the next step of adding the dimmer switch to the Philips Hue app.
Step 5: Adding the dimmer switch to the Philips Hue app
Now that you have mounted the Philips Hue Dimmer Switch, the next step is to add it to the Philips Hue app. Adding the switch to the app allows you to easily control your smart lights, customize settings, and take advantage of advanced features offered by the Philips Hue ecosystem.
Follow these steps to add the dimmer switch to the Philips Hue app:
- Open the Philips Hue app: Launch the Philips Hue app on your smartphone or tablet. Ensure that you are connected to the same Wi-Fi network as the Philips Hue Bridge.
- Navigate to the device settings: In the app’s navigation menu, locate the settings section for devices. This may be labeled as “Devices,” “Switches,” or something similar.
- Select “Add a device”: Within the device settings, look for the option to add a new device. Select this option to start the process of adding the dimmer switch.
- Follow the on-screen instructions: The Philips Hue app will guide you through the process of adding the dimmer switch. This may involve pressing specific buttons on the switch or performing certain actions to establish the connection.
- Wait for pairing confirmation: Once the app recognizes the dimmer switch, it will confirm the successful pairing. The switch should now appear in the list of devices within the app.
- Customize settings (optional): After adding the dimmer switch, you may have the option to customize its settings within the Philips Hue app. This can include assigning specific scenes or actions to the buttons on the switch, adjusting sensitivity, or configuring other preferences as desired.
Once the dimmer switch is successfully added to the Philips Hue app, you can begin using it to control your lights. The app will provide a user-friendly interface that allows you to easily adjust brightness, turn lights on or off, and access additional features offered by the Philips Hue ecosystem.
Remember to keep your Philips Hue app up to date to benefit from new features and improvements rolled out by Philips. It’s also recommended to familiarize yourself with the app’s interface and explore its various functionalities to make the most of your smart lighting system.
Step 6: Configuring the dimmer switch settings
Once you have added the Philips Hue Dimmer Switch to the Philips Hue app, the next step is to configure its settings according to your preferences. The app provides various customization options that allow you to personalize the functionality of the dimmer switch and optimize your smart lighting experience.
Follow these steps to configure the dimmer switch settings:
- Open the Philips Hue app: Launch the Philips Hue app on your smartphone or tablet. Ensure that you are connected to the same Wi-Fi network as the Philips Hue Bridge.
- Navigate to the dimmer switch settings: In the app’s navigation menu, locate the settings section for the dimmer switch. This may be labeled as “Switch settings,” “Device settings,” or something similar.
- Configure button assignments: Depending on the Philips Hue app version and the capabilities of your dimmer switch, you may have the option to assign specific actions or lighting scenes to each button on the switch. Follow the on-screen instructions to configure these assignments to your liking.
- Adjust sensitivity: If your dimmer switch offers sensitivity settings, you can fine-tune them to your preference. This allows you to control how responsive the switch is to your button presses.
- Explore advanced settings (optional): The Philips Hue app may offer additional advanced settings for the dimmer switch. This can include features like configuring sleep timers, setting up room-specific control, or integrating the switch with other smart devices in your home. Take the time to explore these options and enable any features that enhance your smart lighting experience.
By configuring the dimmer switch settings, you can tailor its operation to suit your specific needs and lifestyle. Whether you want to easily access your favorite lighting scenes or fine-tune the controls for a specific room, the Philips Hue app offers the flexibility to customize the dimmer switch to your liking.
It’s recommended to revisit the settings periodically to make any necessary adjustments or take advantage of new features introduced through app updates. Experiment with different configurations to find the setup that works best for you and enhances your overall smart home experience.
Step 7: Setting up scenes and automations with the dimmer switch
One of the great advantages of the Philips Hue Dimmer Switch is the ability to create personalized lighting scenes and automate your smart lighting system. Setting up scenes and automations allows you to enhance the ambiance of your space, improve convenience, and make the most out of your smart lighting experience.
Follow these steps to set up scenes and automations with the dimmer switch:
- Open the Philips Hue app: Launch the Philips Hue app on your smartphone or tablet. Ensure that you are connected to the same Wi-Fi network as the Philips Hue Bridge.
- Create lighting scenes: Using the app’s interface, create customized lighting scenes to reflect different moods or activities in your home. You can adjust the brightness, color, and even the color temperature of your lights to create the perfect ambiance.
- Assign scenes to the dimmer switch buttons: Once you have created your lighting scenes, assign them to specific buttons on the dimmer switch. This allows you to easily switch between different scenes with the press of a button.
- Set up automations: Explore the automation options provided by the Philips Hue app to further streamline your smart lighting experience. You can create schedules to automatically turn your lights on or off at specific times, or configure motion sensors to trigger specific lighting scenes when movement is detected.
- Test and adjust: After setting up scenes and automations, test them to ensure they work as intended. Make any necessary adjustments to ensure the lighting changes align with your desired preferences and daily routines.
By setting up scenes and automations with the dimmer switch, you can enhance the overall functionality and convenience of your smart lighting system. Whether you want to create a cozy movie night scene or have your lights turn on automatically when you enter a room, these features allow you to effortlessly set the perfect lighting environment for any occasion.
Continuously explore and experiment with different scene combinations and automation setups to find the ones that best suit your needs and preferences. Regularly reviewing and adjusting your scenes and automations ensures that your smart lighting system remains aligned with your evolving lifestyle and preferences.
Troubleshooting common issues with the Philips Hue Dimmer Switch
The Philips Hue Dimmer Switch is a reliable and user-friendly device, but like any technology, it may encounter occasional issues. Here are some common problems that you may encounter with the dimmer switch and some troubleshooting steps to help resolve them:
1. Dimmer switch not responding:
- Make sure the switch has a working battery and is properly connected to the Philips Hue Bridge.
- Check the dimmer switch’s range and ensure it is within range of the bridge and the lights it is supposed to control. Consider moving the switch closer to the bridge to test the connection.
- Try resetting the dimmer switch by removing the battery and reinserting it after a few seconds.
2. Inconsistent dimming or brightness control:
- Ensure that the lights you are trying to control with the dimmer switch are compatible with dimming. Not all LED lights are dimmable.
- Double-check the dimmer switch settings in the Philips Hue app to ensure that the button assignments and sensitivity are properly configured.
- If using multiple Philips Hue Bridges, ensure that the switch is paired with the correct bridge that controls the desired lights.
3. Problems with scene or automation activation:
- Confirm that the scenes or automations are properly set up in the Philips Hue app and are assigned to the appropriate buttons on the dimmer switch.
- Verify that the dimmer switch has a stable connection to the Philips Hue Bridge and the Wi-Fi network. Weak or intermittent connections can affect scene or automation activation.
- If the dimmer switch is not triggering the desired scenes or automations, try resetting the assignments and reconfiguring them in the Philips Hue app.
4. Connectivity issues between the dimmer switch and the Philips Hue Bridge:
- Verify that the Philips Hue Bridge is powered on, properly connected to the Wi-Fi network, and within range of the dimmer switch.
- Restart the Philips Hue Bridge and the dimmer switch by unplugging their power sources, waiting for a few seconds, and plugging them back in.
- Ensure that there are no physical obstructions or interference that may disrupt the wireless connection between the dimmer switch and the bridge.
If you continue to experience issues with the Philips Hue Dimmer Switch, consult the user manual, or reach out to Philips customer support for further assistance. They can provide specific troubleshooting steps and guidance tailored to your situation.
By following these troubleshooting steps, you can overcome common issues and ensure that your Philips Hue Dimmer Switch operates smoothly, allowing you to enjoy the convenience and versatility of smart lighting in your home.