
Why Forward Hotmail Email?
Email forwarding is a helpful feature that allows you to redirect your incoming messages from one email account to another. If you are a Hotmail (now Outlook) user, forwarding your emails to a different account can offer several benefits and convenience. Whether you are switching to a new email provider, consolidating multiple email accounts, or simply want to access your Hotmail emails in one place, email forwarding can simplify your communication and streamline your inbox management.
By forwarding your Hotmail emails to another account, you can ensure that all your messages are centralized in one location. This eliminates the need to constantly switch between different accounts to check and respond to emails. Additionally, forwarding can be particularly useful when you are transitioning from an old email address to a new one. Instead of notifying all your contacts about the new address, you can simply set up email forwarding to automatically send your incoming Hotmail emails to the new account.
Another advantage of email forwarding is increased flexibility and accessibility. You can access your Hotmail emails from any device or email client without the need to log in to multiple accounts. This can be especially beneficial for individuals who use multiple devices or prefer to manage their emails from a single platform.
Furthermore, email forwarding can serve as a backup mechanism to prevent the loss of important emails. By forwarding your Hotmail emails to another account, you can preserve a copy in case of any issues with your primary email provider or account.
Overall, forwarding Hotmail emails to a different account offers convenience, centralization, flexibility, and backup options. It simplifies email management and ensures that you can access and respond to your messages efficiently, regardless of the device or email provider you prefer to use.
How to Set Up Email Forwarding in Hotmail
If you’ve made the decision to forward your Hotmail emails to another account, setting up the email forwarding feature is a simple process. Follow the steps below to get started:
Step 1: Login to your Hotmail Account
Start by opening your preferred web browser and navigating to the Hotmail login page. Enter your email address and password to access your account.
Step 2: Access Email Forwarding Settings
Once you are logged in, click on the gear icon located in the top right corner of the page. From the dropdown menu, select “Options.”
Under the “Managing your account” section, locate and click on the “Email forwarding” option.
Step 3: Enable Email Forwarding
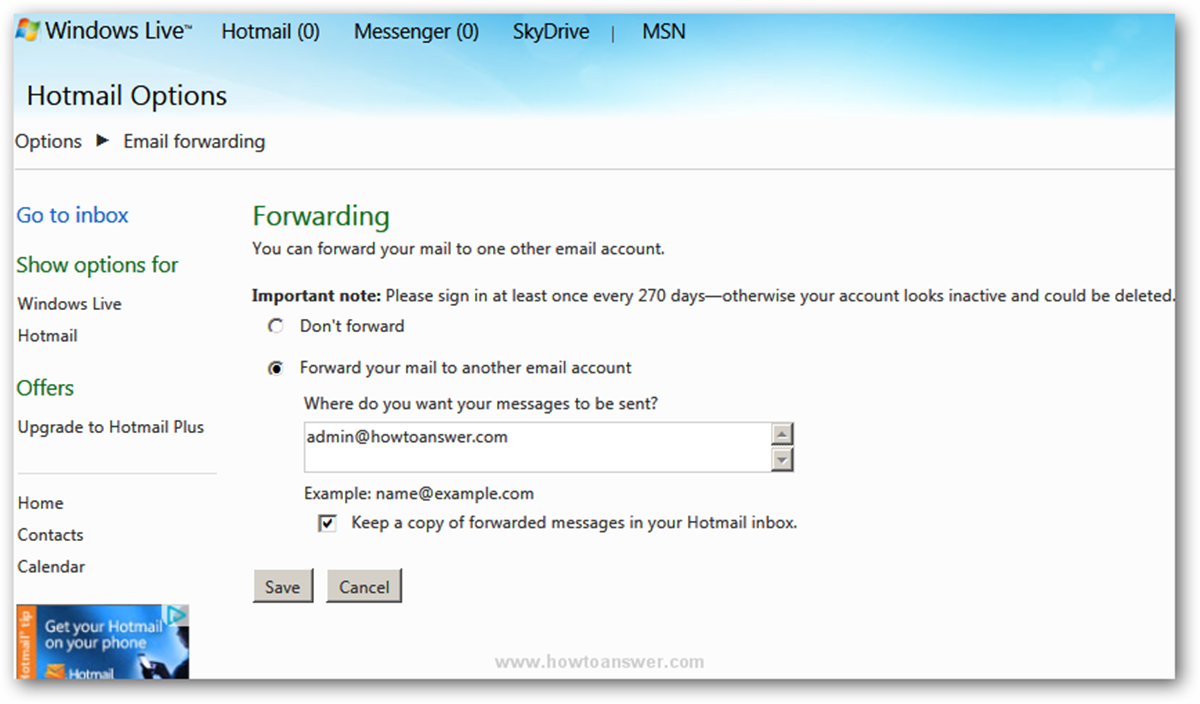
In the email forwarding settings, you will find an option to enable forwarding. Toggle the switch to turn on email forwarding.
Step 4: Specify the Forwarding Email Address
After enabling email forwarding, you will be prompted to enter the email address to which you want your Hotmail emails forwarded. Type in the desired email address in the provided field.
Step 5: Save the Changes
Once you have entered the forwarding email address, click on the “Save” button to save your settings. Hotmail will now start forwarding any incoming emails to the specified email address.
Step 6: Test the Forwarded Emails
To ensure that the forwarding process is working correctly, send a test email to your Hotmail account from another email address. Check the forwarding email address to verify that the email is successfully forwarded.
Setting up email forwarding in Hotmail is straightforward and can be done in minutes. Remember, you can always come back to the email forwarding settings to make changes or disable forwarding if needed. Enjoy the convenience of having your Hotmail emails automatically redirected to another account!
Step 1: Login to your Hotmail Account
The first step to set up email forwarding in Hotmail is to log in to your Hotmail account. Follow the simple instructions below to access your account:
1. Open a Web Browser: Launch your preferred web browser on your computer or mobile device. Hotmail is now known as Outlook, so you can also visit the Outlook website for logging in.
2. Go to the Hotmail Login Page: In the address bar of your browser, type “www.hotmail.com” or “www.outlook.com” and press Enter. This will take you to the Hotmail login page.
3. Enter Your Email Address: On the login page, enter the email address associated with your Hotmail account. Make sure to type it correctly to avoid any login errors.
4. Provide Your Password: Below the email field, enter the password associated with your Hotmail account. Ensure that you enter the correct password to gain access to your account. If you have forgotten your password, you can click on the “Forgot my password” link to reset it.
5. Click on “Sign In”: After entering your email address and password, click on the “Sign In” button to proceed. Hotmail will verify your login details and if they are correct, you will be directed to your Hotmail inbox.
6. Two-Step Verification (if enabled): If you have enabled two-step verification for your Hotmail account, you may need to provide an additional security code sent to your mobile device or alternate email address. Follow the on-screen instructions to complete the login process.
By successfully logging in to your Hotmail account, you are now ready to move on to the next step of setting up email forwarding. Remember to keep your login credentials secure and avoid sharing them with anyone to maintain the privacy and security of your Hotmail account.
Step 2: Access Email Forwarding Settings
Once you have successfully logged in to your Hotmail account, you can proceed to access the email forwarding settings. Follow the steps below to navigate to the email forwarding settings:
1. Locate the Gear Icon: On the top-right corner of your Hotmail inbox, you will see a small gear icon. Click on this gear icon to open a dropdown menu.
2. Select “Options”: From the dropdown menu, select the “Options” link. This will take you to the settings page of your Hotmail account.
3. Find “Email forwarding” Option: On the left side of the settings page, you will see various categories. Look for the category labeled “Managing your account” and click on the “Email forwarding” option within this section.
4. Verify Account Security (if prompted): Hotmail may ask you to verify your account security before accessing the email forwarding settings. This is to ensure that only authorized users are making changes to the email forwarding feature. Follow the on-screen instructions to complete the verification process if prompted.
5. Access Email Forwarding Settings: After completing any necessary security verification, you will be directed to the email forwarding settings page. Here, you can manage and configure the forwarding options for your Hotmail account.
It is important to note that Hotmail may periodically update its user interface and settings layout. If you are unable to locate the email forwarding settings using the given steps, look for an option similar to “Forwarding” or refer to the Hotmail/Outlook Help documentation for the most up-to-date instructions.
Now that you have accessed the email forwarding settings in Hotmail, you can proceed to enable email forwarding and specify the email address to which you want your Hotmail messages to be forwarded. This will be covered in the next steps of the setup process.
Step 3: Enable Email Forwarding
After accessing the email forwarding settings in your Hotmail account, you can proceed to enable the email forwarding feature. Follow the steps below to enable email forwarding:
1. Locate the Email Forwarding Option: In the email forwarding settings page, you will find an option to enable forwarding. Look for a toggle switch or checkbox labeled “Enable forwarding” or something similar.
2. Enable Email Forwarding: Click on the toggle switch or check the box to enable email forwarding. This will activate the forwarding feature for your Hotmail account.
3. Review Additional Settings (if available): Depending on the Hotmail/Outlook version you are using, you may have additional options related to email forwarding. These options could include choosing how to handle spam emails, leaving a copy of forwarded emails in your Hotmail inbox, or filtering specific emails from being forwarded. Review these settings and adjust them according to your preferences.
4. Save the Changes: After enabling email forwarding and configuring any additional settings, make sure to save the changes you made. Look for a “Save” or “Apply” button on the email forwarding settings page and click on it to save your changes. Hotmail will now start forwarding your incoming emails to the specified email address.
Note: Remember that enabling email forwarding in Hotmail may impact the delivery of emails to your Hotmail inbox. Once email forwarding is enabled, any new emails received will be redirected to the forwarding email address. They will no longer be delivered to your Hotmail inbox unless you disable and turn off email forwarding.
With email forwarding now enabled, you have successfully set up the forwarding feature in your Hotmail account. In the next step, we will cover how to specify the email address to which you want your Hotmail emails forwarded.
Step 4: Specify the Forwarding Email Address
After enabling email forwarding in your Hotmail account, the next step is to specify the email address to which you want your Hotmail emails forwarded. Follow the instructions below to specify the forwarding email address:
1. Locate the Forwarding Email Address Field: In the email forwarding settings page, you will find a field labeled “Forwarding email address” or something similar. This is where you will enter the email address to which you want your Hotmail emails forwarded.
2. Enter the Forwarding Email Address: Click on the forwarding email address field and type in the complete email address to which you want your Hotmail emails forwarded. Make sure to enter the email address correctly to avoid any delivery issues.
3. Verify the Forwarding Email Address (if required): Depending on the version of Hotmail/Outlook you are using, you may be prompted to verify the forwarding email address. This is an additional security measure to ensure that you have access to the specified email address. Follow the on-screen instructions to complete the verification process if prompted.
4. Review any Additional Options (if available): Some versions of Hotmail/Outlook may offer additional options related to forwarding, such as including the original message as an attachment or forwarding the email as an inline message. Review these options and choose the one that best suits your needs.
5. Save the Changes: Once you have entered the forwarding email address and reviewed any additional options, save the changes you made by clicking on the “Save” or “Apply” button on the email forwarding settings page. Hotmail will now start forwarding your incoming emails to the specified email address.
Note: It is crucial to ensure that the forwarding email address is correct and active. If the specified email address is incorrect or no longer in use, your forwarded emails will not reach their intended destination. Double-check the email address for accuracy before saving your changes.
With the forwarding email address now specified, your Hotmail emails will be automatically forwarded to the designated email account. In the next step, we will cover how to save the changes made to the email forwarding settings.
Step 5: Save the Changes
After specifying the forwarding email address in your Hotmail account, it’s essential to save the changes you’ve made to ensure that your emails are properly forwarded. Follow the steps below to save the changes in your email forwarding settings:
1. Locate the Save Button: In the email forwarding settings page, look for a “Save,” “Apply,” or “OK” button. This button is typically located at the bottom of the settings page.
2. Click on the Save Button: Once you have found the save button, click on it to save the changes you made to the email forwarding settings. Hotmail will update the settings and activate the email forwarding feature.
3. Confirmation Message: After clicking the save button, you may see a confirmation or success message indicating that your changes have been applied. This message reassures you that your email forwarding settings are successfully saved and active.
4. Double-check the Forwarding Email Address: Before leaving the email forwarding settings page, take a moment to double-check the forwarding email address you entered. Ensure that it is correct and exactly as you intended. If there are any errors, you can edit the field to make the necessary corrections before saving again.
5. Verify Forwarding: To ensure that the changes are working as expected, send a test email to your Hotmail account from another email address. Check the forwarding email address to confirm that the email is successfully forwarded.
Note: It is important to revisit the email forwarding settings if you ever want to make changes to your forwarding preferences or if you decide to disable email forwarding. You can always come back to this settings page, make the desired changes, and save them to update your forwarding settings.
With the changes saved, your Hotmail emails will now be forwarded to the specified email address. Enjoy the convenience of having your emails automatically redirected, ensuring that you never miss an important message.
Step 6: Test the Forwarded Emails
After enabling and saving the email forwarding settings in your Hotmail account, it is crucial to test the forwarded emails to ensure that they are being redirected correctly. Follow the steps below to test the forwarding functionality:
1. Send a Test Email: From another email account, send a test email to your Hotmail email address. Make sure to include a clear subject line and some content in the body of the email.
2. Check the Forwarding Email Address: After sending the test email, go to the email account you specified as the forwarding email address. Open the email inbox and look for the test message. Confirm that the email has been successfully forwarded and appears in the inbox of the forwarding email address.
3. Verify the Email Content: Open the forwarded test email and review the content to ensure that the email was forwarded accurately. Check that all the details, including the subject line, sender information, and email body, are correctly preserved in the forwarded email.
4. Test Different Email Types: To thoroughly test the forwarding functionality, send various types of emails to your Hotmail account. This can include plain text emails, emails with attachments, and emails with HTML formatting. Verify that all types of emails are properly forwarded to the designated email address.
5. Check for any Issues: During the testing phase, pay attention to any issues that may arise. Look for potential problems such as delays in forwarding, missing email content, or emails being marked as spam. If you encounter any issues, refer to the troubleshooting section below for potential solutions.
6. Repeat the Testing (if necessary): If you encounter any issues or want to reconfirm the forwarding functionality, repeat the testing process using different test emails. This will help ensure that the forwarding feature is consistently working as intended.
By testing the forwarded emails, you can have peace of mind knowing that your Hotmail emails are being successfully redirected to the specified email address. If any issues arise during the testing process, refer to the troubleshooting tips in the next section for potential solutions.
How to Disable Email Forwarding in Hotmail
If you have enabled email forwarding in your Hotmail account but no longer wish to have your emails redirected, you can easily disable the forwarding feature. Follow the steps below to disable email forwarding in Hotmail:
Step 1: Access Email Forwarding Settings
Start by logging in to your Hotmail account and navigating to the email forwarding settings. To access the settings, click on the gear icon located in the top-right corner of the page and select “Options” from the dropdown menu. Then, click on the “Email forwarding” option under the “Managing your account” section.
Step 2: Disable Email Forwarding
In the email forwarding settings page, you will find the option to enable or disable email forwarding. Locate the toggle switch or checkbox associated with email forwarding and turn it off. This will disable the forwarding feature for your Hotmail account.
Step 3: Save the Changes
Once you have disabled email forwarding, make sure to save the changes you made to the settings. Look for a “Save” or “Apply” button on the email forwarding settings page and click on it. Hotmail will update the settings and deactivate the email forwarding feature.
Note: Disabling email forwarding will prevent any new incoming emails from being redirected to the designated email address. However, any emails that were already forwarded will not be affected by disabling the feature. Those emails will remain in the forwarding email account.
By following these simple steps, you can effortlessly disable email forwarding in your Hotmail account. If you decide to re-enable forwarding in the future, you can revisit the email forwarding settings and follow the necessary steps to activate it again.
Step 1: Access Email Forwarding Settings
To disable email forwarding in your Hotmail account, you need to access the email forwarding settings. Follow the steps below to navigate to the settings page:
1. Log in to your Hotmail Account: Open your preferred web browser and go to the Hotmail login page. Enter your email address and password to access your account.
2. Go to the Settings Menu: After logging in, look for a gear icon located in the top-right corner of the page. Click on this gear icon to open a dropdown menu.
3. Click on “Options”: From the dropdown menu, select the “Options” link. This will take you to the settings page of your Hotmail account.
4. Find the Email Forwarding Option: On the left side of the settings page, you will see different categories and sections. Look for the category labeled “Managing your account” and click on the “Email forwarding” option within this section.
5. Verify Account Security (if prompted): Hotmail may require you to verify your account security before accessing the email forwarding settings. This is a security precaution to prevent unauthorized access. Follow the on-screen instructions to complete the verification process if prompted.
6. Access the Email Forwarding Settings: After completing any necessary security verification, you will be directed to the email forwarding settings page. This is where you can manage and configure the forwarding options for your Hotmail account.
Note that the exact layout and organization of the settings page may vary depending on the version of Hotmail/Outlook you are using. If you are unable to locate the email forwarding settings using the given steps, look for an option similar to “Forwarding” or refer to the Hotmail/Outlook Help documentation for the most up-to-date instructions.
Now that you have accessed the email forwarding settings in Hotmail, you can proceed to disable the email forwarding feature. The next steps will guide you through the process of disabling email forwarding.
Step 2: Disable Email Forwarding
Once you have accessed the email forwarding settings in your Hotmail account, you can proceed to disable the email forwarding feature. Follow the steps below to disable email forwarding:
1. Locate the Email Forwarding Option: In the email forwarding settings page, you will find the option to enable or disable email forwarding. It could be in the form of a toggle switch, checkbox, or radio button.
2. Disable Email Forwarding: Find the option or control associated with email forwarding. If there is a toggle switch, turn it off by clicking or sliding it. If there is a checkbox, uncheck it. If there are radio buttons, select the option that indicates disabling email forwarding.
3. Review Additional Options (if available): Depending on the version of Hotmail/Outlook you are using, there may be additional options related to email forwarding. Review these options and make sure they are adjusted according to your preferences, especially when disabling email forwarding.
4. Save the Changes: After disabling email forwarding and reviewing the settings, save the changes you made. Look for a “Save,” “Apply,” or “OK” button on the email forwarding settings page, and click on it to save the updated settings.
Note: Disabling email forwarding will stop the redirection of your incoming emails to the specified forwarding email address. Any new emails you receive will remain in your Hotmail inbox instead of being forwarded.
By following these steps, you can easily disable email forwarding in your Hotmail account. If you ever decide to re-enable email forwarding in the future, you can revisit the email forwarding settings and follow the necessary steps to activate it again.
Step 3: Save the Changes
After disabling email forwarding in your Hotmail account, it is important to save the changes you’ve made to ensure that the forwarding feature remains disabled. Follow the steps below to save the changes:
1. Locate the Save Button: In the email forwarding settings page, look for a “Save,” “Apply,” or “OK” button. This button is typically located at the bottom or top-right corner of the settings page.
2. Click on the Save Button: Once you have found the save button, click on it to save the changes you made to the email forwarding settings. Hotmail will update the settings and ensure that the forwarding feature remains disabled.
3. Confirmation Message: After clicking the save button, you may see a confirmation or success message indicating that your changes have been applied. This serves as confirmation that the email forwarding feature has been successfully disabled.
4. Verify Forwarding Status: To ensure that email forwarding is indeed disabled, try sending a test email to your Hotmail account from another email address. Check to see if the email remains in your Hotmail inbox and is not forwarded to any other email address.
Note: It’s important to periodically check your email forwarding settings, especially if you are no longer using the forwarding feature. This ensures that your emails are delivered to your Hotmail inbox as intended.
By saving the changes and verifying the forwarding status, you have successfully disabled email forwarding in your Hotmail account. If you change your mind in the future and wish to re-enable this feature, you can always revisit the email forwarding settings and follow the necessary steps to activate it again.
Common Issues and Troubleshooting Tips
While setting up email forwarding in Hotmail, you may encounter some common issues or face challenges. Here are some troubleshooting tips to help you resolve these issues:
Issue 1: Forwarding Emails Not Received
If you are not receiving forwarded emails in your specified forwarding email address, follow these steps:
- Double-check the forwarding email address to ensure it is entered correctly.
- Verify the spam/junk folder of your forwarding email address to ensure the forwarded emails are not being marked as spam.
- Check the forwarding settings in your Hotmail account to ensure email forwarding is still enabled and properly configured.
- If the issue persists, try disabling email forwarding, saving the changes, and then enabling it again to reset the forwarding feature.
Issue 2: Forwarding Email to a Blocked Email Address
If you are unable to forward emails to a specific email address, follow these steps:
- Check the forwarding email address to ensure it is not blocked or filtered by the recipient’s email service provider.
- Contact the recipient and verify if they have any specific email settings that may impact the delivery of forwarded emails.
- Try forwarding the email to a different email address to see if the issue is specific to that particular recipient.
Issue 3: Forwarded Emails Going to Spam/Junk Folder
If the forwarded emails are consistently being marked as spam or ending up in the junk folder of the forwarding email address, follow these steps:
- Check the spam or junk folder settings in the forwarding email account and adjust the settings to allow emails from your Hotmail account.
- Add your Hotmail email address to the contact list or safe senders list of the forwarding email account to ensure the emails are not marked as spam.
- If the issue persists, contact the support team of the email service provider for the forwarding email address and inquire about their spam filtering policies.
By following these troubleshooting tips, you can address common issues that may arise while setting up or using email forwarding in Hotmail. If you are unable to resolve the issues on your own, it is recommended to contact the support team of the respective email service providers for further assistance.
Issue 1: Forwarding Emails Not Received
One common issue that users may encounter while setting up email forwarding in Hotmail is when forwarded emails are not received in the specified forwarding email address. If you are facing this issue, here are some troubleshooting tips to help resolve the problem:
1. Double-check the forwarding email address: Ensure that the email address entered in the forwarding settings is correct. Even a small typo can result in emails being sent to the wrong address.
2. Check the spam/junk folder: Check the spam or junk folder in the forwarding email account. Sometimes, forwarded emails can be incorrectly flagged as spam by the email provider’s filters. If found in the spam or junk folder, mark the email as not spam to help train the email provider’s filters.
3. Verify the forwarding settings: Double-check the forwarding settings in your Hotmail account to ensure that email forwarding is still enabled and properly configured. Make sure that there are no issues or error messages displayed in the settings page.
4. Disable and re-enable email forwarding: If the issue persists, try disabling email forwarding, save the changes, and then re-enable it again. This can sometimes resolve any minor glitches or configuration issues that may be causing the problem.
5. Test with different email addresses: To pinpoint the issue, try forwarding test emails to different email accounts. Send test emails to multiple email addresses, including ones from different email providers, to see if the issue is specific to a particular recipient or email service.
6. Contact Hotmail support: If the above steps do not resolve the problem, contact Hotmail support for assistance. They will be able to address any technical issues specific to your account and provide further guidance to ensure that forwarding works smoothly.
By following these troubleshooting tips, you can increase the chances of resolving the issue of emails not being received in the forwarding email address. It’s important to identify and address the problem promptly to ensure that your emails are correctly forwarded to the intended destination.
Issue 2: Forwarding Email to a Blocked Email Address
Another common issue that users may encounter while setting up email forwarding in Hotmail is when emails cannot be forwarded to a specific email address. If you find yourself unable to forward emails to a particular recipient, here are some troubleshooting tips to help resolve the issue:
1. Check for blocked or filtered addresses: Verify if the recipient’s email address is blocked or filtered by their email service provider. Some email providers have strict filtering rules that may prevent emails from certain senders or domains from being delivered.
2. Contact the recipient: Reach out to the intended recipient and confirm if they have any specific email settings that might be blocking incoming forwarded emails. They may have set up filters or blocking rules that prevent emails from being received.
3. Try a different email address: Attempt to forward the email to a different email address, such as an alternate email of the same recipient or a different person altogether. This will help determine if the issue is limited to that specific email address or if it is a broader problem.
4. Check for bounce-back messages: If the email fails to be forwarded, check your Hotmail inbox for any bounce-back or error messages. These messages could provide insight into the reason why the email is not being forwarded and could contain helpful information for troubleshooting.
5. Verify email forwarding settings: Review the email forwarding settings in your Hotmail account to ensure that forwarding is correctly configured. Double-check the recipient’s email address to ensure it was entered accurately without any typos or extraneous characters.
6. Contact Hotmail support: If the issue persists and none of the above steps resolve the problem, it may be necessary to reach out to Hotmail support for further assistance. They can investigate the issue and provide guidance based on the specifics of your account and the recipient’s email provider.
By following these troubleshooting tips, you can work towards resolving the issue of being unable to forward emails to a specific email address. It is important to identify and address the problem to ensure that your emails reach the intended recipients without any hindrance.
Issue 3: Forwarded Emails Going to Spam/Junk Folder
One common issue that users may face while setting up email forwarding in Hotmail is when forwarded emails end up in the spam or junk folder of the forwarding email address. If you are experiencing this issue, here are some troubleshooting tips to help resolve it:
1. Check spam or junk folder settings: Review the spam or junk folder settings in the forwarding email account. Adjust the settings to ensure that emails from your Hotmail account are not mistakenly marked as spam. Whitelist or mark the email address as a safe sender to prevent future emails from being filtered.
2. Add Hotmail email address to the contact list: Add your Hotmail email address to the contact list or address book of the forwarding email account. This can help the email provider recognize your emails as legitimate and prevent them from being flagged as spam.
3. Avoid using misleading subject lines or spam-triggering content: Ensure that the subject line and content of your forwarded emails are clear and relevant. Avoid using deceptive subject lines or content that may trigger spam filters. Keep the content concise, free from excessive formatting, and avoid using excessive capitalization or spammy phrases.
4. Test with different forwarding methods: Try using different email forwarding methods, such as using a different email client or forwarding service, to see if the issue persists. Some forwarding methods may have better deliverability rates to prevent emails from being marked as spam.
5. Monitor and adjust email filtering rules: Regularly review the filtering rules in the forwarding email account. Adjust any rules that may be mistakenly filtering forwarded emails into the spam or junk folder. Customize the filters to ensure that forwarded emails from your Hotmail account are properly delivered to the inbox.
6. Contact the email service provider: If the issue persists despite following the above steps, contact the support team of the email service provider for the forwarding email account. They can provide specific assistance and guidance in adjusting spam filtering settings or troubleshooting the issue.
By following these troubleshooting tips, you can address the issue of forwarded emails going to the spam or junk folder. Proper configuration, setting adjustments, and communication with the email service provider can help ensure that forwarded emails are delivered to the intended inbox rather than being marked as spam.