
Precautions before Deleting Contacts
Before you embark on the journey of deleting contacts from your iPhone 12, it's crucial to exercise caution and consider a few important factors. Contacts are valuable pieces of information, often representing connections to friends, family, colleagues, and acquaintances. Therefore, it's essential to approach the process thoughtfully to avoid accidental deletions and potential data loss.
-
Backup Your Contacts: Prior to deleting any contacts, it's highly recommended to create a backup of your existing contact list. This can be done by syncing your contacts with iCloud or using third-party backup solutions. By doing so, you can safeguard your contacts and easily restore them in case of accidental deletions.
-
Review Contacts Thoroughly: Take a moment to review your contact list and ensure that you are not deleting any important or irreplaceable contacts. Sometimes, contacts may appear redundant at first glance, but they could hold significant value in the future. Therefore, it's wise to double-check before proceeding with the deletion process.
-
Consider Alternative Solutions: If your primary reason for deleting contacts is to declutter your address book, consider alternative solutions such as creating contact groups or using contact management apps. These options allow you to organize and streamline your contacts without permanently removing them from your device.
-
Sync with Other Devices: If you have multiple devices linked to the same iCloud account, it's important to consider the potential impact of contact deletions across all synced devices. Ensure that you are aware of the synchronization settings and the implications of deleting contacts on other connected devices.
By taking these precautions, you can approach the process of deleting contacts on your iPhone 12 with confidence and minimize the risk of unintended data loss. It's always better to err on the side of caution when dealing with valuable information, and these simple steps can help you navigate the process smoothly and securely.
Method 1: Deleting Contacts from the Contacts App
Deleting contacts directly from the Contacts app on your iPhone 12 is a straightforward process that allows you to remove individual contacts with ease. Follow these simple steps to tidy up your contact list:
-
Open the Contacts App: Locate and tap the "Contacts" app on your iPhone's home screen. The app icon typically features a silhouette of a person and is labeled "Contacts."
-
Select the Contact: Once the Contacts app is open, browse through your contact list and select the contact you wish to delete. Tap on the contact to view their details.
-
Tap "Edit": In the top-right corner of the contact's details page, you will find an "Edit" button. Tap on it to enter the editing mode for the selected contact.
-
Scroll Down and Tap "Delete Contact": Scroll down to the bottom of the contact's editing page, and you will find the option to "Delete Contact." Tap on this option to initiate the deletion process.
-
Confirm Deletion: A confirmation prompt will appear, asking if you want to delete the contact. Tap "Delete Contact" to confirm. Once confirmed, the contact will be permanently removed from your iPhone 12.
By following these steps, you can efficiently remove unwanted contacts from your iPhone 12 using the Contacts app. This method is ideal for deleting individual contacts and offers a simple and intuitive way to manage your contact list directly from your device.
It's important to note that once a contact is deleted, it cannot be recovered unless you have a backup of your contacts. Therefore, it's advisable to exercise caution and ensure that you are deleting the correct contact before confirming the deletion.
Additionally, if you have multiple contacts to delete, repeating this process for each contact may become time-consuming. In such cases, you may consider alternative methods for deleting contacts in bulk or explore the option of using iCloud to manage your contacts more efficiently.
Overall, the Contacts app provides a convenient and user-friendly interface for managing your contacts, allowing you to declutter your address book and maintain a streamlined list of contacts on your iPhone 12.
Method 2: Deleting Contacts from the Phone App
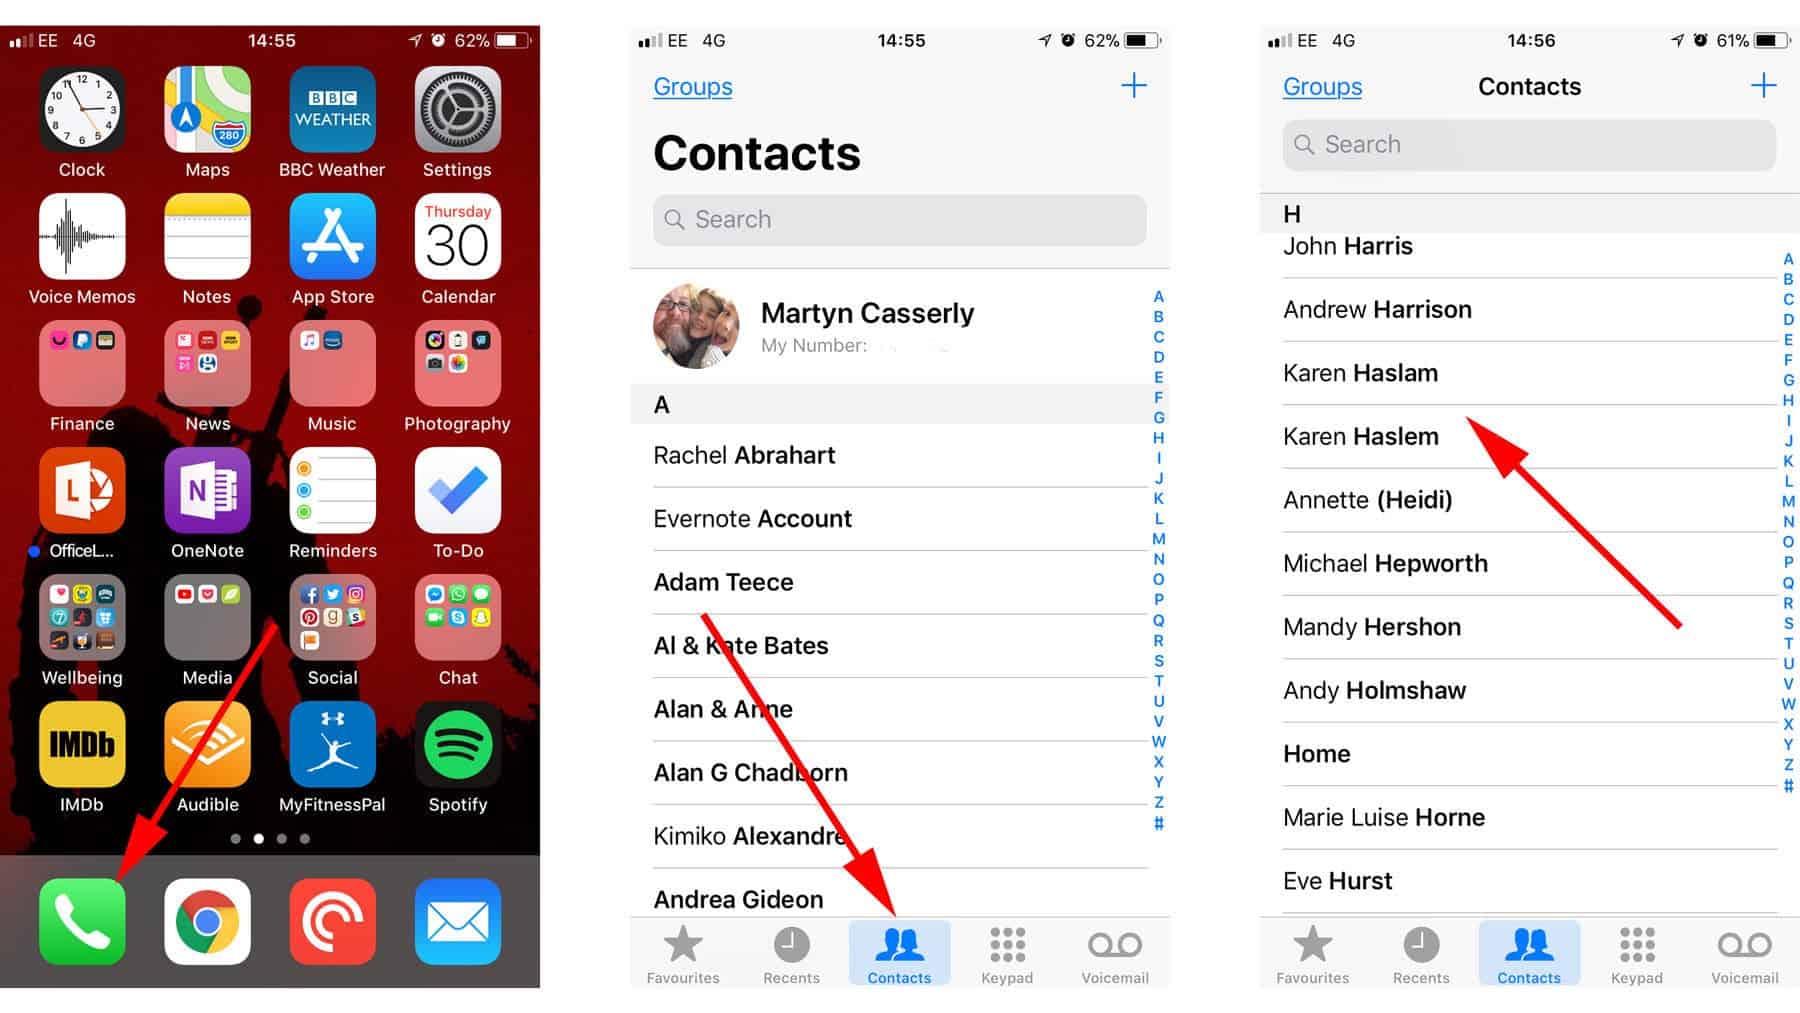
Deleting contacts from the Phone app on your iPhone 12 offers an alternative method for efficiently managing your contact list. While the Contacts app provides a dedicated interface for contact management, the Phone app also allows you to remove unwanted contacts with ease. Here's a detailed guide on how to delete contacts using the Phone app:
-
Open the Phone App: Begin by locating and tapping the "Phone" app on your iPhone's home screen. The Phone app icon typically features a classic telephone receiver symbol and is labeled "Phone."
-
Navigate to Contacts: Within the Phone app, navigate to the "Contacts" section, which is usually accessible through a dedicated tab or menu option. Once you are in the Contacts section, you will have access to your complete contact list.
-
Select the Contact: Browse through your contact list and select the contact you wish to delete. Tap on the contact to view their details. This action will allow you to access the contact's information and initiate the deletion process.
-
Edit Contact Details: Look for an "Edit" option or an "Edit" button within the contact's details page. Tap on it to enter the editing mode for the selected contact. This step is crucial as it enables you to make changes to the contact's information, including the option to delete the contact.
-
Scroll Down and Delete: Once in the editing mode, scroll down to the bottom of the contact's details page. Look for the option to "Delete Contact" or a similar deletion prompt. Tap on this option to initiate the deletion process for the selected contact.
-
Confirm Deletion: A confirmation prompt will appear, asking if you want to delete the contact. Confirm the deletion by tapping "Delete Contact" or a similar confirmation option. Once confirmed, the contact will be permanently removed from your iPhone 12.
By following these steps, you can effectively delete contacts from the Phone app on your iPhone 12. This method provides a convenient and streamlined approach to managing your contacts directly from the Phone app, offering an alternative to the Contacts app for contact deletion.
It's important to exercise caution and ensure that you are deleting the correct contact before confirming the deletion. Additionally, similar to the Contacts app method, once a contact is deleted from the Phone app, it cannot be recovered unless you have a backup of your contacts.
Overall, the Phone app serves as a versatile platform for contact management, allowing you to declutter your contact list and maintain a well-organized collection of contacts on your iPhone 12.
Method 3: Deleting Multiple Contacts at Once
Managing a large number of contacts on your iPhone 12 can be a daunting task, especially when it comes to deleting multiple contacts simultaneously. Fortunately, there are efficient methods available that allow you to streamline the process and declutter your contact list with ease. Deleting multiple contacts at once can save time and effort, providing a convenient solution for those looking to tidy up their address book. Here's a detailed guide on how to delete multiple contacts at once on your iPhone 12:
Using the Contacts App
-
Open the Contacts App: Launch the Contacts app on your iPhone 12, and navigate to the contact list.
-
Select Multiple Contacts: Tap the "Select" option, usually located in the top-right corner of the screen. This will enable you to select multiple contacts by tapping on each contact's profile.
-
Delete the Selected Contacts: Once you have selected the desired contacts, look for the delete option, often represented by a trash can icon or a "Delete" button. Tap on this option to initiate the deletion process for the selected contacts.
-
Confirm Deletion: A confirmation prompt will appear, asking if you want to delete the selected contacts. Confirm the deletion, and the selected contacts will be permanently removed from your iPhone 12.
Using Third-Party Contact Management Apps
-
Explore Contact Management Apps: Consider using third-party contact management apps available on the App Store. These apps often offer advanced features for contact organization, including the ability to delete multiple contacts at once.
-
Install and Launch the App: Choose a reputable contact management app, install it on your iPhone 12, and launch the app to access its features.
-
Select and Delete Contacts: Utilize the app's interface to select multiple contacts for deletion. The app may provide a dedicated option or tool for bulk contact deletion.
-
Confirm Deletion: Follow the app's prompts to confirm the deletion of the selected contacts. Once confirmed, the contacts will be deleted from your iPhone 12.
By leveraging these methods, you can efficiently delete multiple contacts at once, reducing the time and effort required to manage your contact list. Whether using the native Contacts app or third-party solutions, the ability to delete multiple contacts simultaneously empowers you to maintain a well-organized and relevant collection of contacts on your iPhone 12.
Method 4: Using iCloud to Delete Contacts
Utilizing iCloud for contact management provides a seamless and efficient way to delete contacts across multiple devices while ensuring that the changes are synchronized and reflected uniformly. iCloud serves as a centralized platform for managing contacts, offering a convenient method for deleting individual contacts or removing multiple contacts simultaneously. Here's a comprehensive guide on how to leverage iCloud to delete contacts on your iPhone 12:
Deleting Individual Contacts
- Access iCloud Contacts: Begin by accessing iCloud Contacts through a web browser on your computer or by navigating to the Contacts section within the iCloud settings on your iPhone 12.
- Select the Contact: Locate and select the contact you wish to delete from the iCloud Contacts interface.
- Delete the Contact: Look for the delete option, often represented by a trash can icon or a "Delete" button. Click on this option to initiate the deletion process for the selected contact.
- Confirm Deletion: A confirmation prompt will appear, asking if you want to delete the contact. Confirm the deletion, and the contact will be permanently removed from your iCloud account and synchronized across all connected devices, including your iPhone 12.
Deleting Multiple Contacts
- Access iCloud Contacts: Similarly, access iCloud Contacts through a web browser or the iCloud settings on your iPhone 12.
- Select Multiple Contacts: Utilize the interface to select multiple contacts for deletion. This can often be achieved by holding down the Ctrl key (Windows) or the Command key (Mac) while clicking on individual contacts.
- Delete the Selected Contacts: Once you have selected the desired contacts, look for the delete option and initiate the deletion process for the selected contacts.
- Confirm Deletion: Confirm the deletion, and the selected contacts will be permanently removed from your iCloud account, ensuring that the changes are synchronized across all linked devices, including your iPhone 12.
By leveraging iCloud for contact management, you can efficiently delete individual contacts or remove multiple contacts at once, streamlining the process and ensuring consistent updates across your devices. This method offers a centralized and synchronized approach to contact deletion, empowering you to maintain a well-organized and up-to-date contact list on your iPhone 12.