
Understanding Text Blockade on iPhone 12
Text blockade on the iPhone 12 refers to the ability to prevent specific contacts from sending you text messages. This feature is particularly useful for managing communication and maintaining a peaceful digital environment. By understanding how text blockade works on the iPhone 12, you can effectively control the messages you receive and ensure a more streamlined messaging experience.
When you block a contact on your iPhone 12, you essentially prevent them from sending you text messages. This means that any texts they attempt to send will not reach your device. Additionally, you won't receive notifications for messages from blocked contacts, providing a seamless way to avoid unwanted communication.
It's important to note that when you block a contact, it doesn't notify them that they've been blocked. This discreet approach allows you to manage your messaging preferences without causing unnecessary conflict or discomfort.
Furthermore, the text blockade feature on the iPhone 12 provides a sense of control over your messaging environment. Whether it's to avoid spam messages, prevent harassment, or simply minimize distractions, the ability to block texts from specific contacts empowers users to curate their digital interactions according to their preferences.
Understanding the text blockade feature on the iPhone 12 is essential for leveraging its capabilities to enhance your messaging experience. By utilizing this functionality, you can effectively manage your contacts and streamline your communication, ultimately contributing to a more organized and stress-free digital lifestyle.
How to Block Texts from Specific Contacts on iPhone 12
Blocking texts from specific contacts on your iPhone 12 is a straightforward process that empowers you to manage your messaging experience. Whether you're looking to avoid unwanted communication or minimize distractions, the ability to block texts from specific contacts provides a practical solution. Here's a step-by-step guide to effectively block texts from specific contacts on your iPhone 12:
-
Open the Messages App: Begin by launching the Messages app on your iPhone 12. This is where you'll access the conversation with the contact you wish to block.
-
Select the Conversation: Navigate to the conversation with the specific contact you want to block. Tap on the conversation to open it.
-
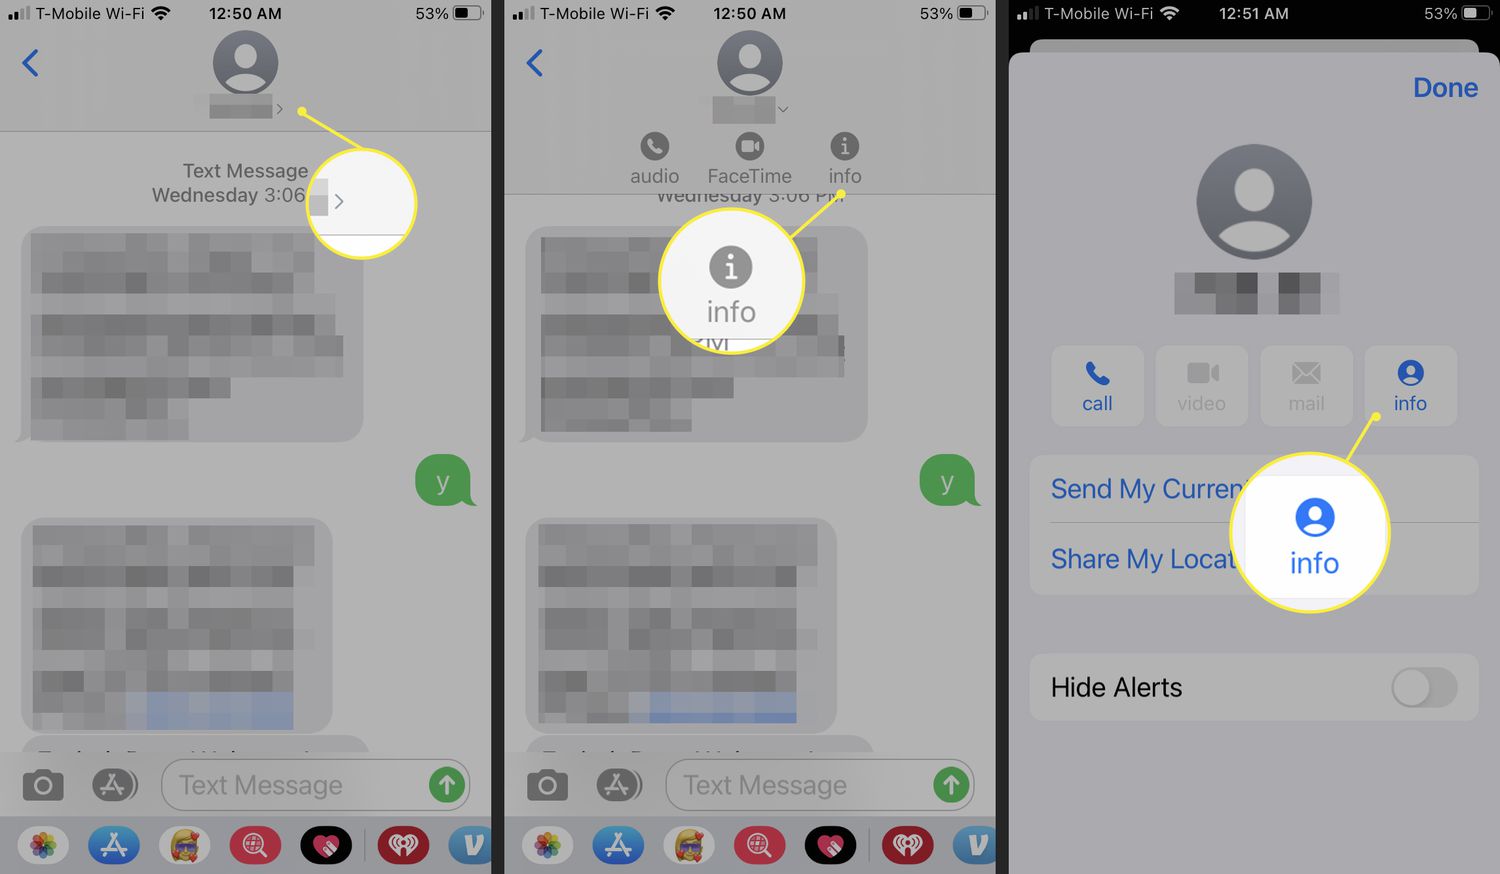
Tap on the Contact's Name: Within the conversation, tap on the contact's name at the top of the screen. This will open the contact details and additional options.
-
Select "Info": Once you're in the contact details, scroll down and tap on "Info." This will bring up a screen with more options related to the contact.
-
Tap on "Info" Again: On the next screen, tap on "Info" once more. This will reveal additional details and options for the contact.
-
Scroll Down and Select "Block this Caller": Scroll down to the bottom of the contact details screen and tap on "Block this Caller." A confirmation prompt will appear.
-
Confirm the Block: Confirm the block by tapping "Block Contact." This action will effectively block the contact from sending you text messages.
Once you've completed these steps, the contact will be blocked from sending you text messages on your iPhone 12. Additionally, you won't receive notifications for any messages they attempt to send, providing a seamless way to avoid unwanted communication.
By following these simple steps, you can take control of your messaging experience and ensure that you only receive texts from contacts you wish to engage with. This feature empowers iPhone 12 users to curate their digital interactions according to their preferences, contributing to a more organized and stress-free communication environment.
Using Do Not Disturb Mode to Block Texts on iPhone 12
Do Not Disturb mode on the iPhone 12 offers a versatile solution for managing incoming text messages without the need to block specific contacts. This feature allows users to customize their notification settings, ensuring uninterrupted periods of focus or relaxation. By leveraging Do Not Disturb mode, you can effectively block texts from all contacts or specific groups during designated timeframes or under certain conditions.
Activating Do Not Disturb Mode
To activate Do Not Disturb mode on your iPhone 12, simply follow these steps:
- Control Center: Swipe down from the top-right corner of the screen to access the Control Center.
- Do Not Disturb Icon: Tap the crescent moon icon to enable Do Not Disturb mode. The icon will turn purple, indicating that the feature is active.
Customizing Do Not Disturb Settings
Once Do Not Disturb mode is activated, you can customize its settings to tailor the blocking of text messages according to your preferences:
-
Scheduled Do Not Disturb: Under Settings > Do Not Disturb, you can schedule specific timeframes during which incoming text messages will be silenced. This is particularly useful for blocking texts during sleep hours, work meetings, or other designated periods.
-
Allow Calls From: Within the Do Not Disturb settings, you can specify which contacts are allowed to bypass the text blocking feature. This ensures that important calls can still come through, even when Do Not Disturb mode is active.
-
Repeated Calls: Enabling the "Repeated Calls" option allows a second call from the same person within three minutes to bypass Do Not Disturb mode. This can be helpful in urgent situations.
Utilizing Do Not Disturb While Driving
The iPhone 12 also offers a "Do Not Disturb While Driving" feature, which can automatically block text messages while you're on the road. This safety-focused functionality detects when you're driving and silences incoming texts to minimize distractions.
By leveraging Do Not Disturb mode on the iPhone 12, users can effectively block texts from all contacts or specific groups, providing a flexible approach to managing incoming messages. Whether it's for focused work sessions, peaceful relaxation, or safe driving, the customizable nature of Do Not Disturb mode empowers users to curate their digital experience according to their preferences.
Blocking Unknown Senders and Spam Texts on iPhone 12
Blocking unknown senders and spam texts on your iPhone 12 is essential for maintaining a clutter-free messaging experience. The prevalence of unsolicited messages and potential security risks associated with unknown senders make it crucial to effectively manage and block such content. Fortunately, the iPhone 12 provides robust features to address these concerns and empower users to take control of their messaging environment.
Utilizing the "Filter Unknown Senders" Feature
The "Filter Unknown Senders" feature on the iPhone 12 offers a proactive approach to managing messages from unfamiliar contacts. When enabled, this feature automatically filters messages from unknown senders into a separate list, keeping your main inbox free from clutter. To activate this feature:
- Open Settings: Navigate to the Settings app on your iPhone 12.
- Messages Settings: Scroll down and tap on "Messages" to access messaging settings.
- Enable "Filter Unknown Senders": Toggle the switch next to "Filter Unknown Senders" to activate this feature.
By utilizing the "Filter Unknown Senders" feature, you can effectively block messages from unfamiliar contacts, reducing the likelihood of encountering spam texts and unwanted communication.
Blocking Spam Texts and Unwanted Messages
In addition to filtering unknown senders, the iPhone 12 allows users to block specific phone numbers and contacts associated with spam texts and unwanted messages. This proactive approach empowers users to curate their messaging environment and minimize the impact of unsolicited content. To block a specific contact or phone number:
- Open the Messages App: Launch the Messages app on your iPhone 12.
- Select the Message: Navigate to the message from the sender you wish to block.
- Tap on Contact Details: Tap on the contact's name or number at the top of the message to access additional options.
- Select "Info" and "Block this Caller": Tap on "Info" and then "Block this Caller" to effectively block the sender from sending you further messages.
By following these steps, you can proactively block spam texts and unwanted messages, ensuring a more streamlined and secure messaging experience on your iPhone 12.
Leveraging Third-Party Apps and Services
Beyond the built-in features of the iPhone 12, users can also explore third-party apps and services designed to enhance spam text blocking and message filtering. These apps often provide advanced capabilities for identifying and blocking spam texts, augmenting the native functionality of the device and offering additional layers of protection against unwanted communication.
By leveraging the "Filter Unknown Senders" feature, blocking specific contacts, and exploring third-party solutions, iPhone 12 users can effectively manage unknown senders and spam texts, contributing to a more secure and organized messaging environment.
In summary, the iPhone 12 offers robust tools and features to empower users in blocking unknown senders and spam texts, ensuring a more secure and streamlined messaging experience. By proactively managing and filtering messages, users can mitigate the impact of unsolicited content and maintain control over their digital communication.
Managing Blocked Contacts and Texts on iPhone 12
Managing blocked contacts and texts on your iPhone 12 is an essential aspect of maintaining control over your messaging environment. Whether you've blocked specific contacts to avoid unwanted communication or to minimize distractions, it's important to understand how to review and manage your blocked list effectively. The iPhone 12 provides intuitive tools to navigate and adjust your blocked contacts and texts, empowering you to curate your digital interactions according to your preferences.
Accessing Blocked Contacts
To manage blocked contacts and texts on your iPhone 12, follow these steps to access the list of blocked contacts:
- Open Settings: Navigate to the Settings app on your iPhone 12.
- Phone Settings: Scroll down and tap on "Phone" to access phone settings.
- Blocked Contacts: Tap on "Blocked Contacts" to view the list of contacts you've blocked from calling, messaging, or FaceTiming you.
Reviewing and Editing Blocked Contacts
Once you've accessed the list of blocked contacts, you can review and edit the entries to adjust your blocking preferences:
- Unblocking Contacts: To unblock a contact, simply swipe left on their name in the blocked contacts list and tap "Unblock."
- Adding New Blocked Contacts: You can also add new contacts to the blocked list by tapping "Add New" and selecting the contact you wish to block.
Managing Blocked Texts
In addition to managing blocked contacts, it's important to review and manage blocked texts to ensure a streamlined messaging experience:
- Reviewing Blocked Texts: Open the Messages app and navigate to the conversation with the blocked contact. You'll notice that the messages from blocked contacts are stored in a separate section within the conversation, allowing you to review them without receiving notifications.
- Deleting Blocked Texts: If you wish to clear the blocked texts, simply swipe left on the message and tap "Delete" to remove it from the conversation.
Customizing Blocking Preferences
The iPhone 12 offers customizable blocking preferences to tailor your messaging experience according to your specific needs:
- Silent Blocking: When a contact is blocked, you won't receive notifications for their messages, ensuring a discreet and non-disruptive blocking experience.
- Managing Call Blocking: In addition to blocking texts, you can also manage call blocking preferences for individual contacts, providing comprehensive control over your communication channels.
By effectively managing blocked contacts and texts on your iPhone 12, you can maintain a peaceful and organized messaging environment tailored to your preferences. Whether it's to avoid unwanted communication, minimize distractions, or enhance your digital security, the ability to manage blocked contacts and texts empowers you to curate your messaging experience according to your individual needs and preferences.