
Setting Up Your Mail Account
Setting up your mail account is the first step to ensuring that your emails are kept on the server. Here’s a step-by-step guide to help you get started:
- Open Mail: Launch the Mail app on your macOS device. If it’s your first time using Mail, you’ll be prompted to set up an account. Otherwise, go to the “Mail” menu and select “Add Account.”
- Choose Account Type: Select the type of account you want to add. This could be Gmail, Yahoo, Outlook, or another email service provider. Enter your email address and password, and click “Sign In.”
- Verify Account Information: Mail will attempt to automatically configure the necessary settings for your email account. If the information is incorrect or missing, you may need to provide additional details such as incoming and outgoing mail server addresses.
- Set Sync Preferences: During the setup process, you’ll be asked to choose how you want to sync your emails. Select “Sync All” to ensure that all your emails are downloaded to your device. Alternatively, you can choose to sync only a specific number of recent emails.
- Complete the Setup: Follow any additional prompts to finish setting up your mail account. Once the setup is complete, your emails will start syncing to your device.
By following these steps, you can easily set up your mail account and start keeping your emails on the server. It’s important to note that the exact steps may vary slightly depending on the email service provider you’re using, but the general process remains the same. Now that your account is set up, you’re ready to configure the mail sync settings to ensure your emails are stored on the server.
Configuring Mail Sync Settings
To keep your emails on the server, you need to configure the mail sync settings in the Mail app. Follow these steps to ensure that your emails are synchronized correctly:
- Open Preferences: Open the Mail app and click on “Mail” in the menu bar. From the drop-down menu, select “Preferences.”
- Select Accounts: In the Preferences window, click on the “Accounts” tab. Here, you’ll see a list of all the mail accounts you have set up in the Mail app.
- Choose an Account: Select the account for which you want to configure the sync settings. You can select multiple accounts and configure the settings individually for each.
- Go to Mailbox Behaviors: Once you’ve selected the account, click on the “Mailbox Behaviors” tab. This is where you can adjust the sync settings for this particular account.
- Check “Synchronize all messages”: Make sure the option to “Synchronize all messages” is checked. This ensures that all messages, including those you’ve already downloaded, are synced with the server.
- Enable “Store draft messages on the server”: If you want to access your draft emails from different devices, it’s recommended to enable this option. It allows you to access and edit draft messages from any device connected to the server.
- Choose Sent and Trash folders: You can select the folders where you want your sent emails and deleted emails to be stored. By default, Mail uses the server’s folders, but you can choose to store them locally on your device if you prefer.
- Save the changes: Once you’ve configured the desired settings, click “OK” to save the changes.
By following these steps, you can configure the mail sync settings in the Mail app to keep your emails on the server. This ensures that your emails are accessible from any device and are not permanently deleted from the server when you delete them from your local device. Now that you’ve configured the sync settings, you can proceed to the next step of enabling the “Leave messages on server” option.
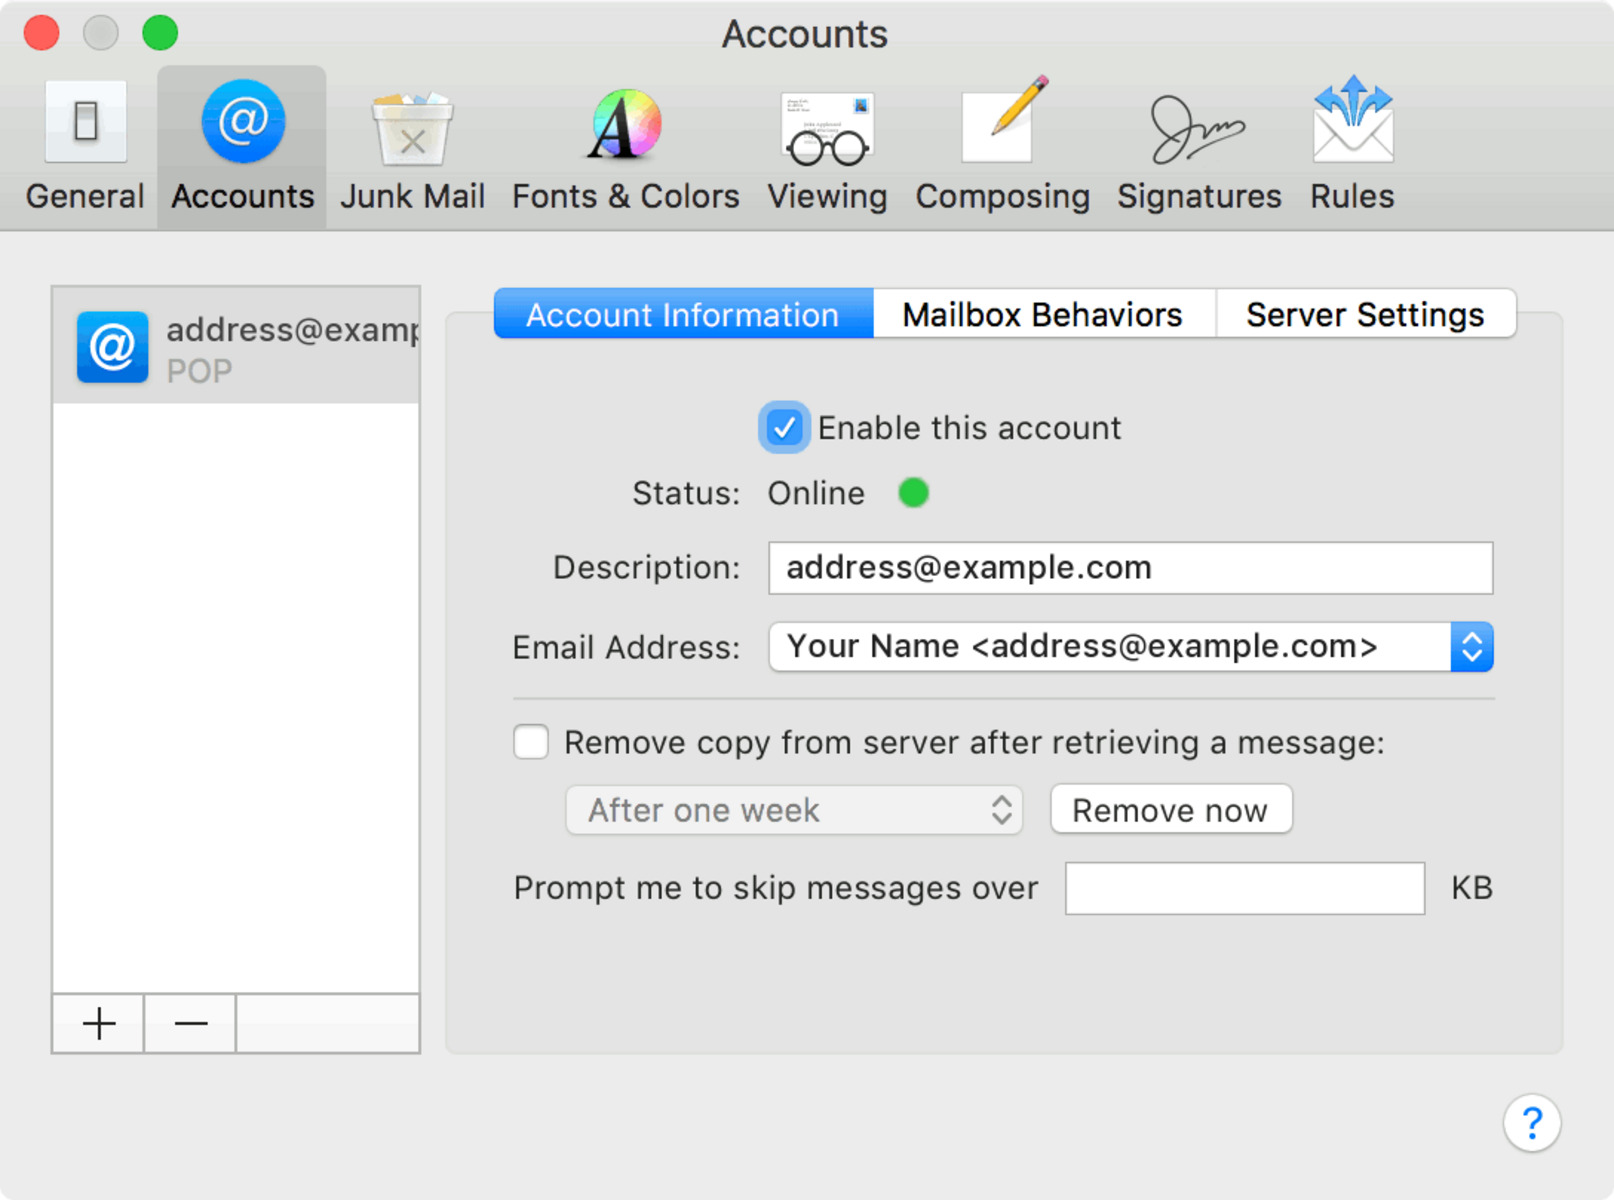
Enabling “Leave messages on server” option
In order to keep your emails on the server, you need to enable the “Leave messages on server” option in the Mail app. This ensures that the copies of your emails are stored on the server even after downloading them to your device. Here’s how you can do it:
- Open Preferences: Launch the Mail app and click on “Mail” in the menu bar. From the drop-down menu, select “Preferences.”
- Select Accounts: In the Preferences window, click on the “Accounts” tab. Here, you’ll see a list of all the mail accounts you have set up in the Mail app.
- Choose an Account: Select the account for which you want to enable the “Leave messages on server” option. Remember, you can configure this option individually for each account.
- Go to Advanced Settings: In the account settings, click on the “Advanced” tab. This is where you’ll find additional options for your email account.
- Enable “Remove copy from server after retrieving a message”: By default, this option is checked. If you want to keep your emails on the server, uncheck this option. This ensures that the copies of the emails are not deleted from the server after you’ve downloaded them to your device.
- Save the changes: Once you’ve made the necessary adjustments, click “OK” to save the changes and close the Preferences window.
By enabling the “Leave messages on server” option, you can ensure that your emails are retained on the server even after you’ve downloaded them to your device. This is particularly useful if you access your emails from multiple devices or if you want to keep a backup of your emails on the server. Now that you’ve enabled this option, you can adjust the “Remove copy from server after retrieving a message” behavior to further customize your email management settings.
Adjusting “Remove copy from server after retrieving a message”
The “Remove copy from server after retrieving a message” setting in the Mail app determines how long the server keeps copies of your emails after you’ve downloaded them to your device. By adjusting this setting, you can determine whether your emails are kept on the server for a specific period of time or permanently. Here’s how you can adjust this setting:
- Open Preferences: Launch the Mail app and click on “Mail” in the menu bar. From the drop-down menu, select “Preferences.”
- Select Accounts: In the Preferences window, click on the “Accounts” tab. Here, you’ll see a list of all the mail accounts you have set up in the Mail app.
- Choose an Account: Select the account for which you want to adjust the “Remove copy from server after retrieving a message” setting.
- Go to Advanced Settings: In the account settings, click on the “Advanced” tab. Here, you’ll find the option to adjust the behavior of removing copies from the server.
- Choose from the options: Depending on your preferences and email management needs, you can select one of the available options:
- Remove copy from server after a certain number of days: With this option, you can specify a specific number of days after which the copies of your emails will be removed from the server.
- Remove copy from server when deleted from “Deleted Items”: If you delete an email from your “Deleted Items” folder, the copy of that email will also be removed from the server.
- Remove copy from server when moved from Inbox: If you move an email from your inbox to another folder, the copy of that email will be removed from the server.
- Save the changes: Once you’ve selected the desired option, click “OK” to save the changes and close the Preferences window.
By adjusting the “Remove copy from server after retrieving a message” setting, you can customize how long your emails are kept on the server after you’ve downloaded them to your device. This flexibility allows you to manage your email storage and backups effectively. Now that you’ve adjusted this setting, you can move on to changing the delete behavior for selected emails to further enhance your email management experience.
Changing delete behavior for selected emails
The Mail app offers the flexibility to customize the delete behavior for selected emails, allowing you to choose whether to delete the emails locally or on the server. By changing this setting, you can ensure that important emails are retained on the server while removing unnecessary clutter from your local device. Here’s how you can change the delete behavior for selected emails:
- Select the Emails: Open the Mail app and go to the mailbox where the desired emails are located. Select the emails that you want to change the delete behavior for. You can select multiple emails by holding down the command key while clicking on them.
- Right-Click or Control-Click: After selecting the emails, right-click (or control-click) on one of the selected emails. A context menu will appear.
- Choose Delete Preferences: From the context menu, hover over “Move To” or “Delete” (depending on the version of Mail you’re using) and select “Preferences” or “Settings.”
- Modify the Delete Behavior: In the Preferences or Settings window, you’ll see options to change the delete behavior. You can choose to:
- Delete the email from the server: Selecting this option will permanently delete the selected emails from the server, ensuring they are removed from all devices.
- Move the email to the Trash mailbox: This option will move the selected emails to the Trash mailbox on the server, retaining a copy for a specific period of time before permanent deletion.
- Customize the delete behavior for future emails: Some versions of Mail allow you to modify the default delete behavior for future emails that match a specific criteria (such as sender, subject, or keywords).
- Save the Changes: Once you’ve modified the delete behavior as desired, click on “OK” to save the changes.
By changing the delete behavior for selected emails, you can manage your inbox more effectively and ensure that important emails are retained on the server while removing unnecessary clutter from your local device. This gives you greater control over your email management and prevents accidental deletion of important messages. Now that you’ve customized the delete behavior, it’s important to consider managing storage space on the server to keep your emails organized and accessible.
Managing storage space on the server
As you continue to use your email account, it’s important to keep an eye on your storage space to ensure smooth email operation and avoid hitting any storage limits set by your email service provider. Here are some tips for managing storage space on the server:
- Delete Unnecessary Emails: Regularly go through your inbox and other folders to identify and delete emails that are no longer needed. This will free up storage space on the server and improve overall performance.
- Empty the Trash Folder: When you delete emails, they are often moved to the Trash folder. Remember to periodically empty the Trash folder to permanently delete those emails from the server and reclaim storage space.
- Archive Old Emails: Consider archiving old emails that you don’t need to access frequently. Archiving stores the emails separately, freeing up space on the server while still allowing you to retrieve them if needed.
- Compress Attachments: If you often receive emails with large attachments, consider compressing the files before saving them. This reduces the file size and helps save storage space on the server without compromising the content.
- Use Online Storage Services: If you frequently receive large files or have limited storage space on the server, consider utilizing online storage services like Google Drive or Dropbox. These services allow you to store files externally and provide a link within your emails instead of attaching the files directly.
- Set up Auto-Delete Rules: Take advantage of mail rules and filters to automatically delete or move certain types of emails to specific folders. This helps keep your inbox organized and prevents unnecessary emails from using up storage space on the server.
- Periodic Backups: It’s always a good practice to perform periodic backups of your important emails. This can be done by exporting them to a local storage device or using email backup services to store copies of your emails externally.
By implementing these strategies, you can effectively manage the storage space on the server, ensuring that your email account continues to operate smoothly. Regularly assess and optimize your email storage to maintain an organized and efficient email system. Now that you have a better understanding of managing storage space on the server, let’s explore how you can use rules to organize emails and prevent unintended deletion.
Using rules to organize emails and prevent deletion
Rules in the Mail app allow you to automate actions for incoming emails, helping you to organize and categorize them more efficiently. By using rules, you can also prevent unintended deletion of important emails. Here’s how you can use rules to your advantage:
- Open Preferences: Launch the Mail app and click on “Mail” in the menu bar. From the drop-down menu, select “Preferences.”
- Select Rules: In the Preferences window, click on the “Rules” tab. Here, you can set up and manage rules for your emails.
- Add a New Rule: Click on the “+” button to add a new rule. Give your rule a name that represents its purpose.
- Set Conditions: Specify the conditions under which the rule should be applied, such as sender, subject, or specific keywords.
- Choose Actions: Select the actions you want the rule to perform. For example, you can choose to move the email to a specific folder, mark it as read, flag it, or highlight it.
- Set Exceptions (Optional): If there are any exceptions to the rule, such as certain emails or senders you want to exclude, you can specify them in the exceptions section.
- Save and Apply the Rule: Once you’ve configured the rule to your liking, click “OK” to save it. The rule will now be applied to incoming emails that meet the specified conditions.
By using rules effectively, you can automatically organize your emails as they arrive, saving you time and keeping your inbox clutter-free. Additionally, using rules can help prevent accidental deletion of important emails by ensuring they are moved to designated folders or marked as important.
It’s important to periodically review and adjust your rules as your email usage and preferences change. This will ensure that your rules are always up-to-date and functioning as intended. With the ability to automate email actions and prevent unintended deletion, rules are a powerful tool for managing and safeguarding your emails within the Mail app.
Now that you’re familiar with using rules, it’s time to troubleshoot any common issues you might encounter while managing your emails in the Mail app.
Troubleshooting common issues
While using the Mail app to manage your emails, you may encounter some common issues. Here are a few troubleshooting tips to help you resolve them:
- Email Syncing Issues: If your emails are not syncing properly, try quitting and relaunching the Mail app. You can also check your internet connection and ensure that your email account settings are correct.
- Unable to Send or Receive Emails: Verify that you have a stable internet connection and check if your email server is experiencing any outages. Double-check the email settings to ensure they are entered correctly. Clearing outbox, disabling antivirus software, and checking for any filtering rules can also help resolve this issue.
- Missing or Deleted Emails: If you’re unable to find certain emails or they have been accidentally deleted, check the Trash folder first. Also, ensure that you are looking in the correct mailbox or folder. In case of missing emails, verify your email account settings and consider checking the server-side settings.
- Unable to Add an Email Account: If you’re having difficulty adding an email account in the Mail app, double-check the email server settings, including the incoming and outgoing server addresses, username, and password. Ensure that the email service provider supports the specific type of account you’re trying to add (e.g., IMAP or POP).
- Slow Performance: If the Mail app is running slowly, first ensure that your device has sufficient storage space. Clearing the cache and rebuilding mailboxes can help improve performance. Additionally, disabling unnecessary or resource-intensive plugins and checking for software updates can help enhance the app’s performance.
- Authentication Issues: If you’re having trouble authenticating your email account, double-check the entered credentials, including the username and password. Consider generating an application-specific password if two-factor authentication is enabled for your email account.
If you’re still experiencing issues after attempting these troubleshooting steps, it can be helpful to consult online forums or reach out to your email service provider’s support team for further assistance. They can provide specialized guidance based on the specific issue you’re facing.
Remember, troubleshooting steps may vary depending on the version of the Mail app and the email service provider you’re using. Stay proactive, keep your app and device updated, and explore resources available to help you resolve any issues efficiently.