
What is Yandex.Mail?
Yandex.Mail is a popular email service provided by Yandex, a leading Russian internet company. It offers reliable and secure email accounts with a user-friendly interface and a range of useful features. With Yandex.Mail, users can send and receive emails, manage contacts and calendars, and access their emails via various email programs, including IMAP.
Yandex.Mail provides users with a generous storage capacity, so they can store and archive their emails without worrying about running out of space. It also has powerful spam filters that help prevent unwanted emails from cluttering the inbox.
One of the notable features of Yandex.Mail is its integration with other Yandex services, such as Yandex.Disk for file storage and Yandex.Calendar for managing schedules and appointments. This seamless integration allows users to have all their important information in one place, making it convenient and efficient.
Yandex.Mail prioritizes user privacy and security. It employs encryption to protect data during transmission, and also offers two-step verification to ensure that only authorized individuals can access the account. Additionally, Yandex.Mail has a built-in antivirus system that scans incoming attachments for potential threats, providing an extra layer of protection for users.
Yandex.Mail is available on various platforms, including desktop computers, smartphones, and tablets. This means that users can access their emails from anywhere, at any time, making it a convenient option for both personal and professional use.
Overall, Yandex.Mail is a reliable and feature-rich email service that offers users a secure and convenient way to manage their emails and stay connected. Whether you are an individual user or a business professional, Yandex.Mail provides the tools and functionality to meet your email needs.
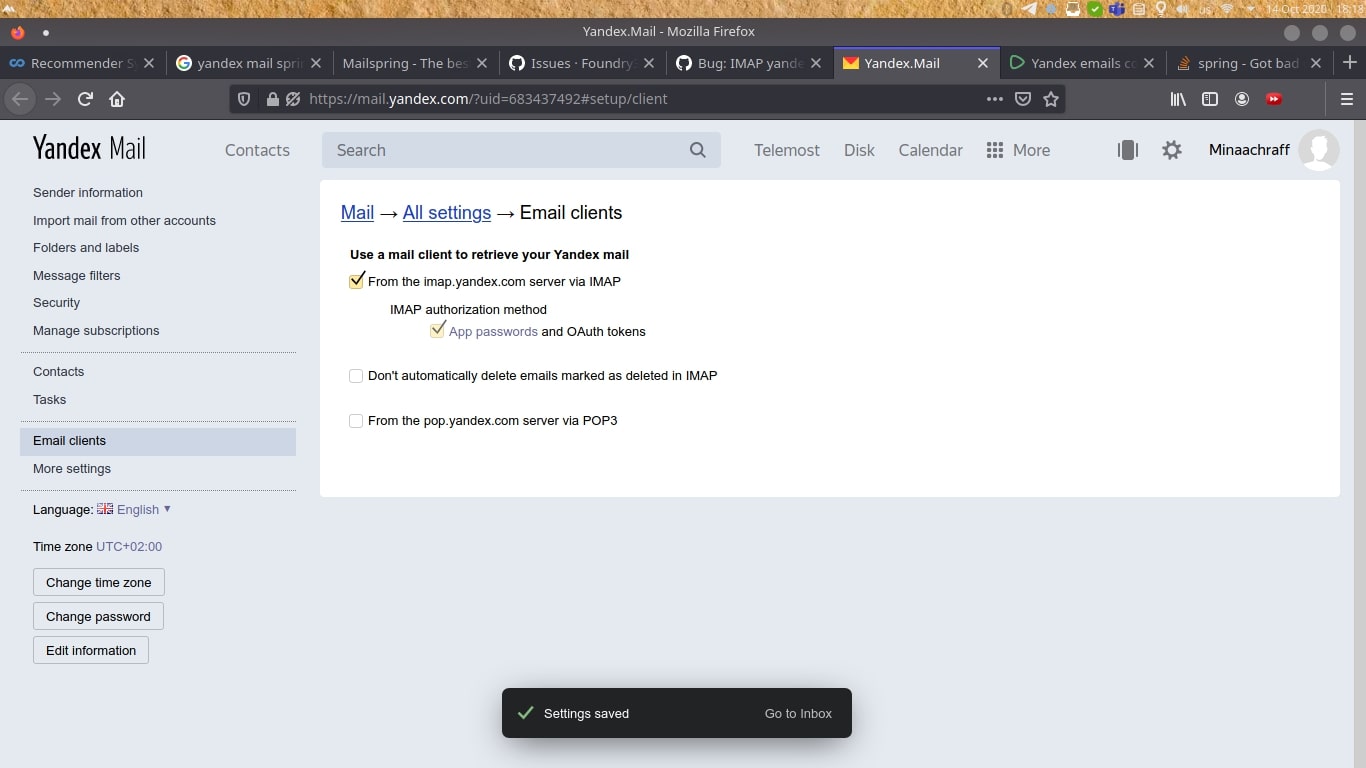
How to Access Yandex.Mail Using IMAP
IMAP (Internet Message Access Protocol) is a standard email protocol that allows users to access and manage their email accounts from email programs or applications. Yandex.Mail supports IMAP, enabling users to integrate their Yandex.Mail accounts with their preferred email programs for a more streamlined email experience. Here’s how to access Yandex.Mail using IMAP:
- First, make sure you have created a Yandex.Mail account. If you haven’t, you can easily sign up for one on the Yandex.Mail website.
- Once you have your Yandex.Mail account, open your preferred email program on your computer or mobile device.
- Navigate to the account settings or preferences section of your email program, where you can add a new email account.
- Choose the option to add a new email account, and when prompted, enter your Yandex.Mail email address and password.
- Next, you will need to provide the incoming and outgoing mail server settings. For the incoming mail server, enter “imap.yandex.com” and choose the IMAP protocol. For the outgoing mail server, enter “smtp.yandex.com” and choose the SMTP protocol.
- Ensure that you have checked the box to enable encryption for both the incoming and outgoing servers. This will ensure that your communication with the Yandex.Mail servers is secure.
- Complete any additional settings required by your email program, such as choosing the folder synchronization options or configuring advanced settings.
- Once you have entered all the necessary information, save the account settings and exit the settings or preferences section of your email program.
- Your email program will now attempt to connect to the Yandex.Mail servers using the provided IMAP settings. If the connection is successful, you will be able to access your Yandex.Mail emails, folders, and contacts within your email program.
By setting up Yandex.Mail using IMAP, you can take advantage of the features and functionalities offered by your email program while still enjoying the reliability and security of Yandex.Mail. This allows you to have a unified email experience across multiple email accounts and devices.
Configuring Yandex.Mail in Popular Email Programs
Yandex.Mail is compatible with a variety of popular email programs, making it easy for users to access their Yandex.Mail accounts using their preferred email client. Here are the steps to configure Yandex.Mail in some of the most commonly used email programs:
Configuring Yandex.Mail in Microsoft Outlook:
- Open Microsoft Outlook on your computer and go to the File tab.
- Click on the “Add Account” button under the Account Information section.
- Enter your name, Yandex.Mail email address, and password in the given fields.
- Click on the “Next” button and let Outlook automatically configure the email settings.
Configuring Yandex.Mail in Mozilla Thunderbird:
- Launch Mozilla Thunderbird on your computer and go to the Tools menu.
- Select “Account Settings” and choose “Account Actions”.
- Click on “Add Mail Account” and enter your name, Yandex.Mail email address, and password.
- Click on the “Continue” button and let Thunderbird retrieve the email settings automatically.
Configuring Yandex.Mail in Apple Mail:
- Open Apple Mail on your Mac and go to the Mail menu.
- Select “Preferences” and click on the “Accounts” tab.
- Click on the “+” button to add a new account and enter your name, Yandex.Mail email address, and password.
- Click on the “Continue” button and let Apple Mail configure the account settings automatically.
Configuring Yandex.Mail in Gmail:
- Go to the Gmail website and log in to your Gmail account.
- Click on the gear icon in the top-right corner and select “Settings”.
- Go to the “Accounts and Import” tab and click on “Add a mail account” in the “Check mail from other accounts” section.
- Enter your Yandex.Mail email address and click on the “Next” button.
- Follow the on-screen instructions to enter your Yandex.Mail account credentials and configure the necessary settings.
Once you have completed these steps, your Yandex.Mail account will be successfully configured in your chosen email program. You can now start using your preferred email client to access and manage your Yandex.Mail emails, contacts, and folders.
Configuring Yandex.Mail in Microsoft Outlook
Microsoft Outlook is a widely used email program that allows users to manage their email accounts and access their emails conveniently. Here are the steps to configure Yandex.Mail in Microsoft Outlook:
- Launch Microsoft Outlook on your computer and go to the File tab in the top-left corner of the screen.
- Click on the “Add Account” button under the Account Information section.
- In the Add Account window, select the option to manually configure server settings or additional server types, then click on the “Next” button.
- Choose the option for “POP or IMAP” and click on the “Next” button again.
- Enter your name and Yandex.Mail email address in the Your Name and Email Address fields, respectively.
- In the Account Type dropdown menu, select IMAP.
- For the Incoming Mail Server, enter “imap.yandex.com”.
- For the Outgoing Mail Server, enter “smtp.yandex.com”.
- Enter your Yandex.Mail email address and password in the User Name and Password fields, respectively.
- Click on the “More Settings” button, then go to the Outgoing Server tab.
- Check the box that says “My outgoing server (SMTP) requires authentication.”
- Select the option to use the same settings as your incoming mail server.
- Next, go to the Advanced tab and verify the incoming and outgoing server port numbers:
- The incoming server port should be set to 993 for IMAP.
- The outgoing server port should be set to 465 for SMTP.
- Ensure that SSL encryption is selected for both incoming and outgoing servers.
- Once you have entered all the necessary information, click on the “OK” button.
- Back in the Add Account window, click on the “Next” button to let Outlook validate your Yandex.Mail account settings.
- If the validation is successful, you will see a “Congratulations!” message. Click on the “Finish” button to complete the setup process.
After following these steps, you will be able to access and manage your Yandex.Mail emails, folders, and contacts directly through Microsoft Outlook. Enjoy the seamless integration of Yandex.Mail with the powerful features of Outlook, enhancing your email experience.
Configuring Yandex.Mail in Mozilla Thunderbird
Mozilla Thunderbird is a popular email client that provides an intuitive interface and robust features for managing email accounts. Follow these steps to configure Yandex.Mail in Mozilla Thunderbird:
- Open Mozilla Thunderbird on your computer.
- Go to the Tools menu and select “Account Settings”.
- In the Account Settings window, click on the “Account Actions” button and choose “Add Mail Account”.
- Enter your name, Yandex.Mail email address, and password in the provided fields.
- Click on the “Continue” button.
- Thunderbird will attempt to automatically detect the server settings for your Yandex.Mail account.
- Review the incoming and outgoing server settings that Thunderbird suggests, and make any necessary adjustments if needed.
- Click on the “Done” button to complete the configuration process.
- Thunderbird will now verify your Yandex.Mail account settings and establish a connection with the Yandex.Mail servers.
- If the verification is successful, you will see a confirmation message.
- Click on the “OK” button to close the Account Settings window.
- You will now be able to access your Yandex.Mail emails, folders, and contacts within Mozilla Thunderbird.
With Yandex.Mail configured in Mozilla Thunderbird, you can enjoy the convenience of managing your Yandex.Mail account alongside other email accounts in one unified interface. Thunderbird’s powerful features, such as advanced search options, customizable filters, and intelligent spam detection, enhance your email management experience.
Configuring Yandex.Mail in Apple Mail
Apple Mail is the default email client for macOS and offers a seamless email experience for Apple users. Here’s how you can configure Yandex.Mail in Apple Mail:
- Open Apple Mail on your Mac.
- Go to the Mail menu and select “Preferences”.
- In the Preferences window, click on the “Accounts” tab.
- Click on the “+” button to add a new account.
- Enter your name, Yandex.Mail email address, and password in the provided fields.
- Click on the “Continue” button.
- Apple Mail will automatically attempt to detect the server settings for your Yandex.Mail account.
- Verify the server settings that Apple Mail suggests, and make any necessary adjustments if needed.
- Click on the “Done” button to complete the configuration process.
- Apple Mail will now validate your Yandex.Mail account settings and establish a connection with the Yandex.Mail servers.
- If the validation is successful, you will see a confirmation message.
- Close the Preferences window.
- You can now access your Yandex.Mail emails, folders, and contacts within Apple Mail.
With Yandex.Mail set up in Apple Mail, you can benefit from features such as offline access to your emails, a unified inbox for multiple email accounts, and efficient organization of your messages using folders and smart mailboxes. Apple Mail’s intuitive interface and seamless integration with macOS make it a convenient choice for managing your Yandex.Mail account on your Mac.
Configuring Yandex.Mail in Gmail
Gmail is a widely used email service by Google that offers a user-friendly and feature-rich email experience. If you prefer to access your Yandex.Mail account through Gmail, you can easily configure it using the following steps:
- Go to the Gmail website and log in to your Gmail account.
- Click on the gear icon in the top-right corner, and select “Settings” from the dropdown menu.
- In the Settings page, go to the “Accounts and Import” tab.
- In the “Check mail from other accounts” section, click on “Add a mail account”.
- A pop-up window will appear. Enter your Yandex.Mail email address and click on the “Next” button.
- Choose the option to import emails from my other account (POP3) and click on the “Next” button.
- Enter your Yandex.Mail email address and password, as well as the POP Server settings below:
- POP Server: pop.yandex.com
- Port: 995
- Username: Your Yandex.Mail email address
- Password: Your Yandex.Mail password
- Check the box that says “Leave a copy of retrieved message on the server” if you want to keep a copy of your Yandex.Mail emails on the Yandex server.
- Click on the “Add Account” button.
- You will be asked if you want to send messages as your Yandex.Mail email address. Choose the appropriate option based on your preference.
- Click on the “Next” button and enter your name.
- Choose the option to treat the new Yandex.Mail address as an alias or not, and click on the “Next Step” button.
- Verify the email address by clicking on the link sent to your Yandex.Mail account.
- Once verified, you will be able to send and receive emails from your Yandex.Mail account through your Gmail interface.
By configuring Yandex.Mail in Gmail, you can take advantage of Gmail’s powerful features such as advanced search options, labels, filters, and smart organization tools. Additionally, you can manage multiple email accounts in one unified inbox, making it more convenient to stay on top of your email correspondence.
Troubleshooting Common Issues with Yandex.Mail IMAP Access
While setting up and accessing Yandex.Mail using IMAP is generally a smooth process, there can be some common issues that users may encounter. Here are a few troubleshooting tips to help resolve these issues:
1. Incorrect Server Settings
Make sure that you have entered the correct server settings for both the incoming (IMAP) and outgoing (SMTP) servers. Double-check the server addresses, ports, and encryption settings to ensure they match the recommended settings provided by Yandex.Mail.
2. Authentication Errors
If you are experiencing authentication errors, double-check that you have entered your Yandex.Mail email address and password correctly. Ensure there are no extra spaces or typos in the credentials. If you are still unable to authenticate, try resetting your password and attempt the setup again.
3. Connection Issues
If your email program is unable to establish a connection with the Yandex.Mail servers, check your internet connection. Ensure that you have a stable and reliable internet connection and try again. Also, make sure that any firewalls or antivirus software on your computer are not blocking the connection to the Yandex.Mail servers.
4. IMAP Folder Synchronization
If you notice that the folders in your email program are not synchronizing properly with your Yandex.Mail account, try refreshing the folder list or manually syncing the folders. You can also check the folder subscription settings in your email program and ensure that all the necessary folders are selected for synchronization.
5. Error Messages or Unresponsive Behavior
If you encounter error messages or experience unresponsiveness in your email program while accessing Yandex.Mail, try restarting the program or your device. Clearing the cache and reconfiguring the Yandex.Mail account settings in your email program can also help resolve any software-related issues.
If you have tried these troubleshooting tips and are still experiencing difficulties with Yandex.Mail IMAP access, it is recommended to reach out to the Yandex.Mail support team for further assistance. They can provide specific guidance based on the issue you are facing and help you overcome any technical challenges.