
What is an SMTP Server?
An SMTP (Simple Mail Transfer Protocol) server is a computer program or software component that handles the sending and delivery of email messages over the internet. It acts as a mail delivery agent, taking care of the transmission of emails from the sender’s email client to the recipient’s email server.
SMTP servers are responsible for several key functions in the email delivery process. First, they validate sender authentication to prevent unauthorized access and spamming. They also handle the routing of email messages, ensuring that they are directed to the correct destination server based on the recipient’s email address. Additionally, SMTP servers facilitate the transfer of email data between different mail servers, utilizing various protocols and encryption methods to ensure secure transmission.
When you send an email, your email client communicates with the SMTP server to initiate the message transfer. The SMTP server then contacts the recipient’s email server through multiple hops, using DNS (Domain Name System) to look up the correct server. Once the message reaches the recipient’s server, it is stored in a mailbox until the recipient’s email client or webmail service retrieves it.
SMTP servers play a crucial role in the functionality and reliability of the email infrastructure. Without them, sending and receiving emails across different domains and providers would not be possible. Whether you are using a personal email account or a business email service, understanding how SMTP servers work is essential for seamless email communication.
Why Specify a Preferred SMTP Server?
Specifying a preferred SMTP server on your Mac can offer several advantages and improve your email sending experience. Here are a few reasons why you might want to consider setting a preferred SMTP server:
1. Reliable Delivery: By specifying a preferred SMTP server, you can ensure that your emails are sent through a reliable and trustworthy server. This minimizes the chances of your emails getting rejected or marked as spam by recipient servers.
2. Custom Configuration: Some SMTP servers offer advanced configuration options that allow you to customize your email settings according to your specific requirements. This includes options like specifying port numbers, enabling encryption, or setting limits for sending emails.
3. Improved Security: Setting a preferred SMTP server that supports secure encryption protocols, such as SSL (Secure Sockets Layer) or TLS (Transport Layer Security), can enhance the security of your email communications. These protocols encrypt your email data, protecting it from unauthorized access.
4. Enhanced Performance: Certain SMTP servers are optimized for faster email delivery, ensuring that your messages reach their recipients in a timely manner. This can be important for time-sensitive communication or urgent business emails.
5. Avoiding ISP Restrictions: Some internet service providers (ISPs) might impose restrictions on outgoing email traffic, limiting the number of messages you can send or the recipients you can reach. By specifying a preferred SMTP server, you can bypass these restrictions and ensure uninterrupted email delivery.
6. Multiple Account Management: If you have multiple email accounts set up on your Mac, specifying a preferred SMTP server allows you to manage the outgoing mail settings for each account separately. This provides flexibility in choosing the SMTP server that best suits each account’s needs.
Overall, specifying a preferred SMTP server gives you greater control over your email sending process, improves reliability and security, and allows for customization based on your specific requirements. It ensures that your emails are sent smoothly and reach their intended recipients without any issues.
How to Find Your SMTP Server Information
Before you can specify a preferred SMTP server on your Mac, you need to gather the necessary information about your SMTP server. Here are the steps to find your SMTP server information:
1. Check Your Email Provider’s Documentation: Start by referring to your email service provider’s documentation or website. They often provide specific instructions on how to find your SMTP server information. Look for help articles or support pages related to email setup or configuration.
2. Contact Your Email Service Provider: If you can’t find the required information, reach out to your email service provider’s customer support. They should be able to assist you in locating the SMTP server details you need. Be prepared to provide them with your account information for verification purposes.
3. Look for Server Settings in Your Email Client: If you are using an email client like Apple Mail or Outlook, you can often find the SMTP server information within the account settings. In your email client, navigate to the account settings or preferences section and locate the SMTP settings. The SMTP server address, port number, and authentication method should be listed there.
4. Search Online Resources: Another option is to search online for the SMTP server settings related to your email service provider. Many websites and forums provide comprehensive lists of popular email providers’ SMTP server information. Simply search for your email provider along with “SMTP server settings” in a search engine to find relevant resources.
5. Use Network Diagnostics: On macOS, you can utilize the built-in Network Diagnostics feature to discover your SMTP server information. Go to “System Preferences” > “Network” and select your active network connection. Click on the “Advanced” button, then navigate to the “TCP/IP” or “Proxies” tab. Here, you may find the SMTP server address and port number.
Remember to note down the SMTP server address, port number, and any other required authentication details you find during this process. Having accurate and up-to-date SMTP server information is crucial for configuring your preferred server on your Mac.
How to Specify a Preferred SMTP Server
Once you have gathered the necessary SMTP server information, you can proceed to specify a preferred server on your Mac. There are two common methods to accomplish this: using Mail Preferences or using Terminal commands.
Method 1: Using Mail Preferences
Follow these steps to specify a preferred SMTP server using Mail Preferences:
- Open the Mail application on your Mac.
- Go to “Preferences” from the Mail menu.
- Select the “Accounts” tab.
- Choose the email account for which you want to set a preferred SMTP server.
- Click on the “Server Settings” or “Outgoing Mail Server” option.
- Add or edit the SMTP server details, including the server address and port number.
- Enable any required authentication settings, such as username and password.
- Save the changes, and your specified SMTP server will now be used for sending emails from that account.
Method 2: Using Terminal Commands
If you prefer a command-line approach, you can use Terminal to specify a preferred SMTP server. Follow these steps:
- Open Terminal on your Mac.
- Type the following command and press Enter:
sudo nano /etc/postfix/main.cf - Enter your macOS user password when prompted, and press Enter.
- In the text editor, locate the line starting with “relayhost” and modify it to specify your preferred SMTP server address. For example:
relayhost = smtp.example.com:25 - Save the changes by pressing Control + X, then Y, followed by Enter.
- Restart the postfix service by entering the following command in Terminal:
sudo postfix reload
These methods allow you to define your preferred SMTP server for sending emails from your Mac. Remember to verify the settings and ensure they match the server information provided by your email service provider.
Method 1: Using Mail Preferences
One way to specify a preferred SMTP server on your Mac is by using the Mail Preferences. This method is user-friendly and can be easily done through the following steps:
- Open the Mail application on your Mac.
- From the menu at the top of the screen, click on “Mail” and select “Preferences.”
- A new window will appear with various tabs. Click on the “Accounts” tab.
- Choose the email account for which you want to set a preferred SMTP server from the left-hand sidebar.
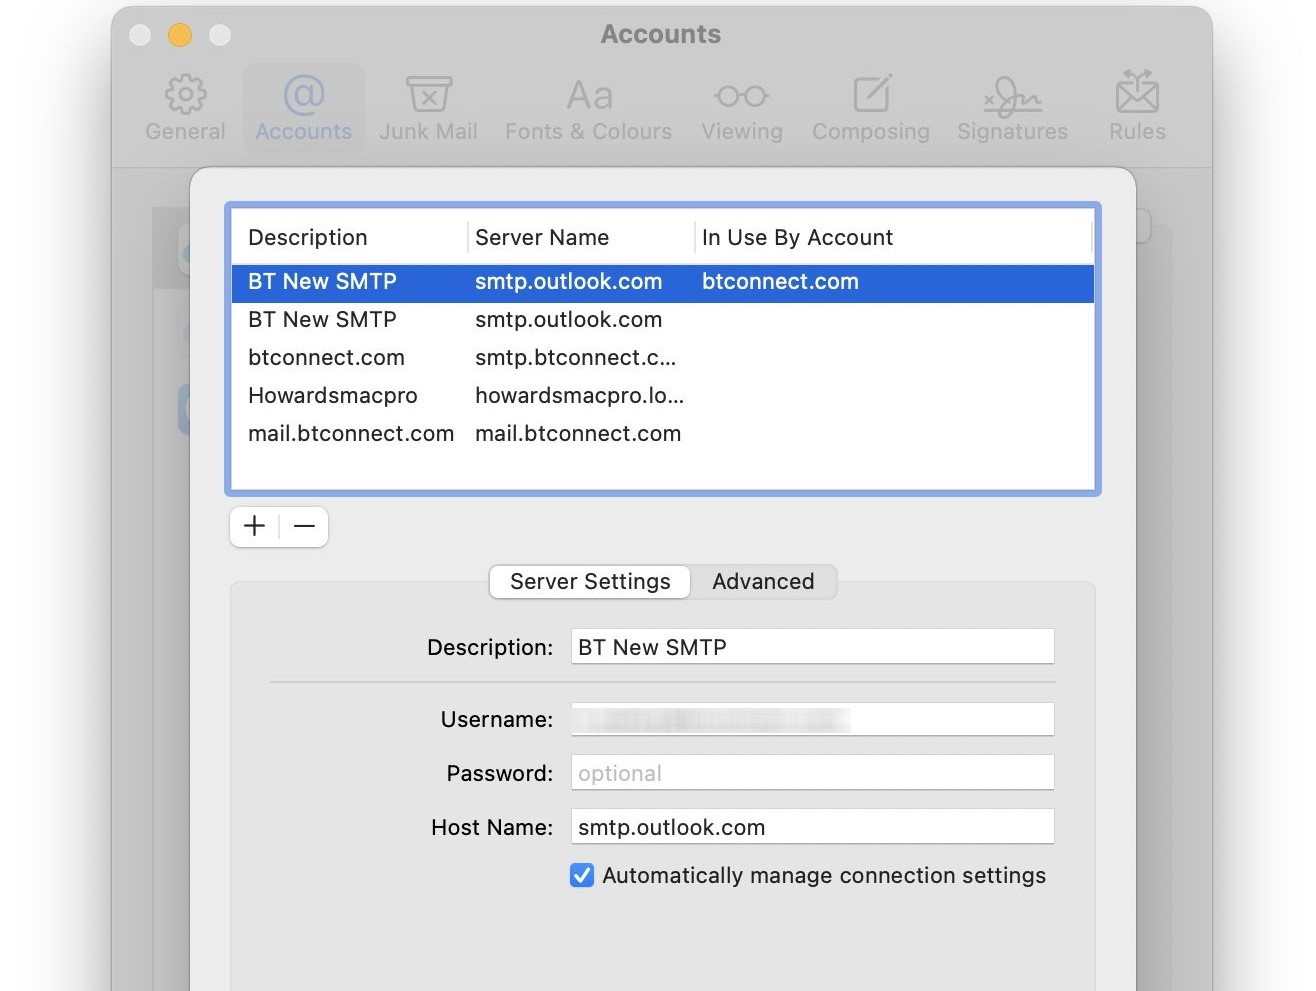
- Within the selected account, locate and click on the “Server Settings” or “Outgoing Mail Server” option.
- You will see a list of SMTP servers associated with the account. Click on the “+” button to add a new server.
- Enter the required information for the new server, such as the server address and port number. This information can be obtained from your email service provider.
- If necessary, enable any authentication settings by entering your username and password.
- Click “OK” to save the changes.
By following these steps, you can specify a preferred SMTP server for the selected email account in the Mail application on your Mac. This ensures that any outgoing emails from that account will be sent through the designated SMTP server.
Note that this method allows you to set different SMTP servers for different email accounts that you have configured on your Mac. You can repeat the above steps for each account to specify its respective preferred SMTP server.
It’s advisable to verify the accuracy of the SMTP server information provided to ensure seamless email sending. Additionally, remember to test the newly set preferred SMTP server by sending a test email to confirm its functionality.
Method 2: Using Terminal Commands
If you prefer a command-line approach, you can use Terminal to specify a preferred SMTP server on your Mac. This method involves modifying the configuration file using a text editor. Follow these steps:
- Open the Terminal application on your Mac. You can find it in the Utilities folder within the Applications folder, or use Spotlight Search (Command + Space) to quickly locate it.
- In the Terminal window, type the following command and press Enter:
sudo nano /etc/postfix/main.cf - You will be prompted to enter your macOS user password. Type it in and press Enter.
- A text editor will open, displaying the main.cf configuration file for the postfix mail transfer agent.
- Use the arrow keys on your keyboard to navigate to the line starting with “relayhost”. This line specifies the default SMTP server used by your Mac.
- Edit the line to specify your preferred SMTP server address and port number. For example, if your preferred server is smtp.example.com and it uses port 25, the line should look like this:
relayhost = smtp.example.com:25 - Press Control + O to save the changes to the file, then press Enter to confirm.
- Press Control + X to exit the text editor.
- To apply the changes, you need to reload the postfix service. Enter the following command in the Terminal:
sudo postfix reload
After following these steps, the specified SMTP server will be used as the default for sending outgoing emails from your Mac. It’s important to ensure that the SMTP server information you enter is accurate and matches the settings provided by your email service provider.
Keep in mind that modifying system files requires administrative privileges, which is why the “sudo” command is used at the beginning of the Terminal commands. Take precautionary measures and double-check any changes made to avoid errors that could affect your mail service.
Common SMTP Server Addresses and Ports
When specifying a preferred SMTP server, it’s important to use the correct server address and port number to ensure successful email delivery. Here are some commonly used SMTP server addresses and ports:
- Gmail: SMTP Server: smtp.gmail.com, Port: 465 or 587
- Outlook.com: SMTP Server: smtp-mail.outlook.com, Port: 587
- Yahoo Mail: SMTP Server: smtp.mail.yahoo.com, Port: 465 or 587
- Hotmail: SMTP Server: smtp.live.com, Port: 587
- AT&T: SMTP Server: smtp.att.yahoo.com, Port: 465 or 587
- Verizon: SMTP Server: outgoing.verizon.net, Port: 465 or 587
- Comcast: SMTP Server: smtp.comcast.net, Port: 465 or 587
- AOL Mail: SMTP Server: smtp.aol.com, Port: 465 or 587
- Office 365: SMTP Server: smtp.office365.com, Port: 587
- ISP-specific Servers: Some internet service providers have their own SMTP servers. Check with your ISP for the specific server address and port number.
Note that the port numbers mentioned here are the most commonly used ones, but they may vary depending on the email service provider and their configuration. It’s important to refer to the documentation provided by your email service provider to obtain the accurate server address and port information.
Additionally, keep in mind that certain SMTP servers may require authentication and encryption settings. These settings ensure secure and authorized access to the server. Make sure to configure your email client or SMTP server settings accordingly to align with the requirements of your email service provider.
By using the correct server address and port number, you can successfully specify and connect to the preferred SMTP server, ensuring reliable email communication from your Mac.
Troubleshooting SMTP Server Configuration
While specifying a preferred SMTP server on your Mac can improve your email sending experience, you may encounter issues with the server configuration. Here are some common troubleshooting steps to resolve SMTP server configuration problems:
1. Double-check the Server Information: Ensure that you have entered the correct SMTP server address, port number, and any required authentication details. Even a small typo can prevent your emails from being sent successfully.
2. Verify Network Connectivity: Check your internet connection to ensure it is stable and working properly. If you’re experiencing network issues, it may affect your ability to connect to the SMTP server. Try accessing other websites or services to confirm if your connection is functioning correctly.
3. Confirm Firewall and Antivirus Settings: Firewalls or antivirus programs on your Mac can sometimes block the outgoing email connection. Make sure that your firewall or antivirus software is not interfering with the SMTP server connection. Temporarily disabling the firewall or antivirus can help identify if they are causing the problem.
4. Test with Alternate Ports: If you’re having trouble connecting to the SMTP server using the default port, try using alternative port numbers. Common alternatives include port 587 and port 2525. Refer to your email service provider’s documentation to find out if they support alternate ports.
5. Use SSL/TLS Encryption: If your email service provider supports SSL or TLS encryption, make sure to enable it in your email client settings. Enabling encryption ensures that your communication with the SMTP server is secure and helps prevent unauthorized access to your email data.
6. Contact Your Email Service Provider: If you have followed the steps above and are still experiencing issues with SMTP server configuration, reach out to your email service provider’s customer support. They can assist you with troubleshooting specific to their servers and provide guidance on resolving any configuration problems.
Remember to keep your email client and macOS up to date with the latest software updates. Software updates often include bug fixes and improvements that can enhance compatibility with SMTP servers.
By following these troubleshooting steps, you can address common issues associated with SMTP server configuration and ensure smooth email sending from your Mac.