
How to Set up Mail.com SMTP for Outlook
If you are using Microsoft Outlook as your preferred email client, setting up Mail.com SMTP is a straightforward process. By following these steps, you can easily configure your Mail.com account to send outgoing emails via the SMTP server in Outlook.
Step 1: Open Outlook and navigate to Account Settings.
In Outlook, go to the “File” tab, and select “Info” from the left-hand sidebar. Then, click on “Account Settings” and choose “Account Settings” again from the dropdown menu.
Step 2: Add a new email account.
In the “Account Settings” window, click on the “New” button under the “Email” tab. Select “Manual setup or additional server types” and click “Next.”
Step 3: Choose POP or IMAP settings.
On the next screen, choose either “POP” or “IMAP” as the email server type. We recommend selecting “IMAP” if you want your emails synced across multiple devices. Click “Next” to proceed.
Step 4: Enter your Mail.com account details.
Fill in the required information, including your name, email address (yourname@mail.com), and password for your Mail.com account. Make sure to check the box that says “Remember password” for convenience. Click “Next” to continue.
Step 5: Configure the outgoing server settings.
In the next window, click on the “More Settings” button and go to the “Outgoing Server” tab. Check the box that says “My outgoing server (SMTP) requires authentication” and select the option “Use same settings as my incoming mail server.”
Step 6: Add the Mail.com SMTP server information.
Still in the “More Settings” window, go to the “Advanced” tab. Enter the following SMTP server details:
- Outgoing server (SMTP): smtp.mail.com
- Port number: 587
- Encryption: TLS
Click “OK” to save the changes.
Step 7: Test the settings and complete the setup.
After saving the changes, click on the “Test Account Settings” button to ensure the Mail.com SMTP settings are correct. If the test is successful, you will see a confirmation message. Click “Next” and then “Finish” to complete the setup process.
You have now successfully set up Mail.com SMTP for Outlook. You can start sending outgoing emails directly from your Mail.com account using Outlook as your email client.
How to Set up Mail.com SMTP for Gmail
If you prefer using Gmail to manage your emails and want to configure your Mail.com SMTP settings to send outgoing emails through your Gmail account, follow these simple steps:
Step 1: Log in to your Gmail account.
Open a web browser and access your Gmail account by entering your credentials.
Step 2: Go to Gmail settings.
In the upper-right corner of the Gmail interface, click on the gear icon, then select “Settings” from the dropdown menu.
Step 3: Navigate to the “Accounts and Import” tab.
In the Settings menu, click on the “Accounts and Import” tab.
Step 4: Add your Mail.com email address.
Under the “Send mail as” section, click on the “Add another email address” link.
Step 5: Enter your Mail.com SMTP settings.
A popup window will appear. In the “Email address” field, enter your Mail.com email address (yourname@mail.com). Click on the “Next Step” button.
Step 6: Configure the SMTP server.
For the SMTP server, enter “smtp.mail.com.” Set the SMTP port to “587” and select “TLS” as the encryption method. Ensure that the checkbox next to “Secured connection using TLS” is selected. Click on the “Add Account” button.
Step 7: Complete the verification process.
Gmail will send a verification email to your Mail.com account. Open your Mail.com inbox and click on the verification link in the email. This step confirms that you own the email address and allows you to send emails using it from Gmail.
Step 8: Select the default email address.
Return to the “Accounts and Import” tab in Gmail settings. Under the “Send mail as” section, you will see your Mail.com email address listed. Click on the “make default” link next to it if you want it to be your default sending address. You can also choose to reply from the same address the message was sent to.
Step 9: Send emails using your Mail.com SMTP settings.
You can now compose a new email in Gmail and choose your Mail.com address from the “From” field. Gmail will use the configured Mail.com SMTP settings to send the email.
By following these steps, you can easily set up Mail.com SMTP for Gmail and enjoy the convenience of managing your Mail.com emails within your Gmail account.
Mail.com SMTP Settings for iPhone
If you use an iPhone and want to send outgoing mails through your Mail.com account, you can easily set up the Mail.com SMTP settings on your device. Follow the steps below to configure your iPhone for Mail.com SMTP:
Step 1: Open the Settings app on your iPhone.
Locate the “Settings” app on your iPhone’s home screen and tap on it to open.
Step 2: Scroll down and tap on “Mail.”
In the Settings menu, locate and tap on “Mail” (or “Mail, Contacts, Calendars” on older versions of iOS).
Step 3: Tap on “Accounts.”
In the Mail settings, tap on “Accounts” to view a list of your email accounts.
Step 4: Choose your Mail.com account.
From the list of email accounts, tap on your Mail.com account to access its settings.
Step 5: Tap on the “Account” field.
In the Mail.com account settings, tap on the “Account” field to view and modify the account details.
Step 6: Tap on “SMTP” under the Outgoing Mail Server section.
Scroll down to the “Outgoing Mail Server” section and tap on “SMTP.”
Step 7: Tap on the primary SMTP server for Mail.com.
Under the “SMTP” section, you will see a list of SMTP servers associated with your Mail.com account. Tap on the primary server labeled “smtp.mail.com.”
Step 8: Configure the Mail.com SMTP settings.
In the SMTP server settings, make sure the following information is entered correctly:
- Server: smtp.mail.com
- Username: Your full Mail.com email address (e.g., yourname@mail.com)
- Password: Your Mail.com account password
- Use SSL: Enabled
- Authentication: Password
- Server Port: 587
Step 9: Save the settings.
After entering the Mail.com SMTP settings, tap the “Done” button to save the changes and exit the settings screen.
You have now successfully set up Mail.com SMTP for your iPhone. You can start sending outgoing emails through your Mail.com account using the Mail app on your iPhone.
Mail.com SMTP Settings for Android
To send outgoing emails through your Mail.com account on your Android device, you need to configure the Mail.com SMTP settings. Follow these steps to set up Mail.com SMTP on your Android:
Step 1: Open the Email app on your Android device.
Locate the Email app on your home screen or app drawer and tap on it to open.
Step 2: Enter your Mail.com email address and password.
In the Email app, enter your Mail.com email address (e.g., yourname@mail.com) and password in the provided fields. Tap “Next” to proceed.
Step 3: Select “POP” or “IMAP” as the account type.
In the account type selection screen, choose either “POP” or “IMAP” as per your preference. We recommend selecting “IMAP” for better email synchronization. Tap “Next” to continue.
Step 4: Enter the Mail.com SMTP server details.
In the “Outgoing server settings” screen, enter the following Mail.com SMTP server details:
- SMTP Server: smtp.mail.com
- Port: 587
- Security Type: STARTTLS (or TLS, if STARTTLS is not available)
- Require sign-in: Enable the checkbox
- Username: Your full Mail.com email address
- Password: Your Mail.com account password
Step 5: Tap “Next” and complete the setup.
After entering the Mail.com SMTP settings, tap “Next” to proceed. The Email app will attempt to verify the settings and establish a connection with the Mail.com server. Once the verification is successful, you can customize additional sync options and account settings if desired. Tap “Next” and then tap “Finish” to complete the setup process.
Your Mail.com SMTP settings are now configured on your Android device. You can start sending outgoing emails through your Mail.com account using the Email app on your Android device.
Mail.com SMTP Settings for Mac Mail
If you use Mac Mail as your email client on your macOS device and want to send outgoing emails through your Mail.com account, you can easily configure the Mail.com SMTP settings in Mac Mail. Follow these steps:
Step 1: Open Mac Mail and go to Preferences.
Open the Mac Mail application on your macOS device. In the top menu bar, click on “Mail” and select “Preferences” from the dropdown menu.
Step 2: Select your Mail.com account.
In the Preferences window, click on the “Accounts” tab. Select your Mail.com account from the list on the left-hand side.
Step 3: Go to the Account Information tab.
In the Account Information tab, ensure that the correct account details are displayed, including your Mail.com email address and account description.
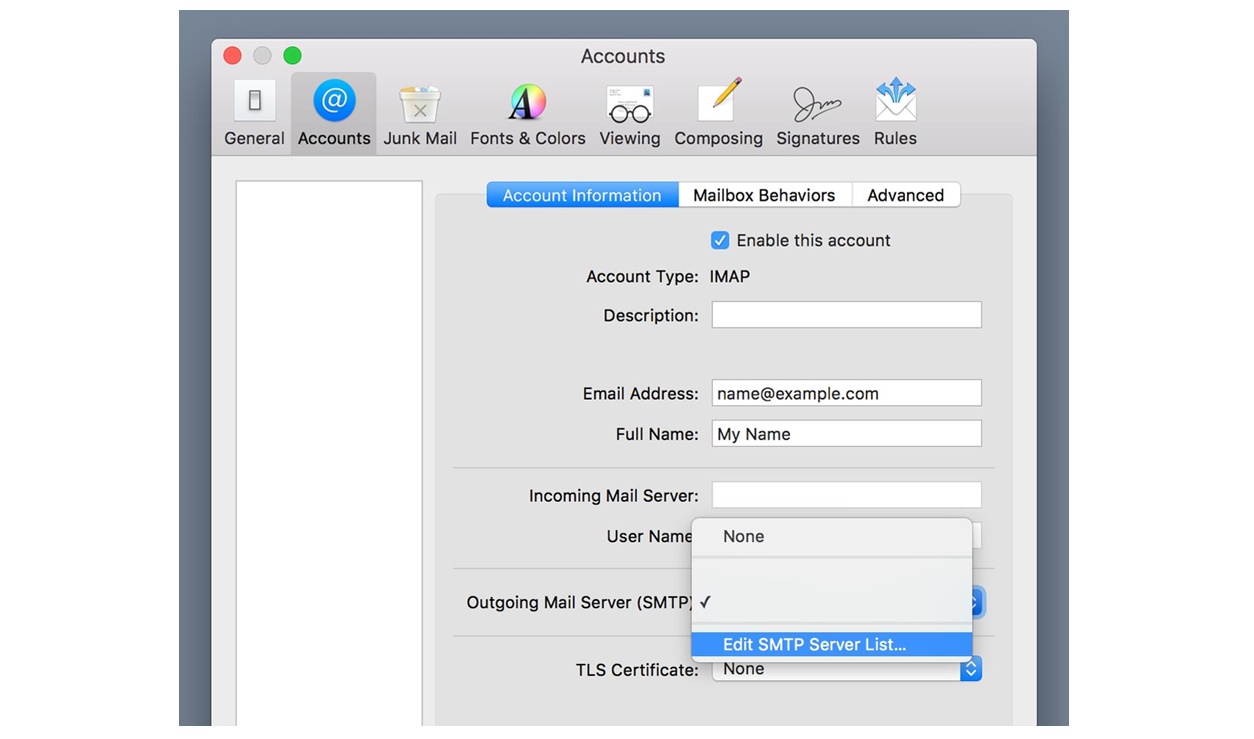
Step 4: Configure the Mail.com SMTP settings.
Under the Account Information tab, click on the dropdown menu next to “Outgoing Mail Server (SMTP)” and choose “Edit SMTP Server List.”
Step 5: Add the Mail.com SMTP server.
In the SMTP Server List, click on the “+” button to add a new SMTP server. Enter the following information:
- Server Name: smtp.mail.com
- Port: 587
- Use Secure Sockets Layer (SSL): Checked
- Authentication: Password
- Username: Your full Mail.com email address
- Password: Your Mail.com account password
Step 6: Save the settings and close the preferences window.
Click “OK” to save the Mail.com SMTP settings and close the preferences window.
You have successfully configured Mail.com SMTP for Mac Mail. You can now send outgoing emails through your Mail.com account using the Mac Mail application on your macOS device.
Mail.com SMTP Settings for Thunderbird
If you use Mozilla Thunderbird as your email client and want to set up Mail.com SMTP to send outgoing emails through your Mail.com account, follow these steps:
Step 1: Open Mozilla Thunderbird and go to Account Settings.
Launch Thunderbird and click on the three horizontal lines in the top right corner to access the menu. From the dropdown menu, select “Options” and then click on “Account Settings.”
Step 2: Select your Mail.com account.
In the Account Settings window, select your Mail.com account from the list on the left-hand side.
Step 3: Click on “Outgoing Server (SMTP)”.
Under the selected account, click on “Outgoing Server (SMTP)” to view and modify the outgoing server settings.
Step 4: Add the Mail.com SMTP server.
In the SMTP Server window, click on the “Add” button to add a new SMTP server.
Step 5: Enter the Mail.com SMTP details.
Provide the following SMTP server settings for Mail.com:
- Description: Enter a unique name for the server, such as “Mail.com SMTP.”
- Server Name: smtp.mail.com
- Port: 587
- Connection security: STARTTLS
- Authentication method: Normal password
- Username: Your full Mail.com email address
Click on “OK” to save the Mail.com SMTP server settings.
Step 6: Set the Mail.com SMTP server as the default.
In the Account Settings window, under the selected Mail.com account, select the newly added Mail.com SMTP server from the dropdown menu next to “Outgoing Server (SMTP).” This makes it the default outgoing server for your Mail.com account.
Step 7: Save the settings and exit Account Settings.
Click on “OK” to save the Mail.com SMTP settings and close the Account Settings window.
You have now successfully configured Mail.com SMTP for Thunderbird. You can send outgoing emails through your Mail.com account using the Thunderbird email client.
Mail.com SMTP Settings for Windows Live Mail
To set up Mail.com SMTP for Windows Live Mail and send outgoing emails through your Mail.com account, follow these steps:
Step 1: Open Windows Live Mail and go to Accounts.
Launch Windows Live Mail and click on “Accounts” in the top menu bar.
Step 2: Add your Mail.com account.
In the Accounts window, click on the “Email” button to add a new email account.
Step 3: Enter your Mail.com account details.
Enter your Mail.com email address (e.g., yourname@mail.com) and password in the respective fields. Make sure to check the box that says “Manually configure server settings.” Click “Next” to continue.
Step 4: Select the server type.
Choose “IMAP” or “POP” as the server type based on your preference. We recommend selecting “IMAP” for better email synchronization across devices. Click “Next” to proceed.
Step 5: Configure the incoming server settings.
Enter the following information for the incoming server:
- Server address: imap.mail.com
- Port number: 993
- Encryption: SSL
Click “Next” to continue.
Step 6: Configure the outgoing server (SMTP) settings.
Enter the following information for the outgoing server:
- Server address: smtp.mail.com
- Port number: 587
- Encryption: TLS
Check the box that says “Requires a secure connection (SSL)” and ensure that the box for “Outgoing server requires authentication” is checked. Click “Next” to proceed.
Step 7: Enter your display name.
Provide a display name that will be shown to recipients when they receive emails from you. Click “Next” to continue.
Step 8: Complete the setup process.
Review the account information and settings summary. If everything looks correct, click “Finish” to complete the Mail.com SMTP setup for Windows Live Mail.
You have now successfully configured Mail.com SMTP for Windows Live Mail. You can start sending outgoing emails through your Mail.com account using Windows Live Mail as your email client.
Common Issues and Troubleshooting Tips for Mail.com SMTP Setup
While setting up Mail.com SMTP, you may encounter some common issues that can prevent your outgoing emails from being sent. Here are some troubleshooting tips to help you resolve these issues:
1. Authentication errors:
If you receive authentication errors, double-check your Mail.com login credentials (email address and password). Ensure that you have entered them correctly without any typos or extra spaces. Make sure that the “Requires authentication” option is enabled in your email client settings.
2. Incorrect SMTP server settings:
Verify that you have entered the correct Mail.com SMTP server address, port number, and encryption type. The SMTP server should be set to “smtp.mail.com,” the port number should be “587,” and the encryption type should be either “TLS” or “STARTTLS” (as per the email client’s setup instructions).
3. Firewall or antivirus blocking SMTP:
Check if your firewall or antivirus software is blocking the SMTP connection. Temporarily disable or adjust the settings of your firewall or antivirus program to allow outgoing SMTP traffic.
4. ISP blocking port 587:
Some ISPs (Internet Service Providers) block port 587, which is commonly used for SMTP. In such cases, try using port 25 or port 465 instead. Consult your ISP’s support documentation or contact their customer service to inquire about any port restrictions.
5. Interference from third-party plugins or add-ons:
If you have any third-party plugins or add-ons installed in your email client, disable them temporarily to check if they are interfering with the Mail.com SMTP configuration. Some plugins or add-ons may conflict with the outgoing server settings and cause issues.
6. Check for software updates:
Ensure that your email client application is up to date. Check for any available updates and install them if necessary. Updating to the latest version of your email client may resolve any compatibility issues that could be causing SMTP setup problems.
7. Contact Mail.com support:
If you have tried all the troubleshooting steps and are still facing issues, reach out to Mail.com support for further assistance. They can provide specific guidance based on your account and help you resolve any SMTP setup-related problems.
By following these troubleshooting tips, you can overcome common issues and successfully set up Mail.com SMTP for sending outgoing emails through your Mail.com account.
Additional Resources for Mail.com SMTP Setup
Setting up Mail.com SMTP can sometimes be challenging, especially if you encounter specific issues or require more detailed information. Here are some additional resources that can assist you in configuring and troubleshooting Mail.com SMTP:
1. Mail.com Help Center:
The Mail.com Help Center is a comprehensive resource that provides step-by-step guides, FAQs, and tutorials on various topics, including SMTP setup. Visit the Help Center on the Mail.com website to access valuable information and resources.
2. Mail.com Support Team:
If you need direct assistance or have specific questions related to Mail.com SMTP setup, the Mail.com support team is available to help. Contact their support team through email or live chat for personalized support and guidance.
3. Online Forums and Communities:
Online forums and communities dedicated to email clients and SMTP configuration can be valuable sources of information. Websites like Stack Exchange, Reddit, and various tech forums offer user-generated content and discussions on various email-related topics. Participating in these communities can help troubleshoot specific issues and find solutions from experienced users.
4. Email Client Documentation:
Refer to the official documentation and user guides provided by your specific email client (e.g., Outlook, Gmail, Thunderbird, etc.). These resources typically include detailed instructions for setting up SMTP servers, troubleshooting common issues, and optimizing email client settings for optimal performance.
5. Social Media Channels:
Follow Mail.com’s official social media channels, such as Facebook, Twitter, and LinkedIn, where they may share tips, updates, and important information related to SMTP setup. Social media platforms can provide additional guidance and support in real-time.
6. Online Tutorials and YouTube Videos:
Search for online tutorials and video guides on platforms like YouTube. Many tech enthusiasts and experts create video tutorials that walk you through the process of setting up Mail.com SMTP on different email clients, highlighting common issues, and providing troubleshooting tips.
By exploring these additional resources, you can access a wealth of information and support to ensure a smooth and successful setup of Mail.com SMTP for your specific email client and configuration requirements.