
Check Vipre Internet Security’s System Requirements
Before proceeding with the uninstallation process for Vipre Internet Security, it is essential to ensure that your system meets the necessary requirements. This will help prevent any compatibility issues and ensure a smooth uninstallation process. Here are the system requirements you need to check:
- Operating System: Vipre Internet Security is compatible with Windows 10, Windows 8.1, Windows 7, and Windows Vista.
- Processor: Your computer should have a minimum of 1 GHz processor or higher.
- RAM: The recommended RAM size for Vipre Internet Security is 2 GB or more.
- Hard Disk Space: Ensure that you have at least 1.5 GB of free disk space available.
- Internet Connection: A stable and active internet connection is required to download, install, and update Vipre Internet Security.
- Browser Compatibility: Vipre Internet Security supports Internet Explorer 11 or later, Mozilla Firefox, and Google Chrome.
By checking and confirming that your system meets these requirements, you can proceed with the uninstallation process without any technical difficulties. It is advisable to double-check these requirements to avoid any unnecessary complications during the uninstallation process.
Now that you have verified the system requirements, let’s move on to the next step of disabling the real-time scanning feature in Vipre Internet Security.
Disable Real-Time Scanning
Before initiating the uninstallation process for Vipre Internet Security, it is recommended to disable the real-time scanning feature. This step ensures that the program is not actively protecting your system during the uninstallation process. Here’s how you can disable the real-time scanning feature:
- Locate the Vipre Internet Security icon in your system tray, typically located in the bottom-right corner of the screen.
- Right-click on the icon to open the context menu.
- From the menu, select “Disable Active Protection.”
- A confirmation prompt will appear, asking if you want to disable real-time scanning. Click “Yes” to proceed.
Once you have disabled the real-time scanning feature, Vipre Internet Security will no longer provide active protection against threats. This temporary disabling allows for a smoother uninstallation process without any interference from the antivirus program.
Now that you have disabled the real-time scanning feature, it’s time to access the Control Panel to remove Vipre Internet Security from your computer.
Access the Control Panel
In order to uninstall Vipre Internet Security from your computer, you will need to access the Control Panel. The Control Panel is a centralized hub for managing various settings and programs on your Windows operating system. Here’s how you can access the Control Panel:
- Click on the “Start” menu button located in the bottom-left corner of your screen.
- In the search bar, type “Control Panel” and press Enter.
- The Control Panel window will open, displaying various categories of settings and options.
- From the available categories, locate and click on “Programs” or “Programs and Features.”
- A list of all installed programs on your computer will be displayed.
By accessing the Control Panel, you gain the ability to manage and modify various aspects of your computer, including installed programs. This is where you will find the necessary tools to uninstall Vipre Internet Security.
Now that you have successfully accessed the Control Panel, let’s proceed to the next step of uninstalling Vipre Internet Security through the “Programs and Features” section.
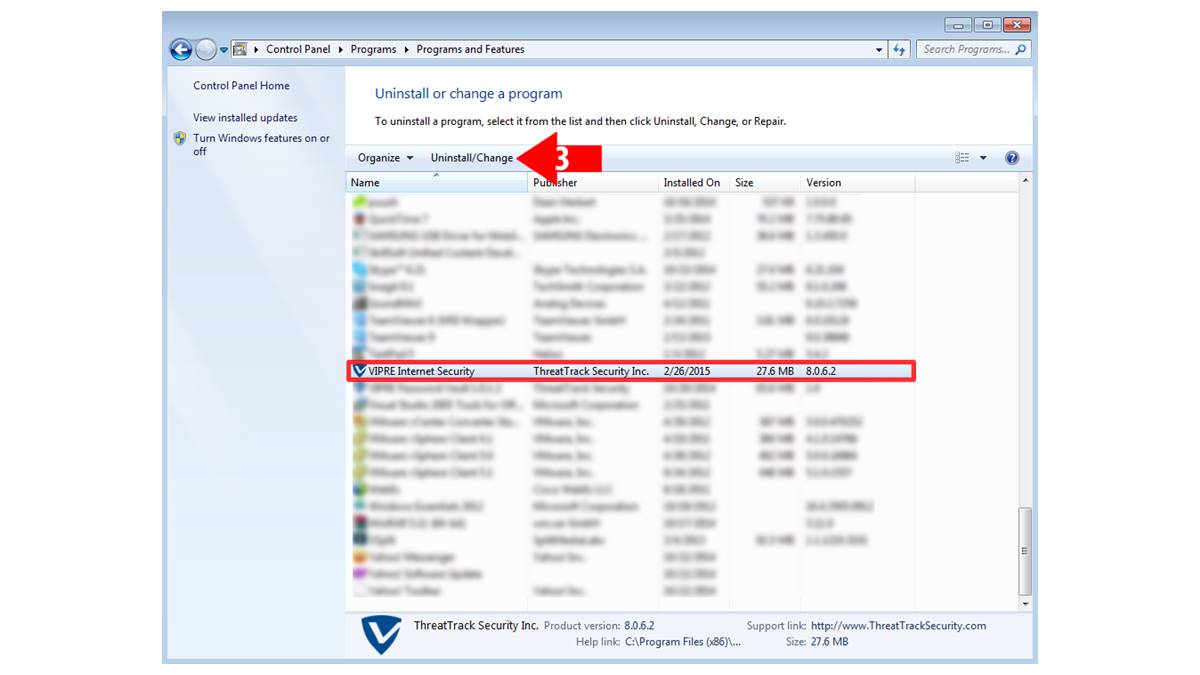
Uninstall Vipre Internet Security through “Programs and Features”
The “Programs and Features” section in the Control Panel provides a convenient way to uninstall programs from your computer. To remove Vipre Internet Security using this method, follow the steps below:
- Open the Control Panel by clicking on the “Start” menu button and typing “Control Panel” in the search bar.
- In the Control Panel window, navigate to the “Programs” or “Programs and Features” category.
- Locate Vipre Internet Security in the list of installed programs.
- Right-click on Vipre Internet Security and select “Uninstall” or “Remove” from the context menu.
- Follow the on-screen prompts to complete the uninstallation process.
Note that the exact steps may vary slightly depending on your version of Windows. Always carefully read and follow the instructions provided during the uninstallation process.
Once the uninstallation is complete, it is recommended to restart your computer to ensure that any residual files or settings are properly cleared. By utilizing the “Programs and Features” section, you can conveniently remove Vipre Internet Security from your system without any hassle.
Next, we will explore an alternative method to uninstall Vipre Internet Security using the Vipre Removal Tool.
Remove Vipre Internet Security with Vipre Removal Tool
If you are encountering difficulties with the standard uninstallation process or if there are leftover files from Vipre Internet Security after uninstalling through “Programs and Features,” you can use the Vipre Removal Tool to ensure a complete and thorough removal. Follow these steps:
- Begin by downloading the Vipre Removal Tool from the official Vipre website. Ensure that you download the appropriate version for your operating system.
- Once the tool is downloaded, locate the file and double-click on it to run the program.
- Follow the on-screen instructions provided by the Vipre Removal Tool to initiate the removal process.
- The tool will scan for any remaining traces of Vipre Internet Security on your computer and remove them.
- During the process, you may be prompted to restart your computer to complete the removal. If prompted, click “Yes” to restart your system.
The Vipre Removal Tool is designed to thoroughly remove Vipre Internet Security, including any leftover files, registry entries, or other components that may not be removed through the standard uninstallation process. It is an effective solution to ensure a clean and complete removal of the software from your system.
After successfully using the Vipre Removal Tool, you can proceed to the final step of manually deleting any leftover files and registry entries related to Vipre Internet Security.
Let’s move on to the next section to learn how to manually remove any remaining traces of Vipre Internet Security from your computer.
Manually Delete Leftover Files and Registry Entries
Even after using the standard uninstallation method and the Vipre Removal Tool, there may be some residual files and registry entries associated with Vipre Internet Security. To ensure a thorough removal, you can manually delete these leftover files and registry entries. Here are the steps to do so:
- Open the File Explorer on your computer by pressing the Windows key + E.
- Navigate to the installation directory of Vipre Internet Security. This is typically located in the “Program Files” or “Program Files (x86)” folder.
- Select the Vipre Internet Security folder and press the delete key on your keyboard to remove it. Please note that deleting this folder will permanently remove all associated files and folders.
- Next, open the Registry Editor by pressing the Windows key + R, typing “regedit” in the Run dialog box, and hitting Enter.
- In the Registry Editor, navigate to the following key:
HKEY_LOCAL_MACHINE\SOFTWARE - Locate the folder named “Vipre.” Right-click on it and select “Delete” to remove it from the registry. Note: Exercise caution when deleting registry entries, as any incorrect modification can have adverse effects on your system.
By manually removing the leftover files and registry entries, you ensure a thorough uninstallation of Vipre Internet Security from your computer. This step is optional but recommended for those who want to completely eliminate any remnants of the software.
Once you have completed these steps, you can be confident that Vipre Internet Security has been fully removed from your system. Remember to restart your computer to finalize the removal process.
Now that you have successfully uninstalled Vipre Internet Security and cleaned up any remaining traces, your computer is ready for a fresh start with a different antivirus solution or any other software of your choosing.