Check if you have the latest version of AVG Internet Security
Before proceeding with the uninstallation process of AVG Internet Security, it is essential to ensure that you have the latest version of the software installed on your computer. Keeping your antivirus software up to date ensures that you have access to the latest features, bug fixes, and protection against the newest threats.
To check if you have the latest version of AVG Internet Security, follow these steps:
- Open AVG Internet Security by double-clicking on the desktop icon or searching for it in the Start menu.
- Once the program is open, click on the menu icon in the top-right corner, often represented by three horizontal lines.
- From the dropdown menu, select “Settings.”
- In the left sidebar, click on “Update.”
- Under the “Program” tab, click on the “Check for updates” button.
If there is a newer version available, AVG Internet Security will start downloading and installing it automatically. This process may take some time, depending on your internet connection speed.
It is crucial to have the latest version of the software before performing the uninstallation process, as older versions may not contain all the necessary components and may cause conflicts during the uninstallation process. Upgrading to the latest version ensures a smooth uninstallation and prevents any potential issues that may arise.
Once you have confirmed that you are using the latest version of AVG Internet Security, you can proceed to the next steps to temporarily disable the program before uninstalling it.
Disable AVG Internet Security temporarily
Before uninstalling AVG Internet Security, it is essential to disable it temporarily to prevent any conflicts or interference during the uninstallation process. Here’s how you can disable AVG Internet Security temporarily:
- Locate the AVG Internet Security icon in the system tray, usually located in the bottom-right corner of your screen. It may appear as a small blue square with a white shield icon.
- Right-click on the AVG icon to open the context menu.
- In the context menu, hover over “AVG Protection” or a similar option, then select “Temporarily Disable AVG Protection.”
- A dialog box will appear, asking you to confirm the temporary disablement. Select the duration for which you want to disable AVG Internet Security. You can choose options like 10 minutes, 1 hour, or until the computer restarts.
- Once you have selected the desired duration, click on the “Disable Now” button.
After disabling AVG Internet Security, you will notice a change in the AVG icon in the system tray, indicating that the program protection is temporarily disabled. This allows you to proceed with the uninstallation process without any interference from the antivirus software.
It is important to note that temporarily disabling AVG Internet Security only suspends its protection features for the specified duration. After the specified time has elapsed, AVG will automatically enable its protection again. If you want to permanently disable AVG Internet Security, you can do so by following the appropriate instructions in the program settings.
With AVG Internet Security temporarily disabled, you can now move on to uninstalling the software using the Control Panel.
Uninstall AVG Internet Security using the Control Panel
If you’ve decided to remove AVG Internet Security from your computer, one of the most common methods is through the Control Panel. Here’s how you can uninstall AVG Internet Security using the Control Panel:
- Open the Start menu and type “Control Panel” in the search bar. Click on the Control Panel app to open it.
- In the Control Panel, click on the “Programs” or “Programs and Features” option. This will open a list of installed programs on your computer.
- Scroll through the list and locate “AVG Internet Security.”
- Right-click on “AVG Internet Security” and select “Uninstall” from the dropdown menu. Alternatively, you can also click on “AVG Internet Security” and then click on the “Uninstall” button at the top of the list.
- A confirmation dialog box will appear, asking if you want to uninstall AVG Internet Security. Click “Yes” to proceed.
- Follow the on-screen instructions provided by the uninstaller to complete the uninstallation process. This may involve confirming your choice, selecting additional options, or entering your administrator password.
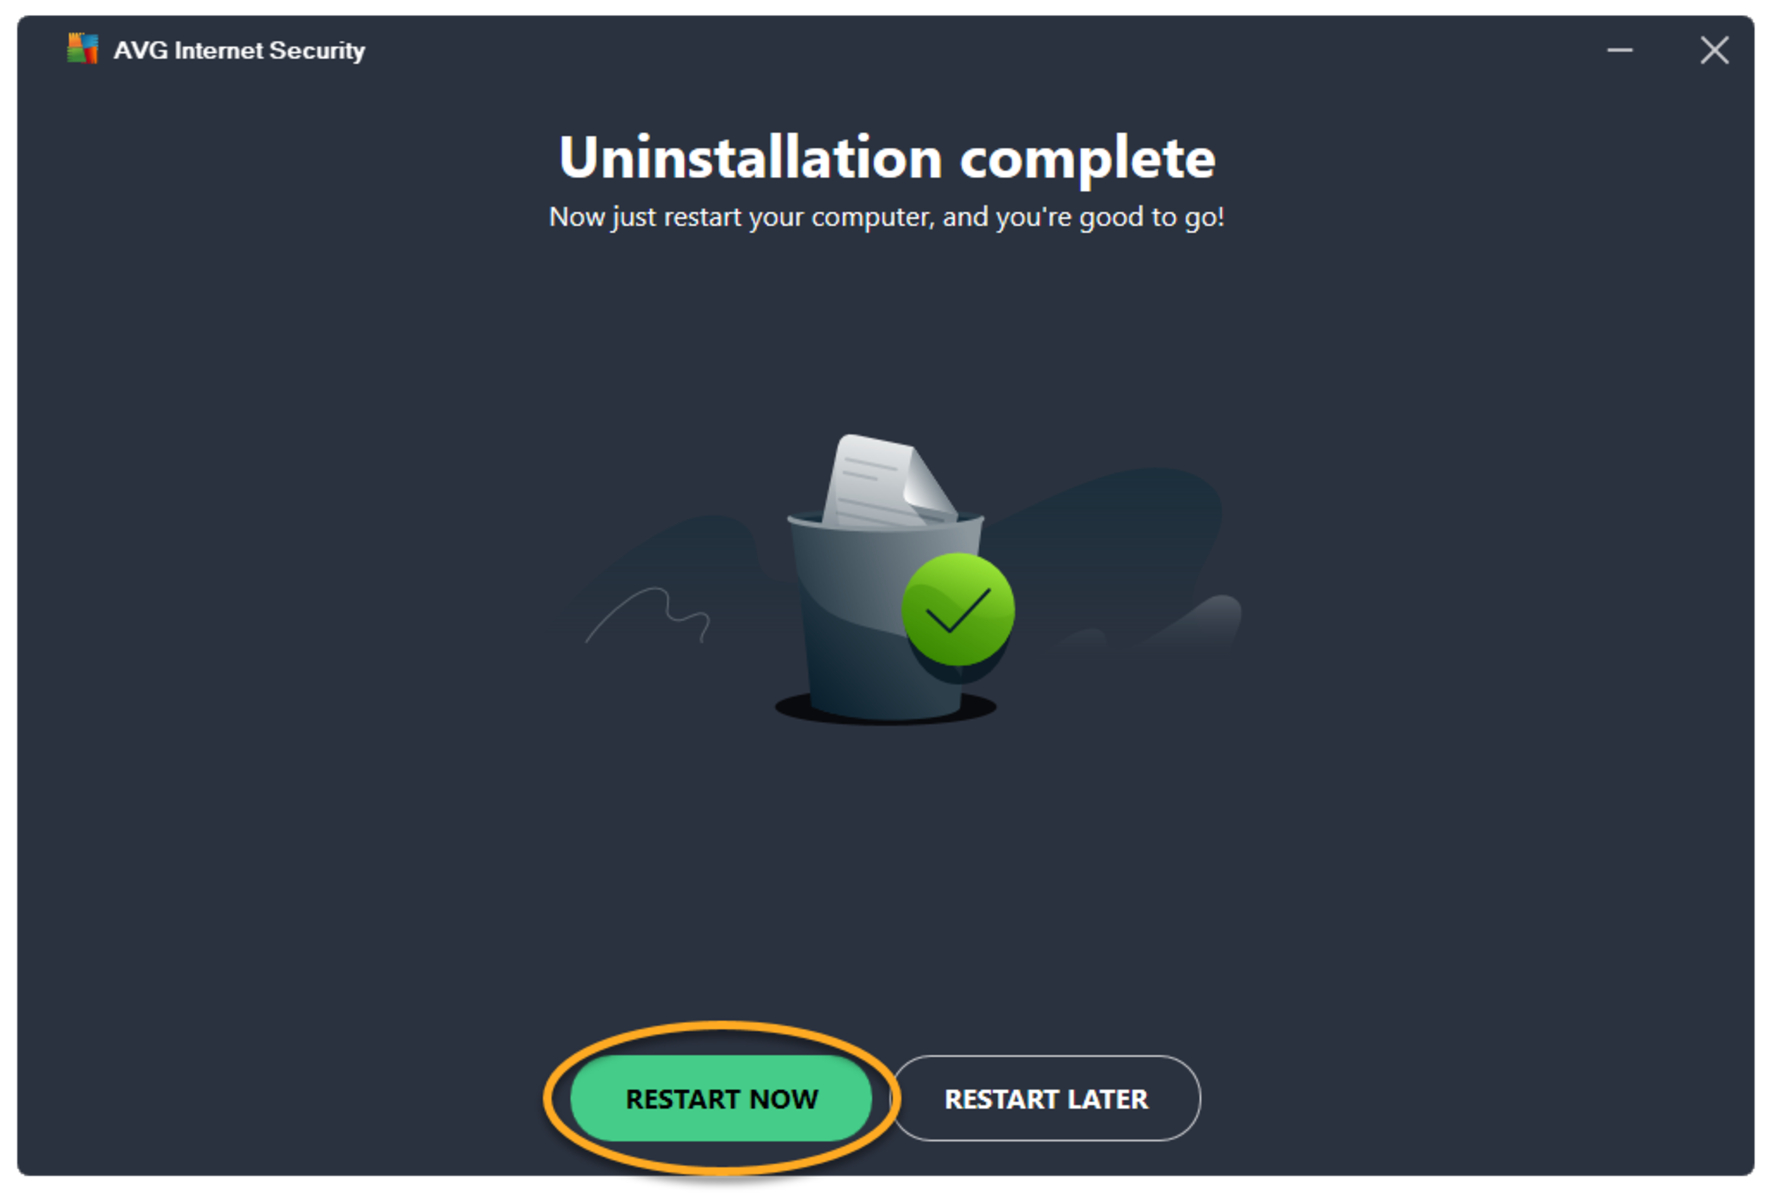
- Once the uninstallation process is complete, you may be prompted to restart your computer. If so, save any open files, close all programs, and click on the “Restart Now” button to restart your computer.
After your computer restarts, AVG Internet Security should be completely uninstalled from your system. It is always a good practice to double-check the list of installed programs to ensure that AVG Internet Security is no longer present. If you still see AVG Internet Security in the list, you may need to consider using the AVG Remover tool for a complete uninstallation.
Now that you have successfully uninstalled AVG Internet Security using the Control Panel, you can proceed with removing any leftover files and folders associated with the program.
Uninstall AVG Internet Security using the AVG Remover tool
If you have encountered difficulties in uninstalling AVG Internet Security using the Control Panel, or if you want to ensure a complete removal of the software, you can use the AVG Remover tool. The AVG Remover tool is a specialized utility provided by AVG that helps to thoroughly uninstall their software from your computer. Follow the steps below to uninstall AVG Internet Security using the AVG Remover tool:
- Go to the AVG official website and search for the “AVG Remover” tool. Download the latest version of the tool compatible with your operating system.
- Once the download is complete, locate the downloaded file and double-click on it to run the AVG Remover tool.
- Follow the prompts and instructions provided on the screen. The tool will start scanning your computer for any installed AVG products.
- After the scan is complete, a list of detected AVG products will be displayed. Select “AVG Internet Security” from the list.
- Click on the “Uninstall” or “Remove” button to initiate the uninstallation process using the AVG Remover tool.
- Follow any additional on-screen instructions to complete the uninstallation process.
- Once the uninstallation is finished, you may be prompted to restart your computer. If so, save your work, close any open programs, and click on the “Restart Now” button.
When your computer restarts, AVG Internet Security should be completely removed from your system. It is recommended to check the list of installed programs in the Control Panel to ensure that AVG Internet Security is no longer present.
The AVG Remover tool is designed to assist in the removal of AVG products, ensuring a more thorough and complete uninstallation process. It helps to eliminate any remaining files, folders, or registry entries that may have been left behind by the regular uninstallation process.
With AVG Internet Security successfully uninstalled using the AVG Remover tool, you can proceed to the next step of removing any leftover files and folders associated with the program.
Remove leftover files and folders from AVG Internet Security
After uninstalling AVG Internet Security using either the Control Panel or the AVG Remover tool, it is important to ensure that any leftover files and folders associated with the software are completely removed from your system. Here are the steps to remove any remnants of AVG Internet Security:
- Open File Explorer by pressing the Windows key + E or by searching for “File Explorer” in the Start menu.
- In the File Explorer window, navigate to the following locations and delete any AVG-related files and folders you find:
- C:\Program Files\AVG
- C:\ProgramData\AVG
- C:\Users\YourUsername\AppData\Local\AVG
Note: Replace “YourUsername” with your actual Windows username.
- If you encounter any difficulty in deleting a file or folder, you may need to right-click on it, select “Properties,” go to the “Security” tab, and make sure you have the necessary permissions to delete the file or folder. You may also need to restart your computer and try again.
- Empty the Recycle Bin by right-clicking on the Recycle Bin icon on your desktop and selecting “Empty Recycle Bin.”
By deleting the leftover files and folders, you ensure a clean removal of AVG Internet Security from your system. This step helps to free up disk space and prevents any potential conflicts or issues with other antivirus software or security programs you may have installed.
After removing the leftover files and folders, it is a good practice to restart your computer. This helps to ensure that any system changes related to AVG Internet Security uninstallation take effect.
With AVG Internet Security completely uninstalled and all remnants removed, you have successfully completed the uninstallation process. Your computer is now ready for any new antivirus software or security solution you may wish to install.
Restart your computer after uninstallation
After uninstalling AVG Internet Security and removing any leftover files and folders, it is highly recommended to restart your computer. Restarting your computer serves several important purposes to ensure that the uninstallation process is complete and that your system is in an optimal state. Here’s why restarting your computer after uninstallation is essential:
- Apply System Changes: Restarting allows any system changes made during the uninstallation process to take effect. This includes removing registry entries, updating system files, and resetting configurations.
- Reset System Resources: Restarting your computer helps to free up system resources that were previously occupied by AVG Internet Security. This ensures that your computer runs smoothly and efficiently without any remnants of the software interfering with other programs.
- Validate Uninstallation: Restarting your computer allows you to confirm that AVG Internet Security has been completely uninstalled. After the restart, check the list of installed programs in the Control Panel to ensure that AVG Internet Security is no longer present.
- Solve Issues: Restarting your computer can resolve any lingering issues or conflicts that may have been caused by the uninstallation process. It provides a fresh start for your system, helping to eliminate any potential errors or glitches caused by the removal of AVG Internet Security.
To restart your computer, click on the “Start” button in the bottom-left corner of the screen, select the power icon, and choose the “Restart” option.
It is important to save any open files and close all programs before restarting your computer. This ensures that you don’t lose any unsaved work and that the restart process goes smoothly.
After your computer restarts, allow it to fully boot up, and then log in to your user account. Take a moment to ensure that your system is functioning as expected and that there are no apparent issues or errors.
By restarting your computer after uninstalling AVG Internet Security, you complete the uninstallation process and ensure that your system is ready for any new antivirus software or security solution you may choose to install.