
Why Uninstall Chrome on Mac?
Chrome is undoubtedly a popular and feature-rich web browser that offers a seamless browsing experience on Mac. However, there may come a time when you need to uninstall Chrome from your Mac for various reasons. These reasons could include switching to a different browser, troubleshooting issues, optimizing system resources, or simply wanting a fresh start with a clean slate.
One reason to uninstall Chrome on Mac is if you have decided to switch to a different web browser. Each browser has its own set of features, interface, and performance characteristics, and you may find that another browser better suits your browsing needs. Uninstalling Chrome allows you to make a clear transition and fully embrace your new browser of choice.
If you have been experiencing performance issues or crashes with Chrome, uninstalling and reinstalling the browser can often resolve these problems. Sometimes, a corrupted installation or conflicts with other software can cause Chrome to become unstable. By uninstalling Chrome and reinstalling it, you can start with a fresh installation and potentially fix any underlying issues that were causing the browser’s performance problems.
Uninstalling Chrome can also help optimize system resources on your Mac. Chrome is known for consuming a significant amount of memory, especially if you have numerous tabs open or use heavy web applications. If you have limited system resources or want to improve the overall performance of your Mac, uninstalling Chrome can free up valuable memory and processing power for other tasks.
Add a few sentences about privacy concerns and data management.
Lastly, if you simply want to start fresh with a clean slate, uninstalling Chrome allows you to remove all browsing history, preferences, extensions, and saved data associated with the browser. This can be helpful if you want to maintain privacy or if you want to get rid of any accumulated clutter that may have accumulated over time. By uninstalling Chrome, you can ensure that no traces of your browsing activities or personal information remain on your Mac.
Step 1: Quit Chrome and Close All Windows
Before uninstalling Chrome from your Mac, it is essential to ensure that all Chrome windows and processes are closed. This step is crucial to prevent any potential conflicts or errors during the uninstallation process. Follow the steps below to quit Chrome and close all windows:
- Click on the Chrome menu located in the top-left corner of the screen. It is represented by three vertical dots.
- In the drop-down menu, click on the “Quit Google Chrome” option. Alternatively, you can use the keyboard shortcut Command + Q to quit Chrome.
- Ensure that all Chrome windows are closed. You can do this by clicking the red “X” button in the top-left corner of each Chrome window or using the keyboard shortcut Command + W to close individual windows.
- It is also important to check if any Chrome processes are running in the background. To do this, open the Activity Monitor on your Mac by searching for it in Spotlight or navigating to Applications > Utilities > Activity Monitor.
- In the Activity Monitor window, search for any processes related to Chrome (e.g., “Google Chrome Helper”). If you find any Chrome processes, select them and click on the “X” button in the toolbar to quit them.
By following these steps, you will ensure that Chrome is completely closed, preventing any potential conflicts that may arise during the uninstallation process. It is important to note that quitting Chrome and closing all its windows is a necessary preliminary step before proceeding with the actual uninstallation of the browser.
If you encounter any difficulties or error messages while trying to quit Chrome, you may need to force quit the application. To do this, follow these additional steps:
- Press and hold the Option key on your keyboard.
- While holding the Option key, click on the Chrome icon in the Dock.
- In the context menu that appears, click on the “Force Quit” option.
Force quitting Chrome should only be done if you are unable to quit the application using the regular method. However, it is recommended to use force quit sparingly and to only do so if necessary.
Step 2: Drag Chrome to the Trash
Once you have ensured that Chrome is completely closed, you can proceed with the next step: dragging Chrome to the Trash. Follow the steps below to uninstall Chrome from your Mac:
- Locate the Chrome icon in the Applications folder on your Mac. You can access this folder by clicking on the Finder icon in the Dock and then selecting “Applications” in the sidebar.
- Click and hold the Chrome icon, then drag it to the Trash bin located at the end of the Dock. Alternatively, you can right-click the Chrome icon and select “Move to Trash” from the context menu.
- Release the Chrome icon to drop it into the Trash bin.
- You can also access the Trash bin by clicking on the Trash icon in the Dock. Once you open the Trash, you will see the Chrome icon inside.
- To complete the uninstallation process, right-click on the Trash icon and select “Empty Trash.” Alternatively, you can click on the “Empty” button located at the top-right corner of the Trash window.
- Confirm the action by clicking on the “Empty Trash” or “Empty” button in the dialog box that appears.
Dragging Chrome to the Trash effectively removes the application from your Mac. However, it is important to note that this step only deletes the application itself and not all the associated files and settings. To ensure a complete uninstallation, you need to proceed with the remaining steps outlined in this guide.
Before emptying the Trash, you might want to double-check its contents to make sure you didn’t accidentally include any important files related to Chrome. Once you have verified that you no longer need any of the files in the Trash, you can confidently empty it to free up disk space on your Mac.
It’s worth mentioning that dragging the Chrome application to the Trash is the primary method to uninstall Chrome manually. However, it may not remove some residual files and settings scattered throughout your Mac. To completely remove all remnants of Chrome, including user preferences and other associated files, follow the remaining steps in this guide.
Step 3: Delete Chrome’s User Profile
After dragging the Chrome application to the Trash, it’s important to delete Chrome’s user profile to remove all user-specific data associated with the browser. This includes bookmarks, browsing history, saved passwords, and other personalized settings. To delete Chrome’s user profile, follow these steps:
- Open the Finder on your Mac by clicking on the Finder icon in the Dock.
- Click on the “Go” menu from the top menu bar and select “Go to Folder” from the drop-down menu.
- In the dialog box that appears, type “~/Library/” (without the quotes) and click on the “Go” button.
- A new Finder window will open, displaying the contents of the Library folder. Scroll down or use the search bar to locate the “Application Support” folder and double-click to open it.
- Inside the “Application Support” folder, find the “Google” folder and open it.
- Locate and select the “Chrome” folder and move it to the Trash. You can do this by either dragging the folder to the Trash bin or right-clicking on the folder and selecting “Move to Trash” from the context menu.
Deleting the Chrome folder in the “Application Support” directory removes all user-specific data associated with Chrome. This includes extensions, cache files, cookies, and other settings specific to your user profile. Removing the user profile ensures that all remnants of your browsing activity are completely wiped from your Mac.
It’s important to note that the “~/Library/” directory is typically hidden by default in the Finder. However, you can access it by either using the “Go to Folder” option or by holding down the Option key and clicking on the “Go” menu in the Finder menu bar.
By following these steps, you have taken another important step towards fully uninstalling Chrome from your Mac. However, there are still additional actions to be taken to ensure a complete removal. Continue reading this guide to find out how to remove Chrome’s application support files, preferences, extensions, and other associated data.
Step 4: Remove Chrome’s Application Support Files
In addition to deleting Chrome’s user profile, removing Chrome’s application support files is another crucial step to completely uninstall Chrome from your Mac. These support files contain various data and settings that may remain even after deleting the Chrome application. To remove Chrome’s application support files, follow these steps:
- Open a Finder window on your Mac by clicking on the Finder icon in the Dock.
- Click on the “Go” menu from the top menu bar and select “Go to Folder” from the drop-down menu.
- In the dialog box that appears, enter “~/Library/” (without the quotes) and click on the “Go” button.
- Locate and open the “Application Support” folder.
- Inside the “Application Support” folder, find the “Google” folder and open it.
- You will see a list of folders related to different Google applications. Locate and select the “Chrome” folder.
- Move the “Chrome” folder to the Trash by dragging it or right-clicking on it and selecting “Move to Trash” from the context menu.
Deleting the “Chrome” folder in the “Application Support” directory ensures that all application-specific support files and related data are removed from your Mac.
It is important to note that the “~/Library/” directory is typically hidden. You may need to access it using the “Go to Folder” option, as mentioned in the steps above. Alternatively, you can hold down the Option key and click on the “Go” menu in the Finder menu bar to make the Library folder visible.
By removing Chrome’s application support files, you are effectively eliminating any lingering data associated with Chrome on your Mac. However, for a thorough uninstallation, it is recommended to proceed with the next steps, which include cleaning up Chrome’s preferences, removing extensions and plugins, and clearing cache and cookies.
Continue reading this guide to learn how to perform these additional steps and ensure a complete removal of Chrome from your Mac.
Step 5: Clean Up Chrome’s Preferences
To ensure a complete uninstallation of Chrome from your Mac, it is important to clean up Chrome’s preferences. These preferences include various settings and configurations that may still be present on your system, even after removing the Chrome application and its associated support files. Follow these steps to clean up Chrome’s preferences:
- Open a Finder window on your Mac by clicking on the Finder icon in the Dock.
- Click on the “Go” menu from the top menu bar and select “Go to Folder” from the drop-down menu.
- In the dialog box that appears, enter “~/Library/” (without the quotes) and click on the “Go” button.
- Locate and open the “Preferences” folder.
- Scroll through the list of preference files and look for any files that start with “com.google.Chrome” or “com.google.Chrome.plist”.
- Select these preference files and move them to the Trash by dragging them or right-clicking and selecting “Move to Trash” from the context menu.
By deleting Chrome’s preference files, you are removing any personalized settings or configurations that were stored on your Mac. This includes settings related to Chrome’s appearance, default search engine, startup behavior, and more.
It is important to note that the “~/Library/” directory might be hidden by default in the Finder. To access it, use the “Go to Folder” option as mentioned in the steps above, or hold down the Option key and click on the “Go” menu in the Finder menu bar.
After cleaning up Chrome’s preferences, you have eliminated any remaining preference files associated with Chrome on your Mac. However, to ensure a thorough uninstallation, it is recommended to proceed with the next steps: removing Chrome extensions and plugins, clearing Chrome’s cache and cookies, and deleting Chrome’s local storage.
Continue reading this guide to learn how to perform these additional steps and ensure a complete removal of Chrome from your Mac.
Step 6: Remove Chrome Extensions and Plugins
As part of the uninstallation process, it is important to remove any Chrome extensions and plugins that you may have installed. Extensions and plugins can add functionality to Chrome, but they may also leave behind residual files and settings even after uninstalling the browser. Follow these steps to remove Chrome extensions and plugins:
- Open Chrome on your Mac, even if you have already uninstalled the application. This will allow you to access the Chrome extensions and plugins settings.
- In the Chrome browser, click on the three vertical dots in the top-right corner to open the menu.
- Hover over “More Tools” in the dropdown menu, and then click on “Extensions”.
- A new tab will open, displaying all the installed extensions on your Chrome browser.
- Click the “Remove” button next to each extension you want to uninstall. Confirm the removal when prompted.
- Next, type “chrome://plugins” in the address bar of the Chrome browser and press Enter.
- You will be directed to the Chrome plugins page, which lists all the installed plugins.
- For each plugin you want to remove, click the “Disable” or “Remove” button below it.
By removing Chrome extensions and plugins, you ensure that all associated files and settings are fully eliminated from your Mac. This step helps to prevent any potential conflicts or issues that may arise from residual extension or plugin data.
It is important to note that even if you have already uninstalled the Chrome application, some extensions and plugins may still be present within your Chrome profile. Therefore, it is recommended to follow these steps to remove them manually.
With the removal of extensions and plugins, you are nearing the end of the process to completely uninstall Chrome from your Mac. However, to ensure a thorough removal, it is important to proceed with the remaining steps, which include clearing Chrome’s cache and cookies, deleting Chrome’s local storage, and removing saved passwords.
Continue reading this guide to learn how to perform these final steps and successfully uninstall Chrome from your Mac.
Step 7: Clear Chrome’s Cache and Cookies
Clearing Chrome’s cache and cookies is an important step in the uninstallation process as it ensures the removal of temporary files and browsing data accumulated during your use of Chrome. Clearing the cache and cookies helps maintain your privacy and ensures a clean start with any new browser you may choose to install. Follow these steps to clear Chrome’s cache and cookies:
- Open Chrome on your Mac, even if you have already uninstalled the application. This will allow you to access Chrome’s settings.
- Click on the three vertical dots in the top-right corner of the Chrome window to open the menu.
- Hover over “More Tools” in the dropdown menu, and then click on “Clear browsing data”.
- In the “Clear browsing data” window that appears, ensure that the “Browsing history” and “Cookies and other site data” options are selected.
- You can also choose to select other types of data you want to delete, such as cached images and files.
- Select the time range for which you want to clear the data. To clear all data, select “All time”.
- Click on the “Clear data” button to start the process.
By clearing Chrome’s cache and cookies, you remove any stored website data, login information, and temporary files that may be stored on your Mac. This not only helps protect your privacy but also ensures a fresh start when using a new browser or re-installing Chrome in the future.
It’s important to note that clearing the cache and cookies in Chrome may log you out of websites and remove any stored preferences or settings associated with those sites. Make sure to take note of any important login information or settings before proceeding with this step.
With the completion of clearing Chrome’s cache and cookies, you are nearing the end of the process to fully uninstall Chrome from your Mac. However, there is still one final step remaining: deleting Chrome’s local storage.
Continue reading this guide to learn how to perform the last step and successfully uninstall Chrome from your Mac.
Step 8: Delete Chrome’s Local Storage
Deleting Chrome’s local storage is the final step to ensure a thorough uninstallation of the browser from your Mac. Local storage includes various files and data that Chrome stores on your computer, such as offline web application data, website-specific preferences, and more. Follow these steps to delete Chrome’s local storage:
- Open a Finder window on your Mac by clicking on the Finder icon in the Dock.
- Click on the “Go” menu from the top menu bar and select “Go to Folder” from the drop-down menu.
- In the dialog box that appears, enter the following path: “~/Library/Application Support/Google/Chrome/Default/”.
- Click on the “Go” button or press Enter to open the specified folder.
- Inside the “Default” folder, locate and delete all files with names starting with “Local Storage”.
Deleting Chrome’s local storage ensures the removal of any cached or locally stored data that Chrome may have accumulated. This step helps to ensure a complete and clean uninstallation of Chrome from your Mac.
It is worth mentioning that the “~/Library/” directory might be hidden by default in the Finder. You can access it by using the “Go to Folder” option, as mentioned in the steps above. Alternatively, you can hold down the Option key and click on the “Go” menu in the Finder menu bar to make the Library folder visible.
With the completion of this step, you have successfully deleted Chrome’s local storage, finishing the process to fully uninstall Chrome from your Mac.
By following all the steps in this guide, you have removed Chrome and all associated files, preferences, extensions, cache, cookies, and local storage from your Mac. Your system is now free from any remnants of Chrome, allowing you to start fresh with a clean slate or transition to a different browser of your choice.
Step 9: Remove Chrome’s Saved Passwords
When uninstalling Chrome from your Mac, it is crucial to remove any saved passwords associated with the browser. Chrome’s password manager securely stores and autofills passwords for websites you visit, which could pose a potential security risk if not properly removed. Follow these steps to remove Chrome’s saved passwords:
- Open Chrome on your Mac, even if you have already uninstalled the application. This will allow you to access Chrome’s settings.
- Click on the three vertical dots in the top-right corner of the Chrome window to open the menu.
- Hover over “Settings” in the dropdown menu and click on “Passwords.”
- In the “Passwords” settings, you will see a list of all the saved passwords in Chrome.
- For each password entry you want to remove, click on the three vertical dots next to it and select “Remove” or click on the bin icon.
- If you want to remove all saved passwords, click on the three vertical dots at the top-right corner of the “Passwords” page and select “Remove all.”
- Confirm the removal of the passwords when prompted.
By removing Chrome’s saved passwords, you ensure that any login credentials stored by the browser are permanently deleted. This is important to protect your online accounts and maintain your privacy after uninstalling Chrome.
It’s worth noting that if you have enabled Chrome’s synchronization feature, your passwords may also be stored on Google’s servers. To ensure the complete removal of your saved passwords, consider disabling Chrome sync and managing your passwords within a different password manager or browser if desired.
With the completion of this step, you have successfully removed Chrome’s saved passwords, further ensuring a complete and secure uninstallation of Chrome from your Mac.
Now that you have completed all the necessary steps, your Mac is free from any traces of Chrome, including the application itself, user profile, support files, preferences, extensions, cache, cookies, local storage, and saved passwords. You can now move forward with confidence, either exploring other browsers or performing a clean installation of Chrome if desired.
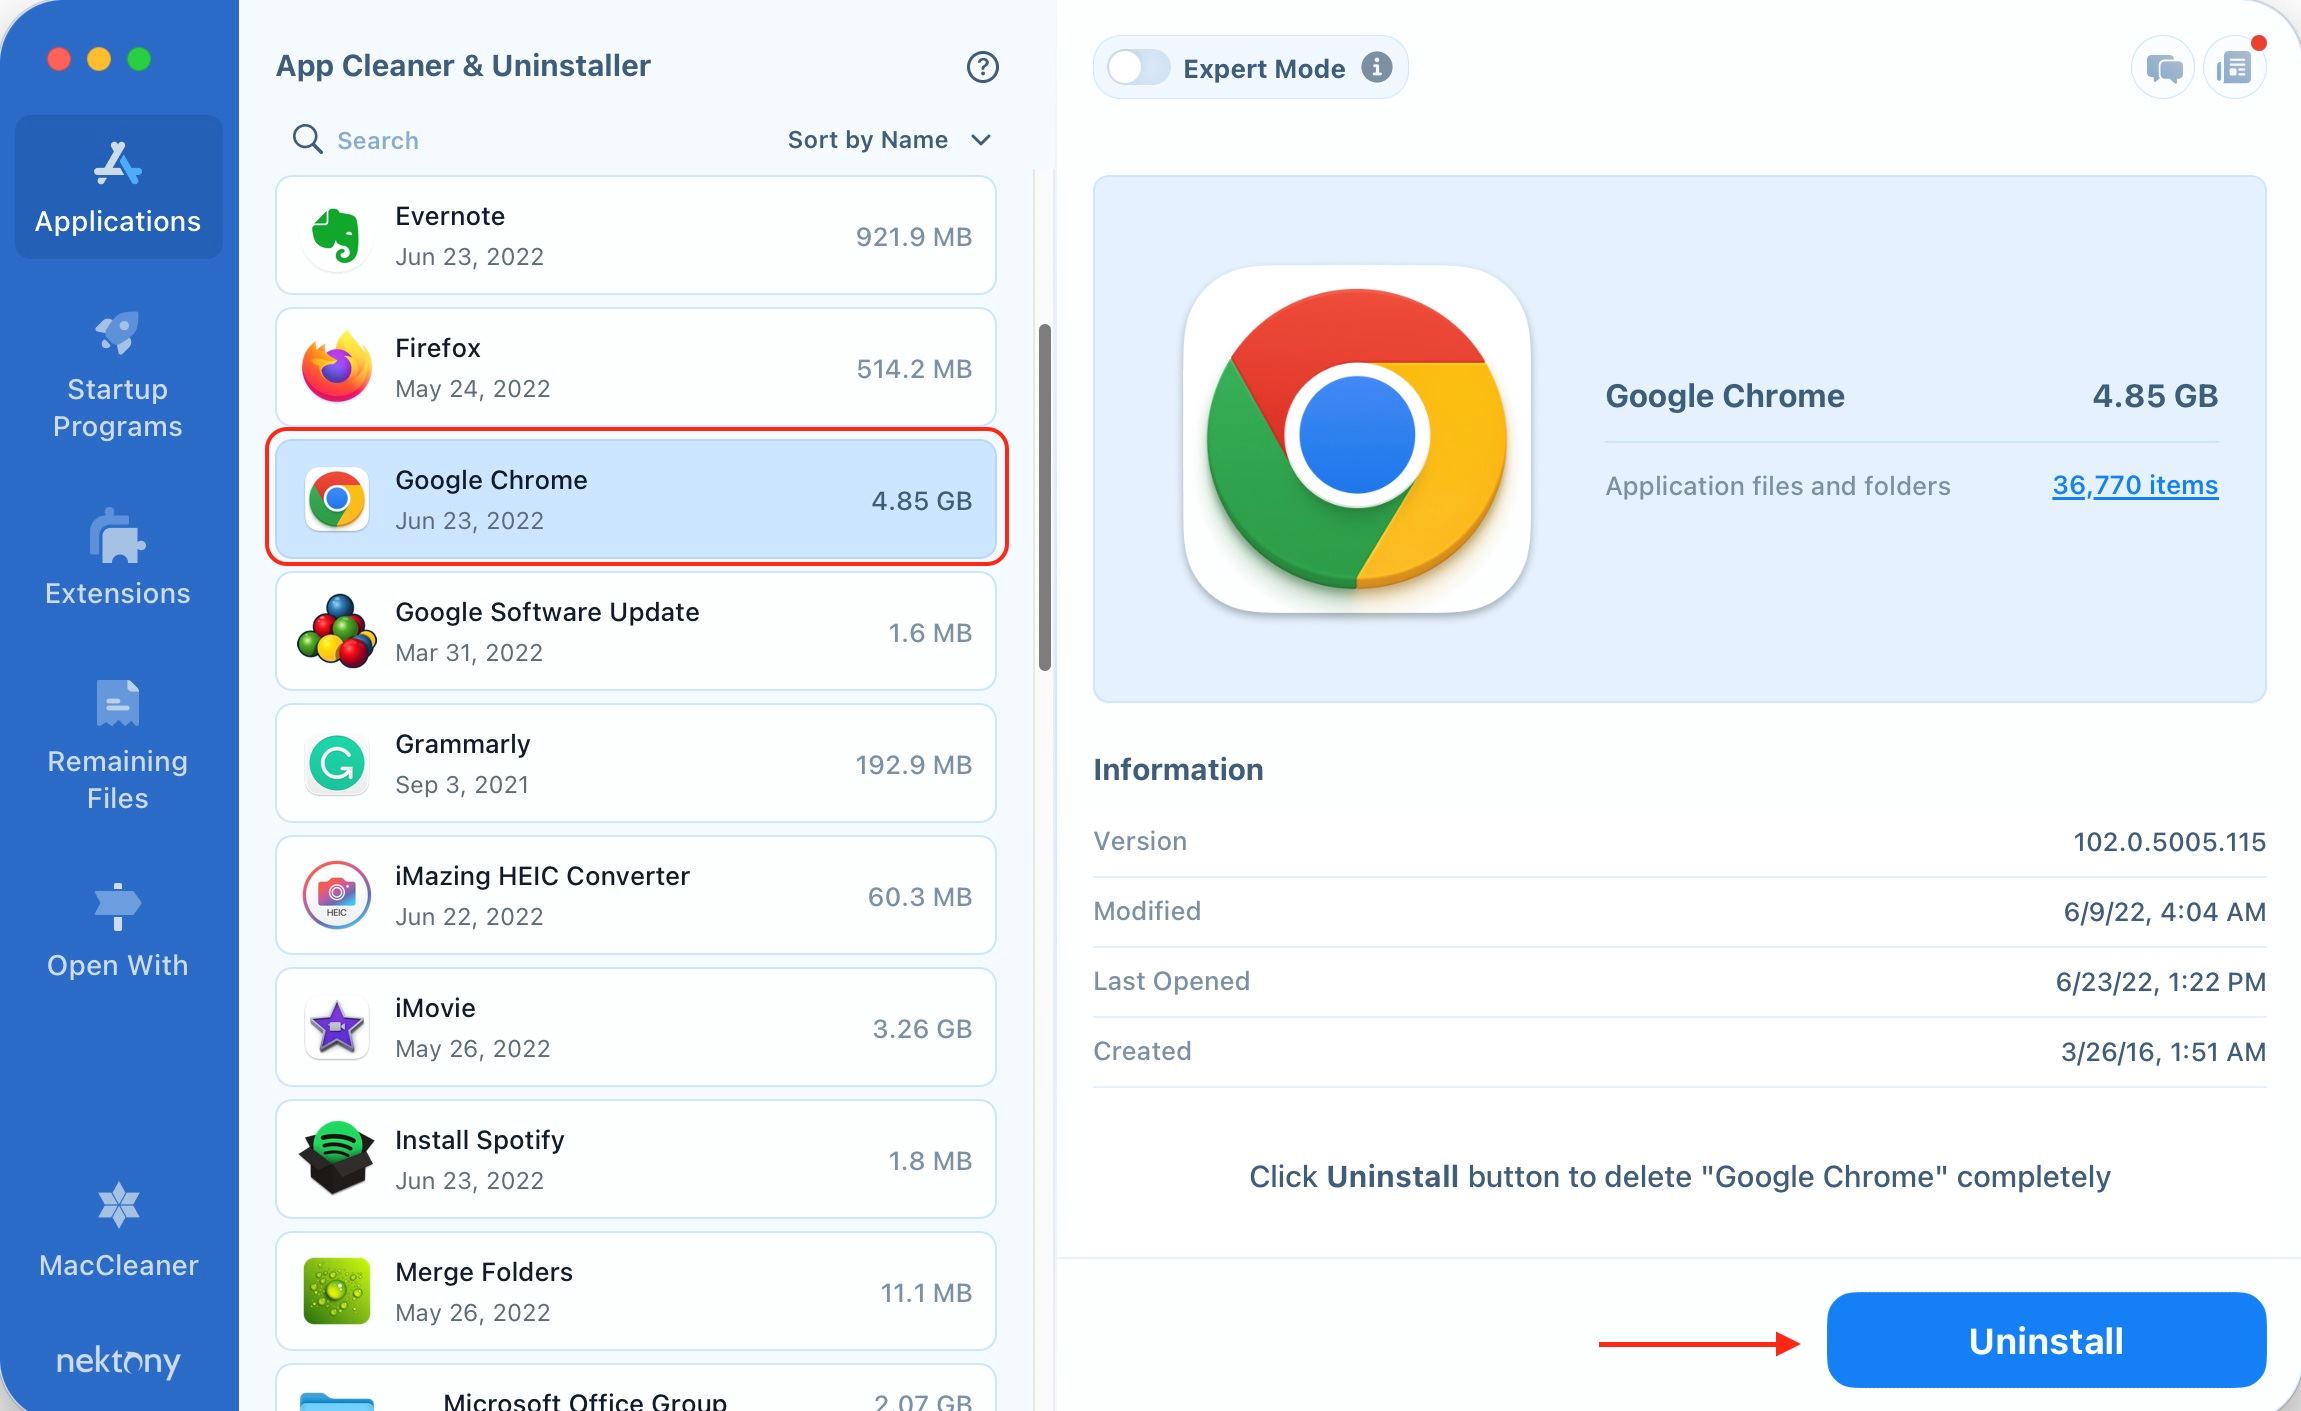
Step 10: Uninstall Chrome Completely using Third-Party Tools
If you want to ensure the most thorough and complete uninstallation of Chrome from your Mac, you can consider using third-party uninstaller tools specifically designed for this purpose. These tools help to remove not just the application itself, but also any associated files, preferences, extensions, and other remnants that may be left behind. Here are some popular third-party tools you can use to uninstall Chrome completely:
- AppCleaner: AppCleaner is a free application that helps you uninstall software and remove associated files. Simply drag the Chrome application into AppCleaner, and it will scan for related files and folders that can be safely removed.
- AppZapper: AppZapper offers a simple and intuitive interface to uninstall applications on your Mac. Dragging Chrome onto the AppZapper window will scan for any associated files, and you can choose to remove them with a single click.
- CleanMyMac X: CleanMyMac X is a comprehensive utility that offers various tools to optimize and clean up your Mac. It includes an uninstaller feature that thoroughly removes applications like Chrome, along with their associated files, extensions, and cache.
Using third-party uninstaller tools can provide a more robust and thorough uninstallation of Chrome, ensuring that no leftover files or settings remain on your Mac.
Before using any third-party tool, it is advisable to read user reviews, check compatibility with your operating system, and follow the instructions provided by the tool’s developer. Additionally, it’s always a good idea to create a backup of important data before uninstalling any software from your Mac.
By utilizing third-party tools, you can have peace of mind knowing that Chrome is completely and securely uninstalled from your Mac, leaving no traces behind.
Congratulations! You have now completed all the necessary steps to uninstall Chrome from your Mac using both manual methods and third-party tools. Your Mac is now free from Chrome and its associated files, preferences, extensions, cache, cookies, local storage, and saved passwords. You can now explore alternative browsers or continue enjoying a clean and optimized Mac experience.