
Checking for Updates
Keeping your Chrome browser up to date is crucial for maintaining its performance, security, and compatibility with the latest web technologies. Thankfully, checking for updates on Chrome is a simple process. In this section, we will explore various ways to ensure you are running the latest version of Chrome on your Mac.
1. Automatic Updates:
By default, Chrome is set to automatically update itself whenever a new version is available. This ensures that you always have the latest features and security patches without any extra effort. To check if automatic updates are enabled:
- Open Chrome and click on the three-dot menu icon in the top-right corner.
- Go to “Settings” and scroll down to click on “Advanced.”
- Under the “System” section, make sure the “Update Chrome automatically” option is turned on.
If the option is already enabled, Chrome will automatically check for updates and install them silently in the background.
2. Manual Updates:
If you have disabled automatic updates or want to manually check for updates, follow these steps:
- Open Chrome and click on the three-dot menu icon in the top-right corner.
- Navigate to “Help” and select “About Google Chrome.”
- Chrome will automatically check for updates and display the current version number.
- If an update is available, click on “Relaunch” to install the update. It may take a few moments for Chrome to restart and apply the changes.
3. Updating through the Chrome Menu:
You can also update Chrome through the Chrome menu:
- Open Chrome and click on the three-dot menu icon in the top-right corner.
- Hover your cursor over “Help” and select “Update Google Chrome.”
- If an update is available, Chrome will download and install it.
- Click on “Relaunch” to restart Chrome and complete the update process.
4. Updating through the About Chrome Page:
An alternative way to update Chrome is through the “About Chrome” page:
- Open Chrome and click on the three-dot menu icon in the top-right corner.
- Navigate to “Help” and click on “About Google Chrome.”
- Chrome will automatically check for updates and install them if available.
- Click on “Relaunch” to restart Chrome and apply the update.
Regularly checking for updates and keeping Chrome up to date ensures that you have access to the latest security patches, bug fixes, and performance improvements. It also ensures compatibility with new web technologies and features. In the next sections, we will explore troubleshooting options if you encounter any issues during the update process.
Automatic Updates
One of the easiest ways to ensure that you’re always running the latest version of Google Chrome is by enabling automatic updates. When enabled, Chrome will automatically check for updates and install them in the background, saving you time and effort. Here’s how you can enable automatic updates:
- Launch Google Chrome on your Mac.
- Click on the three-dot menu icon located in the top-right corner of the browser window.
- In the dropdown menu, select “Settings.”
- Scroll down to the bottom of the Settings page and click on “Advanced” to expand additional options.
- Under the “System” section, ensure that the “Update Chrome automatically” toggle switch is turned on.
Once you’ve enabled automatic updates, Chrome will periodically check for new versions and download them silently in the background. It will then prompt you to relaunch the browser to apply the update. This process helps to ensure that you’re always up to date with the latest security patches, bug fixes, and new features that Google releases.
Automatic updates are particularly beneficial for users who prefer a hassle-free way of keeping their browser up to date. They take the guesswork out of manually checking for updates and remove the need for constant monitoring. With automatic updates enabled, you can focus on browsing the web and trust that Chrome is taking care of staying updated.
However, it’s worth noting that automatic updates require an internet connection to download the updates. So, make sure you have a stable and reliable internet connection to ensure the smooth functioning of the update process.
In addition to the convenience of automatic updates, Google Chrome also employs a phased rollout strategy. This means that updates are often released gradually to a subset of users before being made available to everyone. This approach allows Google to monitor any potential issues and address them before a widespread release. As a result, automatic updates help ensure a more stable and secure browsing experience for users.
By enabling automatic updates in Chrome, you can rest assured that you’re benefiting from the latest improvements and safeguards without any extra effort. However, if you prefer to manually check for updates or need to update immediately, refer to the subsequent sections for alternative methods.
Manual Updates
If you prefer to have more control over when updates are installed on your Google Chrome browser, you can manually check for updates and decide when to apply them. Here are the steps to manually update Chrome on your Mac:
- Launch Google Chrome on your Mac.
- Click on the three-dot menu icon located in the top-right corner of the browser window.
- In the dropdown menu, hover over “Help” and select “About Google Chrome.”
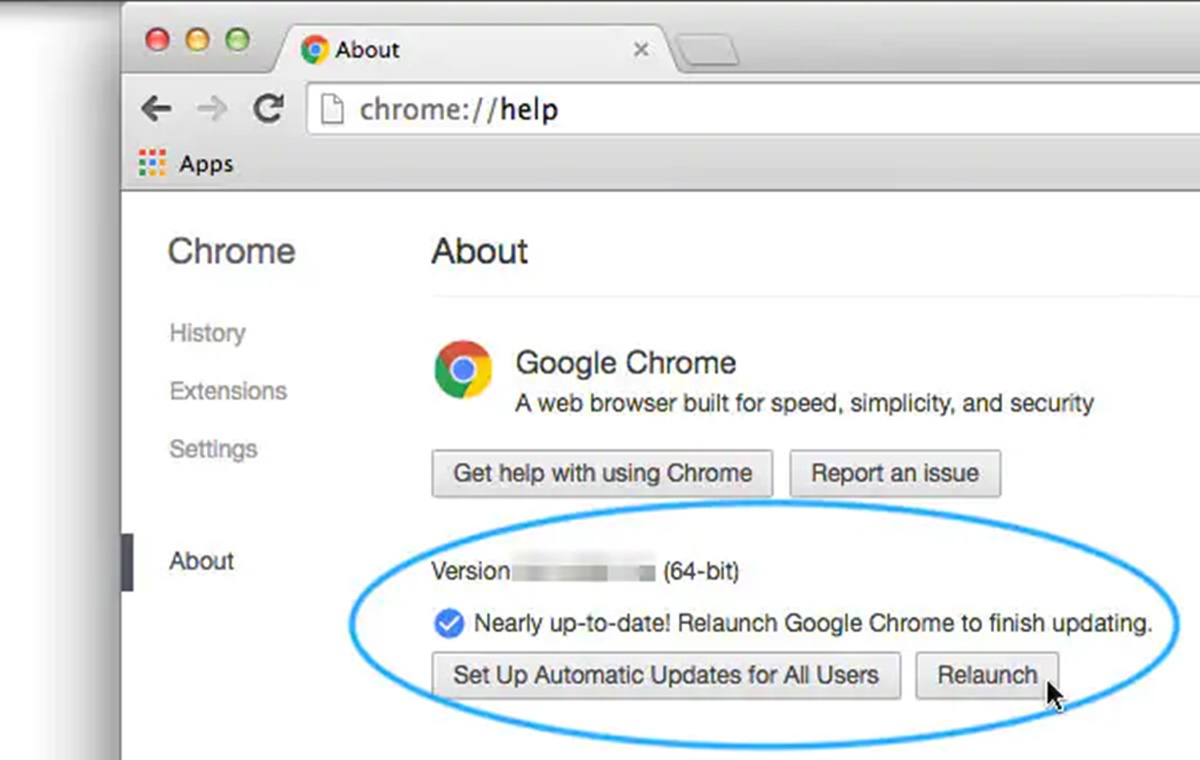
- Chrome will automatically check for updates and display the current version number.
- If an update is available, you’ll see a message stating “An update is available.”
- Click on the “Relaunch” button to install the update and restart Chrome.
Once you click on the “Relaunch” button, Chrome will close all open tabs and relaunch with the updated version. This ensures that any security patches, bug fixes, and new features included in the update are applied. After the relaunch, you can resume browsing with the latest version of Chrome.
Manually checking for updates allows you to be in control of when you update your Chrome browser. This can be useful if you have specific requirements for updating, such as needing to close important tabs or ensuring compatibility with certain websites or applications. By manually updating Chrome, you have the flexibility to choose when to install updates that align with your preferences and workflow.
Keep in mind that manually updating Chrome requires you to actively check for updates and initiate the installation process. It’s crucial to periodically check for updates to ensure that you’re benefiting from the latest security enhancements and improvements. Failure to update regularly may leave your browser vulnerable to potential security threats and prevent you from accessing the latest features and optimizations.
Additionally, if you encounter any issues during the manual update process, such as errors or failed installations, it’s recommended to troubleshoot the problem by following the steps outlined in the next sections. These troubleshooting methods can help resolve common update-related issues and ensure a smoother updating experience for your Chrome browser.
Now that you’re familiar with how to manually update Chrome, let’s explore other ways to update your browser through the Chrome menu and the About Chrome page in the upcoming sections.
Updating through the Chrome Menu
Updating your Google Chrome browser can also be done directly through the Chrome menu. This method provides a quick and convenient way to check for updates and install them on your Mac. Here’s how to update Chrome through the Chrome menu:
- Open Google Chrome on your Mac.
- Click on the three-dot menu icon in the top-right corner of the browser window.
- In the dropdown menu, hover over the “Help” option.
- From the help submenu, select “Update Google Chrome.”
After selecting “Update Google Chrome,” Chrome will start checking for updates. If an update is available, Chrome will begin downloading and installing it automatically. Once the update is complete, you will be prompted to relaunch the browser to apply the changes.
Clicking on the “Relaunch” option will close all open tabs and windows, and Chrome will restart with the updated version. It’s important to save any ongoing work or bookmarks before performing the update to avoid potential data loss.
Updating Chrome through the Chrome menu is a user-friendly approach that ensures you have the most up-to-date version of the browser without the need to visit external websites or navigate through complex settings. The Chrome menu conveniently consolidates various options and functions, making it an easy go-to location for updating your browser.
By regularly updating Chrome through the menu, you can take advantage of the latest security patches, performance improvements, and new features that Google releases. Staying up to date is essential for maintaining a secure and optimized browsing experience.
If for any reason you encounter difficulties or face issues during the update process, such as a failed update or error messages, do not worry. The next sections will cover troubleshooting techniques that can help you overcome these challenges and successfully update your Chrome browser.
Now that you’re familiar with updating Chrome through the menu, let’s move on to the process of updating Chrome through the About Chrome page in the next section.
Updating through the About Chrome Page
Updating Google Chrome on your Mac can also be done through the “About Chrome” page. This method provides an alternative way to check for updates and ensures that you have the latest version of Chrome installed. Here’s how to update Chrome through the About Chrome page:
- Launch Google Chrome on your Mac.
- Click on the three-dot menu icon located in the top-right corner of the browser window.
- In the dropdown menu, hover over “Help.”
- Select “About Google Chrome” from the help submenu.
After selecting “About Google Chrome,” Chrome will open a new tab displaying information about the current version of the browser. Chrome will automatically check for updates and start downloading them if they’re available. You will see a progress bar indicating the downloading process.
Once the update is downloaded, Chrome will prompt you to relaunch the browser to complete the installation. Click on the “Relaunch” button, and Chrome will close all open tabs and windows before restarting with the updated version.
Updating through the About Chrome page offers a straightforward and centralized method to keep your browser up to date. With just a few clicks, you can ensure that you have the latest security patches, bug fixes, and performance enhancements that Google releases for Chrome.
This method is particularly useful if you prefer a dedicated page specifically for checking and updating Chrome, making it easy to stay current with the latest updates without navigating through multiple menus or settings.
It’s important to note that regular updates are crucial for maintaining a secure browsing experience. By keeping Chrome updated, you can protect yourself from potential security vulnerabilities and ensure compatibility with evolving web technologies.
If you encounter any difficulties during the update process, such as errors or failed updates, don’t worry. The next sections will provide troubleshooting steps that can help you address common issues and ensure successful updating of your Chrome browser.
Now that you’re familiar with updating through the About Chrome page, we’ll explore troubleshooting methods in the upcoming sections.
Troubleshooting Updates
While updating Google Chrome on your Mac is typically a straightforward process, you may encounter occasional issues or errors. These can range from failed updates to unexpected behavior during the update process. If you come across any problems, don’t worry—there are several troubleshooting steps you can take to resolve them. Here are some common troubleshooting methods for Chrome updates:
1. Clearing Cache and Cookies:
Clearing your browser’s cache and cookies can help resolve update-related issues. To clear cache and cookies in Chrome:
- Click on the three-dot menu icon in the top-right corner of the browser window.
- Go to “Settings” and scroll down to click on “Privacy and security.”
- Under the “Privacy and security” section, click on “Clear browsing data.”
- Select the desired time range and check the boxes next to “Cookies and other site data” and “Cached images and files.”
- Click on “Clear data” to clear the cache and cookies.
2. Resetting Chrome Settings:
Resetting Chrome settings can help resolve issues caused by misconfigurations. To reset Chrome settings:
- Open Chrome and click on the three-dot menu icon.
- Navigate to “Settings” and scroll down to click on “Advanced.”
- Scroll down further until you see the “Reset settings” section.
- Click on “Restore settings to their original defaults.” Confirm the action by clicking on “Reset settings.”
3. Reinstalling Chrome:
If all else fails, reinstalling Chrome can often resolve stubborn update issues. To reinstall Chrome:
- Completely uninstall Chrome from your Mac.
- Visit the official Google Chrome website and download the latest version for Mac.
- Open the downloaded file and follow the installation instructions.
The above troubleshooting methods can help resolve common update-related issues in Google Chrome. However, if the problem persists or you encounter more complex issues, it may be advised to seek further assistance from the Chrome support team or online communities dedicated to Chrome-related topics.
Remember to regularly check for updates and keep Chrome up to date to ensure optimal performance, security, and compatibility with the latest web technologies. Updates often include important bug fixes, security patches, and new features that enhance your browsing experience.
Now that you’re equipped with troubleshooting methods, you can confidently address any issues that arise during the update process and enjoy a seamless Chrome browsing experience.
Clearing Cache and Cookies
Clearing the cache and cookies in Google Chrome can help resolve various issues related to browser performance, loading of websites, and even update problems. When you visit websites, your browser saves certain data, including images, scripts, and cookies, in its cache. Over time, this cache can accumulate and cause conflicts or outdated information, leading to difficulties during updates. Clearing the cache and cookies can refresh your browser and eliminate these potential issues. Here’s how you can clear the cache and cookies in Chrome:
- Launch Google Chrome on your Mac.
- Click on the three-dot menu icon located in the top-right corner of the browser window.
- In the dropdown menu, select “Settings.”
- Scroll down to the bottom of the Settings page and click on “Privacy and security.”
- Under the “Privacy and security” section, click on “Clear browsing data.”
- A new tab will open with the “Clear browsing data” options. Choose the desired time range for which you want to clear the data.
- Check the boxes next to “Cookies and other site data” and “Cached images and files.”
- Click on the “Clear data” button to initiate the clearing process.
Chrome will begin clearing the cache and cookies, which may take a few moments depending on the amount of data to be cleared. Once the process is complete, you can close the tab and continue using Chrome.
Clearing the cache and cookies ensures that your browser starts fresh and eliminates any stored data that might be causing conflicts or hindering the update process. This process can also help resolve issues such as slow browsing speed, unresponsive websites, or incorrect page rendering.
Keep in mind that clearing the cache and cookies will sign you out of websites and remove any saved preferences or login information. After clearing the data, you may need to sign back in to your accounts and customize any settings that were reset.
Regularly clearing the cache and cookies in Chrome is a good practice for maintaining optimal browser performance and resolving various issues. It’s recommended to perform this action periodically or whenever you encounter difficulties during updates or while browsing specific websites.
Now that you know how to clear the cache and cookies in Chrome, you’ll be able to keep your browser running smoothly and improve its overall performance.
Resetting Chrome Settings
Resetting the settings in Google Chrome can help resolve issues related to misconfigurations or conflicting settings that may affect the update process. When you reset Chrome settings, it restores the browser to its original state, removing any customizations or changes you’ve made. Here’s how you can reset the settings in Chrome:
- Open Google Chrome on your Mac.
- Click on the three-dot menu icon located in the top-right corner of the browser window.
- In the dropdown menu, select “Settings.”
- Scroll down to the bottom of the Settings page and click on “Advanced.”
- Scroll down further until you see the “Reset settings” section.
- Click on “Restore settings to their original defaults.”
- A confirmation prompt will appear, indicating that resetting Chrome settings will remove your extensions and restore default search engine settings. If you’re ready to proceed, click on “Reset settings.”
After clicking on “Reset settings,” Chrome will revert to its original state, resolving any potential issues caused by misconfigured settings. The process may take a few moments, and Chrome will restart automatically once it’s complete.
Resetting Chrome settings can help resolve various problems related to updates, browser performance, and website compatibility. It’s a useful troubleshooting step if you’ve made extensive changes to Chrome settings and suspect they may be interfering with the update process.
However, keep in mind that resetting Chrome will remove all your extensions, restore the default search engine, and revert any personalized settings you’ve applied. You may need to reinstall extensions and customize your settings after the reset.
If you’re facing issues specifically related to updates or you need to address other problems in Chrome, resetting the settings can often provide a clean starting point and help diagnose the root cause of the issue.
Remember to regularly update Chrome and keep your browser settings optimized to ensure a smooth and secure browsing experience. If resetting the settings doesn’t resolve the problem, you may need to consider other troubleshooting steps or seek additional help from the Chrome support team or online communities.
Now that you know how to reset Chrome settings, you have a valuable tool to address various issues and ensure the smooth functioning of the update process.
Reinstalling Chrome
If you’re encountering persistent issues with Google Chrome updates, reinstalling the browser can often resolve these problems. Reinstalling Chrome on your Mac involves completely uninstalling the existing installation and then downloading and installing the latest version available. Here’s how you can reinstall Chrome:
- First, ensure that you have a backup of any important bookmarks, saved passwords, or other personal data stored in Chrome. You can export the bookmarks by going to the Bookmarks Manager (press Command+Shift+B) and selecting “Export bookmarks.”
- Next, uninstall the current installed version of Chrome from your Mac. To do this, open the “Applications” folder and drag the Google Chrome icon to the Trash.
- Alternatively, you can use a third-party uninstaller application for a more thorough removal of Chrome and its associated files.
- Once you have uninstalled Chrome, visit the official Google Chrome website (https://www.google.com/chrome) using another browser.
- Click on the “Download Chrome” button to download the latest version of Chrome for Mac.
- Open the downloaded file and follow the on-screen instructions to install Chrome. You may need to enter your administrator password during the installation process.
- After the installation is complete, launch the newly installed Chrome browser.
- Import your saved bookmarks if you have exported them previously by going to the Bookmarks Manager and selecting “Import bookmarks.”
Reinstalling Chrome ensures that you have a fresh and updated installation of the browser. This can help resolve persistent issues that may be affecting the updating process or other aspects of Chrome’s performance.
However, keep in mind that reinstalling Chrome will remove any extensions, settings, or saved data associated with your previous installation. Therefore, it’s crucial to back up any important information before proceeding with the reinstallation.
Additionally, if the issues persist even after reinstalling Chrome, it’s recommended to reach out to the Chrome support team or seek advice from online communities dedicated to Chrome-related topics. They can provide further guidance and assistance in troubleshooting specific issues you may be facing.
Regularly updating Chrome is crucial for maintaining a secure and optimized browsing experience. Reinstalling Chrome when encountering persistent issues ensures that you have a clean installation that can resolve any underlying problems that may be hindering updates or causing other difficulties.
Now that you know how to reinstall Chrome, you have a powerful method to address stubborn issues and ensure a smooth update process on your Mac.