
Clear the Browser Cache and Cookies
When experiencing issues with videos not playing in Google Chrome, one of the first troubleshooting steps you should take is clearing the browser cache and cookies. The cache and cookies store temporary data to help websites load faster and remember your preferences. However, over time, this data can become outdated or corrupt, potentially causing playback errors.
To clear the cache and cookies in Google Chrome:
- Open Chrome and click on the three-dot menu icon in the top-right corner of the browser’s window.
- Select “Settings” from the dropdown menu.
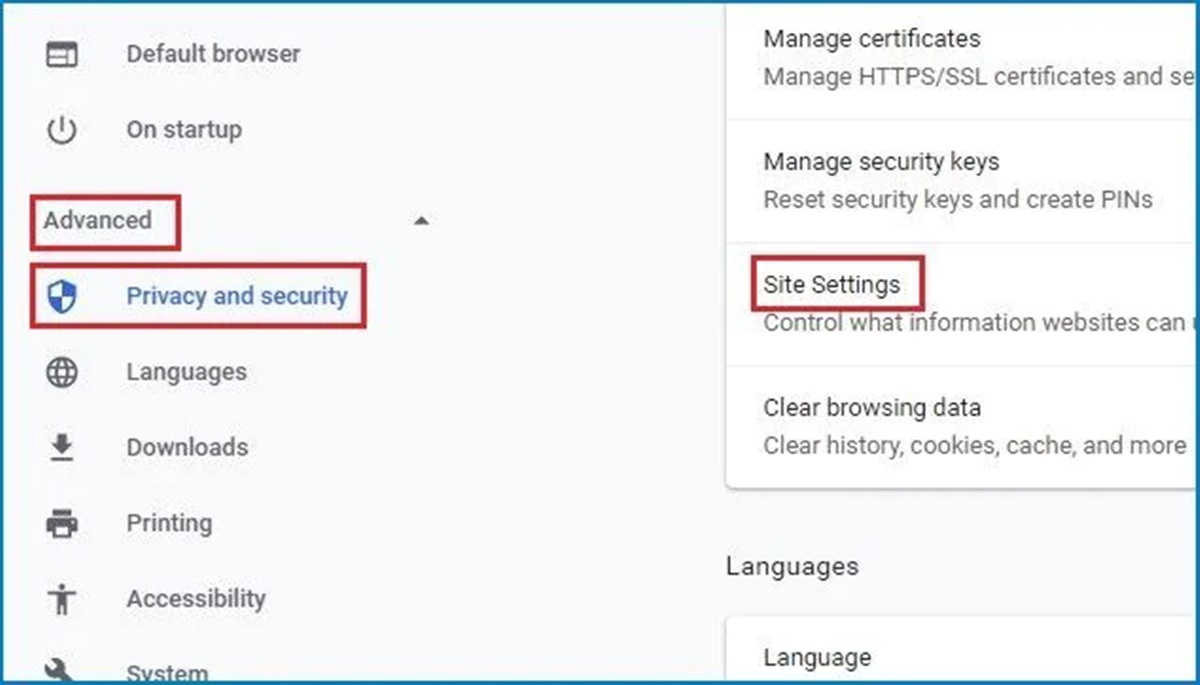
- Scroll to the bottom of the page and click on “Advanced” to expand more options.
- Under the “Privacy and Security” section, click on “Clear browsing data.”
- In the pop-up window, choose a time range from which you want to clear the data. To clear everything, select “All time.”
- Make sure to check the boxes next to “Cookies and other site data” and “Cached images and files.”
- Click on the “Clear data” button to remove the selected cache and cookies.
Once the cache and cookies have been cleared, restart Google Chrome and try playing the video again. Clearing this data can resolve compatibility issues and allow the browser to load the video properly.
Note that clearing the cache and cookies will log you out of any websites where you were previously signed in. You will need to re-enter your login credentials for those sites.
If clearing the cache and cookies does not resolve the video playback issue, continue with the next troubleshooting step.
Update Google Chrome to the Latest Version
Keeping your Google Chrome browser updated is crucial for optimal performance and compatibility with various web elements, including video playback. Outdated versions of Chrome may lack necessary bug fixes and security patches, leading to issues with playing videos.
To update Google Chrome to the latest version:
- Open Chrome and click on the three-dot menu icon in the top-right corner of the browser’s window.
- In the dropdown menu, hover over “Help” and then select “About Google Chrome.”
- A new tab will open, and Chrome will automatically check for updates.
- If an update is available, it will be downloaded and installed automatically.
- Once the update is complete, click on the “Relaunch” button to restart Chrome.
After updating Chrome, relaunch the browser and check if the video plays without any issues. Updating to the latest version ensures that you have the most recent bug fixes and enhancements, which can address problems preventing videos from playing correctly.
If you have already updated Chrome and are still experiencing video playback problems, proceed to the next troubleshooting step.
Disable Chrome Extensions
Extensions in Google Chrome can enhance your browsing experience, but they can also interfere with video playback. Some extensions may conflict with certain websites or interfere with the normal functioning of the browser, leading to video playback issues.
To disable Chrome extensions:
- Open Chrome and click on the three-dot menu icon in the top-right corner of the browser’s window.
- Select “More tools” from the dropdown menu and then click on “Extensions.”
- You will see a list of all the installed extensions. To disable an extension, simply toggle off the switch next to it.
- Alternatively, you can click on the “Remove” button to completely uninstall an extension.
- Disable or remove any extensions that you suspect might be causing the video playback issue.
After disabling the extensions, restart Chrome and try playing the video again. Disabling extensions helps determine if any of them were the cause of the problem. If the video now plays properly, you can enable the extensions one by one to identify the specific extension causing the issue.
If disabling extensions does not resolve the video playback problem, proceed to the next troubleshooting step.
Disable Hardware Acceleration in Chrome
Hardware acceleration is a feature in Google Chrome that allows the browser to leverage your computer’s hardware, such as the graphics card, to improve performance and speed up certain operations. However, in some cases, hardware acceleration can cause issues with video playback.
To disable hardware acceleration in Chrome:
- Open Chrome and click on the three-dot menu icon in the top-right corner of the browser’s window.
- Select “Settings” from the dropdown menu.
- Scroll down and click on “Advanced” to expand more options.
- Under the “System” section, toggle off the switch next to “Use hardware acceleration when available.”
Once hardware acceleration is disabled, restart Chrome and try playing the video again. Disabling this feature can help resolve issues related to video playback, especially if your graphics card or drivers are not fully compatible with Chrome’s hardware acceleration.
If disabling hardware acceleration does not fix the video playback problem, proceed to the next troubleshooting step.
Check for Conflicting Applications or Software
In some cases, conflicts between certain applications or software installed on your computer can interfere with video playback in Google Chrome. It’s important to identify and address any conflicting programs to ensure smooth video playback.
To check for conflicting applications or software:
- Close all open applications and programs on your computer.
- Open Google Chrome and try playing the video to see if the issue persists. If the video plays fine with no problems, it indicates that a conflicting application is causing the issue.
- Gradually open your other applications one by one while attempting to play the video in Chrome each time.
- If the video stops playing or encounters issues after opening a particular application, that application is likely causing the conflict.
Once you have identified the conflicting application, you have a few options:
- Update the conflicting application to the latest version, as software updates often include bug fixes that can resolve compatibility issues.
- Disable the conflicting application while using Google Chrome to see if that resolves the video playback problem.
- If the issue persists, you may need to uninstall the conflicting application temporarily or permanently to continue using Chrome for video playback.
By identifying and addressing any conflicts between applications or software, you can eliminate potential issues that may be hindering video playback in Google Chrome.
If checking for conflicting applications or software does not resolve the video playback issue, proceed to the next troubleshooting step.
Reset Chrome Settings to Default
If you’re still encountering video playback issues in Google Chrome, resetting the browser settings to their default configuration can help eliminate any problematic customization or corrupted settings that might be causing the problem.
To reset Chrome settings to their default:
- Open Chrome and click on the three-dot menu icon in the top-right corner of the browser’s window.
- Select “Settings” from the dropdown menu.
- Scroll down and click on “Advanced” to expand more options.
- Scroll further down and under the “Reset and clean up” section, select “Restore settings to their original defaults.”
- Click on the “Reset settings” button in the confirmation pop-up window.
Chrome will then reset its settings to the default configuration. This will not delete your bookmarks, history, or saved passwords, but it will remove any extensions and themes you have installed.
After the reset is complete, restart Chrome and try playing the video again. Resetting the settings can resolve issues caused by corrupted preferences or incompatible configurations, allowing for smoother video playback.
If resetting Chrome settings does not solve the video playback problem, proceed to the next troubleshooting step.
Check Adobe Flash Player Settings
If you’re experiencing issues with video playback in Google Chrome, it’s worth checking the settings of Adobe Flash Player as it can sometimes cause conflicts or playback errors. Here’s how to access and adjust the settings:
- Open Chrome and visit a website that uses Flash Player to play videos.
- Right-click anywhere on the page and select “Settings” from the context menu.
- In the Adobe Flash Player settings panel, navigate to the “Display” tab.
- Ensure that hardware acceleration is enabled by checking the box next to “Enable hardware acceleration” if it is not already selected. Enabling hardware acceleration can enhance video playback performance.
- Next, go to the “Storage” tab in the Flash Player settings.
- Ensure that the storage settings are not set to “Block all sites from storing information on this computer.” Selecting this option can prevent videos from playing properly.
- Finally, click on the “Advanced” tab.
- Make sure that the “Allow Adobe to install updates” option is selected. This ensures that you have the latest version of Flash Player with any necessary bug fixes.
Once you have checked and adjusted the Adobe Flash Player settings, refresh the page or restart Chrome and try playing the video again. Proper configuration of Flash Player can help resolve issues related to video playback and ensure compatibility with websites that use Flash technology.
If checking Adobe Flash Player settings does not resolve the video playback problem, proceed to the next troubleshooting step.
Update Graphics Card Drivers
Outdated or incompatible graphics card drivers can often lead to video playback issues in Google Chrome. To ensure smooth and optimal performance, it is crucial to keep your graphics card drivers up to date. Here are the steps to update your graphics card drivers:
- Identify the make and model of your graphics card. You can typically find this information in the Device Manager on Windows or the System Information on macOS.
- Visit the website of the graphics card manufacturer, such as NVIDIA, AMD, or Intel.
- Locate the “Drivers” or “Support” section on the manufacturer’s website.
- Search for the appropriate driver for your graphics card model and operating system.
- Download and install the latest available driver for your graphics card.
- Follow the on-screen instructions provided by the driver installation wizard.
- Once the driver update is complete, restart your computer.
After updating your graphics card drivers, launch Google Chrome and try playing the video again. Up-to-date drivers can significantly improve video playback performance and compatibility with Chrome, ensuring a seamless viewing experience.
If updating your graphics card drivers does not resolve the video playback problem, proceed to the next troubleshooting step.
Check the Video’s Format and Codec
Another factor that can affect video playback in Google Chrome is the format and codec of the video file. If the video is encoded in a format that is not supported by Chrome or requires a codec that is not installed on your system, playback issues may occur. Here’s how to check the video’s format and codec:
- Right-click on the video file and select “Properties” (Windows) or “Get Info” (macOS).
- Navigate to the “Details” tab (Windows) or “More Info” section (macOS) in the file properties.
- Look for the “File type” or “Kind” field to identify the format of the video, such as MP4, AVI, or MKV.
- Next, check the “Codec” field to determine which codec was used to encode the video, such as H.264, VP9, or MPEG-4.
Once you have identified the video’s format and codec, you can take the following steps:
- If the video file format is not supported by Chrome, you may need to convert the video to a compatible format using a video conversion tool.
- If the video requires a codec that is not installed on your system, you can try installing a codec pack, such as K-Lite Codec Pack, which includes a wide range of popular codecs.
- Alternatively, you can try playing the video in a different media player that supports the video format and codec.
By checking the format and codec of the video, and taking appropriate action if necessary, you can troubleshoot playback issues related to compatibility and ensure smoother video playback in Google Chrome.
If checking the video’s format and codec does not resolve the video playback problem, proceed to the next troubleshooting step.
Check Internet Connection and Bandwidth
A stable and sufficient internet connection is essential for smooth video playback in Google Chrome. If you’re facing issues with video playback, it’s important to check your internet connection and bandwidth to ensure they meet the requirements for streaming videos. Here are a few steps to follow:
- Ensure that your computer or device is connected to the internet. Check that Wi-Fi is enabled and connected to a reliable network, or verify that your Ethernet cable is securely plugged in.
- Try accessing other websites or streaming services to confirm if it is a specific video issue or a broader internet connectivity problem.
- Perform a speed test using an online tool like Ookla’s Speedtest to measure your internet connection’s download and upload speeds.
- Compare your measured speeds with the recommended requirements for streaming videos. Generally, a minimum download speed of 3 Mbps is recommended for standard definition (SD) videos and a higher speed of 5 Mbps or more for high definition (HD) videos.
- If your internet speed is below the recommended requirements, you may need to contact your internet service provider (ISP) to troubleshoot and resolve any connection issues or consider upgrading your internet plan for smoother video streaming.
- If your internet speed meets the requirements but you’re still experiencing video playback problems, you can try resetting your router, as it may help resolve any network congestion or conflicts.
By checking your internet connection and bandwidth, you can ensure that you have a stable and fast connection capable of streaming videos without interruptions or buffering issues. If your internet connection is not the cause of the problem, proceed to the next troubleshooting step.
Disable VPN or Proxy Connections
If you are using a VPN (Virtual Private Network) or a proxy connection, it can sometimes interfere with video playback in Google Chrome. Though these tools can provide privacy and security benefits, they may route your internet traffic in a way that affects video streaming. To troubleshoot this issue, consider disabling your VPN or proxy connection:
- Locate your VPN or proxy connection software on your computer or device.
- Disable the VPN or proxy connection by exiting or turning off the software.
- Once the VPN or proxy connection is disabled, relaunch Google Chrome and try playing the video again.
Disabling VPN or proxy connections can resolve issues caused by network routing conflicts and allow for better video playback. If the video now plays without any problems, it indicates that your VPN or proxy connection was causing the issue.
If disabling your VPN or proxy connection does not resolve the video playback issue, proceed to the next troubleshooting step.
Disable Antivirus or Firewall Software
Antivirus or firewall software, while crucial for protecting your computer from threats, can sometimes interfere with video playback in Google Chrome. These security programs may mistakenly identify video files or streaming websites as potential risks and block their access, causing playback issues. To determine if this is the cause of the problem, you can temporarily disable your antivirus or firewall software:
- Locate the antivirus or firewall software icon in your system tray or taskbar.
- Right-click on the icon and look for an option to disable or pause the protection temporarily.
- Choose the appropriate option to disable the antivirus or firewall software for a specified period or until the program is manually re-enabled.
Once the antivirus or firewall software is disabled, relaunch Google Chrome and try playing the video again. If the video plays without any issues, it indicates that your antivirus or firewall software was blocking the video playback.
If the video plays fine with the antivirus or firewall software disabled, you have a few options:
- Exclude Google Chrome or the specific video streaming website from the antivirus or firewall program’s scanning or blocking features.
- Update your antivirus or firewall software to the latest version, as new updates may resolve compatibility issues.
- Consider using an alternative antivirus or firewall software that is more compatible with video streaming.
If disabling your antivirus or firewall software does not resolve the video playback problem, proceed to the next troubleshooting step.
Run Chrome in Compatibility Mode
If you are experiencing video playback issues in Google Chrome, running the browser in compatibility mode can help resolve compatibility-related problems. Compatibility mode allows Chrome to mimic the behavior of older versions or different operating systems, which can sometimes resolve playback issues. Here’s how to run Chrome in compatibility mode:
- Right-click on the Google Chrome icon on your desktop or taskbar.
- From the context menu, select “Properties.”
- In the Properties window, navigate to the “Compatibility” tab.
- Check the box that says “Run this program in compatibility mode.”
- From the dropdown menu, select an operating system or a previous version of Windows that is different from what you are currently using.
- Click “Apply” and then “OK” to save the changes.
After applying compatibility mode settings, relaunch Chrome and try playing the video again. Running Chrome in compatibility mode can help overcome compatibility issues with certain websites or plugins, ensuring smoother video playback.
If running Chrome in compatibility mode does not resolve the video playback problem, proceed to the next troubleshooting step.
Disable Chrome’s Default Flash Player
If you continue to encounter video playback issues in Google Chrome, disabling Chrome’s default Flash Player and using an alternative Flash Player plugin or HTML5 can be a potential solution. Here’s how to disable Chrome’s default Flash Player:
- Open Google Chrome and type “chrome://settings/content” in the address bar, then press Enter.
- Scroll down and click on “Flash” to access the Flash Player settings.
- Toggle off the switch next to “Ask first” to disable Chrome’s default Flash Player.
Disabling Chrome’s default Flash Player can help if the video playback issues are related to compatibility or performance with the built-in Flash Player. Once disabled, you can try using an alternative Flash Player plugin or switch to HTML5 for video playback on compatible websites.
To enable an alternative Flash Player plugin or switch to HTML5, follow these steps:
- Visit the official Adobe Flash Player website or the website of the alternative Flash Player plugin you wish to use.
- Download and install the alternative Flash Player plugin.
- Restart Google Chrome, and the browser will automatically detect and use the installed alternative Flash Player plugin.
After making these changes, try playing the video again to see if the playback issues have been resolved. If disabling Chrome’s default Flash Player does not fix the issue, move on to the next troubleshooting step.
Enable JavaScript in Chrome
JavaScript is a programming language used by many websites, including those that contain videos. If JavaScript is disabled in Google Chrome, it can prevent proper video playback and cause issues. Enabling JavaScript can help resolve these problems. Here’s how to enable JavaScript in Chrome:
- Open Google Chrome and type “chrome://settings/content” in the address bar, then press Enter.
- Scroll down and click on “JavaScript” to access the JavaScript settings.
- Toggle on the switch next to “Allowed (recommended)” to enable JavaScript.
Enabling JavaScript ensures that websites can run scripts, including those needed for video playback, without any restrictions. Once you have enabled JavaScript, relaunch Chrome and try playing the video again to see if the issue has been resolved.
If the video playback problem persists even after enabling JavaScript, proceed to the next troubleshooting step.
Perform a Clean Installation of Chrome
If you have tried all the previous troubleshooting steps and are still experiencing video playback issues in Google Chrome, performing a clean installation of the browser can help resolve any underlying problems or corrupted files. Here’s how to perform a clean installation:
- Uninstall Google Chrome from your computer or device. On Windows, you can do this by going to “Control Panel > Programs > Programs and Features”, selecting Google Chrome, and clicking on “Uninstall”. On macOS, drag the Google Chrome application to the Trash.
- Once Chrome is uninstalled, restart your computer to ensure any remaining files or processes related to Chrome are cleared.
- After the restart, download the latest version of Google Chrome from the official Google Chrome website.
- Install Chrome by following the on-screen instructions provided by the installer.
A clean installation of Chrome will ensure that you have the latest version of the browser without any corrupted files or conflicting configurations. This can help resolve video playback issues that may have been caused by software conflicts or outdated installations.
Once Chrome is installed, launch the browser and try playing the video again to see if the issue has been resolved.
If performing a clean installation of Chrome does not fix the video playback problem, it may be worth seeking further assistance from Google support or exploring other potential causes of the issue.
Seek Help from Google Support
If you have exhausted all troubleshooting steps and are still unable to resolve the video playback issue in Google Chrome, it may be beneficial to seek further assistance from Google Support. The support team has extensive knowledge and resources to help users troubleshoot and resolve complex Chrome-related problems. Here’s what you can do to seek help:
- Visit the official Google Chrome Help Center website (support.google.com/chrome) for comprehensive troubleshooting articles and guides.
- Search for specific keywords related to your video playback issue within the Help Center to find relevant articles that may provide a solution.
- If you are unable to find a solution through self-help resources, visit the Google Chrome Help Forum to seek guidance from the Chrome user community or even Chrome experts from Google.
- Consider reaching out to Google Support directly through their official channels, such as submitting a support ticket or using the live chat or phone support options available.
When seeking help from Google Support, be prepared to provide specific details about your issue, including the steps you have already taken to troubleshoot and any error messages you have encountered. The more information you can provide, the better equipped the support team will be to assist you.
Remember, Google Support is there to assist you and provide expert guidance, so don’t hesitate to reach out to them for further assistance if needed.