Why Uninstall Bitdefender?
Bitdefender is a popular antivirus software that provides excellent protection against malware and other cyber threats. However, there may be situations where you need to uninstall Bitdefender from your Mac or PC. Here are a few reasons why you might consider uninstalling Bitdefender:
1. Performance issues: While Bitdefender is known for its effectiveness in protecting your device, it can sometimes consume a significant amount of system resources, which could lead to a slowdown in performance. If you notice your Mac or PC becoming sluggish or experiencing frequent freezes, uninstalling Bitdefender might help alleviate these issues.
2. Compatibility conflicts: Antivirus software can occasionally clash with other applications or software installed on your device. In some cases, Bitdefender may conflict with certain programs or cause compatibility issues, rendering them unusable. If you encounter such conflicts and are unable to find a resolution, removing Bitdefender could be a solution.
3. Switching to a different antivirus: Technology is ever-evolving, and you might find that another antivirus software meets your requirements better than Bitdefender. Whether you are looking for additional features, a more user-friendly interface, or better customer support, uninstalling Bitdefender allows you to explore alternative antivirus options that align with your needs.
4. Subscription renewal concerns: Bitdefender is a subscription-based software, and some users might decide not to renew their subscription for various reasons, such as cost or a change in security needs. If you have made the decision to switch to a different antivirus or opt for a free alternative, uninstalling Bitdefender is necessary to avoid unnecessary charges.
5. Troubleshooting purposes: In certain situations where you encounter persistent issues on your Mac or PC, uninstalling Bitdefender may be a troubleshooting step recommended by technical support. This can help to rule out any software conflicts or issues that may be caused by Bitdefender’s presence on your device.
Remember, before proceeding with the uninstallation process, it is advisable to disable Bitdefender’s real-time protection, as it helps prevent any possibility of malware infecting your device during the uninstallation process. By considering these reasons, you can make an informed decision on whether or not to uninstall Bitdefender from your Mac or PC.
How to Uninstall Bitdefender from Mac
If you have decided to uninstall Bitdefender from your Mac, there are a few methods you can follow. Here are two commonly used methods:
Method 1: Uninstall Bitdefender using the Uninstaller:
- Open the Bitdefender application on your Mac.
- Click on the “Bitdefender” menu located at the top left corner of your screen.
- Select “Uninstall Bitdefender” from the drop-down menu.
- A confirmation window will appear. Click “Uninstall” to proceed with the uninstallation process.
- Enter your administrator password if prompted.
- Wait for the uninstallation process to complete.
- Restart your Mac to finalize the uninstallation.
Method 2: Uninstall Bitdefender manually:
- Open the Finder application on your Mac.
- Click on “Applications” in the sidebar.
- Locate the Bitdefender application in the list of installed applications.
- Drag the Bitdefender application to the Trash.
- Right-click on the Trash icon in your Dock and select “Empty Trash” to completely remove Bitdefender from your Mac.
- Restart your Mac to ensure that all components of Bitdefender are removed.
These methods should effectively uninstall Bitdefender from your Mac. However, if you encounter any difficulties or if some remnants of Bitdefender remain on your system, you can consider using a professional uninstaller software to thoroughly remove all traces of the antivirus.
It is important to note that uninstalling Bitdefender will leave your Mac unprotected. If you decide to remove Bitdefender, ensure that you have an alternative antivirus solution installed to safeguard your Mac against malware and other threats.
Method 1: Uninstall Bitdefender using the Uninstaller
Uninstalling Bitdefender using the dedicated uninstaller is the recommended method as it ensures a complete removal of all its components. Here are the steps to follow:
- Open the Bitdefender application on your Mac. You can find it in the Applications folder or in your Dock if you have pinned it there.
- Click on the “Bitdefender” menu located at the top left corner of your screen.
- From the drop-down menu, select “Uninstall Bitdefender”.
- A confirmation window will appear, informing you that the uninstallation process will remove all Bitdefender components. It will also prompt you to ensure that you have an alternate security solution installed. This is important to keep your Mac protected.
- Click on the “Uninstall” button to proceed.
- If prompted, enter your administrator password to grant permission for the uninstallation.
- Wait for the uninstallation process to complete. It may take several minutes.
- Once the uninstallation is complete, you will see a message confirming the successful removal of Bitdefender from your Mac.
- Restart your Mac to finalize the uninstallation process.
By following these steps, you should successfully uninstall Bitdefender using the dedicated uninstaller. If you have any other Bitdefender products installed, such as Bitdefender VPN or Bitdefender Virus Scanner, you may need to uninstall them separately using their respective uninstallation methods, which can be found in the documentation provided by Bitdefender.
After uninstalling Bitdefender, make sure to install and activate an alternative antivirus application to ensure ongoing protection for your Mac against malware and other online threats. There are several reputable antivirus options available in the market, so choose the one that best suits your needs and preferences.
It is worth noting that if you encounter any issues or if some remnants of the Bitdefender software persist after the uninstallation, you can reach out to Bitdefender customer support for further assistance in resolving the problem.
Method 2: Uninstall Bitdefender manually
If the first method doesn’t work or you prefer to uninstall Bitdefender manually, you can follow these steps:
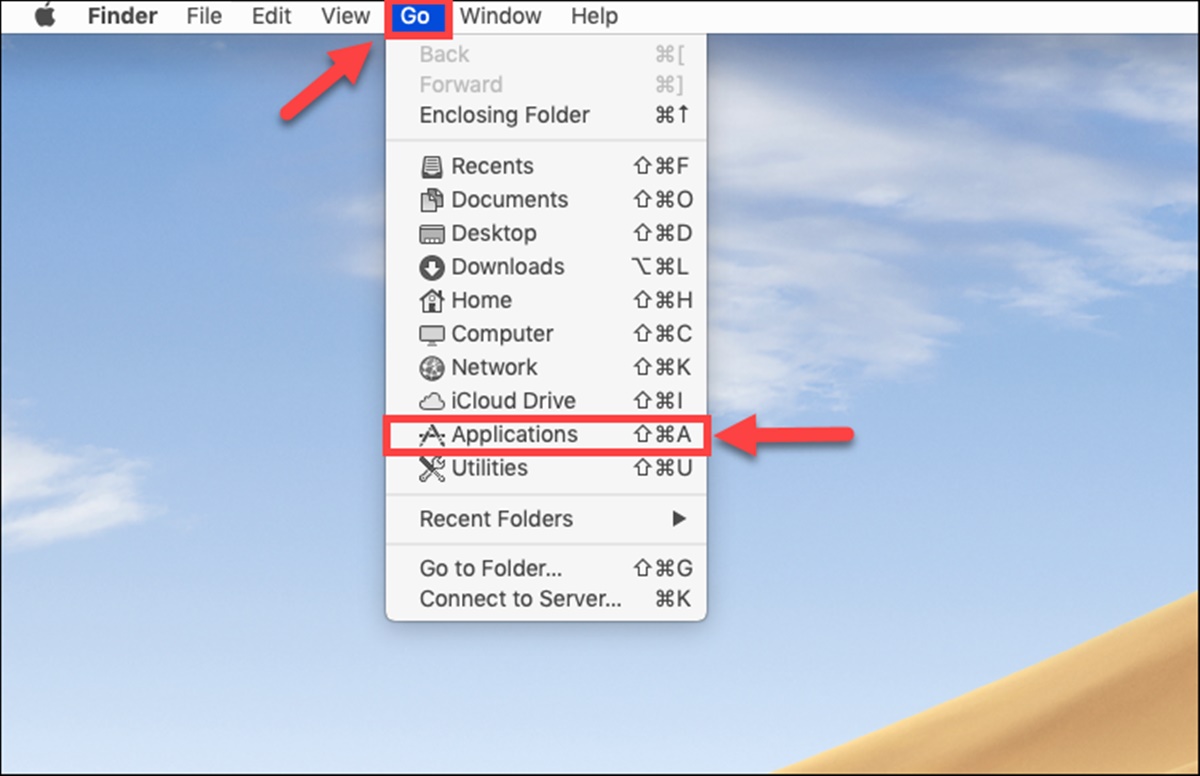
- Open the Finder application on your Mac by clicking on the Finder icon in the Dock or selecting it from the Applications folder.
- In the Finder sidebar, click on “Applications” to view all installed applications.
- Locate the Bitdefender application in the list of installed applications. You can either scroll through the list or use the search bar in the top right corner to search for “Bitdefender”.
- Once you find Bitdefender, click and hold its icon and drag it to the Trash icon in your Dock. Alternatively, you can right-click on the Bitdefender icon and select “Move to Trash”.
- A confirmation dialog may appear, asking for your permission to move the application to the Trash. Click “Move to Trash” to proceed.
- Next, right-click on the Trash icon in your Dock and select “Empty Trash”. Alternatively, you can open the Trash folder by clicking on the Trash icon and then click on “Empty” in the upper-right corner of the window.
- Enter your administrator password if prompted.
- Finally, restart your Mac to complete the removal process and ensure that all Bitdefender components are completely removed.
After following these steps, Bitdefender should be successfully uninstalled from your Mac. However, keep in mind that manual uninstallation may leave behind some residual files or folders associated with Bitdefender. If you want to ensure a thorough removal, you can consider using a dedicated uninstaller software that can scan your system for leftover files and remove them.
Remember, it is crucial to have an alternative antivirus solution installed and activated on your Mac after uninstalling Bitdefender to maintain the security and protection of your device. Choose a reputable antivirus program that meets your specific requirements and provides reliable malware detection and prevention.
If you encounter any difficulties during the manual uninstallation process or if you need further assistance, you can refer to the Bitdefender support documentation or reach out to their customer support for guidance.
How to Uninstall Bitdefender from PC
If you’ve decided to uninstall Bitdefender from your PC, there are several methods you can use, depending on your preference and the version of Windows you’re using. Here are three commonly used methods:
Method 1: Uninstall Bitdefender using the Control Panel:
- Open the Control Panel on your PC by searching for “Control Panel” in the Windows search bar and selecting it from the search results.
- Click on “Programs” or “Programs and Features”, depending on your version of Windows.
- In the list of installed programs, locate “Bitdefender” and click on it.
- Click on the “Uninstall” or “Uninstall/Change” button at the top of the list.
- Follow the on-screen prompts to proceed with the uninstallation process.
- Once the uninstallation is complete, restart your PC to finalize the removal of Bitdefender.
Method 2: Uninstall Bitdefender using the Bitdefender Uninstaller:
- Download the Bitdefender Uninstaller tool from the official Bitdefender website.
- Run the downloaded tool on your PC.
- Read and accept the End User License Agreement (EULA) to proceed.
- Choose the Bitdefender product you want to uninstall from the list.
- Click on the “Uninstall” button to begin the uninstallation process.
- Follow the instructions provided by the Uninstaller tool to complete the removal of Bitdefender.
- Restart your PC after the uninstallation process is finished.
Method 3: Uninstall Bitdefender using a third-party uninstaller:
- Install a reliable third-party uninstaller software on your PC.
- Launch the uninstaller tool and allow it to scan your system for installed applications.
- Locate Bitdefender in the list of installed programs.
- Select Bitdefender and click on the “Uninstall” button.
- Follow the prompts provided by the uninstaller tool to remove Bitdefender from your PC.
- Restart your PC to ensure that all traces of Bitdefender are completely removed.
After uninstalling Bitdefender, consider installing an alternative antivirus program to ensure continuous protection for your PC against malware and online threats. There are numerous reputable antivirus solutions available in the market, so choose one that best suits your needs and provides reliable security features.
If you encounter any issues or difficulties during the uninstallation process or if you have any questions, refer to the Bitdefender support documentation or contact their customer support for further assistance.
Method 1: Uninstall Bitdefender using the Control Panel
One of the commonly used methods to uninstall Bitdefender from your PC is through the Control Panel. This method is suitable for different versions of Windows and involves the following steps:
- Open the Control Panel on your PC by clicking on the Start menu, searching for “Control Panel,” and selecting it from the search results.
- In the Control Panel window, locate and click on the “Programs” or “Programs and Features” option.
- A list of all installed programs will appear. Scroll down or search for “Bitdefender” in the list.
- Once you find Bitdefender, select it by clicking on it, and then click on the “Uninstall” or “Uninstall/Change” button at the top.
- Follow the on-screen prompts and instructions provided by the uninstaller.
- In some cases, you may be asked to provide confirmation or enter your administrator password to proceed with the uninstallation process.
- Wait for the uninstallation process to complete. The time taken may vary depending on the speed and performance of your PC.
- Once the uninstallation is finished, restart your PC to ensure all remnants of Bitdefender are removed from your system.
By following these steps, you should be able to successfully uninstall Bitdefender using the Control Panel. However, it is important to note that sometimes, remnants of the antivirus software may still be present on your PC. If this is the case, using a dedicated third-party uninstaller or the official Bitdefender uninstaller tool may be necessary for a complete removal.
After uninstalling Bitdefender, it is crucial to install an alternative antivirus solution to protect your PC from malware and other online threats. Choose a reputable antivirus program that offers real-time protection, regular updates, and a range of security features.
If you encounter any difficulties during the uninstallation process or have any questions, refer to the Bitdefender documentation or contact their customer support for further assistance.
Method 2: Uninstall Bitdefender using the Bitdefender Uninstaller
Another efficient method to uninstall Bitdefender from your PC is by using the Bitdefender Uninstaller tool. This dedicated uninstaller ensures a thorough removal of all Bitdefender components. Follow the steps below:
- Visit the official Bitdefender website and download the Bitdefender Uninstaller tool. Make sure to download the correct version that matches your Bitdefender product.
- Once the download is complete, locate the downloaded file on your PC and run it.
- A window will appear, displaying the terms of the End User License Agreement (EULA). Read the agreement and click on the “Accept” button to proceed.
- The Bitdefender Uninstaller tool will open, presenting a list of Bitdefender products installed on your PC.
- Select the Bitdefender product you want to uninstall from the list. If you have multiple Bitdefender products installed, ensure that you choose the correct one.
- Click on the “Uninstall” button to begin the uninstallation process.
- Follow the prompts and instructions provided by the Bitdefender Uninstaller tool to complete the uninstallation process. It may require your confirmation or ask for your administrator password.
- Wait for the Bitdefender Uninstaller tool to remove all components of the selected Bitdefender product from your PC.
- Once the uninstallation is finished, restart your PC to ensure that all remnants of Bitdefender are completely removed.
By following these steps, you can successfully uninstall Bitdefender using the Bitdefender Uninstaller tool. This method ensures a comprehensive removal of the antivirus software and its associated files from your PC.
After uninstalling Bitdefender, remember to install an alternative antivirus program on your PC to maintain its security. Choose a reliable antivirus solution that offers real-time protection, malware detection, and other essential security features.
If you encounter any difficulties during the uninstallation process or have any questions, refer to the Bitdefender documentation or contact their customer support for further assistance.
Method 3: Uninstall Bitdefender using a third-party uninstaller
If you’re unable to uninstall Bitdefender using the Control Panel or the Bitdefender Uninstaller tool, you can consider using a reliable third-party uninstaller software. These uninstallers are designed to thoroughly remove stubborn programs, including Bitdefender, from your PC. Here’s how you can uninstall Bitdefender using a third-party uninstaller:
- Search for reputable third-party uninstaller software online and choose one that suits your needs.
- Download and install the third-party uninstaller software onto your PC.
- Launch the uninstaller software and allow it to scan your system for installed programs.
- Locate Bitdefender in the list of installed programs and select it for uninstallation.
- Follow the prompts and instructions provided by the uninstaller software to initiate the removal process.
- Depending on the software, you may need to confirm the uninstallation and provide any additional information required.
- Wait for the uninstaller software to complete the removal of Bitdefender from your PC.
- Once the process is finished, restart your PC to ensure that all remnants of Bitdefender have been successfully removed.
Using a third-party uninstaller can be helpful if you encounter difficulties or if Bitdefender’s components remain on your PC even after attempting the previous methods. These uninstaller tools are designed to identify and remove any lingering files or registry entries associated with Bitdefender.
After uninstalling Bitdefender, it is crucial to install an alternative antivirus program to ensure continued protection for your PC against malware and other threats. Choose a reputable antivirus solution that offers real-time scanning, regular updates, and other essential security features.
Should you encounter any issues during the uninstallation process or have any questions, refer to the documentation or support provided by the third-party uninstaller software.
Additional Steps after Uninstalling Bitdefender
After successfully uninstalling Bitdefender from your Mac or PC, there are a few additional steps you should consider taking to ensure the security and functionality of your device. Here are some recommended actions:
1. Install an Alternative Antivirus:
It is important to have reliable antivirus software installed on your device to protect it from malware and other online threats. After uninstalling Bitdefender, choose and install an alternative antivirus solution that suits your needs. Make sure the antivirus program offers real-time scanning, regular updates, and comprehensive security features.
2. Run a Full System Scan:
To ensure that no malware or residual files from Bitdefender are left on your device, perform a full system scan with your newly installed antivirus software. This will help detect and remove any potential threats that may have been missed during the uninstallation process.
3. Check Firewall and Windows Defender Settings:
Removing Bitdefender might affect your device’s firewall and Windows Defender settings. Verify that your firewall is turned on and configured correctly to provide adequate protection. Additionally, ensure that Windows Defender is enabled and up to date to provide an additional layer of security to your system.
4. Delete Bitdefender Remnants:
Even after uninstalling Bitdefender, there might be some residual files or folders left behind. Use the search function on your Mac or PC to search for any remaining Bitdefender files. Delete them manually to ensure a clean removal.
5. Reinstall or Update Other Security Software:
If you had any other security software installed that was temporarily disabled or modified during the Bitdefender uninstallation process, reinstall or update those programs to restore full protection to your device. This includes VPN software, firewall applications, or any other security tools you use.
6. Enable Automatic Updates:
Ensure that your operating system, antivirus software, and other essential applications are set to receive automatic updates. Regular updates include security patches that address newly discovered vulnerabilities, so keeping your software up to date is crucial for maintaining strong security defenses.
7. Enable System Restore (Windows):
If you’re using Windows, consider enabling the System Restore feature. This feature can help you revert your system back to a previous point in case any issues arise after uninstalling Bitdefender or installing a new antivirus program.
By following these additional steps, you can help maintain the security and proper functionality of your device after uninstalling Bitdefender.