
Enable Contact Ringtones on Your iPhone
Setting unique ringtones for each contact on your iPhone allows you to differentiate incoming calls just by listening to the ringtone. This feature not only adds a personal touch to your device but also helps you identify important callers without even looking at your screen. Fortunately, enabling contact ringtones on your iPhone is simple and can be done in a few easy steps.
To enable contact ringtones, you’ll need to navigate to your iPhone’s settings. Here’s how:
- Open the “Settings” app on your iPhone’s home screen.
- Scroll down and tap on “Sounds & Haptics” (or “Sounds” depending on your iPhone model).
- In the “Sounds and Vibration Patterns” section, you’ll find various options to customize your device’s sound settings.
- Tap on “Ringtone” to access the list of available ringtones.
- Scroll down until you find the “Default” section. Tap on it.
- Now, you can choose a default ringtone for your iPhone’s incoming calls.
With contact ringtones enabled, you’re now ready to assign unique ringtones to specific contacts on your iPhone. This way, you can identify the caller based on the assigned ringtone. Let’s explore different methods to customize contact ringtones.
Method 1: Using the Phone App
The first method involves using the pre-installed Phone app on your iPhone. Here’s how to set a unique ringtone for a specific contact:
- Open the Phone app on your iPhone.
- Go to the “Contacts” tab.
- Select the contact for which you want to set a custom ringtone.
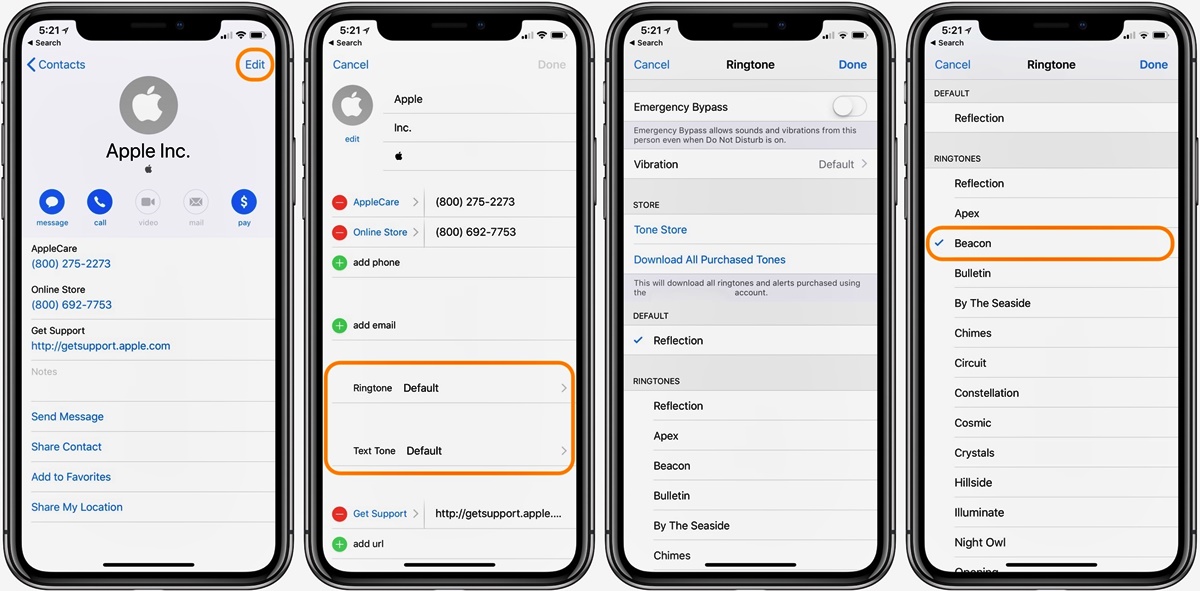
- Tap on “Edit” in the top-right corner of the screen.
- Scroll down and tap on “Ringtone.”
- A list of available ringtones will appear. Select the desired ringtone for this contact.
- Tap “Done” to save your changes.
Method 2: Using the Contacts App
Another way to customize contact ringtones is by utilizing the built-in Contacts app. Follow these steps:
- Launch the Contacts app on your iPhone.
- Find and select the contact you wish to assign a custom ringtone.
- Tap on “Edit” in the top-right corner to edit the contact details.
- Scroll down to the “Ringtone” section.
- Select the desired ringtone for this contact.
- Tap “Done” to save your changes.
Method 3: Using the Settings App
If you prefer using the Settings app to customize contact ringtones, here’s how:
- Open the “Settings” app on your iPhone.
- Scroll down and tap on “Contacts.”
- Tap on “Default Ringtone.”
- Select the desired ringtone for incoming calls from contacts not assigned a specific ringtone.
Now that you know how to enable and customize contact ringtones on your iPhone, you can easily set unique tones for your important contacts, making it easier to recognize them without even looking at your device.
Customize Contact Ringtones for Specific Contacts
One of the great features of iPhones is the ability to personalize the ringtones for specific contacts. This allows you to easily identify who is calling you just by the sound of the ringtone. By customizing contact ringtones, you can add a personal touch to your iPhone and make it more enjoyable to receive calls. Let’s explore different methods to customize contact ringtones for specific contacts.
Method 1: Using the Phone App
The Phone app on your iPhone provides a simple way to customize ringtones for specific contacts. Here’s how:
- Open the Phone app on your iPhone.
- Navigate to the “Contacts” tab.
- Select the contact you want to assign a custom ringtone to.
- Tap on “Edit” in the top-right corner of the screen.
- Scroll down and tap on “Ringtone.”
- A list of available ringtones will appear. Choose the ringtone you want for this contact.
- Tap “Done” to save your changes.
Method 2: Using the Contacts App
The built-in Contacts app also allows you to customize contact ringtones. Follow these steps:
- Launch the Contacts app on your iPhone.
- Find and select the contact you want to assign a custom ringtone to.
- Tap on “Edit” in the top-right corner of the screen.
- Scroll down to the “Ringtone” section.
- Select the desired ringtone for this contact.
- Tap “Done” to save your changes.
Method 3: Using the Settings App
If you prefer using the Settings app to customize contact ringtones, here’s what you need to do:
- Open the “Settings” app on your iPhone.
- Scroll down and tap on “Sounds & Haptics” (or “Sounds” depending on your iPhone model).
- Tap on “Ringtone.”
- Scroll down to the “Contacts” section.
- Select the desired contact.
- Choose the custom ringtone for this contact.
With these methods, you can easily assign specific ringtones to your contacts, making it easier to identify who is calling you. When you hear a unique ringtone, you’ll know exactly who’s on the other end of the line, even without looking at your device.
Aside from the built-in ringtones, you can also create custom ringtones for your contacts. Let’s explore how you can do this in the next section.
Method 1: Using the Phone App
The pre-installed Phone app on your iPhone provides a straightforward method for customizing contact ringtones. By following these steps, you can easily set a unique ringtone for a specific contact:
- Open the Phone app on your iPhone’s home screen.
- Navigate to the “Contacts” tab at the bottom of the screen.
- Find and select the contact for which you want to set a custom ringtone.
- Tap on the “Edit” button located in the top-right corner of the screen.
- Scroll down the contact details page and locate the “Ringtone” option.
- Tap on “Ringtone” to access the list of available ringtones.
- Browse through the options and select the desired ringtone for this contact.
- Once you have chosen the ringtone, tap on the “Done” button in the top-right corner of the screen to save your changes.
By following these steps, you have successfully assigned a custom ringtone to this specific contact. Now, whenever this contact calls you, you will hear the unique ringtone you selected, making it easier to identify who is calling without even looking at your iPhone.
It’s worth noting that the Phone app allows you to set custom ringtones for individual contacts, providing a more personalized experience when receiving calls. This feature is particularly useful for important or frequently contacted individuals in your address book.
Remember that in addition to the pre-installed ringtones, you can also create custom ringtones for your contacts. This allows you to further personalize their ringtones with your favorite songs or unique sounds. Keep reading to learn how to create custom ringtones using GarageBand or third-party apps.
Method 2: Using the Contacts App
The Contacts app on your iPhone offers another convenient method for customizing contact ringtones. By following these steps, you can easily set a unique ringtone for a specific contact:
- Launch the Contacts app on your iPhone.
- Scroll through your contact list and find the contact for which you want to set a custom ringtone.
- Tap on the contact’s name to open their profile.
- Tap on the “Edit” button located in the top-right corner of the screen.
- Scroll down the contact details page until you find the “Ringtone” option.
- Tap on “Ringtone” to open the list of available ringtones.
- Select the desired ringtone for this contact from the list.
- Once you have chosen the ringtone, tap on the “Done” button in the top-right corner of the screen to save your changes.
By following these steps, you have successfully assigned a custom ringtone to this specific contact using the Contacts app. Now, whenever this contact calls you, you will hear the unique ringtone you selected, making it easy to identify who is calling without even looking at your iPhone.
The Contacts app provides a straightforward means of personalizing contact ringtones, allowing you to tailor your iPhone’s ringtone experience to your preferences. This feature is especially useful for identifying important or frequently contacted individuals in your address book.
Remember that in addition to the pre-installed ringtones, you can also create custom ringtones for your contacts. This gives you the opportunity to use your favorite songs or unique sounds as their ringtone. In the next sections, we will explore how to create custom ringtones using GarageBand or third-party apps.
Method 3: Using the Settings App
If you prefer using the Settings app, you can also customize contact ringtones for specific contacts. By following these steps, you can easily set a unique ringtone for a specific contact using the Settings app:
- Open the “Settings” app on your iPhone.
- Scroll down and tap on “Sounds & Haptics” (or “Sounds” depending on your iPhone model).
- In the “Sounds and Vibration Patterns” section, tap on “Ringtone.”
- Scroll down until you locate the “Contacts” section.
- Tap on the contact for which you want to set a custom ringtone.
- A list of available ringtones will appear. Select the desired ringtone for this contact.
- To save your changes, tap on the “Settings” button in the top-left corner, or use the back arrow until you return to the main settings screen.
By following these steps, you have successfully assigned a custom ringtone to this specific contact using the Settings app. From now on, whenever this contact calls you, you will hear the unique ringtone you selected, making it easy to identify who is calling without even looking at your iPhone.
Using the Settings app to customize contact ringtones offers a straightforward and centralized method for managing your iPhone’s ringtone settings. By assigning specific ringtones to individual contacts, you can ensure that important or frequently contacted individuals have distinct ringtones for easy identification.
Remember that aside from the built-in ringtones, you can also create custom ringtones for your contacts. In the following sections, we’ll explore how you can create personalized ringtones using GarageBand or third-party apps.
Create Custom Ringtones for Contacts
In addition to the pre-installed ringtones, you have the option to create custom ringtones for your contacts. This allows you to personalize their ringtone with your favorite songs, unique sounds, or snippets from your favorite audio tracks. Creating custom ringtones can be done using various methods, such as using GarageBand or third-party apps. Let’s explore two popular methods for creating custom ringtones:
Method 1: Using GarageBand
GarageBand is a powerful music creation app available for iPhones, iPads, and Macs. You can use GarageBand to create your own custom ringtones in just a few simple steps:
- Open GarageBand on your iPhone.
- Tap on the “+” icon to create a new project.
- Choose “Audio Recorder” or “Keyboard” as your instrument.
- Create a sound or import a sound file that you want to use as a ringtone.
- Edit the sound and trim it to the desired length.
- Tap on the “Share” button and select “Ringtone”.
- Enter a name for your ringtone and tap “Export”.
- The ringtone will be saved to your “Settings” app under “Sounds & Haptics”. You can now assign it to a specific contact.
Method 2: Using a Third-Party App
There are several third-party apps available on the App Store that offer easy ringtone creation and customization. These apps provide a user-friendly interface and additional features to create unique and personalized ringtones. Here’s how you can create custom ringtones using a third-party app:
- Download and install a reputable ringtone maker app from the App Store.
- Open the app and select the song or sound file you want to use.
- Trim the audio to the desired length.
- Apply any additional effects or enhancements if desired.
- Save the ringtone to your device.
- Open the “Settings” app on your iPhone and navigate to “Sounds & Haptics”.
- Select the “Ringtone” option and tap on the custom ringtone you created.
- The ringtone will now be assigned and available to assign to specific contacts.
By following either of these methods, you can create unique and personalized ringtones for your contacts. Whether you’re using GarageBand or a third-party app, you’ll have the flexibility to customize your contacts’ ringtones according to your preferences.
Customizing contact ringtones adds a personal touch and makes it easier to identify callers, especially in situations where your iPhone may not be immediately visible. Give it a try and have fun personalizing your contacts’ ringtones!
Method 1: Using GarageBand
GarageBand, a popular music creation app available for iPhones, iPads, and Macs, can also be used to create custom ringtones for your contacts. With GarageBand’s intuitive interface and powerful features, you can easily create personalized ringtones using your favorite songs or unique audio files. Here’s how:
- Launch GarageBand on your iPhone.
- Tap on the “+” icon to create a new project.
- Choose “Audio Recorder” or “Keyboard” as your instrument.
- Create a sound from scratch by using the instruments available or import an existing sound file that you want to use as a ringtone.
- Edit the sound by adjusting the length and adding any desired effects or filters.
- Once you are satisfied with the sound, tap on the three dots (…) in the top-right corner of the screen.
- Select “My Songs” to save your creation.
- From the “My Songs” screen, find the newly created song and swipe left on it.
- A “Share” button will appear. Tap on it.
- In the sharing options, select “Ringtone”.
- Enter a name for your ringtone and tap “Export”.
- Your custom ringtone will now be saved on your device and can be found in the “Settings” app under “Sounds & Haptics”.
Now that you have successfully created a custom ringtone using GarageBand, you can assign it to a specific contact. Open the “Settings” app on your iPhone, go to “Sounds & Haptics”, and select “Ringtone”. Scroll through the list of available ringtones until you find your custom creation, then assign it to the desired contact.
GarageBand offers a flexible and creative way to craft unique ringtones that truly reflect your personal style. Whether you want to use a snippet of your favorite song or create a completely original sound, GarageBand provides the tools to make it happen.
With GarageBand, you can unleash your creativity and create custom ringtones that will make your contacts stand out, making it easier to identify incoming calls without even looking at your iPhone.
So, give it a try and start creating your own personalized ringtones with GarageBand today!
Method 2: Using a Third-Party App
In addition to GarageBand, there are also several third-party apps available on the App Store that can help you create custom ringtones for your contacts. These apps offer a user-friendly interface and additional features to make the process quick and easy. Here’s how you can create custom ringtones using a third-party app:
- First, search for a reputable ringtone maker app on the App Store and download it to your iPhone.
- Open the app once it has finished installing.
- Select the song or sound file that you want to use as a ringtone from your music library or the app’s built-in library.
- Trim the audio to the desired length by selecting the start and end points of the ringtone.
- Apply any additional effects or enhancements to the audio if desired.
- Preview the ringtone to ensure it sounds the way you want it.
- Once you are satisfied with the ringtone, save it to your device.
- Open the “Settings” app on your iPhone and navigate to “Sounds & Haptics”.
- Tap on “Ringtone” and scroll through the list of available ringtones.
- Select the custom ringtone you created using the third-party app.
- Now, you can assign the custom ringtone to a specific contact in your address book.
Using a third-party app provides you with additional options and flexibility when creating custom ringtones for your contacts. These apps often have more advanced editing tools and allow you to choose from a wider range of audio formats, including songs from your own music library.
Remember to explore different third-party apps to find the one that suits your preferences and offers the features you need. Reading user reviews and checking app ratings can help you make an informed decision before downloading.
With a third-party app, you can unleash your creativity and create unique ringtones that reflect your personal taste. Whether you want to use your favorite song, a sound effect, or a personalized recording, these apps provide the tools to make it happen.
So, don’t hesitate to explore the variety of third-party ringtone maker apps available on the App Store and start designing your own custom ringtones today!
Troubleshoot Common Issues
While setting up contact ringtones on your iPhone is generally a straightforward process, you may encounter some common issues along the way. Don’t worry, though, as these issues can usually be resolved quickly. Here are some troubleshooting tips for common contact ringtone problems:
Contact Ringtone Not Working: How to Fix It
If you have set a custom ringtone for a specific contact, but it is not working when they call, try the following solutions:
- Ensure that the contact’s ringtone is enabled in the settings. Open the “Contacts” app, select the contact, and verify that the correct ringtone is assigned.
- Make sure that the volume on your iPhone is turned up. It’s possible that the ringtone is playing, but the volume is too low to hear it.
- Restart your iPhone. Sometimes, a simple restart can resolve any temporary glitches or issues.
- If you are using a third-party ringtone maker app, ensure that the app has proper access to your music library. Go to the “Settings” app, scroll down and tap on the app, and make sure it has permission to access your media files.
- Check if the custom ringtone file is supported by your iPhone. Some incompatible audio formats may cause issues. Convert the file to a supported format if necessary.
Contact Ringtone Missing: How to Troubleshoot
If you have created a custom ringtone, but it is not showing up in your iPhone’s ringtone list, try these troubleshooting steps:
- Ensure that the custom ringtone file is properly saved on your iPhone. Double-check that it is in the correct file format and in the appropriate folder.
- If you created the custom ringtone using GarageBand, make sure you followed the export process correctly and saved it as a ringtone file.
- Verify that the custom ringtone file is not too long. iPhone ringtones have a time limit, and any ringtone longer than the allowed duration will not be displayed.
- If you are using a third-party app, make sure you saved the ringtone within the app and properly exported it to your iPhone’s ringtone folder.
- Restart your iPhone to refresh the ringtone list and check if the custom ringtone now appears.
These troubleshooting tips should help you address common issues with contact ringtones on your iPhone. However, if you continue to experience problems, it may be helpful to consult Apple Support or seek assistance from the app developer if you are using a third-party ringtone maker app.
By resolving these issues, you can enjoy the personalized experience of unique contact ringtones on your iPhone.
Contact Ringtone Not Working: How to Fix It
Setting a custom ringtone for a specific contact on your iPhone can add a personal touch and make it easier to identify who is calling. However, if you’ve set a contact ringtone and it’s not working when they call, there are a few troubleshooting steps you can take to resolve the issue:
- Ensure that the contact’s ringtone is enabled in the settings: Open the “Contacts” app, select the contact, and verify that the correct ringtone is assigned. Sometimes, the ringtone may have accidentally been deselected or changed.
- Check the volume settings on your iPhone: Ensure that the volume is turned up and not set to silent or vibrate mode. If the volume is too low, you may not hear the ringtone when the contact calls. Adjust the volume using the side buttons or through the “Sounds & Haptics” settings.
- Restart your iPhone: A simple restart can often fix temporary glitches or issues with the ringtone functionality. Press and hold the power button, then swipe to power off. Wait a few seconds, then press and hold the power button again to turn on your iPhone.
- Verify the file format of the ringtone: If you have created a custom ringtone or downloaded one from a third-party source, ensure that it is in a compatible file format. iPhone supports ringtone files in .m4r format. If the file is in a different format, you may need to convert it using a file conversion tool or an audio editor.
- Check the length of the ringtone: iPhone has a maximum ringtone length limit. If your custom ringtone exceeds this limit, it may not work. Trim or shorten the ringtone to make sure it falls within the duration limits.
By following these troubleshooting steps, you can address common issues that may prevent contact ringtones from working on your iPhone. If the problem persists, it is advisable to reach out to Apple Support or consult the app developer if you are using a third-party ringtone maker app.
Remember, contact ringtones not only offer personalized caller identification but also enhance the overall user experience of receiving calls on your iPhone. Taking a few moments to troubleshoot and fix any issues will ensure that you can enjoy this feature to the fullest.
Contact Ringtone Missing: How to Troubleshoot
If you have created a custom ringtone for a contact on your iPhone but it is not showing up in the ringtone list, there are a few troubleshooting steps you can take to address the issue:
- Verify that the custom ringtone file is saved on your iPhone: Double-check that the ringtone file is properly saved in the correct file format and in the appropriate folder. Custom ringtones should be saved in the “Ringtones” folder of your iPhone’s internal storage.
- Check if the custom ringtone file is within the length limit: iPhone has a maximum ringtone length limit. If your custom ringtone exceeds this limit, it may not appear in the ringtone list. Trim the ringtone to fall within the duration limit.
- Check the file format of the custom ringtone: iPhone supports ringtone files in .m4r format. Ensure that your custom ringtone is saved in this format. If it’s in a different format, you may need to convert it using a file conversion tool or an audio editor.
- Restart your iPhone: Restarting your iPhone can refresh the system and potentially resolve any temporary glitches or issues that may be causing the missing ringtone. Press and hold the power button, then swipe to power off. Wait a few seconds, then press and hold the power button again to turn on your iPhone.
- Try syncing your custom ringtone again: Connect your iPhone to your computer and use iTunes or a similar software to sync the custom ringtone to your device. Ensure that the ringtone is selected to sync in the appropriate settings.
By following these troubleshooting steps, you can address common issues that may cause custom contact ringtones to be missing from the ringtone list on your iPhone. If the problem persists, you may want to double-check the file format, duration, and location of the custom ringtone, or consult Apple Support for further assistance.
Remember, custom contact ringtones allow you to add a personal touch and easily identify important callers. By troubleshooting and resolving any issues with missing ringtones, you can fully enjoy this customized feature on your iPhone.
Tips for Managing Contact Ringtones
Managing contact ringtones on your iPhone allows you to personalize your device and easily identify important callers. Here are some tips to help you effectively manage your contact ringtones:
- Set unique ringtones for key contacts: Assign custom ringtones to contacts that you frequently communicate with or consider important. This way, you can identify them quickly by the sound of the ringtone, even when your iPhone is not in your hand.
- Keep the ringtone duration appropriate: Ensure that the custom ringtone you create or select is not too long. It is recommended to keep ringtone durations relatively short to avoid annoying or distracting ringtones for both you and others around you.
- Regularly review and update contact ringtones: As your contact list and communication habits change, periodically review your assigned contact ringtones. Update them to reflect the importance and frequency of communication with your contacts.
- Be mindful of environments: Consider the environment you’re in when selecting or creating contact ringtones. Opt for ringtones that are audible but not overly disruptive. If you frequently find yourself in quiet or professional settings, choose more subtle or vibration-based ringtones.
- Use different ringtone styles for different contact groups: Group your contacts based on specific categories (e.g., friends, family, work) and assign different styles of ringtones to each group. This can help you identify the nature of the call before even looking at your device.
- Regularly backup custom ringtones: If you have created or downloaded custom ringtones, make sure to back them up on your computer or cloud storage. This way, you can easily restore or re-sync your custom ringtones if you change devices or encounter any technical issues.
- Experiment with different instruments or sounds: Explore the built-in options in GarageBand and other ringtone maker apps to experiment with different instruments, genres, or sound effects for your contact ringtones. Have fun finding unique and distinct sounds that match your contacts’ personalities.
- Consider using vibration alerts: In addition to assigning custom ringtones, take advantage of vibration alerts for different contact groups or individual contacts. This provides an additional layer of notification that can be useful in situations where sound may not be appropriate or feasible.
By following these tips, you can effectively manage your contact ringtones on your iPhone. Personalize your device to suit your preferences, easily identify important callers, and create a more enjoyable and efficient communication experience.
Remember to regularly review and update your contact ringtones to stay organized and adapt to changes in your contact list. With a well-managed set of contact ringtones, you can enhance your overall iPhone usage and make receiving calls a personalized and seamless experience.