
Step 1: Prepare Your Custom Ringtone
Having a custom ringtone on your iPhone is a great way to personalize your device and stand out from the crowd. With just a few simple steps, you can set a unique ringtone that will make your iPhone truly your own. Here’s how to get started:
The first thing you’ll need to do is find or create the audio file that you want to use as your custom ringtone. It could be a favorite song, a sound effect, or even your own voice recording. Keep in mind that the length of the ringtone should be no longer than 40 seconds.
There are a few ways to obtain an audio file for your ringtone. You can use a song from your iTunes library, download one from a ringtone website, or even create your own using audio editing software. Whichever method you choose, be sure to save the audio file to your computer for easy access.
Next, using iTunes, you’ll need to locate the audio file and ensure that it is in the correct format for iPhone ringtones. The supported format for iPhone ringtones is AAC (Advanced Audio Coding). If your file is in a different format, don’t worry – we’ll show you how to convert it to AAC format in the next step.
Before moving on, make sure you have the latest version of iTunes installed on your computer. To check for updates, open iTunes, click on the “Help” menu, and choose “Check for Updates.” If there are any available updates, follow the prompts to install them.
Now that you have your audio file ready and iTunes up to date, you’re one step closer to setting a custom ringtone on your iPhone. In the next step, we’ll guide you through the process of converting the audio file to AAC format and renaming the file to ensure it plays correctly on your iPhone.
Step 2: Convert the Audio File to AAC Format
Now that you have identified or created the audio file you want to use as your custom ringtone, the next step is to convert it to the AAC format. This format is supported by iPhone and ensures that your ringtone will play correctly on your device. Here’s how you can convert your audio file to AAC format:
1. Open iTunes on your computer and click on the “File” tab at the top-left corner of the iTunes window. From the drop-down menu, select “Add File to Library” or “Add Folder to Library,” depending on whether you have the audio file saved as a single file or in a folder.
2. Locate the audio file you want to convert and select it. Click on the “Open” button to add the file to your iTunes library.
3. With the audio file selected in your iTunes library, click on the “File” tab again, and this time, choose “Convert” from the drop-down menu. From the sub-menu options, click on “Create AAC Version.”
4. iTunes will create a new version of the audio file in the AAC format. You can identify the converted file by its shortened duration, which is usually around 30 seconds. The original audio file and the converted AAC version will both appear in your iTunes library.
5. To ensure that you can easily locate and manage your custom ringtone, it’s a good idea to rename the AAC version of the file. Right-click on the new AAC version in your iTunes library and select “Show in Finder” (on Mac) or “Show in Windows Explorer” (on PC).
6. A new window will open, displaying the location of the file on your computer. Rename the file with a name that you will recognize as your custom ringtone. Make sure to keep the file extension as “.m4r,” as this is the format required for iPhone ringtones.
7. Once you have renamed the file, close the window and return to iTunes. To keep your ringtone organized, you can create a new playlist specifically for custom ringtones. Right-click on any empty space in the left sidebar of iTunes, select “New Playlist,” and give it a suitable name.
That’s it! You have successfully converted your audio file to the AAC format and renamed it for your custom ringtone. In the next step, we’ll guide you through the process of importing the ringtone to iTunes for synchronization with your iPhone.
Step 3: Change the File Extension and Rename the File
After converting the audio file to AAC format in the previous step, the next step is to change the file extension and rename the file to ensure it works as a ringtone on your iPhone. Here’s how you can do it:
1. Locate the AAC file that you converted in Step 2. Right-click on the file and select “Rename” from the options. Alternatively, you can click on the file once to select it and press the “Enter” key on your keyboard.
2. Change the file extension from “.m4a” to “.m4r”. This is the file extension used for iPhone ringtones. Ensure that you only modify the file extension and not the rest of the file name.
3. Once you have changed the file extension, press “Enter” to save the changes. You may see a warning message informing you that changing the file extension may cause it to become unusable. Confirm the change by selecting “Use .m4r” or “Yes” when prompted.
4. The file is now successfully renamed and formatted as a ringtone. If you want to keep your ringtone organized, you can move it to a dedicated folder on your computer. Right-click on the file and select “Cut” or “Copy”. Then, navigate to the desired folder location and right-click inside the folder. Choose “Paste” to move or copy the file to the new location.
5. At this point, you can also consider creating a backup of the ringtone file. It’s always a good idea to have a backup in case you accidentally delete the file or need to restore it later. Simply copy the ringtone file to a separate location, such as an external hard drive or cloud storage.
That’s it! You have successfully changed the file extension and renamed the file for your custom ringtone. In the next step, we’ll guide you through the process of importing the ringtone to iTunes so that you can sync it with your iPhone.
Step 4: Import the Ringtone to iTunes
Now that you have prepared and renamed your custom ringtone file, it’s time to import it into iTunes. By adding the ringtone to your iTunes library, you’ll be able to sync it with your iPhone in the next steps. Here’s how you can import the ringtone to iTunes:
1. Launch iTunes on your computer and ensure that you’re signed in with your Apple ID. If you don’t have iTunes installed, you can download the latest version from the Apple website and install it.
2. With iTunes open, click on the “File” tab at the top-left corner of the iTunes window. From the drop-down menu, select “Add File to Library” if you have a single ringtone file, or “Add Folder to Library” if you have a folder containing multiple ringtones.
3. Navigate to the location on your computer where you saved the custom ringtone file from the previous steps. Select the file (or the entire folder) and click on the “Open” button to import it into your iTunes library.
4. After the ringtone is added to your iTunes library, you can find it by clicking on the “Music” tab in the top-left corner of the iTunes window and selecting “Songs” from the drop-down menu. Your custom ringtone will be listed along with your other music files.
5. To make it easier to find and manage your custom ringtone, you can create a playlist specifically for ringtones. Right-click on any empty space in the left sidebar of iTunes, select “New Playlist,” and give it a suitable name, such as “Custom Ringtones.”
6. Drag and drop the custom ringtone from your iTunes library into the newly created playlist. This will ensure that it is easily accessible and distinguishable from other songs in your library.
7. Congratulations! You have successfully imported your custom ringtone into iTunes. In the next step, we’ll guide you through the process of syncing your iPhone with iTunes to transfer the ringtone to your device.
Step 5: Sync Your iPhone with iTunes
Now that you have imported your custom ringtone into iTunes, the next step is to sync your iPhone with iTunes to transfer the ringtone to your device. By syncing, you’ll be able to access and set your custom ringtone on your iPhone. Here’s how you can do it:
1. Connect your iPhone to your computer using the USB cable that came with your device. Ensure that iTunes is already open on your computer.
2. When your iPhone is connected, a small device icon will appear in the upper-left corner of the iTunes window. Click on this icon to access the device settings in iTunes.
3. In the left sidebar of the iTunes window, click on “Tones” under your device name. This will display the ringtone settings for your iPhone.
4. Check the box next to “Sync Tones” to enable the syncing of ringtones from your iTunes library to your iPhone. You can choose to sync all ringtones or select specific ones by ticking the corresponding boxes.
5. Once you have selected the ringtones you want to sync, click on the “Apply” button in the bottom-right corner of the iTunes window. This will initiate the syncing process.
6. Wait for iTunes to sync your selected ringtones to your iPhone. The duration of the syncing process will depend on the number and size of the ringtones you have chosen.
7. Once the syncing process is complete, you can disconnect your iPhone from your computer. The custom ringtone(s) will now be available on your iPhone.
8. To set your custom ringtone on your iPhone, go to “Settings” and select “Sounds & Haptics” (or “Sounds” depending on your iPhone model). From there, tap on “Ringtone” and choose your custom ringtone from the list of available options.
9. Congratulations! You have successfully synced your iPhone with iTunes and transferred your custom ringtone to your device. You can now enjoy your personalized ringtone whenever you receive a call or notification on your iPhone.
Step 6: Set the Custom Ringtone on Your iPhone
After syncing your iPhone with iTunes and transferring your custom ringtone to your device, the next step is to set the custom ringtone as your default ringtone on your iPhone. Here’s how you can do it:
1. Unlock your iPhone and go to the home screen. Tap on the “Settings” app to open the settings menu.
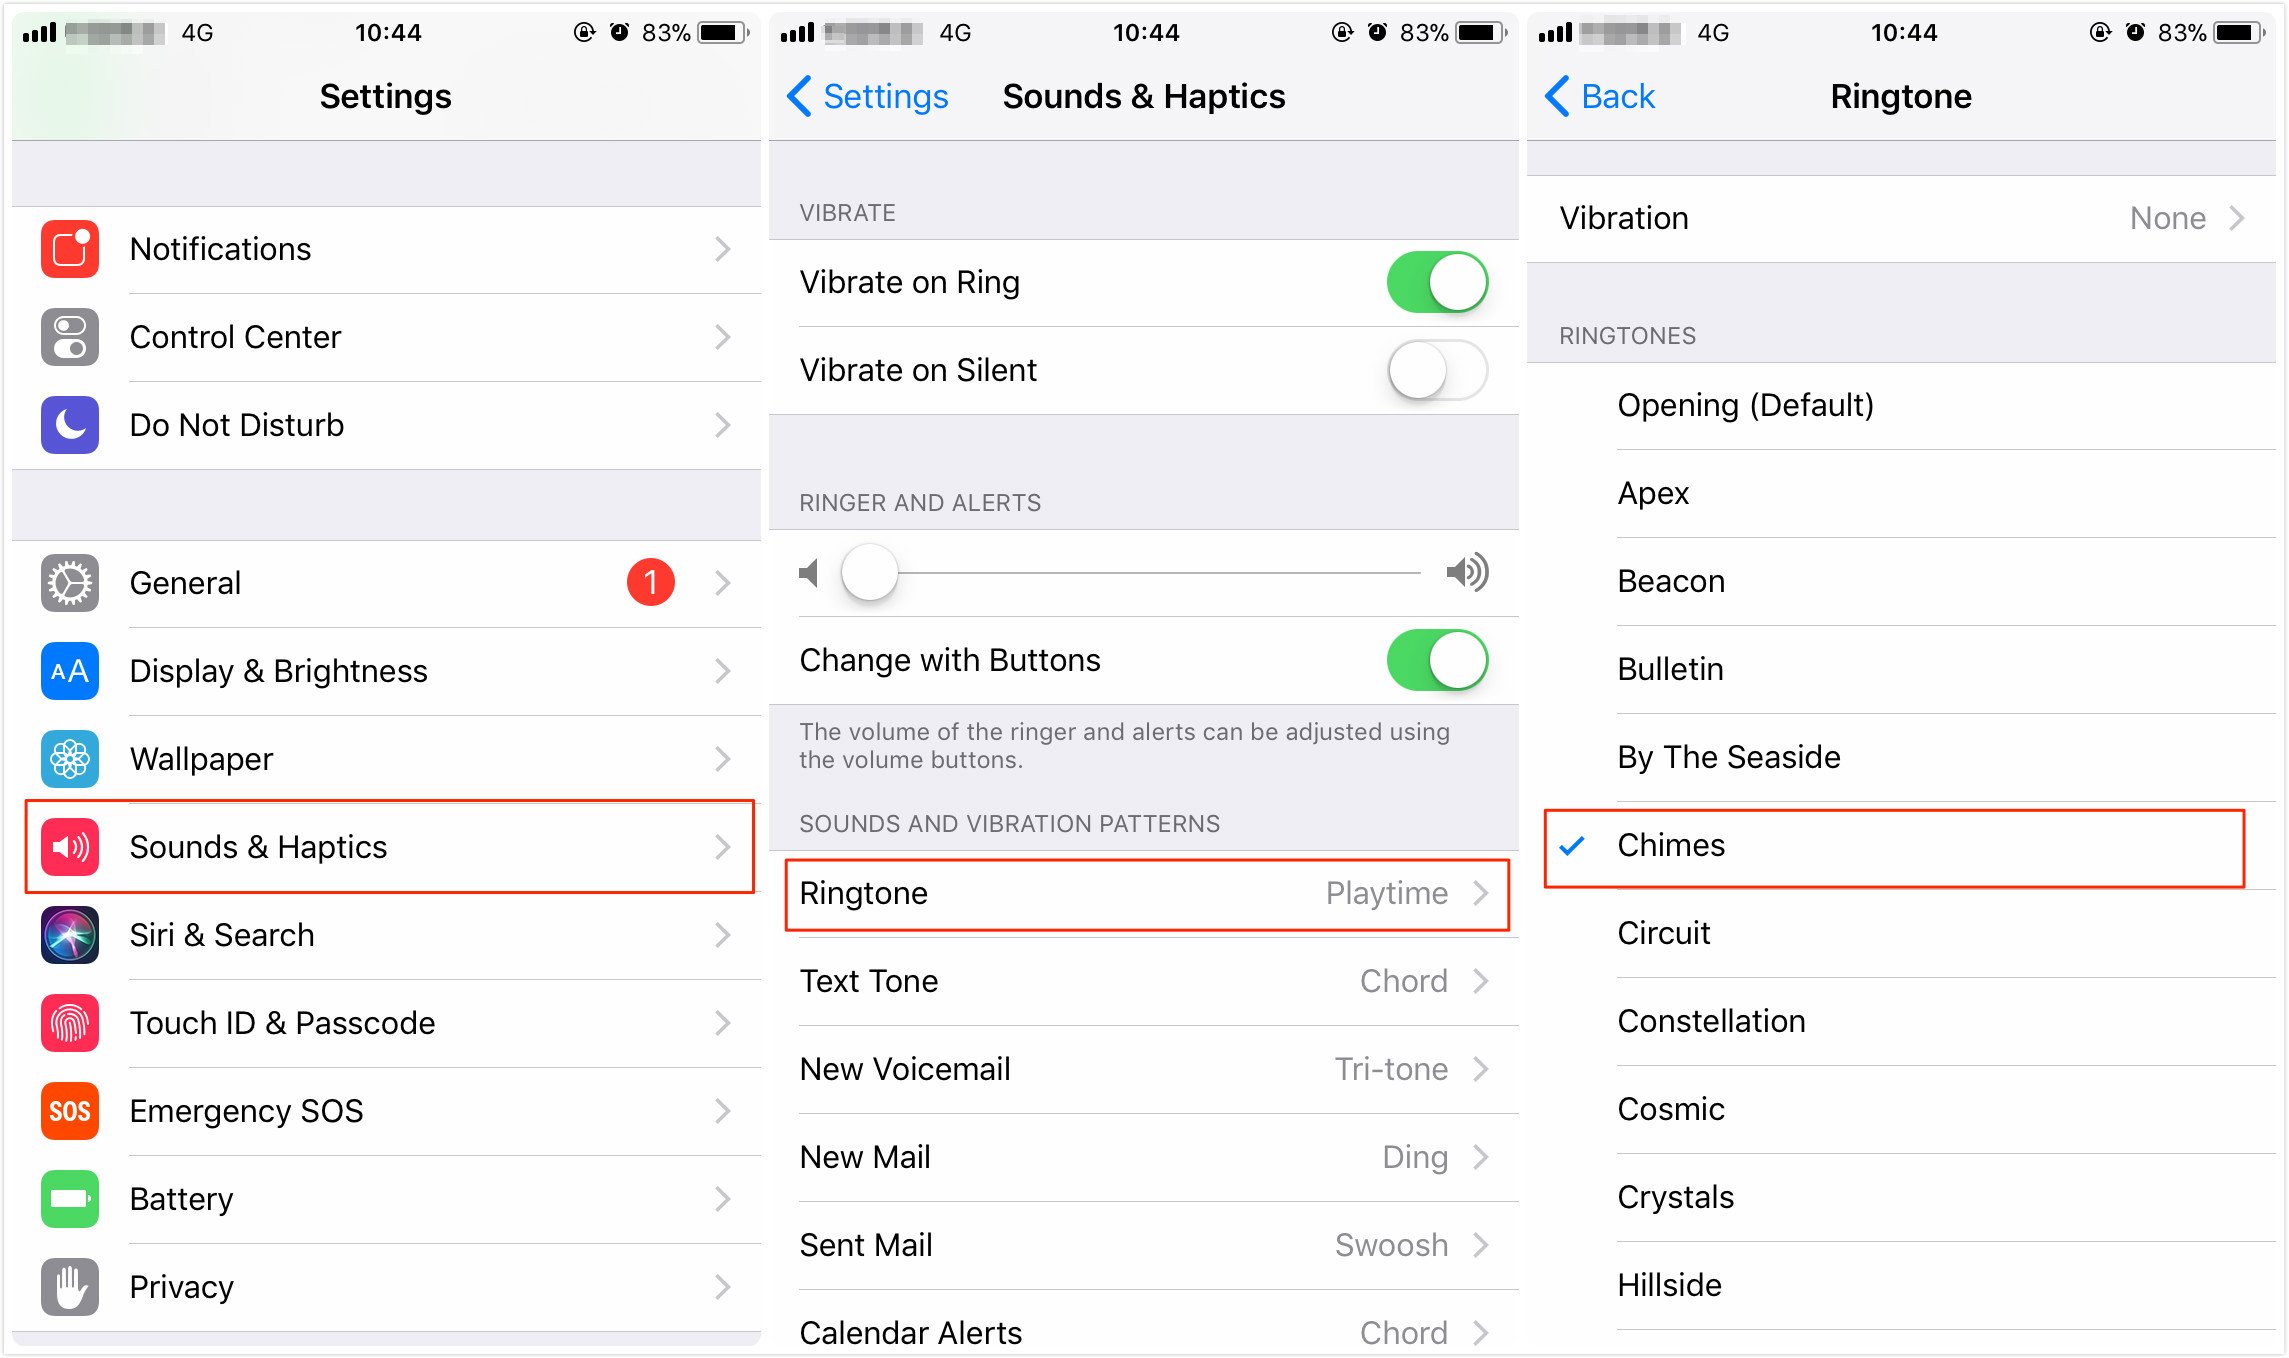
2. In the settings menu, scroll down and tap on “Sounds & Haptics” (or “Sounds” depending on your iPhone model).
3. Under the “Sounds and Vibration Patterns” section, tap on “Ringtone”. This will open the list of available ringtones on your iPhone.
4. On the “Ringtone” screen, you will see a list of default ringtones. Scroll down to the “Custom” section, where your newly added custom ringtone should be listed.
5. Tap on your custom ringtone to select it. You can tap on the ringtone to preview how it sounds before setting it as your default ringtone.
6. Once you have selected your custom ringtone, a checkmark will appear next to it. This indicates that it is now set as your default ringtone.
7. Exit the settings menu by pressing the home button or swiping up from the bottom of the screen (depending on your iPhone model). Your custom ringtone is now set and will play whenever you receive a call on your iPhone.
8. If at any time you want to change your default ringtone or switch back to a different one, simply follow the same steps and choose a different ringtone from the list.
That’s it! You have successfully set your custom ringtone as the default ringtone on your iPhone. Enjoy the personalized touch every time your phone rings.
Step 7: Assign the Ringtone to a Specific Contact
Setting a custom ringtone for a specific contact can be a fun way to personalize your iPhone even further. By assigning a unique ringtone to a specific contact, you’ll be able to quickly identify who is calling without even looking at your phone. Here’s how you can assign a custom ringtone to a specific contact:
1. Open the “Contacts” or “Phone” app on your iPhone. Locate and select the contact that you want to assign a custom ringtone to. If the contact is not already saved, you can add them to your contacts list by tapping on the “+” or “Add Contact” button.
2. Once you have selected the contact, tap on the “Edit” button. This will allow you to modify the contact’s details and settings.
3. Scroll down to the “Ringtone” section. Tap on the current ringtone assigned to the contact to open the list of available ringtones.
4. In the ringtone list, you will see a section labeled “Custom” that contains your custom ringtones. Tap on the custom ringtone that you want to assign to the contact.
5. After selecting the custom ringtone, you will be redirected back to the contact’s editing screen. Verify that the selected custom ringtone is now displayed next to the “Ringtone” field.
6. Tap on the “Save” or “Done” button to save the changes and assign the custom ringtone to the contact.
7. From now on, whenever that specific contact calls you, your iPhone will play the custom ringtone that you assigned to them, making it easy for you to identify the caller without checking your phone.
8. If you want to assign a custom ringtone to multiple contacts, simply repeat the steps for each contact. You can assign different custom ringtones to different contacts based on your preference.
That’s it! You have successfully assigned a custom ringtone to a specific contact on your iPhone. Enjoy the personalized touch and easily distinguish who is calling you.
Troubleshooting Tips for Custom Ringtones on iPhone
While setting custom ringtones on your iPhone is generally a straightforward process, you may encounter some issues or difficulties along the way. Here are a few troubleshooting tips to help you overcome common problems with custom ringtones:
1. Check the file format: Make sure that your custom ringtone is in the correct file format. iPhone ringtones should be in the .m4r format. If your ringtone is in a different format, you can use a file converter or an audio editing software to convert it to the appropriate format.
2. Double-check the file name and extension: Ensure that the file name and extension of your custom ringtone are correct. The file name should not contain any special characters or spaces. Additionally, the file extension should be .m4r, not .m4a or any other format.
3. Check the ringtone’s length: Custom ringtones on iPhone should be no longer than 40 seconds in duration. If your ringtone exceeds this limit, iTunes may not recognize it as a valid ringtone file. Trim the audio file or shorten it to the required length to resolve this issue.
4. Update iTunes and iPhone software: Keeping your iTunes and iPhone software up to date is essential for smooth functioning. Check for updates in the App Store or iTunes and ensure that you have the latest version installed. Outdated software can sometimes cause compatibility issues with custom ringtones.
5. Restart your iPhone: If you’re experiencing issues with your custom ringtone, try restarting your iPhone. This can help refresh the device and resolve any temporary glitches that may be affecting the ringtone functionality.
6. Double-check the syncing settings: If you’ve added the custom ringtone to iTunes but it’s not appearing on your iPhone, make sure that the ringtone syncing option is enabled in iTunes. Connect your iPhone to your computer, go to the device settings in iTunes, and check the “Sync Tones” option. Then, sync your iPhone again to transfer the ringtone.
7. Ensure proper file location: If you’ve renamed or moved the custom ringtone file after adding it to iTunes, it may cause issues. Make sure that the ringtone file is in the correct location on your computer and that iTunes can locate it. You can also try re-adding the ringtone to iTunes and syncing again.
8. Reset iPhone settings: If all else fails, you can try resetting your iPhone settings. Go to “Settings,” then “General,” and select “Reset.” Choose the “Reset All Settings” option. Note that this will reset all your personalized settings, so make sure to back up your device before proceeding.
By following these troubleshooting tips, you can overcome common issues and ensure that your custom ringtones work seamlessly on your iPhone. Enjoy the personalized touch and unique sound of your custom ringtone!