
Choosing a Reliable Ringtone App
When it comes to buying ringtones on your iPhone, choosing a reliable ringtone app is crucial. With so many options available on the App Store, it’s important to select an app that provides a wide range of high-quality ringtones and offers a user-friendly interface. Here are a few key considerations to keep in mind:
1. Rating and Reviews: Before downloading any ringtone app, take a moment to check its rating and read user reviews. This will give you an idea of the app’s overall reputation and reliability. Look for apps that have a high rating and positive feedback from users.
2. Variety of Ringtones: Look for an app that offers a wide variety of ringtones to choose from. Whether you’re into popular hits, classic tunes, or unique sounds, having a diverse selection ensures that you can find the perfect ringtone that suits your style and preferences.
3. User-Friendly Interface: A good ringtone app should have a user-friendly interface that makes it easy to browse through the available options, preview the ringtones, and make purchases. An intuitive and well-designed interface will enhance your overall experience and save you time in finding the right ringtone.
4. Pricing and Payment Options: Consider the pricing and payment options offered by the ringtone app. Some apps may charge a one-time fee for unlimited access to their library, while others may offer a subscription-based model. Choose an option that best fits your budget and preferences.
5. Advertisements and In-App Purchases: Take note of any advertisements or in-app purchases that may be present in the ringtone app. Excessive ads or intrusive pop-ups can be frustrating, so look for apps that offer an ad-free experience or provide an option to remove ads for a fee.
By considering these factors and doing a bit of research, you can ensure that you choose a reliable ringtone app that meets your needs and provides a seamless experience. Once you’ve found the perfect app, you’re ready to start exploring the vast world of ringtones available on the iTunes Store.
Exploring the iTunes Store
Now that you have a reliable ringtone app on your iPhone, it’s time to explore the iTunes Store and discover the wide range of ringtones available. The iTunes Store offers an extensive collection of ringtones, including popular songs, sound effects, and even customized tones. Here’s how you can navigate and explore the iTunes Store:
1. Open the iTunes Store: Launch the iTunes Store app on your iPhone. If you can’t find the app, you may need to download it from the App Store. Once opened, you’ll be greeted with a wide range of media categories, including Music, Movies, TV Shows, and more.
2. Tap on the Search Tab: At the bottom of the screen, you’ll find a tab labeled “Search”. Tap on it to access the search bar, where you can enter keywords related to the type of ringtone you’re looking for. This could include the name of the song, artist, or genre.
3. Browse Ringtone Categories: Alternatively, you can explore the ringtone categories provided by the iTunes Store. These categories are designed to help you narrow down your search based on specific themes or genres. You can find categories such as Top Songs, Featured, Pop, Rock, Soundtracks, and many more.
4. Sort and Filter Options: Use the sort and filter options available in the iTunes Store to further refine your search results. For example, you can sort ringtones by popularity, release date, or price. You can also filter by artist, album, or length to find the perfect ringtone that matches your preferences.
5. Preview and Select: When you come across a ringtone that catches your attention, tap on it to get more information. You’ll be able to listen to a preview of the ringtone to ensure it’s the right choice. Take your time to explore different options and find the ringtone that resonates with you.
6. Make the Purchase: Once you have found the perfect ringtone, tap on the “Buy” or “Purchase” button to initiate the payment process. iTunes Store will prompt you to enter your Apple ID password or use Touch ID/Face ID to confirm the purchase. Once the transaction is complete, the ringtone will be added to your library.
Exploring the iTunes Store allows you to discover a vast selection of ringtones to personalize your iPhone. Whether you prefer the latest hits or unique sound effects, there’s something for everyone. With the multitude of options available, you’re sure to find the perfect ringtone that reflects your style and personality.
Browsing Different Ringtone Categories
When it comes to finding the perfect ringtone for your iPhone, browsing different ringtone categories can help you discover a wide variety of options. The iTunes Store offers a diverse range of categories, each catering to different music genres and themes. Here’s how you can make the most out of browsing different ringtone categories:
1. Explore Top Charts: Start by checking out the “Top Charts” category in the iTunes Store. This section features the most popular and trending ringtones based on user downloads and popularity. It’s a great way to discover new and popular songs that you might not have come across otherwise.
2. Genre-Specific Categories: The iTunes Store provides several genre-specific categories such as Pop, Rock, Hip-Hop, Electronic, R&B, and more. If you have a preferred music genre, navigate to the respective category and explore the ringtone options available. This allows you to find ringtones that align with your musical tastes.
3. Soundtrack and Theme Categories: If you’re a fan of movies, TV shows, or even video games, be sure to check out the soundtrack and theme categories. Here, you’ll find ringtones inspired by popular films, TV series, and games. Whether it’s the iconic theme song from your favorite show or the memorable soundtrack from a blockbuster movie, these ringtones can add a touch of nostalgia and excitement to your iPhone.
4. Ringtone Collections: The iTunes Store also offers curated collections of ringtones that are thematically grouped. These collections could include themes like “Classics”, “Party Hits”, “Relaxing Tones”, and more. Browsing through these collections can help you discover unique and exciting ringtones that you may not have considered before.
5. Featured Categories: Keep an eye on the “Featured” section of the iTunes Store, as it highlights special categories or promotions. This section often showcases holiday-themed ringtones, seasonal collections, or special events. Exploring these featured categories can provide a fun and timely selection of ringtones.
6. Search by Keyword: If you have a specific ringtone in mind or want to explore a particular theme, you can use the search bar in the iTunes Store. Enter keywords related to the type of ringtone you’re looking for, such as the song title, artist name, or specific keywords like “upbeat”, “romantic”, or “funny”. This can help you narrow down your options and find precisely what you’re looking for.
Browsing different ringtone categories in the iTunes Store allows you to explore a wide range of options and discover unique ringtones that suit your preferences. Take your time to delve into various genres, themes, and collections, and find the perfect ringtone that reflects your style and enhances your iPhone experience.
Previewing and Selecting a Ringtone
Once you have browsed through different ringtone categories and identified potential options, the next step is to preview and select the perfect ringtone for your iPhone. The iTunes Store provides various features that allow you to listen to a preview of the ringtone and make an informed decision. Here’s what you need to know about previewing and selecting a ringtone:
1. Tap on the Ringtone: When you come across a ringtone that catches your interest, tap on it to access the detailed information page. Here, you’ll find the track length, artist name, and additional information about the ringtone.
2. Preview the Ringtone: On the ringtone’s information page, you’ll see a “Preview” button or an option to play the ringtone. Tap on it to listen to a short preview of the ringtone. This allows you to get a sense of the tune, melody, and overall sound before making a purchase.
3. Adjust the Preview Duration: Some ringtone previews may be set to a shorter duration by default. If the initial preview doesn’t provide enough context, look for an option to adjust the preview duration. This can help you listen to a more comprehensive part of the ringtone and make a better judgment.
4. Listen to Multiple Previews: Don’t settle for the first ringtone you come across. Take the time to listen to multiple previews from different options. This will allow you to compare the sounds, melodies, and genres, helping you make a decision that truly resonates with your preferences.
5. Consider Ringtone Length: Pay attention to the length of the ringtone you’re previewing. Some ringtones might be too short or too long for your liking. Consider the duration that suits your needs and preferences, as a ringtone that is too short might not catch your attention, while a lengthy one may become repetitive or annoying.
6. Trust Your Instinct: Ultimately, choosing a ringtone is a personal decision. Trust your instincts and go with the one that appeals to you the most. Whether it’s a catchy melody, a nostalgic tune, or a sound effect that makes you smile, selecting a ringtone that resonates with you will enhance your overall user experience.
Previewing and selecting a ringtone is an exciting process that allows you to customize your iPhone according to your preferences and style. Take the time to explore various options, listen to previews, and trust your instincts to find the perfect ringtone that represents your unique personality.
Making the Purchase
After previewing and selecting the ideal ringtone for your iPhone, the next step is to make the purchase. The iTunes Store offers a straightforward and secure process for buying ringtones. Here’s how you can complete the purchase smoothly:
1. Tap on the Buy Button: On the ringtone’s information page, you’ll find a “Buy” or “Purchase” button. Tap on it to initiate the payment process.
2. Verify Your Apple ID: Depending on your settings, the iTunes Store may prompt you to verify your Apple ID. Enter your Apple ID password or use Touch ID/Face ID to authenticate the purchase.
3. Confirm the Purchase: Once your Apple ID is authenticated, the iTunes Store will display a confirmation message. Review the details of the purchase one more time to ensure everything is correct, including the ringtone title and price.
4. Complete the Transaction: Tap on the “Buy” or “Purchase” button again to complete the transaction. The iTunes Store will process your payment and add the purchased ringtone to your library.
5. Check Your Ringtone Library: After the purchase is complete, go to your iPhone’s ringtone library to verify that the newly purchased ringtone has been added. You can access your ringtone library through the Settings app, under the “Sounds & Haptics” or “Sounds & Vibration Patterns” section.
6. Re-download Purchased Ringtones: If you accidentally delete a purchased ringtone or switch to a new device, don’t worry. The iTunes Store keeps a record of your purchases, and you can re-download them at any time without additional charges. Simply go to the ringtone’s information page in the iTunes Store and tap on the “Download” or “Download Again” button.
When making a purchase on the iTunes Store, it’s essential to ensure that you have a secure internet connection and that your Apple ID credentials are kept confidential. This will help protect your personal information and prevent unauthorized purchases.
Completing the purchase of a ringtone is a simple and seamless process that allows you to add personal touches to your iPhone. With the newly purchased ringtone, your device will reflect your unique style and let you stand out from the crowd.
Customizing the Ringtone Settings
Once you have purchased a ringtone and added it to your iPhone, it’s time to customize the ringtone settings to ensure it plays in the desired manner. By customizing these settings, you can further personalize your iPhone and tailor the ringtone experience to your preferences. Here’s how you can customize the ringtone settings:
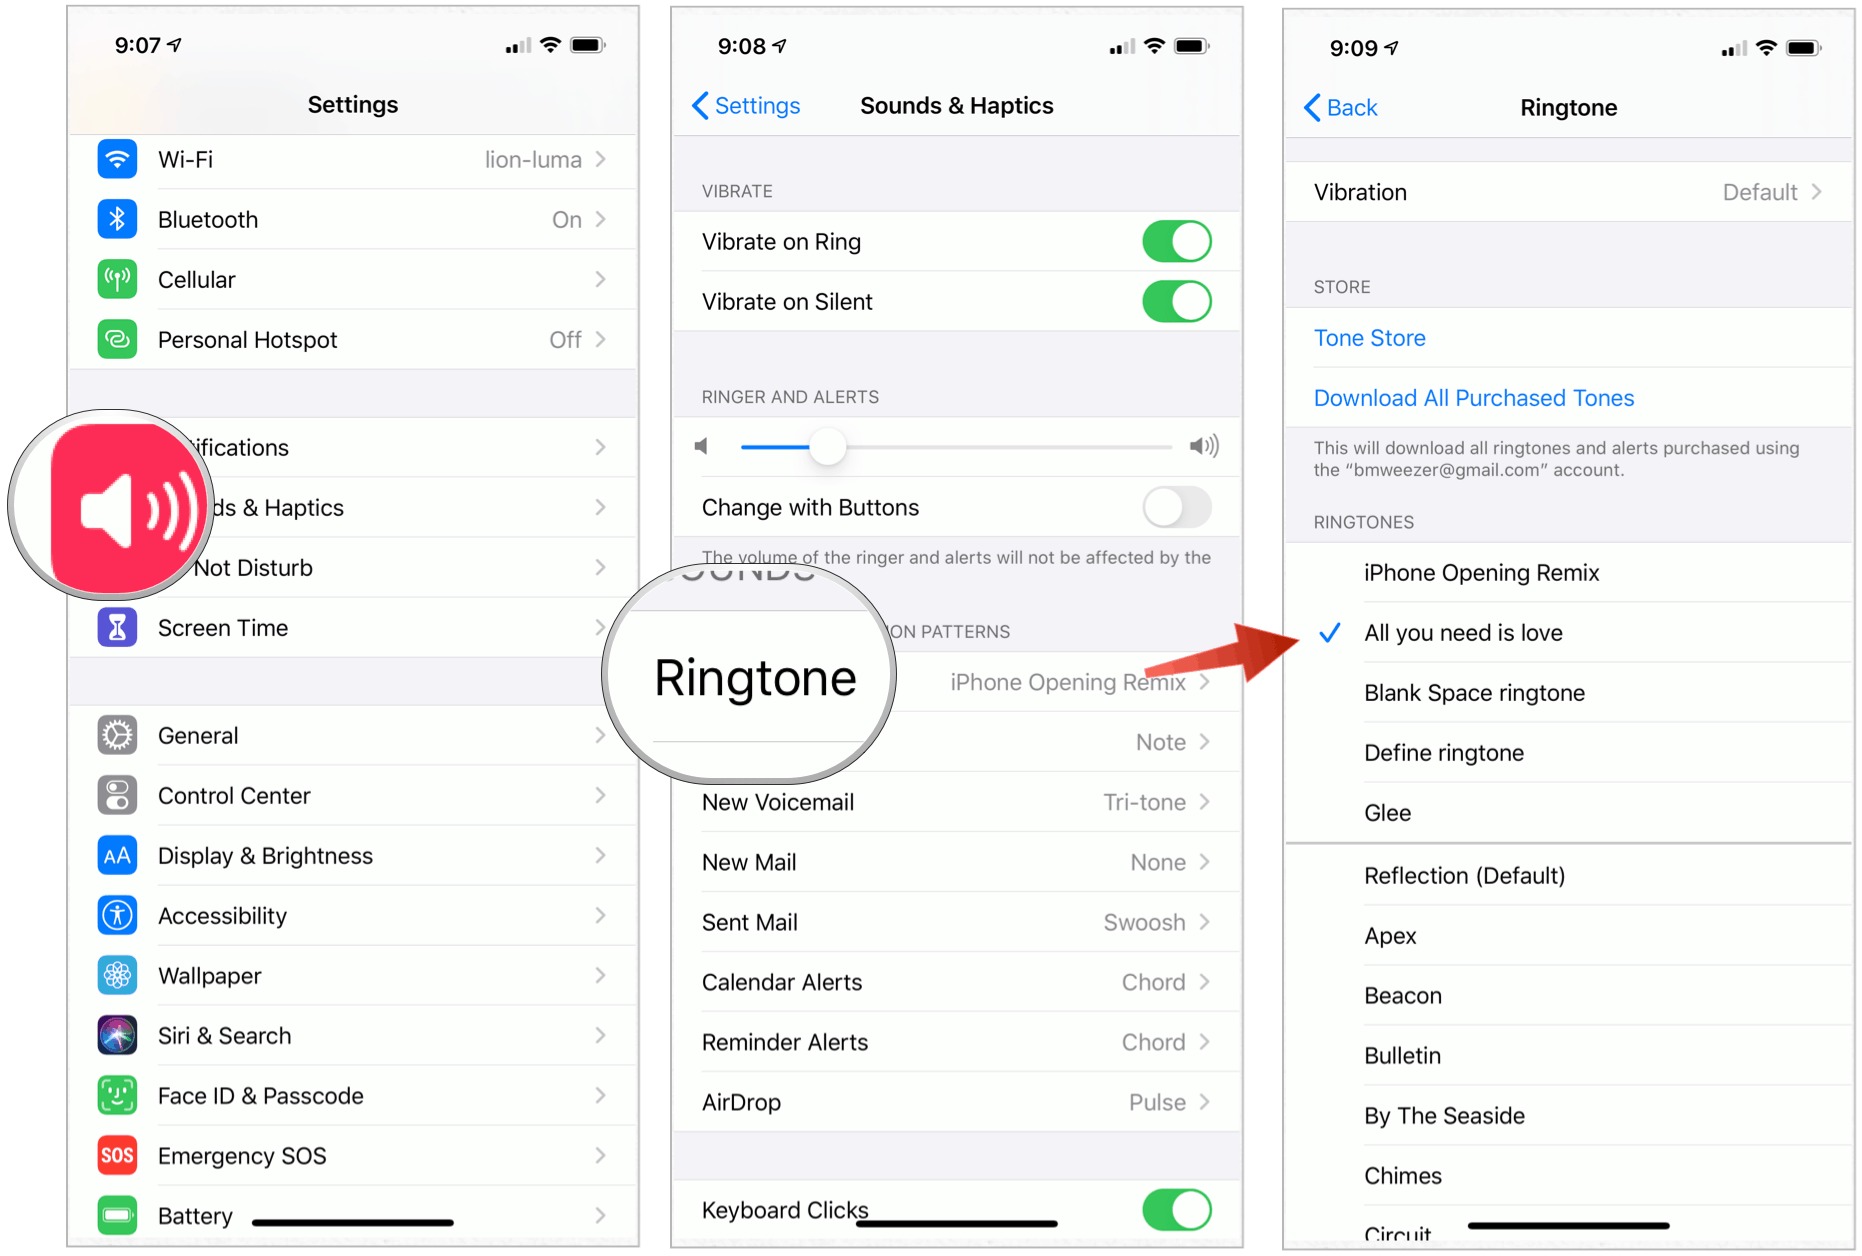
1. Access the Settings: Open the Settings app on your iPhone and navigate to the “Sounds & Haptics” or “Sounds & Vibration Patterns” section. This is where you can adjust the various ringtone settings.
2. Set the Default Ringtone: In the Ringtone section, you’ll find a list of available ringtones. Tap on the one you want to set as your default ringtone. This means it will play whenever you receive a call or a notification unless you’ve customized it for specific contacts.
3. Assign Ringtones to Contacts: If you want to assign specific ringtones to individual contacts, scroll down to the Contacts section in the Settings app. Tap on “Ringtone” next to a contact’s name and choose the desired ringtone from the list. This allows you to have personalized ringtones for different contacts, making it easier to identify who is calling.
4. Turn on Vibration: If you prefer to have both a ringtone and vibration alert for incoming calls and notifications, ensure that the “Vibration” setting is enabled. You can choose the vibration pattern you want from the available options or create a custom vibration pattern using the “Create New Vibration” feature.
5. Adjust Ringtone Volume: To adjust the volume of your ringtone, use the volume buttons on the side of your iPhone. You can also fine-tune the volume levels in the Settings app under the “Sounds & Haptics” or “Sounds & Vibration Patterns” section. Test the ringtone volume to ensure it’s set to a level that’s audible but not too loud or disruptive.
6. Enable Do Not Disturb: If you want to temporarily silence all incoming calls and notifications, consider enabling the “Do Not Disturb” mode. This function can be activated manually or scheduled to automatically turn on during specific hours. While in Do Not Disturb mode, only emergency calls and notifications will ring through.
Customizing the ringtone settings on your iPhone allows you to tailor the sound and vibration experience to your preferences. Whether it’s setting a default ringtone, assigning personalized ringtones to specific contacts, adjusting the volume, or managing the “Do Not Disturb” settings, these customization options ensure that your ringtone experience is both enjoyable and convenient.
Syncing the Ringtone to Your iPhone
Once you have purchased a ringtone and downloaded it from the iTunes Store, the next step is to sync it to your iPhone. Syncing allows you to transfer the ringtone from your computer or iCloud to your device so that you can use it as a personalized ringtone. Here’s how you can sync the ringtone to your iPhone:
1. Connect Your iPhone to Your Computer: Using the USB cable that came with your iPhone, connect your device to your computer. Make sure iTunes is installed and updated on your computer.
2. Launch iTunes and Select Your Device: Open iTunes on your computer and select your iPhone from the device list in the top-left corner of the iTunes window. This will take you to the device summary page.
3. Navigate to the Tones Tab: In the left-hand sidebar of iTunes, click on the “Tones” tab under your device’s name. This will display a list of the ringtones currently available on your iPhone.
4. Add the Ringtone to iTunes Library: To sync the newly purchased ringtone to your iPhone, you first need to add it to your iTunes library. Go to “File” in the top menu bar, select “Add File to Library” or “Add Folder to Library”, and navigate to the location where the ringtone is stored on your computer. Select the ringtone and click “Open” to add it to your iTunes library.
5. Sync the Ringtone: Once the ringtone is added to your iTunes library, select it from the “Tones” tab under your device’s name. Check the box next to “Sync Tones” and choose the option “All tones” or “Selected tones” based on your preference. If you choose “Selected tones”, make sure to check the box next to the newly purchased ringtone.
6. Apply the Changes: Click on the “Apply” or “Sync” button in the bottom-right corner of the iTunes window to apply the changes and start syncing the ringtone to your iPhone. The sync process may take a few moments, so be patient and keep your device connected to your computer until it’s complete.
After syncing, you can disconnect your iPhone from your computer and access the newly synced ringtone on your device. Open the Settings app and navigate to the “Sounds & Haptics” or “Sounds & Vibration Patterns” section. From there, you can set the synced ringtone as your default or assign it to specific contacts.
By following these steps, you can easily sync your purchased ringtone to your iPhone and enjoy a personalized ringtone experience.
Setting the Purchased Ringtone as Your Default
After syncing your purchased ringtone to your iPhone, you have the option to set it as your default ringtone. This means that the ringtone will play automatically whenever you receive a call or a notification, unless you have customized it for specific contacts. Here’s how you can set the purchased ringtone as your default:
1. Open the Settings App: Locate the Settings app on your iPhone’s home screen and tap on it to launch it. The app icon resembles a gray gear.
2. Navigate to the Sounds & Haptics Section: In the Settings app, scroll down and locate the “Sounds & Haptics” or “Sounds & Vibration Patterns” section. Tap on it to access the sound and vibration settings for your device.
3. Select the Ringtone Option: Within the Sounds & Haptics section, tap on the “Ringtone” option. This will take you to a screen displaying the available ringtone options for your device.
4. Locate the Purchased Ringtone: Scroll through the list of available ringtones until you find the purchased ringtone you want to set as your default. The purchased ringtone should appear in the list based on the order of your synced ringtones.
5. Tap on the Purchased Ringtone: Once you have located the purchased ringtone, tap on it to select it as your default ringtone. A checkmark or a highlighted section will indicate that it is now set as your default.
6. Test the Default Ringtone: To ensure that the newly set ringtone is working correctly, have someone call or send a test notification to your iPhone. If you hear the purchased ringtone playing, it means that it has been successfully set as your default.
Setting the purchased ringtone as your default allows you to personalize your iPhone and have a unique ringtone that reflects your style and preferences. With this customization, you can easily differentiate your incoming calls and notifications from others around you.
Remember that you can also assign the purchased ringtone to specific contacts if you want a personalized ringtone for specific individuals in your contact list. Simply go to the individual contact’s settings and select the ringtone for that particular contact in your phonebook.
By following these steps, you can easily set your newly purchased ringtone as your default and enjoy a customized and unique ringtone experience on your iPhone.
Managing and Organizing Your Ringtones
As you continue to purchase and sync ringtones on your iPhone, it’s important to effectively manage and organize them for easy access and customization. Here are some tips for managing and organizing your ringtones:
1. Delete Unused Ringtones: Over time, you may accumulate a collection of ringtones that you no longer use or prefer. To remove these unused ringtones, open the Settings app and navigate to the “Sounds & Haptics” or “Sounds & Vibration Patterns” section. Tap on “Ringtone” and swipe left on the unwanted ringtone to reveal the “Delete” option. Confirm the deletion to remove the ringtone from your device.
2. Create Custom Playlists: If you have a large number of ringtones, consider creating custom playlists to organize them. To do so, open the iTunes app on your computer and connect your iPhone. Under the “Library” tab, click on “Playlists” and then select “New Playlist” from the File menu. Name your playlist and drag the desired ringtones into it. Sync your iPhone to add the playlist to your device.
3. Use Folders in iTunes: In the iTunes app on your computer, you can further organize your ringtones by creating folders. Under the “Library” tab, click on “Ringtones” and select “File” from the menu bar. Choose “New Folder” and name it accordingly. Drag and drop the ringtones into the created folder to categorize and organize them. Sync your iPhone to reflect the changes on your device.
4. Rename Ringtones: If you want to give your ringtones more descriptive or memorable names, you can rename them in iTunes. Simply locate the ringtone in your iTunes library, right-click on it, and select “Get Info”. Under the “Name” field, enter the desired name for the ringtone. Click “OK” to save the changes, and then sync your iPhone to update the renamed ringtone.
5. Back Up Your Ringtones: To ensure that your ringtones are protected, it’s a good idea to regularly back them up. You can do this by creating a backup of your iPhone through iCloud or by connecting your device to your computer and using iTunes to create a full backup. In case of any data loss or device malfunction, you can restore your ringtones easily from the backup.
6. Share Ringtones: If you have unique or custom-made ringtones that you want to share with others, you can do so by using tools like AirDrop, email, or messaging apps. Simply locate the ringtone file in your iTunes library or on your iPhone, and use the sharing function of the respective app to send it to others.
By effectively managing and organizing your ringtones, you can easily access and customize them to suit your preferences. Whether it’s deleting unused ringtones, creating playlists or folders, renaming ringtones, backing up your collection, or sharing unique tones with others, these tips will help you maintain a well-organized ringtone experience on your iPhone.
Troubleshooting Common Issues
While buying and managing ringtones on your iPhone is usually a smooth process, you might encounter some common issues that can be easily resolved. Here are a few troubleshooting tips to help you overcome these issues:
1. Ringtone Not Playing: If you’ve set a ringtone but it’s not playing when you receive a call or notification, first check the volume settings on your device. Ensure that the volume is turned up and not set to silent or vibrate mode. Additionally, make sure that you have selected the correct ringtone in the “Sounds & Haptics” or “Sounds & Vibration Patterns” section of the Settings app.
2. Ringtone Not Syncing: If you’re having trouble syncing your purchased ringtone to your iPhone, ensure that you have the latest version of iTunes installed on your computer. Also, check that your iPhone is properly connected to your computer via the USB cable. In some cases, restarting both your computer and iPhone can resolve this issue.
3. Deleted Ringtone Recovery: If you accidentally delete a purchased ringtone or it goes missing, don’t worry. You can easily recover it by going to the iTunes Store app on your iPhone, tapping on “More” at the bottom-right corner, and selecting “Purchased”. From there, you can locate and re-download any previously purchased ringtones.
4. Ringtone Crashing or Freezing: If a specific ringtone is causing your device to freeze or crash, it’s possible that the file is corrupted. Try deleting the problematic ringtone from your device and then re-syncing it from your computer. If the issue persists, delete the ringtone again and contact the customer support of the app or service from which you purchased the ringtone for further assistance.
5. Ringtone Volume Issues: If you’re experiencing uneven or low volume levels with your ringtones, you can adjust individual ringtone volumes in the “Sounds & Haptics” or “Sounds & Vibration Patterns” section of the Settings app. Additionally, try resetting your iPhone’s settings by going to “Settings” > “General” > “Reset” > “Reset All Settings”. This will restore the default volume settings.
6. Not Hearing Ringtone during Calls: If you’re not hearing the ringtone while a call is in progress, verify that the “Silent” switch on the side of your iPhone is not turned on. This switch mutes all sounds, including ringtones. Additionally, check the call settings in the Phone app to ensure that the “Ringtone” option is not set to “None”.
By troubleshooting these common issues, you can easily overcome any obstacles that might arise during the process of buying, syncing, and using ringtones on your iPhone. If you are unable to resolve an issue on your own, consider reaching out to Apple support or the support team of the app or service from which you purchased the ringtone for further assistance.