
Why Change Your Default Ringtone?
Your iPhone’s default ringtone might be convenient, but it can also become monotonous and blend in with other devices around you. Changing your default ringtone allows you to personalize your iPhone and add a touch of uniqueness to your device. Here are a few reasons why you might consider changing your default ringtone:
- Express your personality: Your ringtone is like your personal signature. By selecting a unique and catchy ringtone, you can express your personality and stand out from the crowd.
- Avoid confusion: The default ringtone is often used by many iPhone users. Changing your ringtone can help you distinguish your incoming calls from others and prevent unnecessary confusion.
- Create different vibes: Different ringtones can create different moods or vibes. Whether you want to set a relaxing tone for work hours or a fun and lively tune for leisure time, changing your default ringtone allows you to set the desired ambiance.
- Enhance accessibility: For individuals with hearing impairments, changing the default ringtone to a more distinct and louder sound can make it easier to notice incoming calls.
- Boost productivity: If you use your iPhone for work, customizing your ringtone can help you prioritize calls and distinguish personal calls from business calls.
Changing your default ringtone is a simple process that can make a big difference in personalizing your iPhone and adding some flair to your daily interactions. Let’s take a look at how you can change your default ringtone on your iPhone.
Step 1: Open the Settings App
To change the default ringtone on your iPhone, start by opening the Settings app. The Settings app is where you can customize various aspects of your device, including sounds and ringtones.
Here’s how you can open the Settings app:
- Unlock your iPhone by using your passcode, Touch ID, or Face ID.
- Locate the Settings app icon on your Home screen. It’s a gray icon with gears.
- Tap on the Settings app icon to open it.
Once you’ve opened the Settings app, you’re one step closer to customizing your default ringtone. The next step is to navigate to the Sounds & Haptics settings.
Tip: You can also access the Settings app by swiping down on your Home screen and using the search bar at the top. Simply type “Settings” and tap on the app icon that appears in the search results.
Step 2: Select “Sounds & Haptics”
After opening the Settings app on your iPhone, the next step is to select the “Sounds & Haptics” option. This is where you can customize the sound settings for various aspects of your device, including ringtones, alerts, and vibrations.
Follow these steps to access the “Sounds & Haptics” settings:
- In the Settings app, scroll down until you find the “Sounds & Haptics” option. It is usually located near the middle of the Settings menu.
- Tap on “Sounds & Haptics” to enter the sound settings.
Once you have entered the “Sounds & Haptics” settings, you will see a variety of options for customizing your device’s sounds and vibrations. This is where you can change the default ringtone to something more unique and personalized.
Tip: If you’re looking to change other sound settings, such as text tones, email alerts, or app notification sounds, you can find those options within the “Sounds & Haptics” settings as well.
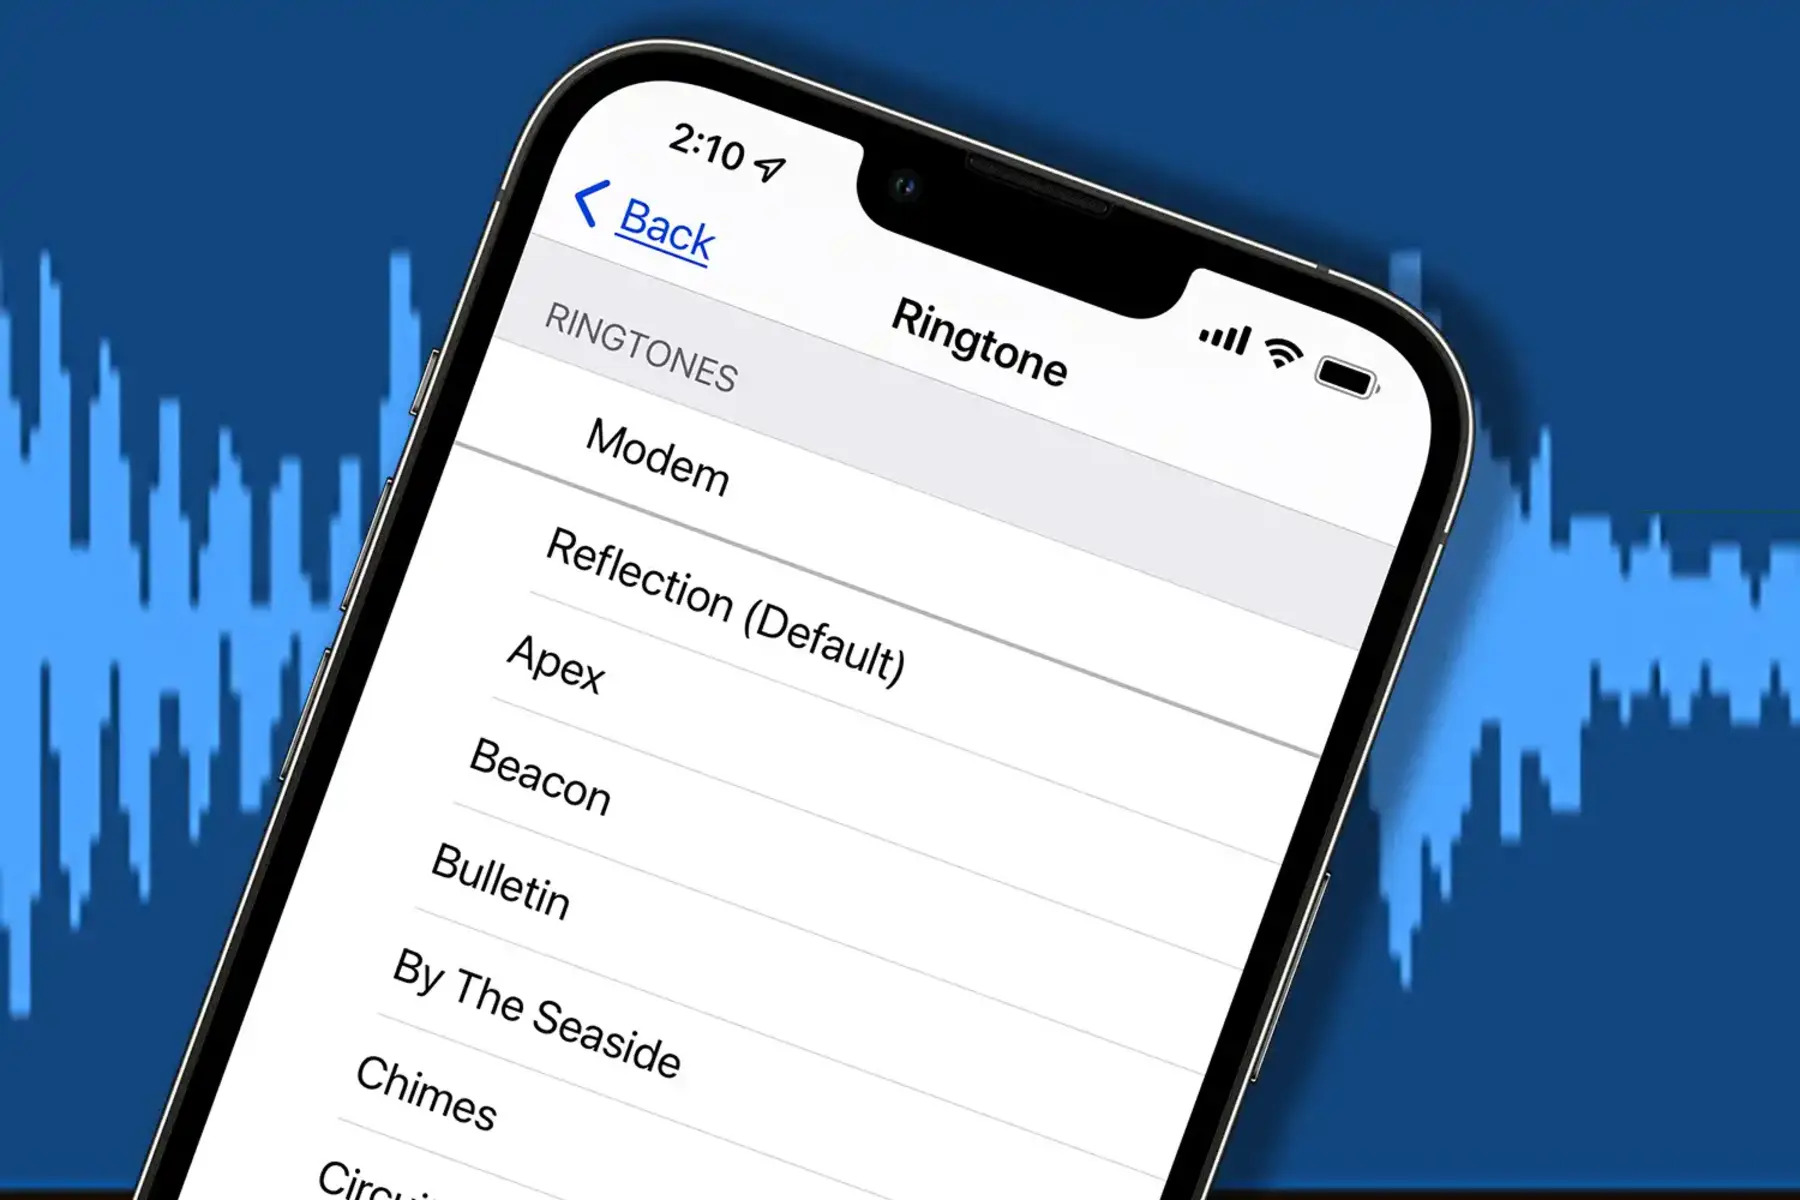
Step 3: Choose “Ringtone”
After accessing the “Sounds & Haptics” settings on your iPhone, the next step is to choose the “Ringtone” option. This is where you can browse and select the desired ringtone for your incoming calls.
Here’s how you can choose the “Ringtone” option:
- In the “Sounds & Haptics” settings, scroll down until you find the “Ringtone” option. It is typically located below the “Sounds & Vibration Patterns” section.
- Tap on “Ringtone” to enter the ringtone selection menu.
Once you have entered the “Ringtone” menu, you will see a list of available ringtones that come pre-installed on your iPhone. These ringtones vary in style and genre, allowing you to choose the one that best suits your preferences.
Tip: If you want to use a custom ringtone from your music library or create a custom ringtone using GarageBand, keep reading to learn how to do so in the following steps.
Step 4: Browse and Preview Available Ringtones
Upon selecting the “Ringtone” option in the “Sounds & Haptics” settings, you will be presented with a wide range of pre-installed ringtones to choose from. This step allows you to browse through these available options and preview them before making your final selection.
Here’s how you can browse and preview the available ringtones:
- Within the “Ringtone” menu, you will see a list of different ringtones. Scroll through the list to explore the various options.
- To preview a ringtone, simply tap on it. Your iPhone will play a short sample of the selected ringtone, allowing you to hear how it sounds.
- If you want to preview another ringtone, repeat the process by tapping on a different option.
Take your time to listen to the different ringtones and find the one that resonates with your preferences and style. Whether you prefer a classic sound, a catchy tune, or something more modern, there’s bound to be a ringtone that suits your taste.
Tip: If you’re having trouble deciding, consider selecting a few favorite ringtones and then proceed to the next step to compare them within the actual ringtone settings.
Step 5: Set a Custom Ringtone from your Music Library
If you want to use a personalized ringtone that is not pre-installed on your iPhone, you have the option to set a custom ringtone from your music library. This allows you to choose any song or audio file from your device and use it as your default ringtone.
Here’s how you can set a custom ringtone from your music library:
- In the “Ringtone” menu, scroll to the top and locate the “Custom” section. It is usually situated above the pre-installed ringtone options.
- Tap on “Custom” to access the custom ringtone settings.
- You will see a list of songs and audio files from your music library. Scroll through the list or use the search bar to find the desired file.
- Once you’ve found the file you want to use as your ringtone, tap on it to select it. The file will be highlighted with a checkmark.
- Exit the “Sounds & Haptics” settings by tapping on the back arrow at the top left corner of the screen.
Congratulations! Your custom ringtone has been set as your default ringtone on your iPhone. Now, whenever you receive a call, your chosen song or audio file will play as your ringtone.
Keep in mind that the chosen file should be in a compatible audio format (such as AAC or MP3) and not protected by digital rights management (DRM). If the file is in the correct format but isn’t displayed in the custom ringtone settings, you may need to sync it from your computer using iTunes or transfer it through other supported methods.
Tip: Be mindful of copyright laws when using custom ringtones from your music library. Ensure that you have the necessary rights or permissions to use the selected song or audio file as your ringtone.
Step 6: Create a Custom Ringtone using GarageBand
If you want to have even more control over your custom ringtone, you can create one using the GarageBand app on your iPhone. GarageBand offers various tools and features that allow you to create unique and personalized ringtones from scratch.
Here’s how you can create a custom ringtone using GarageBand:
- Install the GarageBand app from the App Store if you haven’t already.
- Open GarageBand on your iPhone.
- Create a new project by selecting the “+” symbol or tapping on “Create Document”.
- Choose the “Audio Recorder” option from the Instruments screen.
- Tap on the red record button to start recording your desired sound. You can sing, play an instrument, or record any sound you want to use as your ringtone.
- Once you’ve finished recording, tap on the triangle-shaped icon to stop the recording.
- Trim, edit, and adjust your recorded sound in GarageBand to create the desired ringtone. You can add effects, adjust volume levels, and experiment with different sections of the recording.
- When you’re satisfied with your custom ringtone, tap on the arrow icon in the top-left corner to go to the Project view.
- Tap on the share button (usually symbolized by a box with an arrow pointing out) and select “Ringtone” to export your custom ringtone.
- Choose the desired options for the ringtone, such as assigning a name and setting the duration, and then tap on “Export”.
- GarageBand will save your custom ringtone and make it available in the Settings app under the “Sounds & Haptics” settings.
Now you can enjoy your personally created ringtone and set it as your default ringtone on your iPhone. It’s a great way to showcase your creativity and make your device truly unique.
Tip: GarageBand offers a wide range of additional features to enhance your custom ringtone, including the ability to add effects, loop sections, and adjust the tempo. Take your time to explore these features and create a ringtone that matches your vision.
Step 7: Set a Vibrating Alert as your Default Ringtone
If you prefer a more discreet notification for incoming calls, you have the option to set a vibrating alert as your default ringtone on your iPhone. This allows you to be alerted without a sound, making it useful in situations where you need to be silent or in environments with noise restrictions.
Here’s how you can set a vibrating alert as your default ringtone:
- Open the Settings app on your iPhone.
- Navigate to the “Sounds & Haptics” settings.
- Scroll down until you find the “Vibration” section.
- Tap on “Ringtone” under the “Vibration” section to access the built-in vibration patterns.
- Choose the desired vibration pattern for your incoming calls. You can tap on each option to preview how it feels.
- Once you’ve selected the desired vibration pattern, exit the “Sounds & Haptics” settings by tapping on the back arrow at the top left corner of the screen.
Congratulations! You have successfully set a vibrating alert as your default ringtone on your iPhone. Now, whenever you receive a call, your iPhone will vibrate instead of playing a sound, ensuring that you’re notified without causing any disruption.
Tip: If you want to create a custom vibration pattern, you can do so by tapping on “Create New Vibration” within the “Vibration” section. Follow the prompts to customize the vibration pattern using your taps, and then save it as a custom option.
Keep in mind that setting a vibrating alert as your default ringtone does not affect other sounds or notifications on your iPhone. You can still receive audible alerts for messages, emails, and other notifications if desired.
Step 8: Adjust Ringtone Volume
After selecting the desired ringtone for your iPhone, you may want to make adjustments to the ringtone volume to ensure it’s at the right level for your needs. Whether you want a loud and attention-grabbing ringtone or a more subtle and discreet tone, you can easily adjust the volume settings to suit your preferences.
Here’s how you can adjust the ringtone volume on your iPhone:
- On your iPhone, locate the volume buttons on the left-hand side of the device. These buttons are usually marked with “+” and “-” symbols.
- While your iPhone is not ringing, press the volume buttons to increase or decrease the ringtone volume.
- As you press the volume buttons, a volume indicator will appear on the screen, showing the current volume level.
- Continue pressing the volume buttons until you reach the desired ringtone volume.
- You can also access the volume settings through the Control Center. Swipe down from the top-right corner of the screen (or up from the bottom on older iPhone models) to open the Control Center. Adjust the volume slider to change the ringtone volume.
By adjusting the ringtone volume, you can ensure that you hear your incoming calls clearly without it being too loud or too soft. It’s all about finding the right balance that suits your preferences and the environment you’re in.
Tip: If you want to temporarily silence your ringtone, you can also use the switch on the left-hand side of your iPhone (above the volume buttons). Flicking this switch downwards will put your device in silent mode, and the ringtone will be muted until you switch it back up.
Remember, adjusting the ringtone volume does not affect the volume settings for other functions and apps on your iPhone. It only changes the volume level specifically for incoming calls and ringtones.
Step 9: Assign Custom Ringtones to Specific Contacts
Adding a personal touch to your iPhone’s ringtone experience gets even better when you can assign custom ringtones to specific contacts. This allows you to instantly recognize who is calling based on the unique ringtone you’ve assigned to them. Whether it’s a family member, friend, or important client, customizing ringtones can help you prioritize and respond accordingly.
Here’s how you can assign custom ringtones to specific contacts on your iPhone:
- Open the Contacts app on your iPhone.
- Select the contact to whom you want to assign a custom ringtone.
- Tap on “Edit” at the top right corner of the screen.
- Scroll down until you find the “Ringtone” or “Text Tone” option.
- Tap on the option to access the list of available ringtones.
- Choose the desired ringtone specifically for that contact.
- Tap “Save” at the top right corner to save the changes.
Now, whenever you receive a call or message from that specific contact, your customized ringtone will play, making it easy to identify who is trying to reach you. This feature is not only practical but also adds a personal touch to your communication experience.
Tip: You can also customize the vibration pattern for specific contacts. Look for the “Vibration” option within the contact’s settings to assign a unique vibration pattern that corresponds to their call or message.
Remember, assigning custom ringtones to specific contacts gives you the freedom to personalize your iPhone even further and optimize your communication flow.
Step 10: Troubleshooting Common Issues with Changing Ringtones
While changing ringtones on your iPhone is a straightforward process, you may encounter some common issues along the way. Here are a few troubleshooting steps to help you resolve these issues:
- Ringtone not appearing: If a custom ringtone or newly downloaded ringtone is not appearing in the ringtone options, ensure that the file format is supported (such as AAC or MP3) and that it is not protected by digital rights management (DRM).
- Sound not playing: If the selected ringtone is not playing sound when you receive a call, make sure the iPhone’s ringer switch is not set to silent mode. Check the switch on the side of your device and toggle it towards the screen if necessary.
- Volume not adjusting: If the ringtone volume is not adjusting using the volume buttons, go to Settings > Sounds & Haptics and make sure the “Change with Buttons” option is enabled.
- Inconsistent ringtone: If the ringtone volume seems inconsistent or too loud/soft, go to Settings > Sounds & Haptics and disable the “Attention Aware Features” option. This ensures that the volume of the ringtone remains constant.
- Syncing issues with custom ringtone: If you created a custom ringtone using GarageBand and it is not syncing to your iPhone, connect your iPhone to a computer, open iTunes, and ensure that the ringtone is selected for syncing under your device’s Tones settings.
- Ringtone reset: If the custom ringtone or assigned ringtone for a specific contact resets to the default, check if any changes occur after updating your iPhone’s software. You may need to reassign the custom ringtone after system updates.
If you encounter any other issues or challenges while changing ringtones, consider restarting your iPhone, checking for software updates, or reaching out to Apple Support for further assistance.
Remember, troubleshooting common issues is part of the process when customizing your iPhone’s ringtone. With a little patience and these troubleshooting steps, you’ll be able to enjoy your personalized ringtone without any difficulties.