
How to Access the Notification Center on iPhone
Accessing the Notification Center on your iPhone is easy and convenient. The Notification Center is a centralized hub where all your incoming notifications are stored. It allows you to quickly view and manage notifications from various apps and services on your device. Here’s how you can access the Notification Center on your iPhone:
- Swipe down from the top edge of the screen: To access the Notification Center, simply swipe down from the top edge of the screen. You can do this from the home screen, lock screen, or within any app.
- Use Control Center shortcut: Alternatively, you can access the Notification Center by swiping up from the bottom edge of the screen to open the Control Center, and then swipe from right to left on the top section of the Control Center. This will reveal the Notification Center.
- Use a shortcut gesture: If your iPhone supports it, you can assign a gesture shortcut to access the Notification Center. Go to Settings > Accessibility > Touch > Back Tap. From here, you can set a double or triple tap on the back of your iPhone to open the Notification Center.
Once you access the Notification Center, you will see a list of your recent notifications organized by apps and services. You can scroll through the list to view all the notifications you have received. To dismiss a notification, swipe it to the right or left. You can also tap on a notification to open the corresponding app or take any necessary action.
It’s important to note that the Notification Center only shows the most recent notifications. Older notifications may not be visible in the default view. However, there are ways to access and view older notifications, which we will explore later in this article.
Understanding Notification Center Settings on iPhone
The Notification Center on your iPhone comes with customizable settings that allow you to control how notifications are displayed and organized. Understanding these settings can help you tailor the notifications to your preferences and improve your overall user experience. Here’s a breakdown of the Notification Center settings on iPhone:
- Accessing the settings: To access the Notification Center settings, go to Settings > Notifications on your iPhone.
- Notification types: In the settings, you can see a list of all the installed apps on your iPhone. Tap on an app to modify its notification settings. You can choose between different notification types, such as banners, alerts, or none.
- Notification grouping: You also have the option to group app notifications by app or automatically. By default, notifications are grouped by app, which means all the notifications from a single app will be grouped together in the Notification Center.
- Customizing app notifications: For each app, you can further customize the notification settings. You can choose whether to allow notifications to appear on the lock screen, show them in the Notification Center, or play a sound when a notification is received.
- Priority and sorting: Some apps allow you to set the priority level for their notifications. You can prioritize certain apps to show their notifications at the top of the list. Additionally, you can sort the app notifications manually or by time.
- Notification previews: You can choose whether to allow notification previews to be shown when your iPhone is locked or always. This provides a glimpse of the notification content without unlocking your device.
- Do Not Disturb: The Do Not Disturb feature allows you to silence incoming calls and notifications during specific hours or when your iPhone is locked. You can customize the Do Not Disturb settings to allow certain contacts or repeated calls to bypass the feature.
By exploring and adjusting the Notification Center settings on your iPhone, you can have better control over the notifications you receive and how they are displayed. This allows you to stay informed without being overwhelmed by a constant influx of notifications.
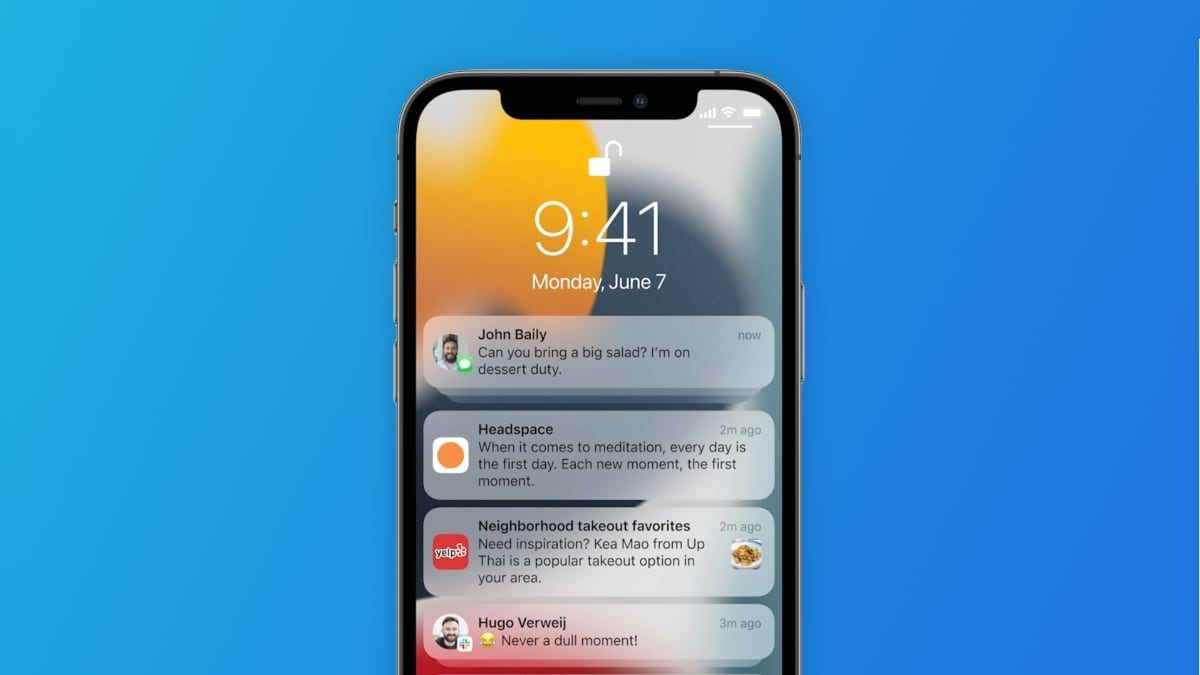
Viewing Recent Notifications on iPhone
The Notification Center on your iPhone keeps track of all the recent notifications you receive, allowing you to quickly view and manage them. Here’s how you can easily access and view your recent notifications:
- Access the Notification Center: To view your recent notifications, swipe down from the top edge of the screen. This action will reveal the Notification Center, where you’ll find a chronological list of your notifications.
- Scroll through the list: Use your finger to scroll through the list of notifications. You’ll see notifications from various apps and services organized by time. The most recent notifications will appear at the top of the list.
- Expand and collapse notifications: Some notifications may appear in a collapsed form, showing only basic information. To view more details of a notification, tap on it to expand it. Conversely, if you want to collapse a notification to save space, you can swipe it up or tap the small arrow next to it.
- Interact with notifications: Depending on the app and notification type, you can take different actions directly from the Notification Center. For example, you might be able to reply to a message, like a social media post, or dismiss a reminder. Simply tap on the notification to open the corresponding app and perform the desired action.
- Clearing notifications: To clear individual notifications from the Notification Center, swipe them to the right or left. Alternatively, you can clear all notifications by tapping the “Clear” button at the top of the Notification Center.
Keep in mind that the Notification Center shows your recent notifications, but it doesn’t provide access to older notifications beyond a certain limit. However, there are methods to access older notifications, which we’ll discuss in later sections. By regularly checking your recent notifications in the Notification Center, you can stay updated and never miss important information or interactions.
Using the Notification History Widget on iPhone
iOS 14 introduced a new feature called the Notification History Widget, which allows you to access and view older notifications on your iPhone. This widget provides a convenient way to retrieve notifications that may have been dismissed or missed. Here’s how you can use the Notification History Widget:
- Add the Notification History Widget: To add the widget, go to your iPhone’s home screen and long-press on an empty space. Tap the “+” icon in the top-left corner to open the widget gallery. Search for “Notification History” and select the widget size you prefer. Tap “Add Widget” to add it to your home screen.
- Access older notifications: Once the Notification History Widget is added to your home screen, you can tap on it to open the widget view. Here, you’ll find a list of older notifications in reverse chronological order. Scroll through the list to view notifications that you may have missed or dismissed.
- Interact with notifications: From the Notification History Widget, you can interact with notifications by tapping on them. Depending on the app and the notification, you may be able to open the corresponding app or perform actions such as replying to a message or interacting with a social media post.
- Clearing the notification history: If you want to clear the notification history from the widget, scroll to the top of the list and tap the “Clear All” button. This will remove all the notifications from the widget view.
The Notification History Widget provides a convenient way to access and review older notifications on your iPhone. By using this widget, you can retrieve important information that may have been missed or dismissed. Whether you’re looking for an important message or need to catch up on recent activities, the Notification History Widget is a valuable tool to have on your home screen.
How to Find Old Notifications on iPhone using Search
If you’re looking for a specific old notification on your iPhone, you can easily find it using the device’s built-in search functionality. The search feature allows you to quickly locate notifications from specific apps, specific contacts, or certain keywords. Here’s how you can find old notifications using the search feature:
- Swipe down or swipe right on the home screen: Start by swiping down from the middle of the home screen or swiping right from the main home screen to access the search bar.
- Type your search query: Once the search bar appears, enter your search query. You can search for the name of an app, a specific contact, or any relevant keywords related to the notification you’re looking for.
- Review the search results: As you type, the search results will update in real-time. The results will include matching apps, messages, contacts, emails, and more. Look for the specific notification or app icon that matches your search query.
- Tap on the result: Once you’ve found the desired notification or app, tap on it to open the corresponding app or view the specific notification that matches your search query.
The search feature on your iPhone is a powerful tool for finding old notifications quickly and efficiently. By utilizing this feature, you can easily track down specific notifications from the past, saving you time and effort in scrolling through the Notification Center or other apps individually.
How to Enable Persistent Notifications on iPhone
iOS provides an option to enable persistent notifications on your iPhone, ensuring that important notifications remain visible until you dismiss them. This feature can be especially useful for crucial alerts or reminders that you don’t want to miss. Here’s how you can enable persistent notifications on your iPhone:
- Go to Settings: On your iPhone, navigate to the Settings app from the home screen.
- Tap on Notifications: In the Settings menu, look for the “Notifications” option and tap on it.
- Select an App: Find and select the app for which you want to enable persistent notifications.
- Enable Critical Alerts: Within the app’s notification settings, look for the “Critical Alerts” option. Tap the toggle switch to enable it.
- Customize Notification Settings: Depending on the app, you may have additional options to further customize the notification settings. You can choose to allow notifications to appear on the lock screen, show them in the Notification Center, play a sound, or display a banner or alert.
Enabling persistent notifications ensures that specific apps can display important alerts on your iPhone, even if your device is in use or locked. It’s important to note that not all apps support persistent notifications, as it is a feature that needs to be implemented by app developers.
With persistent notifications enabled, you no longer have to worry about missing important alerts or reminders. Whether it’s a critical email, a task reminder, or an urgent message, persistent notifications keep you informed and ensure that you stay on top of your important tasks throughout the day.
Viewing App-Specific Notification History on iPhone
If you want to review the notification history for a specific app on your iPhone, you can access the app’s individual notification settings to view its past notifications. This feature allows you to explore the app-specific notification history, providing insights into previous alerts and interactions. Here’s how you can view app-specific notification history on your iPhone:
- Open Settings: Start by opening the Settings app on your iPhone from the home screen.
- Select Notifications: In the Settings menu, locate and tap on the “Notifications” option.
- Choose an App: Look for the app for which you want to view the notification history and tap on it.
- Scroll down to Notification History: Within the app’s notification settings, you’ll find a “Notification History” section. Tap on it to access the app-specific notification history.
- Review Notification History: Once you’re in the app-specific notification history, you’ll see a list of past notifications that the app has sent to your iPhone. You can scroll through the list to review previous alerts and interactions.
By accessing the notification history for a specific app, you can gain a comprehensive understanding of the past notifications and engagements related to that app. This feature can be particularly useful if you need to reference previous messages, reminders, or updates received from the app.
Keep in mind that the availability of app-specific notification history may vary depending on the app and its implementation. Not all apps provide this feature, as it requires developers to enable it in their app’s notification settings.
Overall, app-specific notification history on your iPhone gives you the ability to track and reference past alerts, providing a convenient way to stay organized and revisit important information when needed.
Clearing the Notification Center on iPhone
The Notification Center on your iPhone accumulates all your incoming notifications, providing a centralized place for you to access and manage them. However, over time, the list of notifications can become cluttered. Clearing the Notification Center helps keep it organized and allows you to focus on the most recent alerts. Here’s how you can clear the Notification Center on your iPhone:
- Swipe down from the top of the screen: To access the Notification Center, swipe down from the top edge of the screen. This action reveals the list of notifications.
- Clear individual notifications: To clear individual notifications, simply swipe them to the right or left. Once a notification is swiped away, it will be removed from the Notification Center.
- Clear all notifications: If you have multiple notifications and want to clear them all at once, tap the “Clear” button at the top of the Notification Center. This action deletes all the visible notifications from the list.
By clearing the Notification Center, you keep it free from unnecessary notifications and create space for new and important alerts. It’s worth noting that clearing the Notification Center only removes the notifications from the list; it doesn’t delete the actual content from the respective apps.
Additionally, it’s important to remember that clearing the Notification Center is a manual process. Notifications will continue to accumulate until you actively clear them. Therefore, it’s a good practice to periodically review and clear the Notification Center to ensure you’re staying on top of the most relevant alerts.
Overall, clearing the Notification Center on your iPhone helps maintain a clutter-free and organized interface, making it easier for you to manage your incoming notifications and stay focused on the important ones.