
###
Checking for Updates
Before setting up your new iPhone, it is important to ensure that you have the latest software updates installed. This will not only provide you with the latest features and enhancements but also help in addressing any known bugs or security vulnerabilities. Here’s how you can check for updates:
- Connect your iPhone to a Wi-Fi network: To download and install updates, you need a stable internet connection. Make sure your iPhone is connected to a Wi-Fi network to avoid data charges.
- Open the Settings app: Locate the app with a gear icon on your home screen and tap to open it.
- Tap on General: Scroll down and tap on “General” in the settings menu.
- Select Software Update: In the General menu, look for “Software Update” and tap on it.
- Check for updates: Your iPhone will now check for available updates. If an update is found, you will see a prompt with details about the update.
- Download and install the update: If an update is available, tap on “Download and Install.” Your iPhone will start downloading the update. Once the download is complete, tap on “Install” to begin the installation process. Note that your iPhone may need to restart during the installation.
It is important to have a fully charged battery or to connect your iPhone to a power source while installing an update to avoid any interruptions.
Regularly checking for updates ensures that you have the latest software, which can help improve the performance and security of your iPhone.
###
Backing Up Your Old iPhone
Before setting up your new iPhone, it is crucial to back up your old iPhone to ensure that you don’t lose any important data during the transition. Whether you’re upgrading to a new device or simply want to have a backup, here’s how you can safeguard your information:
- Connect your old iPhone to Wi-Fi: Make sure your old iPhone is connected to a stable Wi-Fi network.
- Open the Settings app: Locate the app with a gear icon on your home screen and tap to open it.
- Tap on your Apple ID: In the settings menu, you will see your name or Apple ID at the top. Tap on it to access your Apple ID settings.
- Select iCloud: Scroll down and tap on “iCloud” to access iCloud settings.
- Tap on iCloud Backup: In the iCloud settings, tap on “iCloud Backup.”
- Toggle on iCloud Backup: Ensure that the toggle switch next to “iCloud Backup” is turned on. This will enable automatic backups of your iPhone’s data to your iCloud account.
- Tap on “Back Up Now”: If you want to perform an immediate backup, tap on “Back Up Now.” This will initiate the backup process, which may take some time depending on the amount of data on your iPhone and your internet speed.
- Wait for the backup to complete: Make sure your old iPhone is connected to Wi-Fi and has sufficient battery or is plugged into a power source. Your iPhone will continue backing up as long as it is connected and has enough storage space in your iCloud account.
It is essential to have a recent backup of your old iPhone to ensure that all your data, including contacts, photos, apps, and settings, is transferred to your new device seamlessly. By following these steps, you can securely preserve your valuable information and set up your new iPhone with ease.
###
Setting Up Your New iPhone
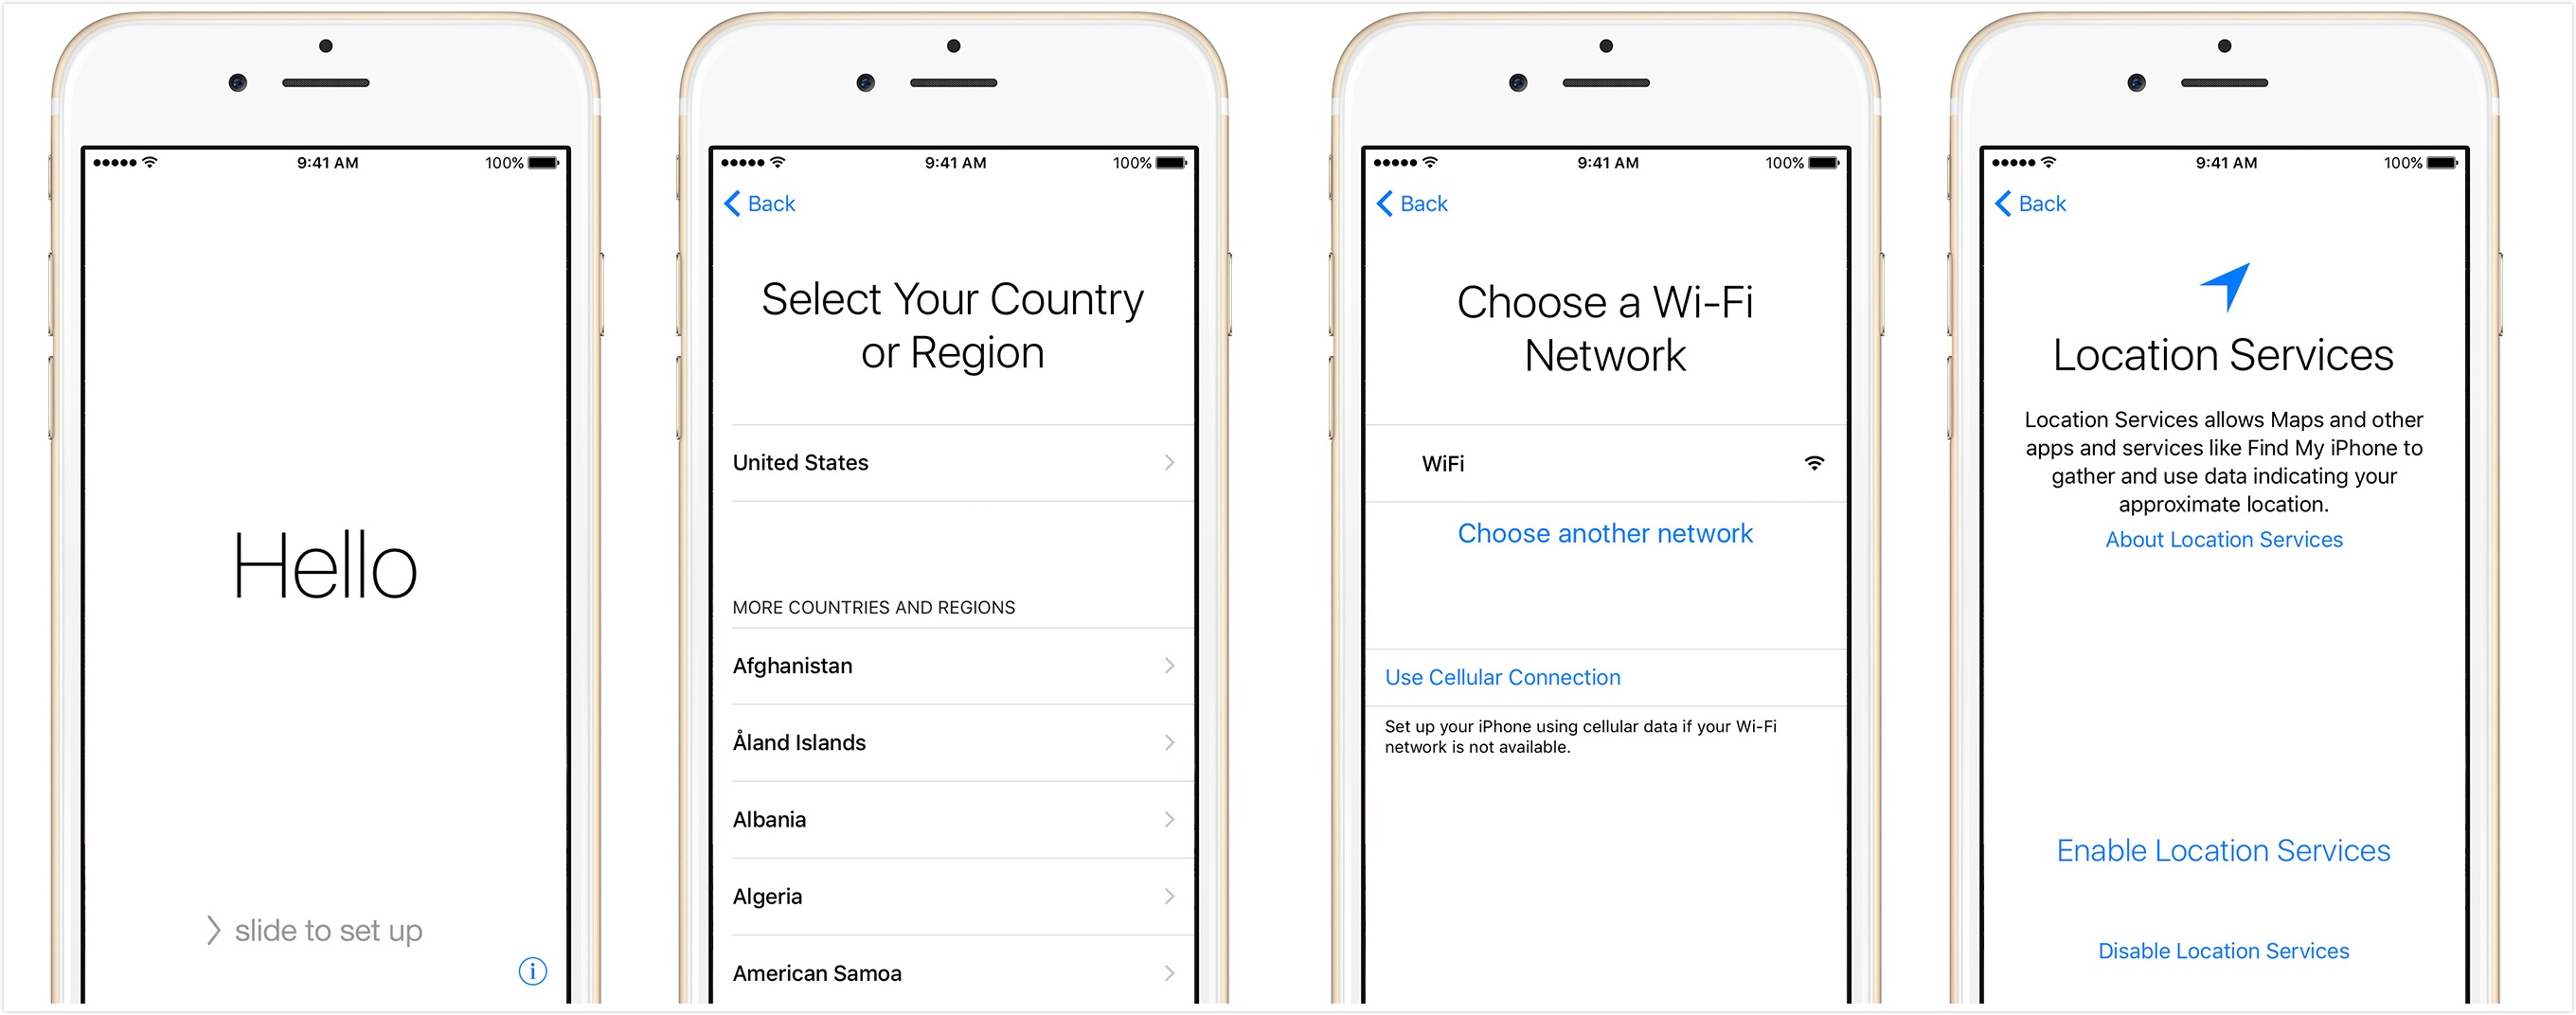
Exciting times ahead! Now that you have your new iPhone, it’s time to set it up and get started. Follow these steps to ensure a smooth and seamless setup process:
- Power on your iPhone: Press and hold the power button on the side or top of your iPhone until you see the Apple logo. The setup process will begin.
- Select your language and region: On the “Hello” screen, choose your preferred language and your current region.
- Connect to a Wi-Fi network: Select a Wi-Fi network and enter the password if required. Make sure to connect to a reliable Wi-Fi network for a faster and more secure setup process.
- Quick Start (for iOS 11 or later): If you have your previous iPhone nearby, you can use Quick Start to transfer your settings and data automatically. Simply follow the on-screen instructions to pair your new iPhone with your old one, and the transfer process will begin.
- Sign in with your Apple ID: Enter your Apple ID and password. If you don’t have an Apple ID, you can create one during the setup process.
- Set up Face ID or Touch ID: Depending on your iPhone model, you can set up either Face ID or Touch ID for secure biometric authentication. Follow the on-screen instructions to set up your preferred option.
- Create a passcode: Set a passcode to protect your iPhone’s data. You can choose between a six-digit or custom alphanumeric passcode. Ensure that you choose a memorable yet secure passcode.
- Choose to restore from a backup or set up as a new iPhone: If you previously backed up your data, you can choose to restore from an iCloud or iTunes backup. Alternatively, you can set up your iPhone as new if you don’t want to restore any previous data.
- Sign in to iCloud: If you chose to restore from an iCloud backup, sign in with your Apple ID and password. This will allow you to access your stored iCloud data, such as contacts, photos, and documents.
- Set up Siri: Customize your Siri settings by choosing whether or not to enable “Hey Siri” and allowing Siri to analyze your app usage for personalized recommendations.
- Agree to terms and conditions: Read and agree to Apple’s terms and conditions to proceed with the setup process.
- Set up Apple Pay: If you wish to use Apple Pay for secure and convenient payments, follow the prompts to set it up with your preferred payment method.
Once you have completed these steps, your new iPhone will be ready to use! You can start exploring its features, downloading apps, and personalizing it to your liking. Enjoy the experience with your new device!
###
Transferring Data from Your Old iPhone
One of the most important aspects of setting up your new iPhone is transferring your data from your old device. This ensures that you have all your contacts, photos, apps, and settings readily available on your new device. Here are a few methods you can use to transfer data from your old iPhone:
- Quick Start (for iOS 11 or later): If you used the Quick Start feature during the iPhone setup, your data will be automatically transferred to your new device. Simply follow the on-screen instructions and wait for the transfer to complete. This method is fast and hassle-free.
- iCloud Backup: If you have been regularly backing up your old iPhone to iCloud, you can restore your new iPhone from an iCloud backup. During the setup process, choose the “Restore from iCloud Backup” option and sign in with your Apple ID. Select the most recent backup from the list and let the restore process complete. Ensure that you are connected to Wi-Fi and have enough iCloud storage available.
- iTunes Backup: If you prefer using iTunes to back up your iPhone, you can transfer your data by connecting your new iPhone to your computer and launching iTunes. Select your new iPhone from the device list, click on the “Restore Backup” button, and choose the most recent backup. Allow the restore process to complete, and your data will be transferred to your new iPhone. Make sure you have the latest version of iTunes installed on your computer.
- Migration with a Lightning to USB 3 Camera Adapter: If you have a Lightning to USB 3 Camera Adapter, you can directly connect your old iPhone to your new iPhone using a Lightning to USB cable. This method allows you to transfer your data quickly without the need for an internet connection. Follow the on-screen instructions to initiate the transfer process.
- Manually Transferring Data: If you prefer a more selective approach or if you don’t have access to the above methods, you can manually transfer your data using various methods. For contacts, you can export them as vCards and import them on your new iPhone. For photos and videos, you can use AirDrop, iCloud Photo Sharing, or transfer them to your computer and then sync them to your new iPhone. Apps can be downloaded from the App Store, and settings can be adjusted manually on your new device.
Choose the method that suits your preferences and the resources available to you. Regardless of the method, always ensure that you have a backup of your data before proceeding with the transfer to avoid any potential loss. Once your data is successfully transferred, you can enjoy using your new iPhone with all your familiar content and settings.
###
Restoring from iCloud or iTunes
Restoring your new iPhone from an iCloud or iTunes backup is a convenient way to transfer all your data, settings, and apps from your old device to your new one. Here’s how you can restore from iCloud or iTunes:
- Restoring from iCloud Backup:
- During the initial setup process on your new iPhone, select the “Restore from iCloud Backup” option.
- Sign in with your Apple ID and password associated with the iCloud backup that you want to restore from.
- Select the most recent backup from the list of available backups. Make sure the backup you choose contains the data you want to restore.
- Allow your new iPhone to complete the restore process. Depending on the size of the backup and the speed of your internet connection, this may take some time. Ensure that your device is connected to Wi-Fi and has sufficient battery or is plugged into a power source.
- Restoring from iTunes Backup:
- Connect your new iPhone to your computer using a USB cable and launch iTunes. Make sure you have the latest version of iTunes installed.
- Select your new iPhone from the device list in iTunes.
- Click on the “Restore Backup” button.
- Choose the most recent backup from the list of available backups and click “Restore.”
- Allow your new iPhone to complete the restore process. Make sure that your device remains connected to your computer throughout the process.
It’s important to note that restoring from a backup will replace all the data on your new iPhone with the data from the backup. Therefore, if you have any important data on your new device, make sure to back it up separately before proceeding with the restore.
Restoring from iCloud or iTunes backup is an efficient way to ensure a seamless transition to your new device. It allows you to effortlessly have all your data, settings, and apps transferred and readily available on your new iPhone.
###
Setting up Face ID or Touch ID
Your new iPhone may feature either Face ID or Touch ID, depending on the model. These biometric authentication methods provide an added layer of security and convenience to unlock your iPhone and authorize various actions. Here’s how you can set up Face ID or Touch ID:
- Setting up Face ID:
- During the initial setup process or after restoring from a backup, follow the on-screen prompts to set up Face ID.
- Position your face within the frame displayed on the screen and move your head in a circular motion to complete the initial scan. Make sure to keep your face fully visible to the camera.
- Repeat the process by moving your head in a circular motion again for a second time.
- Once Face ID is set up, you can choose to enable attention awareness, which requires you to be looking directly at the screen for Face ID to recognize and unlock your device.
- Setting up Touch ID:
- During the initial setup process or after restoring from a backup, follow the on-screen prompts to set up Touch ID.
- Place the finger or thumb you want to use for Touch ID on the Home button and lift it off when prompted. Repeat this process multiple times to allow your iPhone to capture different parts of your fingerprint for accuracy.
- Continue lifting and placing the same finger or thumb on the Home button until the setup is complete.
After setting up Face ID or Touch ID, you can use these authentication methods to unlock your iPhone, authorize App Store purchases, and authenticate various services and apps. Additionally, you can manage Face ID or Touch ID settings in the Face ID & Passcode or Touch ID & Passcode sections of the Settings app. Here, you have the option to enable or disable Face ID or Touch ID for specific actions or features, such as unlocking your device, making purchases, and accessing locked apps or sensitive data.
By setting up Face ID or Touch ID, you enhance the security and convenience of your new iPhone, as it allows for quick and secure access to your device and personalized authentication for various services and actions.
###
Personalizing Your iPhone
Your iPhone is a reflection of your personal style, and personalizing it can make it feel truly yours. Here are some tips and tricks to help you customize and make your iPhone uniquely yours:
- Adjusting Display Settings:
- Go to Settings, then Display & Brightness, and choose your preferred display settings. You can adjust the brightness, enable or disable True Tone, and change the wallpaper to suit your taste.
- Customizing Home Screen Layout:
- Tap and hold on any app icon until the icons start wiggling. Now, you can rearrange app icons, create app folders, and even delete unwanted apps. Drag and drop icons to different screens or create folders with similar apps.
- Changing App Icon Size:
- Go to Settings, then Display & Brightness, and enable the “Display Zoom” feature. Choose either the “Standard” or “Zoomed” option to resize app icons and make them larger or smaller.
- Customizing Control Center:
- Swipe down from the top-right corner (on iPhone models with Face ID) or swipe up from the bottom of the screen (on iPhone models with Touch ID) to access Control Center. From here, you can add, remove, and reorder the controls to fit your preferences.
- Changing Ringtones and Alert Sounds:
- Go to Settings, then Sounds & Haptics, and customize your ringtone, text tone, and other alert sounds. You can select from the pre-installed sounds or purchase and download new ones from the iTunes Store.
- Enabling Dark Mode:
- iOS 13 and later versions offer a Dark Mode option that gives your iPhone a sleek, dark interface. Simply go to Settings, then Display & Brightness, and select the Dark appearance.
- Customizing Widgets:
- Swipe right on your home screen to access the Today View, and scroll to the bottom and tap on “Edit.” From here, you can choose which widgets to display, reorder them, and even customize their size and arrangement.
- Changing App Icons and Themes:
- Some apps and themes offer the ability to change the design of app icons to match your style. Explore the App Store for apps that offer unique icons and themes for a more personalized look.
- Adding Widgets to the Home Screen:
- On iOS 14 and later versions, you can add interactive and informative widgets directly to your home screen. Press and hold on the home screen, tap the + button, and select the widget you want to add.
These are just a few ways to personalize your iPhone. Don’t be afraid to explore and experiment with different settings and customizations to make your device truly unique and tailored to your preferences. Have fun expressing your personal style and make your iPhone an extension of yourself!
###
Customizing Notification Settings
Managing your notification settings is crucial to ensure that you stay informed without being overwhelmed by constant interruptions. By customizing your iPhone’s notification settings, you can be in control of the alerts and updates you receive. Here’s how you can personalize your notification settings:
- Accessing Notification Settings:
- Go to Settings and tap on “Notifications.”
- Managing Lock Screen Notifications:
- Under the “Notification Style” section, you can decide how notifications appear on your lock screen. Choose between showing all notifications, hiding sensitive content, or disabling lock screen notifications altogether.
- Customizing Notification Center:
- Tap on “Notification Center” to specify the order in which notifications appear and adjust the grouping of notifications by app.
- Configuring App Notifications:
- Scroll through the list of apps on the “Notifications” page and select an app to customize its notification settings. You can choose the alert style, sound, badge app icon, and whether the notifications appear in the Notification Center or as banners.
- Enabling or Disabling Notifications:
- If you wish to temporarily silence notifications from a specific app, turn on “Do Not Disturb” or activate “Silent Mode” to prevent alerts from sounding.
- Using Priority Notifications:
- Some apps offer “Priority Notifications,” which allow you to receive alerts only from specific contacts or for important events. Enable this feature within the app’s notification settings to filter out less important notifications.
- Customizing Notification Previews:
- Under the “Notification Style” section, you can choose how much information is shown in the notification previews. Options include always showing previews, only showing them when unlocked, or disabling them completely.
- Scheduling Do Not Disturb:
- Within the “Do Not Disturb” settings, you can schedule specific times for your iPhone to automatically silence notifications. This is especially useful during sleep hours or important meetings.
- Managing Notification Badges:
- Tap on “Badge App Icon” to enable or disable the small number badges that appear on app icons to indicate the number of unread notifications.
By customizing your notification settings, you can prioritize notifications, reduce distractions, and create a more personalized experience on your iPhone. Take the time to fine-tune these settings to suit your individual preferences and ensure that you are only receiving the notifications that matter most to you.
###
Managing App Permissions
When installing and using apps on your iPhone, it’s important to manage app permissions to protect your privacy and control the information apps can access. By understanding and managing these permissions, you can ensure that your personal data remains secure. Here’s how you can manage app permissions on your iPhone:
- Accessing App Permissions:
- Go to Settings and scroll down to find “Privacy.”
- Reviewing App Permissions:
- Tap on “Privacy” to see a list of different categories, such as Location Services, Contacts, Camera, Microphone, and more.
- Managing Location Services:
- Tap on “Location Services” to see which apps have requested access to your location. You can choose to either allow location access always, only while using the app, or never for each individual app.
- Controlling Camera and Microphone Access:
- Go to “Camera” or “Microphone” to view which apps have requested access to these features. Toggle the switches to grant or deny permission as desired.
- Adjusting Contacts, Photos, and other Permissions:
- Explore the different categories under “Privacy” to manage permissions for contacts, photos, calendars, reminders, health, and other sensitive data. You can grant or revoke access to specific apps as per your preferences.
- Revoking App Permissions:
- If you want to revoke an app’s permission entirely, simply toggle the switch to disable it. This will prevent the app from accessing the specific data or feature in question.
- Granting Permissions when Prompted:
- When you install a new app that requires specific permissions, such as accessing your location or contacts, you will receive a prompt asking for your consent. Carefully consider whether you want to grant these permissions and make an informed decision.
- Periodically Reviewing Permissions:
- It’s a good practice to periodically review app permissions to ensure that you are comfortable with the data apps are accessing. This is especially important when you install new apps or when an app has been updated.
By managing app permissions on your iPhone, you have control over the data you share with apps and can safeguard your privacy. Take the time to review and adjust these settings to protect your personal information and ensure a more secure and personalized app experience.
###
Setting up Apple Pay
Apple Pay is a secure and convenient way to make payments using your iPhone. By setting up Apple Pay, you can easily make purchases in stores, apps, and on websites without the need for physical credit cards. Here’s how you can set up Apple Pay on your iPhone:
- Adding Your Credit or Debit Card:
- Open the Wallet app on your iPhone. If the app is not already installed, you can download it from the App Store.
- Tap the “+” button to add a new card.
- You can choose to set up the card manually by entering the card details or use the camera to capture the card information for automatic setup.
- Follow the on-screen instructions to verify the card with your bank or card issuer.
- Setting a Default Card:
- If you have multiple cards added to Apple Pay, you can set a default card for quick and easy payments. Open the Wallet app, tap on the card you want to set as the default, scroll down, and select “Make Default Card.”
- Using Apple Pay in Stores:
- To use Apple Pay at a store, simply hold your iPhone near the contactless payment terminal and authenticate using Face ID, Touch ID, or your passcode. Ensure that your default card is selected, and the payment will be processed.
- Using Apple Pay in Apps and on Websites:
- When making a purchase in supported apps or on websites, look for the Apple Pay option at checkout. Tap the Apple Pay button and authenticate the payment with Face ID, Touch ID, or your passcode.
- Managing Apple Pay Settings:
- You can manage your Apple Pay settings by going to Settings, then Wallet & Apple Pay. From here, you can add or remove cards, change default payment methods, manage transaction notifications, and view transaction history.
- Using Apple Pay Cash:
- Apple Pay Cash allows you to send and receive money directly through the Messages app. You can set up Apple Pay Cash by going to Settings, then Wallet & Apple Pay, and following the prompts to set up Apple Cash.
Setting up Apple Pay on your iPhone provides a convenient and secure way to make payments. Whether you’re shopping in stores, using apps, or making online purchases, Apple Pay streamlines the payment process and eliminates the need to carry physical cards. Enjoy the simplicity and security of using Apple Pay for your transactions!
###
Arranging and Deleting Apps
Organizing and arranging your apps on your iPhone can make it easier to find and access the ones you use most frequently. Additionally, deleting unused apps can help free up storage space on your device. Here’s how you can arrange and delete apps on your iPhone:
- Rearranging Apps on the Home Screen:
- Tap and hold any app icon on the home screen until the icons start wiggling.
- Drag and drop app icons to rearrange them to your desired location. You can move icons to different screens or create folders.
- To create a folder, drag one app icon on top of another. A new folder will be created with the two apps inside.
- Tap outside the folder to exit edit mode and save your changes.
- Moving Apps Using the App Library:
- Swipe left on your home screen to access the App Library, which organizes your apps into categorized folders.
- Tap and hold any app icon in the App Library to enter edit mode.
- Drag and drop app icons from the App Library to your desired location on the home screen.
- Tap outside the App Library to exit edit mode.
- Deleting Apps:
- Tap and hold the app icon that you want to delete until the icons start wiggling.
- Tap the “X” button that appears on the top-left corner of the app icon.
- Confirm the deletion by tapping “Delete” in the pop-up prompt.
- Press the home button or swipe up from the bottom of the screen (on iPhone models with Face ID) to exit delete mode.
- Offloading Unused Apps:
- If you want to free up storage space without deleting the app completely, you can offload unused apps. Go to Settings, then General, then iPhone Storage.
- Tap on the app you want to offload, and select “Offload App.” This removes the app from your device but maintains its data and settings.
- You can reinstall the offloaded app anytime from the App Store, and your data will be restored.
- Deleting Apps from Settings:
- Alternatively, you can delete apps directly from the Settings app. Go to Settings, then General, then iPhone Storage.
- Scroll down and tap on the app you want to delete.
- Select “Delete App” and confirm the deletion.
By arranging and deleting apps on your iPhone, you can optimize your home screen layout and free up valuable storage space. Take a moment to organize your apps in a way that makes sense to you and remove any unused apps. This will help you have a clean and organized iPhone interface that suits your needs.
###
Setting up Siri
Siri is Apple’s intelligent voice assistant, designed to help you perform various tasks on your iPhone using voice commands. By setting up Siri, you can interact with your device hands-free and access information and features with ease. Here’s how you can set up Siri on your iPhone:
- Enabling Siri:
- Go to Settings, then Siri & Search.
- Toggle the switch to enable Siri.
- Setting up ‘Hey Siri’:
- If you want to activate Siri by saying “Hey Siri” without touching your iPhone, follow the on-screen prompts to train Siri to recognize your voice.
- During the setup process, you will be asked to say a few phrases to help Siri learn your voice.
- Follow the prompts until ‘Hey Siri’ is successfully set up.
- Customizing Siri’s Voice:
- In the Siri & Search settings, tap on ‘Siri Voice’ to choose between different voice options, including male and female voices with different accents.
- Allowing Siri Access on the Lock Screen:
- If you want to use Siri even when your iPhone is locked, make sure the ‘Listen for “Hey Siri”‘ and ‘Allow Siri When Locked’ options are enabled in the Siri & Search settings.
- Configuring Siri Suggestions:
- In the Siri & Search settings, you can enable or disable Siri Suggestions for specific apps and features. This allows Siri to offer personalized suggestions based on your usage patterns.
- Setting up Language and Region:
- Tap on ‘Language’ in the Siri & Search settings to choose your preferred language for interacting with Siri.
- From here, you can also customize other language and region settings, such as Siri Voice Feedback and Siri Language options.
- Using Siri Shortcuts:
- Siri Shortcuts allow you to create custom voice commands to perform specific actions or launch certain apps. You can set up Siri Shortcuts in the Shortcuts app, which comes pre-installed on your iPhone.
- Open the Shortcuts app to create and customize your own shortcuts or explore pre-made shortcuts available for download from the Shortcuts Gallery.
Setting up Siri on your iPhone enables you to perform tasks, get information, and control various aspects of your device using just your voice. Make sure to take some time to explore Siri’s capabilities, experiment with different voice commands, and take full advantage of this powerful voice assistant.
###
Enabling Find My iPhone
Find My iPhone is a powerful feature that helps you locate your lost or stolen device, as well as protect your personal data. By enabling Find My iPhone, you can take advantage of various functionalities, such as tracking your device’s location, remotely locking it, and even erasing its data if necessary. Here’s how you can enable Find My iPhone on your iPhone:
- Open the Settings app on your iPhone.
- Tap on your Apple ID banner at the top of the menu.
- Scroll down and tap on “Find My.”
- Toggle on the switch next to “Find My iPhone.”
- When prompted, enable “Send Last Location.” This feature automatically sends the last known location of your iPhone to Apple when the battery level is critically low.
- Choose whether to enable “Find My network.” This allows your iPhone to use nearby Apple devices to help locate your device even if it’s offline.
- After enabling Find My iPhone, you can access its features through the Find My app on your iPhone or by signing in to iCloud.com on a computer or other device.
- To track your device’s location, open the Find My app or sign in to iCloud.com, and select your device from the list. You can view its location on a map.
- If your device is lost or stolen, you can use the Find My app or iCloud.com to remotely lock your device to prevent unauthorized access.
- If necessary, you can also remotely erase all the data on your device to protect your personal information. Keep in mind that this action is irreversible and should only be taken if you’re certain you won’t be able to recover your device.
Enabling Find My iPhone is a crucial step in safeguarding your device and personal data. By ensuring that this feature is activated, you can have peace of mind knowing that you have a way to locate your device or protect your information if it falls into the wrong hands. Take a few moments to enable Find My iPhone and familiarize yourself with its capabilities to make the most out of this essential feature.
###
Configuring iCloud Settings
iCloud is a cloud storage and synchronization service provided by Apple that allows you to securely store your data and access it across multiple devices. Configuring your iCloud settings on your iPhone ensures that your important information, such as photos, documents, contacts, and more, are backed up and readily available whenever you need them. Here’s how you can configure your iCloud settings:
- Open the Settings app on your iPhone.
- Tap on your Apple ID banner at the top of the menu.
- Tap on “iCloud.”
- Review the list of apps and data categories that can be backed up to iCloud.
- Toggle on the switch for each app or data category that you want to include in the iCloud backup.
- If you have limited iCloud storage space, you can manage your storage by tapping on “Manage Storage” in the iCloud settings. From there, you can review your usage and upgrade your storage plan if needed.
- Scroll down to find other iCloud settings like iCloud Drive, Photos, Contacts, Mail, and others.
- Tap on each setting to customize your preferences. For example, you can enable iCloud Drive to store and access your files across all your Apple devices.
- Under Photos, you can choose whether to enable iCloud Photos, which will sync and store your photos and videos in iCloud, making them accessible on all your devices.
- For Contacts, you can enable iCloud syncing to keep your contacts up to date across your devices.
- Explore other settings, such as Calendar, Notes, Reminders, Safari, Health, and more, to customize your iCloud experience.
- Finally, make sure to manage your Apple ID account settings, which include options for password and security, payment & shipping, and more. Tap on “Password & Security” or “Payment & Shipping” to access these settings.
Configuring your iCloud settings on your iPhone ensures that your data is securely stored and easily accessible across all your Apple devices. Take a few moments to customize your settings and choose the apps and data categories you want to include in the iCloud backup. This will provide peace of mind and make it convenient to access your information whenever you need it.
###
Optimizing Battery Performance
Battery life is a crucial aspect of your iPhone’s performance, and optimizing it can help ensure that your device lasts throughout the day. By implementing some best practices and making a few adjustments, you can improve your iPhone’s battery performance. Here are some tips to optimize your battery life:
- Adjust Display Brightness:
- Decreasing the brightness of your display can significantly impact battery life. Consider using auto-brightness or manually adjust the brightness level to a lower setting.
- Enable Auto-Lock:
- Set your iPhone to automatically lock after a certain period of inactivity. This will prevent the display from staying on unnecessarily and consuming power.
- Manage Background App Refresh:
- Go to Settings, then General, then Background App Refresh. Disable this feature for apps that don’t need to update in the background. This helps conserve battery by preventing apps from continuously running in the background.
- Reduce Location Services:
- While location services can be useful, they can also drain your battery. Go to Settings, then Privacy, then Location Services, and choose which apps can use your location. Disable location services for apps that don’t need it constantly.
- Disable Push Email:
- Having your email set to push means your device is constantly checking for new mail. Consider changing it to fetch manually or set it to fetch at longer intervals to reduce the frequency of email updates.
- Enable Low Power Mode:
- Low Power Mode reduces power consumption by disabling non-essential features. You can enable it in Settings or from the Control Center when your battery is running low.
- Limit Background App Refresh:
- Within Settings, go to General, then Background App Refresh. Select which apps can refresh data in the background. Disabling unnecessary refreshes can help save battery life.
- Manage Push Notifications:
- Disable unnecessary push notifications from apps that you don’t need immediate alerts from. You can customize notification settings for each app under Settings and Notifications.
- Update to the Latest iOS:
- Always keep your iPhone’s operating system up to date. Newer iOS updates often include optimizations and enhancements that can improve battery performance.
- Avoid Extreme Temperatures:
- Extreme temperatures, both hot and cold, can impact battery performance. Avoid exposing your iPhone to direct sunlight or extreme cold conditions.
By following these tips and making a few adjustments, you can optimize your iPhone’s battery performance to ensure it lasts longer throughout the day. Experiment with different settings and habits to find the best balance between functionality and preserving battery power.
###
Setting up Family Sharing
Family Sharing is a valuable feature provided by Apple that allows you to share your purchased apps, music, movies, and more with your family members. With Family Sharing, you can also easily manage and control your family’s Apple devices, set up parental controls for younger family members, and share photos and calendars. Here’s how you can set up Family Sharing:
- Open the Settings app on your iPhone.
- Tap on your Apple ID banner at the top of the menu.
- Scroll down and tap on “Set Up Family Sharing.”
- Tap on “Get Started” and choose the feature you want to share.
- Follow the on-screen prompts to invite family members by entering their Apple ID email addresses or by sending them an invitation through Messages.
- Once your family members accept the invitation, they will be added to your Family Sharing group.
- Customize Sharing Settings:
- Under “Family,” you can customize the sharing settings for each feature, such as App Store purchases, Apple Music, iCloud storage, and more.
- Set Up Parental Controls:
- If you have younger family members, you can enable parental controls to manage and limit their access to certain apps, content, and features.
- Share Photos and Calendars:
- Using Family Sharing, you can easily share photo albums and calendars with your family members, making it convenient to stay connected and up to date with each other’s activities and events.
- Manage Family Devices:
- Under “Family,” you can view a list of devices associated with your Family Sharing group. This allows you to manage and control the devices, including locating lost devices, remotely locking them, and even erasing their data if necessary.
- Configure Purchase Sharing:
- If you enable purchase sharing, any purchases made by family members will be billed to the organizer’s account. This allows for easy sharing of apps, music, movies, and more without the need for separate purchases.
- Optional: Set Up Ask to Buy (for children):
- If you have children as part of your Family Sharing group, you can enable Ask to Buy. This feature requires parental approval for app purchases and in-app purchases made by children.
Setting up Family Sharing on your iPhone allows you to create a connected and sharing environment among your family members. Take advantage of the various features and customization options to tailor your Family Sharing experience to suit the needs and preferences of your family.
###
Managing Storage and iCloud Drive
Managing storage and utilizing iCloud Drive effectively is essential for ensuring optimal performance and keeping your files and data organized. With iCloud Drive, you can securely store your documents, photos, videos, and other files in the cloud, making them accessible across all your Apple devices. Here’s how you can manage storage and make the most out of iCloud Drive:
- Checking Storage Usage:
- Go to Settings, then tap on your Apple ID banner at the top of the menu, and select “iCloud.”
- Tap on “Manage Storage” to see a breakdown of your iCloud storage usage.
- Upgrading iCloud Storage:
- If you’re running low on iCloud storage, you can upgrade your plan by tapping on “Change Storage Plan” in the iCloud settings. Choose a plan that suits your needs and follow the prompts to upgrade.
- Enabling Optimize Storage:
- In the iCloud settings, you can enable “Optimize [Device]” under “Photos.” This feature automatically manages your photo library, optimizing storage by replacing full-resolution photos with device-optimized versions, while ensuring the original photos are securely stored in iCloud.
- Managing iCloud Drive Syncing:
- Under “iCloud Drive,” you can manage which apps and documents are allowed to sync with iCloud Drive. Toggle the switch next to each app to enable or disable its syncing with iCloud Drive.
- Organizing Files in iCloud Drive:
- Open the Files app on your iPhone to access your iCloud Drive. From there, you can create folders, move files, and organize your documents according to your preferences.
- Collaborating on Documents:
- If you collaborate on documents with others, you can share files stored in iCloud Drive and collaborate in real-time using compatible apps. Tap on a file, select the share icon, and choose the desired collaboration method.
- Enable Desktop and Documents Folder Syncing:
- In macOS Sierra or later versions, you can enable syncing of your Desktop and Documents folders with iCloud Drive. This ensures that these folders and their contents are available and up to date across all your devices.
- Deleting Unnecessary Files:
- Regularly review and delete unnecessary files stored in iCloud Drive to free up storage space. Tap and hold on a file, and select “Delete” to remove it from iCloud Drive.
- Automatic Backup and Sync:
- iCloud Drive automatically backs up and syncs your files across all your devices connected to the same iCloud account. This ensures that your files are up to date and accessible from any of your Apple devices.
By effectively managing storage and utilizing iCloud Drive, you can optimize your device’s performance and keep your files organized and easily accessible. Take advantage of the various features and options available to customize your iCloud Drive experience and ensure that your files are safely stored in the cloud.
###
Adding and Managing Email Accounts
Adding and managing email accounts on your iPhone allows you to conveniently access and manage your emails on the go. Whether you use a personal email or a work email, setting up your accounts on your iPhone is easy. Here’s how you can add and manage email accounts:
- Open the Settings app on your iPhone.
- Scroll down and tap on “Mail” or “Passwords & Accounts.”
- Tap on “Add Account.”
- Select your email provider from the list or choose “Other” to manually input the account details.
- Enter your email address and password, then tap “Next.”
- Wait while your iPhone verifies the account information. Once verified, choose what information to sync, such as Mail, Contacts, Calendars, and Notes.
- Tap on “Save” or “Done” to complete the setup process.
- To manage your email accounts, go back to the Mail or Passwords & Accounts settings.
- Tap on the email account you want to manage.
- From here, you can customize various settings, such as toggling Mail sync, choosing the number of days to sync, managing email notifications, and more.
- If you want to delete an email account, go back to the Mail or Passwords & Accounts settings.
- Tap on the email account you want to remove, then scroll down and tap on “Delete Account.” Confirm the deletion by tapping “Delete from My iPhone.”
Repeat the above steps to add and manage multiple email accounts on your iPhone. You can easily switch between accounts within the Mail app by tapping on the account name or icon in the navigation bar. Additionally, you can access all accounts’ emails in the unified inbox or view them individually by selecting a specific account’s inbox.
By adding and managing email accounts on your iPhone, you can effortlessly keep track of your emails, respond promptly, and stay organized. Customize your email settings to suit your preferences and ensure that you stay connected and productive while on the go.
###
Configuring Privacy Settings
Protecting your privacy and personal information is of utmost importance when using your iPhone. Configuring the privacy settings on your device allows you to have control over the data you share with apps and services. Here’s how you can configure the privacy settings on your iPhone:
- Open the Settings app on your iPhone.
- Scroll down and tap on “Privacy.”
- Review the various privacy categories, such as Location Services, Contacts, Calendars, Camera, Microphone, and more.
- Tap on each category to see which apps have requested access to that specific data or feature.
- For each app and category, you can choose to allow or deny access by toggling the switch on or off.
- Location Services:
- Choose whether to allow specific apps to access your location always, only while using the app, or never. Consider granting location access to apps that need it for essential functionality.
- Contacts, Calendars, Photos, and other Data:
- Review which apps have requested access to your contacts, calendars, photos, and other sensitive information. Disable access for apps that don’t require it or that you don’t trust.
- Camera and Microphone:
- Decide which apps can access your device’s camera and microphone. Disable access for apps that don’t require these features or that you have privacy concerns about.
- Advertising and Analytics:
- Under “Privacy,” you will find the “Advertising” and “Analytics” sections. Here, you can control how your data is used for personalized ads or shared with app developers for analytics purposes.
- App Tracking Transparency:
- In iOS 14.5 and later versions, you have the option to enable App Tracking Transparency. This gives you control over which apps can track your activity across other apps and websites for targeted advertising purposes.
- Health and Fitness:
- If you use health and fitness apps, review their access to your health data under “Privacy.” You can grant or deny access to specific health data categories, such as heart rate, workouts, and sleep data.
- Other Privacy Settings:
- Explore additional privacy settings, such as microphone and camera usage indicators, location-based alerts, app-specific passwords, and more, to customize your privacy preferences further.
Configuring the privacy settings on your iPhone allows you to protect your personal information and ensure that apps have access only to the data they genuinely need. Regularly review and adjust these settings to maintain a secure and private experience while using your device.
###
Setting up VPN and Wi-Fi Calling
Setting up a VPN (Virtual Private Network) and Wi-Fi Calling on your iPhone can enhance both your privacy and connectivity. A VPN allows you to securely access the internet while protecting your data, while Wi-Fi Calling enables you to make phone calls over a Wi-Fi connection. Here’s how you can set up VPN and Wi-Fi Calling on your iPhone:
- Setting up a VPN:
- Go to Settings, then tap on “VPN.”
- Tap on “Add VPN Configuration.”
- Choose the type of VPN (such as IKEv2, IPSec, or L2TP) and enter the required configuration details provided by your VPN service or IT department.
- Tap on “Done” to save the configuration settings.
- Toggle the switch next to the VPN configuration to connect or disconnect from the VPN.
- Enabling Wi-Fi Calling:
- Go to Settings, then tap on “Phone.”
- Tap on “Wi-Fi Calling” and enable it.
- Follow the on-screen instructions to enter your emergency address for E911 purposes.
- Read and accept the Terms and Conditions.
- You can now use Wi-Fi Calling whenever you have a Wi-Fi connection. Your calls and texts will be routed through the internet instead of a cellular network.
- Customizing VPN and Wi-Fi Calling Settings:
- Under VPN or Wi-Fi Calling settings, you can customize various options, such as toggling VPN or Wi-Fi Calling on or off, configuring Wi-Fi Calling preferences, or managing VPN connections.
- Selecting VPN Apps:
- If you have a VPN app installed, you can configure and manage VPN settings within the app itself. Look for the app icon on your home screen, launch it, and follow the instructions provided by the app to set up and use the VPN service.
- Managing VPN and Wi-Fi Calling Connection Preferences:
- You can prioritize Wi-Fi Calling over cellular calls by going to Settings, then Phone. Tap on “Wi-Fi Calling” and enable “Prefer Wi-Fi While Roaming” if desired.
- For VPN connection preferences and settings, go to Settings, then VPN, and select the VPN configuration. From there, you can adjust various settings such as auto-connect, authentication, and more.
Setting up a VPN and enabling Wi-Fi Calling on your iPhone can enhance your privacy and connectivity experiences. A VPN ensures secure internet browsing, while Wi-Fi Calling allows for reliable phone calls over Wi-Fi networks. Explore the settings and preferences to customize these features according to your preferences and enjoy a safe and connected experience on your iPhone.
###
Troubleshooting Common Issues
While iPhones are known for their reliability, occasional issues may arise. However, many common problems can be resolved with some troubleshooting techniques. Here are some troubleshooting steps to help you address common issues on your iPhone:
- Restart Your iPhone:
- If you encounter any unexpected issues, start by restarting your iPhone. Press and hold the power button (or the power button and volume down button on iPhone X or later) until the slider appears. slide to power off, wait a few seconds, then press and hold the power button again until the Apple logo appears.
- Check for Software Updates:
- Make sure your iPhone has the latest software updates. Go to Settings, tap on “General,” and select “Software Update” to check for any available updates.
- Reset Settings:
- If you’re experiencing system-wide issues, you can reset your iPhone settings without erasing your data. Go to Settings, tap on “General,” select “Reset,” and choose “Reset All Settings.” Note that this will remove any personalized settings you’ve configured.
- Clear Storage Space:
- If your iPhone is running low on storage, you may encounter performance issues. Delete unnecessary apps, photos, or videos to free up space. You can check your storage usage in Settings under “General” and “iPhone Storage.”
- Reset Network Settings:
- If you’re experiencing network-related issues, resetting your network settings may resolve the problem. Go to Settings, tap on “General,” select “Reset,” and choose “Reset Network Settings.” Note that this will remove saved Wi-Fi passwords.
- Force Close Apps:
- If you encounter app-related issues or if an app becomes unresponsive, force close the app. Double-click the Home button (or swipe up from the bottom on iPhones without a Home button) to access the app switcher, then swipe up on the app’s preview to force close it.
- Check Internet Connection:
- If you’re having trouble with internet-related services, ensure that you’re connected to a stable Wi-Fi or cellular network. Try connecting to a different network if available.
- Reset Face ID or Touch ID:
- If you’re having trouble with Face ID or Touch ID, you can reset the feature by going to Settings, tapping on “Face ID & Passcode” or “Touch ID & Passcode,” and following the prompts to reset your biometric data.
- Contact Apple Support:
- If none of the above troubleshooting steps resolve your issue, you can reach out to Apple Support. They can provide further assistance and guidance specific to your situation.
These troubleshooting steps cover common issues encountered on iPhones. Remember to always check for software updates and keep your device in good condition by regularly optimizing storage space and clearing unnecessary clutter. By following these troubleshooting techniques, you can often resolve issues and maintain the smooth functioning of your iPhone.